Extending logical conditions
In this document we will show how to extend existing logics. We will work with the form-factory-snippets-extension module but you can do the same in any module which has a dependency on Form Factory.
WARNING: If you copy-paste code from this document you will have to make sure that all characters are properly transferred. Pay close attention to hyphens. Also, if you create your views using Studio make sure you remove all taglibs that get generated by default.
IMPORTANT: When working with JavaScript it may be necessary to flush browser cache after changes to Javascript files. Most modern browsers provide an add-on tool to perform cache flushes. To get such a tool for your browser you should search available add-ons with a search criteria such as “clear cache” or “empty cache”, select appropriate add-on and follow given instructions.
For demonstration purposes we will guide you through creation of myExampleLogic logic which may not be particularly useful but the example will show all of the necessary manipulations needed to achieve a working rule. Below we provide a step-by-step guide to logics extension.
1 Create a definition
The first thing you need to do is create a logic definition. The standard logic definition has the following form:
[fcnt:ifFieldIsValidLogic] > jnt:content, fcmix:logic, mix:title, jmix:droppableContent, jmix:hiddenType
Following this pattern we create our definition:
[fcnt:myExampleLogic] > jnt:content, fcmix:logic, mix:title, jmix:droppableContent, jmix:hiddenType
Add this definition to your definitions.cnd file.
2 Create views
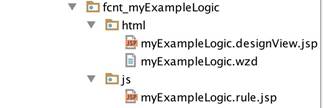
After you have created a definition you need to create a view. Create a fcnt_myExampleLogic folder under your modules resources and html and js folders inside. Then add a designView to the html folder and a default view to the js folder. While you are at this step also add a wzd file. Keep files empty for now. You should see the following structure:
3 Create Wizard
The next step is to fill the wzd file myExampleLogic.wzd. The wzd file specifies the logic name, logic type and all the necessary parameters needed for the logic to work. The name will be created from the label which typically is the logic name, My example in this case. That means that the name of this logic in JCR will be my-example. You also need to specify which types does this logic belong to, in this case set it to input. Now all the inputs that support logic type input will be able to have that logic. Here’s what the wizard file should look like:
package fcnt_myExampleLogic.html

logic {
    label "My example"
    types "input"
    properties {
        requiredValue ""
        fieldName ""
    }
}
Note that you should add properties object and place all required parameters (whatever they may be) inside that object. In this case you should add requiredValue to be able to specify the value you want the input to be less than. You also need to add fieldName property so that we can apply this logic to a field. You may pre-fill requiredValue but fieldName should normally be empty. You can learn more about wizard files from the official architectural overview of Form Factory.
4 Create designView
The design view myExampleLogic.designView.jsp will allow you to see your logic in the edit input panel and be able to edit it, in this case to specify the requiredValue . Here’s what the file should look like:
undefined

Let’s investigate it in a little more detail. The view features a required label and an input of type number where your required value will go. The input has a mandatory, in this case, string-to-number directive and ff-field-value-validation which is set to validate numbers. The latter directive can take number, positiveNumber, any (used for strings) and multiple (used for arrays) as validation parameter.
5 Create logic function
The final step is to create a myExampleLogic.rule.jsp file for logic function which executes every time input changes. As with the label it is customary to name the logic function after the logic name, in this case myExample. The function should go inside the view file in the js folder. Here’s what a typical logic function will look like:
<%@ page contentType="text/javascript" %>
/**
 * Each rule will received, the rule definition, its scope.
 * scope.form will contain the form to enable watch and access to other fields in the same step
 * ctrls will be an array of controllers, first the ffFormController and then the ngModel of the associated * input.
 *
 * @param {object} rule current rule definition
 * @param {object} scope current input scope
 * @param {object} el current html element
 * @param {array} attr attributes of the html element
 * @param {array} ctrls ctrls[0] = FFFormController ctrls[1]=ngModel
 */
ff.logicRules.myExample = function(rule, scope, el, attr, ctrls) {
    'use strict';
    var requiredValue = parseInt(rule.requiredValue);
    return function(scope,fieldValue){
        return (!_.isUndefined(fieldValue) && parseInt(fieldValue) < requiredValue)
    };
};
Let’s take a closer look at it. For convenience you can enforce page content type. You should attach the function to ff.logicRules object so that it is accessible by Form Factory. The rule parameter will give you access to properties you specified in the wzd file. In this case you should cast the value to integer as this is what should be expected. You should check if the fieldValue is defined, that’s the value filled in by the user, and perform all necessary tests as needed for your logic. In this case you should test that user entered value is less than required value. The boolean that you return will determine the visibility of the input field.
6 Add labels to resource bundles
In your resource bundles place the following label:
ff.label.logic.my-example=My example
By convention all your logic labels should start with ff.label.logic followed by dasherized logic name. Also note that in order to get meaningful messages at the bottom of each logics segment you should make sure that your labels explain logic’s meaning. For example, a proper label for this example could be if field value is less than . In that case you would see this message: Display <field source name> if <field target name> value is less than <chosen value>.
Now deploy your module and add it to your site and you should see your newly created logic available.