Jahia Starter Template developer notes
jnt:htmlCodeAsFile & jnt:htmlCodeAsText
The jnt:htmlCodeAsFile and jnt:htmlCodeAsText components allow you to add HTML code in a page.
- jnt:htmlCodeAsText
Contains a text area in which you can directly contribute your HTML - jnt:htmlCodeAsFile
References an HTML file that you have uploaded in jContent
These components also interpret some HTML attributes to allow editors to contribute content. The attributes define placeholders for:
- Simple text components
- Rich text components
- Image reference components
- Areas
These components and areas are stored under jnt:htmlCode* components in the JCR. When deleting a jnt:htmlCode* component, you also delete the text, images, and areas created underneath. The same applies when moving or copying the jnt:htmlCode* component. The subcontents are part of the operation.
Syntax
You need to add the attributes inside an HTML tag declaration using the syntax: data-jahia-component=”componentID” where:
- data-jahia-component
Is the type of component to create. See the options below. - componentID
Is the ID of the component to create. The ID has to be unique to the HTML used in the jnt:htmlCodeAsFile/jnt:htmlCodeAsText.
For example:
<div>
 <h1 data-jahia-text="title">My article title</h1>
 <div data-jahia-area="content">
  <p>First paragraph</p>
  <p>Second paragraph</p>
 </div>
 <div><span>This line is not editable in Jahia</span></div>
</div>
Behavior and interpretation by Jahia
When such an attribute is added in the HTML code, Jahia does not render the content of the tag, and replaces it with the Jahia component. Using the above example, “My article title” will not be rendered, and instead a button to create a simple text displays. The simple text created will display inside the <h1> tag. Similarly, “<p>First paragraph</p> <p>Second paragraph</p>” will not be displayed, and replaced by an area in which editors can create any type of content. As the inner content of the tag will not be rendered by Jahia, so you can’t have nested tags with data-jahia-* attributes.
Note: Page Composer will use these attributes to inject HTML code (using <div> tags) inside the tag containing the data-jahia-* attribute to render the controls in the UI to add or edit the content. As it injects <div> tags, avoid using the data-jahia-component attributes in <p> tags, as the HTML does not allow for <div> in <p> tags. If you do so with simple text, you may have unusual behavior in Page Composer, but it should work as expected in preview and live.
For more information, see HTML code injection by Page Composer.
You can’t also use these attributes in void elements.
HTML Attributes
Here are the HTML attributes you can use to create content placeholders. If you are planning on personalizing or A/B test content, you can only use data-jahia-area as the other attributes are not be compatible with jExperience.
data-jahia-text
This attribute generates a placeholder for a simple text (type: jnt:text). The value of a simple text will be added as is in the page. Use this attribute to create placeholders for labels. In this example “My article title” will be replaced with a simple text.
<div>
 <h1 data-jahia-text="title">My article title</h1>
</div>
data-jahia-richtext
This attribute generates a placeholder for a rich text (type: jnt:bigText). Editors will have access to CKEditor when creating rich texts. In this example, “<p>First paragraph</p> <p>Second paragraph</p>” will not be displayed, and instead it will be replaced with a rich text component.
<div data-jahia-richtext="content">
 <p>First paragraph</p>
 <p>Second paragraph</p>
</div>
data-jahia-image
This attribute generates a placeholder for an image reference (type: jnt:imageReferenceLink). A generic <img> tag will be generated once an editor has chosen an image. Developers can customize the <img> tag, see <img> tag customization.
This code sample will generate a placeholder for an image.
<div data-jahia-image="image">
</div>
Once contributed, the generated HTML will look like:
<div data-jahia-image="image">
 <img src=”...” alt=”...”>
</div>
data-jahia-area
The data-jahia-area attribute is different from the others, as it generates an area in which one can create any type of content. When using the data-jahia-area attribute, you can also add the following two optional attributes, to restrict the number of content items that can be created in the area, and define the allowed types:
- data-jahia-types="type1 type2" to only allow type1 and type2 components in this area. Type the technical name of the content types (e.g. jnt:news) separated by a space
- data-jahia-limit="2" to only allow X component in this area
To be able to contribute content in an area, the corresponding tag has to be displayed at least once in Page Composer (you might need to “tweak” the CSS). Once created, the area can be contributed to from Page Composer and jContent.
In this example, “<p>First paragraph</p> <p>Second paragraph</p>” will be replaced by an area, only allowing the creation of news and articles (you will not be able to create other types of content). You will also only be able to create 2 content items total. Once this limit is reached, the create buttons will not display anymore.
<div>
 <div data-jahia-area="content" data-jahia-types="jnt:news jnt:article" data-jahia-limit=”2”>
  <p>First paragraph</p>
  <p>Second paragraph</p>
 </div>
</div>
Asset management
Asset folder
Sites created using Jahia Starter Template come with the following folder structure for assets, which determine when and where the assets are loaded/included. Files uploaded in the asset folder will be applied to all the pages on the site. If you need to load a specific asset in one page only, please refer to CSS/js and custom metadata at page level.
The asset folder is available in jContent>Media>files.
The structure of the asset folder is as follows:
- Global
The assets uploaded in the following folders will be added in alphabetical order in all the modes (Page Composer, Preview and Live)- Css
Contains the CSS files to be added - jsHead
Contains the js files to be added in the <head> tag - jsFooter
Contains the js files to be added at the end of the <body> tag
- Css
- previewAndLive
The assets uploaded in the following folder will only be added in Preview and Live mode. Use these folders when the assets will alter Page Composer (for example if you have js animation). You can also create a CSS folder here, in case you need some CSS to only apply in preview and live mode- jsHead
Contains the js files to be added in the <head> tag - jsFooter
Contains the js files to be added at the end of the <body> tag
- jsHead
- pageComposerOnly
The assets uploaded here will only be added in Page Composer. This is mainly to allow CSS overrides, to make the page or site look consistent in Page Composer. See the Jahia Starter Template limitations and the HTML code injections by Page Composer.- Css
Already contains pageComposerOverride.css, which already includes a custom style for the code injected by Page Composer
- Css
CSS/js and custom metadata at page level
You can add CSS and JS assets to a specific page.
To add CSS and JS assets to a specific page:
- Upload your CSS/js files in jContent. We suggest you create a dedicated folder under jContent>Media>files>assets.
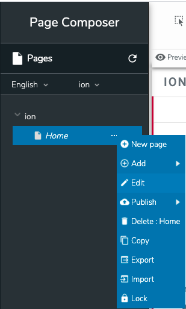
- In Page Composer, open the context menu of the page, then select Edit.
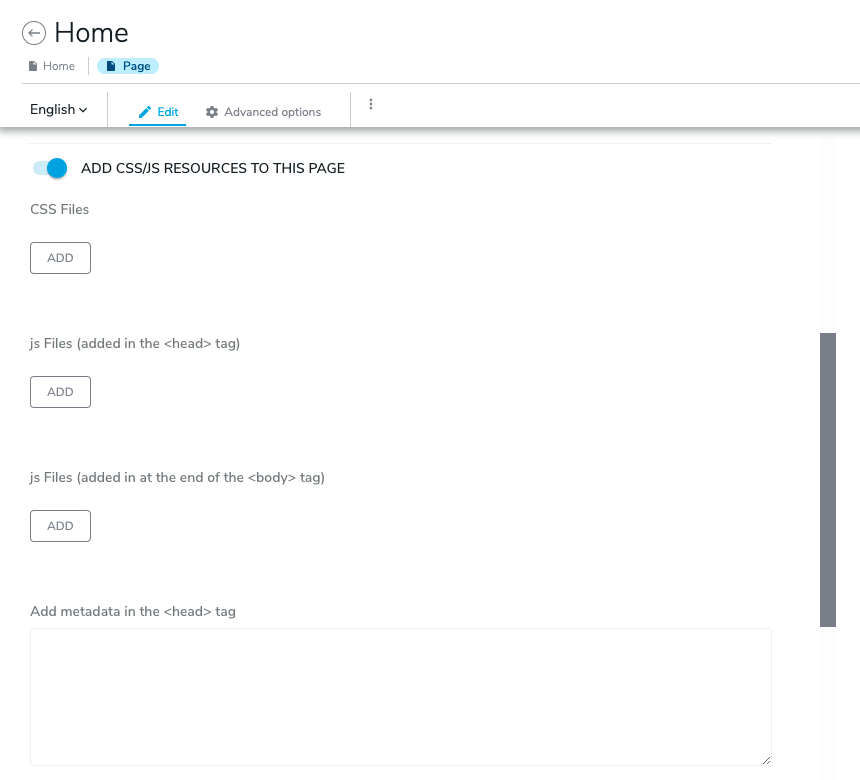
- Enable Add CSS/js resources to this page.

Additional fields display under Add CSS/js resources to this page. - In CSS files, add the CSS files you want to include for this page.
- Click Add, then Add file to open the file picker.
- Browse to the CSS you want to include, select it, and click Select
- In jsFiles (added in the <head> tag), add the jsFiles that need to be included in the <head> tag.
- In js Files (added in at the end of the <body> tag), add the jsFiles that need to be included at the end of the <body> tag.
- In Add metadata in the <head> tag, you can add custom code in the <head> tag in the text area. Proceed with caution as syntax errors may break the HTML of your page.
- Click Save in the upper right corner.

Order of the metadata/resource inclusions
The order of inclusion of assets is:
- Metadata added at site level
- Metadata added at page level
- Global CSS files
- previewAndLive CSS files
- CSS files added at page level
- pageComposerOnly CSS files
Only in Page Composer, as these files are not loaded in Preview and live - Global js files
- previewAndLive js files
- js files added at page level
Navigation Menu
Technical documentation is available in the Git readme at https://github.com/Jahia/site-builder-template-components/tree/master/jahia-starter-template#navigation-menu-component.
Override of jnt:imageReferenceLink default view
Two modifications have been done regarding the Image (from Document Manager) jnt:imageReferenceLink component in the Jahia Starter Template module.
Reordering of the fields
Using Content Editor overrides, the fields of the components have been reordered to display the image picker field at the top, followed by the alt field, the option to add a link to make the image clickable, and finally the title and system name.
If you are interested in Content Editor overrides, have a look at:
- Customizing Content Editor forms documentation starting with How Content Editor forms are generated.
- What has been done for jnt:imageReferenceLink. See github.com/Jahia/site-builder-template-components/tree/master/jahia-starter-template/src/main/resources/META-INF/jahia-content-editor-forms.
As Content Editor overrides are global to the platform, this form override will apply on all the sites of the platform. This can have an impact if you have mixins extending the type jnt:imageReferenceLink.
<img> tag customization
The default view of jnt:imageReferenceLink (Image from document manager) is overridden in the sites using the Jahia Starter Template. This does not apply to the other sites of the platform.
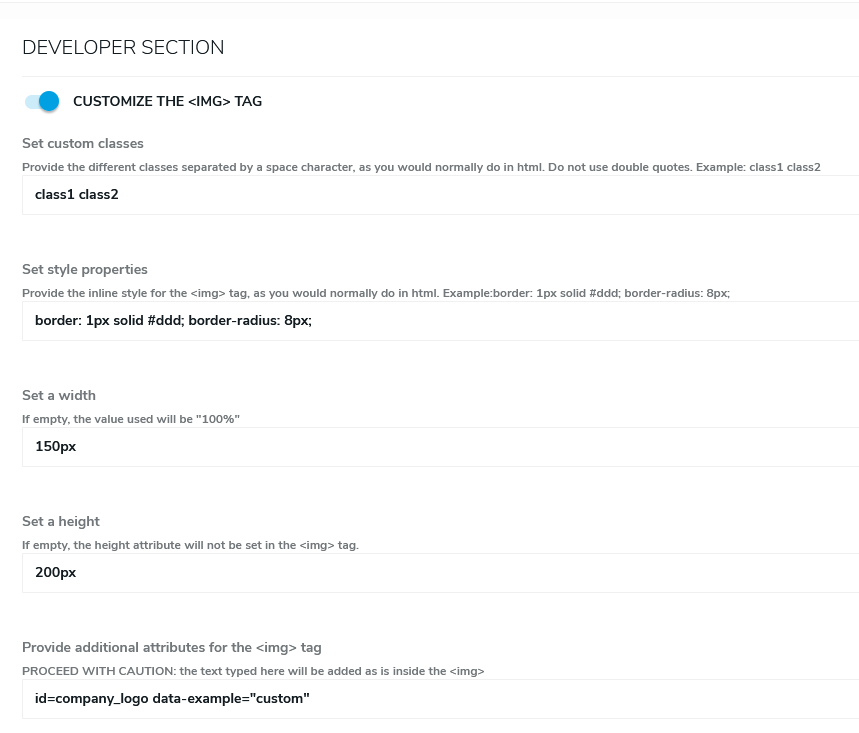
This override allows developers to customize the generated <img> tag. In Content Editor, users with the viewDeveloperSection permission have access to a new section “Developer Section”.
By switching the Customize the <img> tag, you will be able to:
- Set custom classes
Separate the classes using the space character. Example: class1 class2 - Set style properties
Provide the inline style for the <img> tag, as you would normally do in HTML. For example, border: 1px solid #ddd; border-radius: 8px; - Set a custom width and a custom height. Use what will be displayed in the HTML. You can use percentages or pixel values. For examples:
- 100%
- 150px
- Add additional attributes
This is a free text field, and its content will be added inside the tag declaration. For example:- id=”company_logo”
Example
When using the following values:
The generated <img> tag will be:
<img src="/files/default/sites/mySite/files/images/2.jpg" alt="Description of my image" class="class1 class2" style="border: 1px solid #ddd; border-radius: 8px;" id="company_logo" data-example="custom" width="150px" height="200px">