Integration Guide
1 Integrating with Unomi
Apache Unomi is the reference implementation of the upcoming OASIS Context Server (CXS) standard to help standardize personalization of online experience while promoting ethical web experience management and increased user privacy controls.
We will assume that you are familiar with git operations since the code examples are located in a git repository and will require being able to retrieve the code from that repository and switch branches to be able to run the examples. Also, the examples are targeted at Jahia Digital Experience Manager integrators in the form of an example Digital Experience Manager module. However, the concepts and implementations could also be transposed to other tools, albeit with some adjustments.
2 Concepts
Apache Unomi gathers information about users actions, information that is processed and stored by Unomi services. The collected information can then be used to personalize content, derive insights on user behavior, categorize the profiles into segments along user-definable dimensions or acted upon by algorithms.
2.1 Items and scopes
Unomi structures the information it collects using the concept of Item which provides the base the context server needs to process and store the data. Items are persisted according to their type (structure) and identifier (identity). This base structure can be extended, if needed, using properties in the form of key-value pairs.
Additionally, tracked items are also gathered by scope which allows the context server to group together related items. Scopes usually pertain to a given site being analyzed, though they can span across sites depending on the desired analysis granularity. Scopes allow clients accessing the context server to filter data to only see relevant data.
{
    itemType: <type of the item>,
    scope: <scope>,
    itemId: <item identifier>,
    properties: <optional properties>
}
Unomi defines a built-in scope (called systemscope) that clients can use to share data across scopes.
2.2 Events
Users' actions are conveyed from clients to the context server using events. Of course, the required information depends on what is collected and users' interactions with the observed systems but events minimally provide a type, a scope and source and target items. You can imagine an event as being a sentence, the event's type being the verb, the source the subject and the target the object:
{
    eventType: <type of the event>,
    scope: <scope of the event>,
    source: <Item>,
    target: <Item>,
    properties: <optional properties>
}
2.3 Profiles
By processing events, Unomi progressively builds a picture of who the user is and how they behave. This knowledge is embedded in Profile objects. A profile is an Item with any number of properties and optional segments and scores. Unomi provides default properties to cover common data (name, last name, age, email, etc.) as well as default segments to categorize users. Unomi users are, however, free and even encouraged to create additional properties and segments to better suit their needs.
2.4 Items and types
Any information that is processed by and stored in Unomi is structured as an Item. However, items only define a basic, generic structure. Types provide additional structure and semantics to generic items. By defining a new type, users specify which properties (including the type of value they accept) are available to items of that specific type.
Some types can be dynamically defined at runtime by calling the REST API while other extensions are done via Unomi plugins. Part of extending Unomi, therefore, is a matter of defining new types and specifying which kind of Unomi entity (e.g. profiles) they can be affected to. For example, the following JSON document can be passed to Unomi to declare a new property type identified (and named) tweetNb, tagged with the social tag, targeting profiles and using the integer value type.
{
    itemId: 'tweetNb',
    itemType: 'propertyType',
    metadata: {
        id: 'tweetNb',
        name: 'tweetNb'
    },
    tags: ['social'],
    target: 'profiles',
    type: 'integer'
}
Unomi defines default value types: date, email, integer and string, all pretty self-explanatory. While you can think of these value types as "primitive" types, it is possible to extend Unomi by providing additional value types.
2.5 Providing context to Unomi
In order to be able to build a profile based on user actions, Unomi requires data. This data is provided by clients which can choose how to do so. A convenient way to store and provide that contextual information is to leverage the Customer Experience Digital Data Layer digitalData object that is injected into the browser’s window object.
2.5.1 Using Marketing Factory
Jahia Marketing Factory makes it easier to provide the required information to the context server by automatically populating and injecting the digitalData object for the benefit of any javascript application running on a site for which Marketing Factory has been activated.
Marketing Factory populates the digitalData object with metadata that can be sent to the context server, notably the scope configured for the site (which is usually the site's key), metadata about the site and the current page. Marketing Factory also adds to this data the base URL for the context server:
window.digitalData = {
  "scope": <current scope>,
  "site": {
    "siteInfo": {
      "siteID": <site identifier>
    }
  },
  "page": {
    "pageInfo": {
      "pageID": <page identifier>,
      "pageName": <page name>,
      "pagePath": <relative path of the page from the site root>,
      "destinationURL": <the current URL>,
      "referringURL": <the URL from which we came from if any>,
      "language": <the current language>
    },
    "category": {},
    "attributes": {}
  },
  "contextServerPublicUrl": <base URL where the context server is configured>
}
After Marketing Factory loads the initial page the user is viewing, it contacts the context server to retrieve default context information automatically. This results in a cxs object being injected in the global javascript variable space, thus making it available to any javascript code running on the page:
cxs = {
    profileId: <identifier of the current user's profile>,
    sessionId: <identifier of the current user's session>,
    profileProperties: <optional, mapping profile property names to their values>,
    sessionProperties: <optional, mapping session property names to their values>,
    profileSegments: <optional array of segments the user matches>,
    filteringResults: <optional array of filtering results>,
    trackedConditions: <optional array of tracked conditions>
}
Since the cxs object contains the identifiers for the profile and session associated with our user, we could use this information to retrieve more details from the context server.
2.5.2 Without Marketing Factory
If you are not using Marketing Factory, it is still possible (of course!) to provide context to Unomi. You, however, require a little bit more work. In order to replicate the digitalFactory object as provided by Marketing Factory in your Digital Experience Manager components, you could use the following code in your JSPs:
<%--@elvariable id="renderContext" type="org.jahia.services.render.RenderContext"--%>
<%--@elvariable id="resource" type="org.jahia.services.render.Resource"--%>

<c:set var="scriptURL" value='${renderContext.request.secure ? "https://localhost:9443" : "http://localhost:8181"}'/>
<c:set var="pageName" value='${fn:escapeXml(resource.node.displayableName)}'/>

<template:addResources type="inlinejavascript">
    <script type="application/javascript">
        window.digitalData = window.digitalData || {
                "scope": "${renderContext.site.siteKey}",
                "site": {
                    "siteInfo": {
                        "siteID": "${resource.node.resolveSite.identifier}"
                    }
                },
                "page": {
                    "pageInfo": {
                        "pageID": "${resource.node.identifier}",
                        "pageName": "${pageName}",
                        "pagePath": "${resource.node.path}",
                        "destinationURL": document.location.href,
                        "referringURL": document.referrer,
                        "language": "${resource.locale}"
                    }
                },
                "contextServerPublicUrl": "${scriptURL}"
            };
    </script>
</template:addResources>
Note, however, that we hardcode the Unomi server’s URL in the javascript.
2.5.3 Using neither Marketing Factory, nor Digital Experience Manager
Of course, you can still interact with Unomi without either Marketing Factory or Digital Experience Manager, you would just need to provide the appropriate contextual information based on your application needs and constraints.
3 Interacting with Apache Unomi
There are essentially two modalities to interact with Unomi, reflecting different types of Unomi "users" : clients and integrators.
Unomi clients are usually web applications or content management systems. They interact with Unomi by providing raw, uninterpreted contextual data in the form of events and associated metadata. That contextual data is then processed by the context server to be fed to clients once actionable. In that sense context server clients are both consumers and producers of contextual data. Context server clients will mostly interact with Unomi using the ContextServlet, requesting context for the current user and providing any triggered events along the way.
On the other hand, Unomi integrators provide ways to feed more structured data to the context server either to integrate with third party services or to provide analysis of the uninterpreted data provided by context server clients. Such integration will mostly be done using Unomi's API either directly using Unomi plugins or via the provided REST APIs.
4 DX integration Example
We will examine how a Jahia Digital Experience Manager component can interact with Unomi to enrich a user's profile. The use case we will follow is a rather simple one: we want to create a tweet button component that can record the number of times the user tweeted (as a tweetNb integer property) as well as the URLs they tweeted from (as a tweetedFrom multi-valued string property).
We will assume that Marketing Factory is installed and configured for the site on which the component is to be deployed. While this step is not strictly necessary, this makes accessing the context server much easier and we will not examine what would be involved with accessing Unomi without Marketing Factory installed.
4.1 Component overview
The code for the Digital Experience Manager component can be found at: https://github.com/metacosm/unomi-tweet-button.
The component we will develop in this example is fairly simple and consists of a simple droppableContent called smp:twitterButton. The view for the component is really simple and uses the standard Twitter button but defines a javascript resource called twitterButton.js which performs the actual interaction with Unomi. This javascript code has been developed in two different versions depending on how we interact with Unomi. Also depending on that access modality, the component might need some supporting cast as we will see below.
4.2 Using the REST API
Let's first look at the Digital Experience Manager component and try to use the Unomi's REST API to achieve our goal for a pure client-side solution.
In order to see the code for this version, you will need to switch to the using-api branch of the code (git co using-api).
4.2.1 Dealing with authentication
Since the Unomi API is protected behind a login, we will first need to be able to provide our authentication information to the context server. To make things transparent for the component, the solution we've chosen among the ones available to us will leverage the existing information provided by a properly set-up Marketing Factory in the form of a filter injecting a globally-scoped javascript variable called CXSAuthenticationHeader into Digital Experience Manager pages. This is not very subtle but this will do for the purpose of this example.
This variable will provide a Basic Authentication header token ready to be sent along our REST requests. The filter is called CXSSettingsInjectorFilter:
public String execute(String previousOut, RenderContext renderContext, Resource resource, RenderChain chain) throws Exception {
    final String siteKey = renderContext.getSite().getSiteKey();
    ContextServerSettings contextServerSettings = contextServerSettingsService.getSettings(siteKey);

    if (contextServerSettings == null) {
        // force a reload of settings
        contextServerSettingsService.afterPropertiesSet();

        // and re-attempt to get the settings
        contextServerSettings = contextServerSettingsService.getSettings(siteKey);

        if (contextServerSettings == null) {
            logger.error("Couldn't retrieve the settings for site " + siteKey + ". The twitter button component won't be working.");
            return previousOut;
        }
    }

    previousOut += "<script type=\"text/javascript\">var " + CXSAUTHORIZATION_HEADER + " ='" + generateBasicAuth(contextServerSettings) + "';</script>";
    return previousOut;
}
This solution is not as elegant as it could be. The idea was to leverage the existing settings service to retrieve the Unomi configuration from Marketing Factory. However, the service is not currently exposed for consumption in external modules thus requiring us to perform some "hacks" to get it to work how we would like to. In particular, were the service cleanly exposed, it would react to changes to the settings, which is not currently the case. This explains also the tricky bit about reloading the settings if we couldn't retrieve them on first attempt for our site.
Also, since our retrieved service instance doesn't react to settings changes, we also requires a Digital Experience Manager EventListener to listen to updates to the settings node and inform the filter that it will need to regenerate the token on its next invocation. The listener is called CXSSettingsChangeListener and is also fairly straightforward.
Filter and listener are set up as usual using a Spring configuration file.
Another option here would be to retrieve the settings directly from JCR but that would be more brittle since we would need to know how the information is stored by Marketing Factory and would be exposed in case the internals changed, though, to be fair, the listener already requires the name of the settings node in JCR.
4.2.2 Twitter API setup
Let's now look at the javascript code: twitterButton.js.
The first section of the file is strictly twitter-related, so not particularly interesting for our purpose: we're loading the twitter widget asynchronously. We then register a callback that should be called when the widget is ready via the ready function. The callback function is the interesting part: it registers another callback that gets called any time the twitter widget emits the tweet event:
twttr.events.bind('tweet', function (event) { ... }
The callback we provide the Twitter API is where the magic happens: our user has tweeted so that's where we want to update their profile.
4.2.3 Callback utility functions
First, we register some utility functions to deal with calling to the Unomi REST API via AJAX calls: we define a default error callback (defaultErrorCallback) to be used in case the AJAX call goes wrong, we define a function to ease the creation of CORS requests since it's likely our Unomi server runs on a different server than the Digital Experience Manager one (createCORSRequest) and finally we create a function to perform the actual AJAX call (performXHRRequest). These functions should actually be reusable in your project and not particularly interesting here. We will just talk briefly about some salient points of the performXHRRequest function:
function performXHRRequest(url, successCallback, errorCallback, data) {
    var method = data ? 'POST' : 'GET';
    var xhr = createCORSRequest(method, baseURL + url);
    if (!xhr) {
        alert('CORS not supported');
        return;
    }

    xhr.onerror = errorCallback || defaultErrorCallback;
    xhr.onreadystatechange = function () {
        if (xhr.readyState == 4 && xhr.status == 200) {
            successCallback(JSON.parse(xhr.responseText));
        }
    };

    // authenticate with context server
    xhr.setRequestHeader("Authorization", CXSAuthorizationHeader);
    if (!data) {
    // Use text/plain to avoid CORS preflight
        xhr.setRequestHeader("Content-Type", "text/plain;charset=UTF-8");
        xhr.send();
    } else {
        xhr.setRequestHeader("Content-Type", "application/json");
        xhr.send(JSON.stringify(data));
    }
}
The function takes four parameters: a (relative) URL to call (url), a function to call in case of successful call (successCallback), a function to call in case of an error (errorCallback) and optional data to send (data). We first create a CORS request, set the callbacks, all this being fairly standard javascript. We then use our injected CXSAuthorizationHeader to provide the appropriate value to the Authentication header that the AJAX request will provide the context server to authenticate to it. If we have any data to send, then we assume that it's JSON since this is what the context server expects and we set the proper Content-Type header. Nothing really complicated.
The CORS request is initiated to a URL that is built using the relative URL we provide to identify the REST resource handling the request and a base URL that is obtained from the window.digitalData object configured for us by Marketing Factory.
4.2.4 Calling to Unomi
Let's now look at the Unomi REST calls. We will use a little helpful library (async.js) to simplify the sequence of calls since we need to make sure that some calls are performed before others can happen and in an asynchronous world, this can be a little challenging if we want to avoid nested callbacks (the so-called "callback hell"). async.js provides numerous functions but we will only use one of them: series which works by specifying an array of functions to be executed sequentially, calling a callback when done (we won't be using the callback either actually).
First, we need to make sure that Unomi knows about the property types we want to use to enrich our users' profiles. In order to do that, we will ask Unomi to retrieve all property types tagged with the social tag, which we will use for our property types, and check if any of the returned property types match the ones we're interested in. If we can't find them, then we need to create these property types.
To create these property types, we send the new property type as JSON data to the Unomi /profiles/properties resource to specify we want to create a profile property with the given JSON payload. So to create our tweetNb integer property, we would call:
performXHRRequest('/profiles/properties',
    function (data) { console.log("Property type tweetNb successfully added!"); },
    defaultErrorCallback,
    {
        itemId: 'tweetNb',
        itemType: 'propertyType',
        metadata: {
            id: 'tweetNb',
            name: 'tweetNb'
        },
        tags: ['social'],
        target: 'profiles',
        type: 'integer'
    });
Here's the JSON definition for our tweetedFrom property type. Note the string value type and the multivalued property set to true:
{
  itemId: 'tweetedFrom',
  itemType: 'propertyType',
  metadata: {
    id: 'tweetedFrom',
    name: 'tweetedFrom'
  },
  tags: ['social'],
  target: 'profiles',
  type: 'string',
  multivalued: true
}
The createdTypesIfNeeded function encapsulates all that logic, expecting an array of property types returned by Unomi:
var createTypesIfNeeded = function (data) {
    var foundTweetNb, foundTweetedFrom = false;
    for (var i in data) {
        if (data[i].itemId === 'tweetNb') {
            foundTweetNb = true;
        } else if (data[i].itemId === 'tweetedFrom') {
            foundTweetedFrom = true;
        }

        if (foundTweetNb && foundTweetedFrom) {
            // we found the property types, so abort search and return
            return;
        }
    }

    // we haven't found the property types, so create them
    performXHRRequest('/profiles/properties',
        function (data) {
            console.log("Property type tweetNb successfully added!");
        },
        defaultErrorCallback,
        {
            itemId: 'tweetNb',
            itemType: 'propertyType',
            metadata: {
                id: 'tweetNb',
                name: 'tweetNb'
            },
            tags: ['social'],
            target: 'profiles',
            type: 'integer'
        });
    performXHRRequest('/profiles/properties',
        function (data) {
            console.log("Property type tweetedFrom successfully added!");
        },
        defaultErrorCallback,
        {
            itemId: 'tweetedFrom',
            itemType: 'propertyType',
            metadata: {
                id: 'tweetedFrom',
                name: 'tweetedFrom'
            },
            tags: ['social'],
            target: 'profiles',
            type: 'string',
            multivalued: true
        });
};
Our createTypesIfNeeded function needs to be called before we actually perform any profile updates with these new property types since Unomi would create the properties with a potentially wrong type. This is where async.js and its series function comes into play:
// call in sequence to make sure that property types are created
// before we update the profile
async.series([
    // check first if we already have defined the property types
    // we're interested in and create them if needed
    function (callback) {
        performXHRRequest('/profiles/properties/tags/social',
            createTypesIfNeeded, defaultErrorCallback);
        callback(null, null);
    },
    // then retrieve and update profile
    function (callback) {
        ...
        callback(null, null);
    }
]);
Only when we are sure the types are created can we attempt to update our user's profile. We first identify the context server resource associated with the profile by using the profileId property from the injected cxs object prefixed by the /profiles/ relative path. We can then retrieve the associated profile, providing a callback to call upon success. The callback itself retrieves the existing values for our tweetNb and tweetedFrom properties and updates them appropriately using the globally available information from window.digitalData. Once this is done, another call to the URI associated to our profile is performed, this time passing it our updated profile:
performXHRRequest('/profiles/' + cxs.profileId, function (profile) {
    var properties = profile.properties;
    var tweetNb = properties.tweetNb || 0;
    var tweetedFrom = properties.tweetedFrom || [];
    profile.properties.tweetNb = tweetNb + 1;
    var pageInfo = window.digitalData.page.pageInfo;
    if (pageInfo) {
        var url = pageInfo.destinationURL;
        if (url) {
            tweetedFrom.push(url);
            profile.properties.tweetedFrom = tweetedFrom;
        }
    }

    // and update it with the new value for tweetNb
    performXHRRequest('/profiles', function (profile) {
        console.log("Profile successfully updated with tweetNB = "
            + profile.properties.tweetNb);
        console.log("Profile successfully updated with tweetedFrom = "
            + profile.properties.tweetedFrom);
    }, defaultErrorCallback, profile)
});
As you can see, this solution is pretty involved though it has the advantage of being purely implemented on the client, which might be your only option if you don't have access to the Unomi server.
We will now examine another solution using a more elaborate context request associated with a Unomi plugin.
4.3 Using a context request and a Unomi plugin
The code for this approach is located on the master branch of the our Digital Experience Manager component (https://github.com/metacosm/unomi-tweet-button). This time, however, you will also need another component, a Unomi plugin found at https://github.com/metacosm/unomi-tweet-button-plugin/tree/with-mf-1_0_0 (with-mf-1_0_0 branch).
4.3.1 Digital Experience Manager component
The approach being different, our component, while globally similar, is greatly simplified in its interaction with the context server. We define a simpler version of the context server request as follows:
function contextRequest(successCallback, errorCallback, payload) {
    var data = JSON.stringify(payload);
    var url = window.digitalData.contextServerPublicUrl
        + '/context.json?sessionId=' + cxs.sessionId;
    var xhr = new XMLHttpRequest();
    var isGet = data.length < 100;
    if (isGet) {
        xhr.withCredentials = true;
        xhr.open("GET", url + "&payload=" + encodeURIComponent(data), true);
    } else if ("withCredentials" in xhr) {
        xhr.open("POST", url, true);
        xhr.withCredentials = true;
    } else if (typeof XDomainRequest != "undefined") {
        xhr = new XDomainRequest();
        xhr.open("POST", url);
    }
    xhr.onreadystatechange = function () {
        if (xhr.readyState != 4) {
            return;
        }
        if (xhr.status == 200) {
            var response = xhr.responseText ? JSON.parse(xhr.responseText)
                : undefined;
            successCallback(response);
        } else {
            console.log("contextserver: " + xhr.status
                + " ERROR: " + xhr.statusText);
            if (errorCallback) {
                errorCallback(xhr);
            }
        }
    };
    // Use text/plain to avoid CORS preflight
    xhr.setRequestHeader("Content-Type", "text/plain;charset=UTF-8");
    if (isGet) {
        xhr.send();
    } else {
        xhr.send(data);
    }
}
There are a couple of things to note here, in comparison with the version we used in the other approach:
- we didn't separate the CORS request creation because we will only need to make one request
- we're not calling the REST API but rather a single URI: window.digitalData.contextServerPublicUrl + '/context.json?sessionId=' + cxs.sessionId. This URI requests context from Unomi, resulting in an updated cxs object in the javascript global scope. The context server can reply to this request either by returning a JSON-only object containing solely the context information as is the case when the requested URI is context.json. However, if the client requests context.js then useful functions to interact with Unomi are added to the cxs object in addition to the context information as depicted above.
- we don't need to provide any authentication at all to interact with this part of Unomi since we only have access to read-only data (as well as providing events as we shall see later on). We therefore do not need to somehow retrieve the authentication information from Marketing Factory.
The request to Unomi itself is also a lot simpler: one single request / response, no nested callbacks or need to make sure that calls went through before being able to proceed with the next one:
var contextPayload = {
    source: {
        itemType: 'page',
        scope: window.digitalData.scope,
        itemId: window.digitalData.page.pageInfo.pageID,
        properties: window.digitalData.page
    },
    events: [
        {
            eventType: 'tweetEvent',
            scope: window.digitalData.scope,
            source: {
                itemType: 'page',
                scope: window.digitalData.scope,
                itemId: window.digitalData.page.pageInfo.pageID,
                properties: window.digitalData.page
            }
        }
    ],
    requiredProfileProperties: [
        'tweetNb',
        'tweetedFrom'
    ]
};

contextRequest(function (response) {
    console.log("Profile sucessfully updated with tweetNB = "
        + response.profileProperties.tweetNb + " and tweetedFrom = "
        + response.profileProperties.tweetedFrom);
}, defaultErrorCallback, contextPayload);
The interesting part in that context request is, of course, the payload. This is where we provide Unomi with contextual information as well as ask for data in return. This allows clients to specify which type of information they are interested in getting from the context server as well as specify incoming events or content filtering or property/segment overrides for personalization or impersonation. This conditions what the context server will return with its response.
A context request payload needs to at least specify some information about the source of the request in the form of an Item (meaning identifier, type and scope plus any additional properties we might have to provide), via the source property of the payload. Of course the more information can be provided about the source, the better.
A client wishing to perform content personalization might also specify filtering condition to be evaluated by the context server so that it can tell the client whether the content associated with the filter should be activated for this profile/session. This is accomplished by providing a list of filter definitions to be evaluated by the context server via the filters field of the payload. If provided, the evaluation results will be provided in the filteringResults field of the resulting cxs object the context server will send.
It is also possible to clients wishing to perform user impersonation to specify properties or segments to override the proper ones so as to emulate a specific profile, in which case the overridden value will temporarily replace the proper values so that all rules will be evaluated with these values instead of the proper ones. The segmentOverrides (array of segment identifiers), profilePropertiesOverrides and sessionPropertiesOverrides (maps of property name and associated object value) fields allow to provide such information. Providing such overrides will, of course, impact content filtering results and segments matching for this specific request.
The clients can also specify which information to include in the response by setting the requiresSegments property to true if segments the current profile matches should be returned or provide an array of property identifiers for requiredProfileProperties or requiredSessionProperties fields to ask the context server to return the values for the specified profile or session properties, respectively. This information is provided by the profileProperties, sessionProperties and profileSegments fields of the context server response.
Additionally, the context server will also returns any tracked conditions associated with the source of the context request. Upon evaluating the incoming request, the context server will determine if there are any rules marked with the trackedCondition tag and which source condition matches the source of the incoming request and return these tracked conditions to the client. The client can use these tracked conditions to learn that the context server can react to events matching the tracked condition and coming from that source. This is, in particular, used to implement form mapping (a solution that allows clients to update user profiles based on values provided when a form is submitted).
Finally, the client can specify any events triggered by the user actions, so that the context server can process them, via the events field of the context request.
If no payload is specified, the context server will simply return the minimal information deemed necessary for client applications to properly function: profile identifier, session identifier and any tracked conditions that might exist for the source of the request.
Now that we've seen the structure of the request and what we can expect from the context response, let's examine the request our component is doing:
var contextPayload = {
    source: {
        itemType: 'page',
        scope: window.digitalData.scope,
        itemId: window.digitalData.page.pageInfo.pageID,
        properties: window.digitalData.page
    },
    events: [
        {
            eventType: 'tweetEvent',
            scope: window.digitalData.scope,
            source: {
                itemType: 'page',
                scope: window.digitalData.scope,
                itemId: window.digitalData.page.pageInfo.pageID,
                properties: window.digitalData.page
            }
        }
    ],
    requiredProfileProperties: [
        'tweetNb',
        'tweetedFrom'
    ]
};
Our context request payload specifies the source of the request by leveraging the window.digitalData information that Marketing Factory automatically injects in the javascript global scope. We also specify that we want the context server to return the values of the tweetNb and tweetedFrom profile properties in its response. Finally, we provide a custom event of type tweetEvent with associated scope and source information, which matches the source of our context request in this case.
The tweetEvent event type is not defined by default in Unomi. This is where our Unomi plugin comes into play since we need to tell Unomi how to react when it encounters such events.
4.3.2 Unomi plugin overview
As previously mentioned, the Unomi plugin can be found at https://github.com/metacosm/unomi-tweet-button-plugin/tree/with-mf-1_0_0 (with-mf-1_0_0 branch).
In order to react to tweetEvent events, we will define a new Unomi rule since this is exactly what Unomi rules are supposed to do. Rules are guarded by conditions and if these conditions match, the associated set of actions will be executed. In our case, we want our new rule (incrementTweetNumber) to only react to tweetEvent events and we want it to perform the profile update accordingly: create the property types for our custom properties if they don't exist and update them. To do so, we will create a custom action (incrementTweetNumberAction) that will be triggered any time our rule matches. An action is some custom code that is deployed in the context server and can access the Unomi API to perform what it is that it needs to do.
4.3.3 Plugin architecture
Unomi is architected so that users can provide extensions in the form of plugins. Being built on top of Apache Karaf, Unomi leverages OSGi to support plugins. A Unomi plugin is, thus, an OSGi bundle specifying some specific metadata to tell Unomi the kind of entities it provides. A plugin can provide the following entity types to extend Unomi, each with its associated definition (as a JSON file), located in a specific spot within the META-INF/cxs/ directory of the bundle JAR file:
| Entity type | Description | Location in cxs directory |
|---|---|---|
| Action | Consequences triggered when rules are matched | actions |
| Condition | Expression destined at performing tests on items | conditions |
| Persona | Virtual profile with determined properties to test a site against | personas |
| Property | Profile/session property definition with associated category | properties then profiles or sessions subdirectory then <category name> directory |
| Rule | Conditional set of actions to be performed in response to events | rules |
| Scoring | Set of conditions associated with a value to assign to profiles when matching | scorings |
| Segments | Conditions against which profiles are evaluated to categorize them | segments |
| Tag | Tags that can be used to categorize items | tags then <category name> |
| Value | Definition for values that can be assigned to properties ("primitive " types) | values |
| Property merge strategy | Strategy to resolve how to merge properties when performing profile merges | mergers |
Blueprint is used to declare what the plugin provides and inject any required dependency. The Blueprint file is located, as usual, at OSGI-INF/blueprint/blueprint.xml in the bundle JAR file.
The plugin otherwise follows a regular maven project layout and must use the following parent in its POM file, using the appropriate Unomi version:
<parent>
    <groupId>org.oasis-open.contextserver</groupId>
    <artifactId>context-server-plugins</artifactId>
    <version>...</version>
</parent>
4.3.4 Rule definition
Let's look at how our custom (incrementTweetNumber) rule is defined:
{
  "metadata": {
    "id": "smp:incrementTweetNumber",
    "name": "Increment tweet number",
    "description": "Increments the number of times a user has tweeted after they click on a tweet button"
  },
  "raiseEventOnlyOnceForSession": false,
  "condition": {
    "type": "eventTypeCondition",
    "parameterValues": {
      "eventTypeId": "tweetEvent"
    }
  },
  "actions": [
    {
      "type": "incrementTweetNumberAction",
      "parameterValues": {}
    }
  ]
}
Rules define a metadata section where we specify the rule name, identifier and description.
When rules trigger, a specific event is raised so that other parts of Unomi can react to it accordingly. We can control how that event should be raised. Here we specify that the event should be raised each time the rule triggers and not only once per session by setting raiseEventOnlyOnceForSession to false, which is not strictly required since that is the default. A similar setting (raiseEventOnlyOnceForProfile) can be used to specify that the event should only be raised once per profile if needed.
We could also specify a priority for our rule in case it needs to be executed before other ones when similar conditions match. This is accomplished using the priority property. We're using the default priority here since we don't have other rules triggering on tweetEvents and don't need any special ordering.
We then tell Unomi which condition should trigger the rule via the condition property. Here, we specify that we want our rule to trigger on an eventTypeCondition condition. As seen earlier, Unomi can be extended by adding new condition types that can enrich how matching or querying is performed in Unomi. The condition type definition file specifies which parameters are expected for our condition to be complete. In our case, we use the built-in event type condition that will match if Unomi receives an event of the type specified in the condition's eventTypeId parameter value: tweetEvent here.
Finally, we specify a list of actions that should be performed as consequences of the rule matching. We only need one action of type incrementTweetNumberAction that doesn't require any parameters.
4.3.5 Action definition
Let's now look at our custom incrementTweetNumberAction action type definition:
{
  "id": "incrementTweetNumberAction",
  "actionExecutor": "incrementTweetNumber",
  "tags": [
    "event"
  ],
  "parameters": []
}
We specify the identifier for the action type, a list of tags if needed: here we say that our action is a consequence of events using the event tag. Our actions does not require any parameters so we don't define any.
Finally, we provide a mysterious actionExecutor identifier: incrementTweetNumber.
4.3.6 Action executor definition
The action executor references the actual implementation of the action as defined in our blueprint definition:
<blueprint xmlns:xsi="http://www.w3.org/2001/XMLSchema-instance"
           xmlns="http://www.osgi.org/xmlns/blueprint/v1.0.0"
           xsi:schemaLocation="http://www.osgi.org/xmlns/blueprint/v1.0.0 http://www.osgi.org/xmlns/blueprint/v1.0.0/blueprint.xsd">

    <reference id="profileService" interface="org.oasis_open.contextserver.api.services.ProfileService"/>

    <!-- Action executor -->
    <service id="incrementTweetNumberAction" auto-export="interfaces">
        <service-properties>
            <entry key="actionExecutorId" value="incrementTweetNumber"/>
        </service-properties>
        <bean class="org.jahia.modules.unomi_tweet_button_plugin.actions.IncrementTweetNumberAction">
            <property name="profileService" ref="profileService"/>
        </bean>
    </service>
</blueprint>
In standard Blueprint fashion, we specify that we will need the profileService defined by Unomi and then define a service of our own to be exported for Unomi to use. Our service specifies one property: actionExecutorId which matches the identifier we specified in our action definition. We then inject the profile service in our executor and we're done for the configuration side of things!
4.3.7 Action executor implementation
Our action executor definition specifies that the bean providing the service is implemented in the org.jahia.modules.unomi_tweet_button_plugin.actions.IncrementTweetNumberAction class. This class implements the Unomi ActionExecutor interface which provides a single int execute(Action action, Event event) method: the executor gets the action instance to execute along with the event that triggered it, performs its work and return an integer status corresponding to what happened as defined by public constants of the EventService interface of Unomi: NO_CHANGE, SESSION_UPDATED or PROFILE_UPDATED.
Let's now look at the implementation of the method:
final Profile profile = event.getProfile();
Integer tweetNb = (Integer) profile.getProperty(TWEET_NB_PROPERTY);
List<String> tweetedFrom = (List<String>) profile.getProperty(TWEETED_FROM_PROPERTY);

if (tweetNb == null || tweetedFrom == null) {
// create tweet number property type
    PropertyType propertyType = new PropertyType(new Metadata(event.getScope(), TWEET_NB_PROPERTY, TWEET_NB_PROPERTY, "Number of times a user tweeted"));
    propertyType.setValueTypeId("integer");
    service.createPropertyType(propertyType);

// create tweeted from property type
    propertyType = new PropertyType(new Metadata(event.getScope(), TWEETED_FROM_PROPERTY, TWEETED_FROM_PROPERTY, "The list of pages a user tweeted from"));
    propertyType.setValueTypeId("string");
    propertyType.setMultivalued(true);
    service.createPropertyType(propertyType);

    tweetNb = 0;
    tweetedFrom = new ArrayList<>();
}

profile.setProperty(TWEET_NB_PROPERTY, tweetNb + 1);
final String sourceURL = extractSourceURL(event);
if (sourceURL != null) {
    tweetedFrom.add(sourceURL);
}
profile.setProperty(TWEETED_FROM_PROPERTY, tweetedFrom);

return EventService.PROFILE_UPDATED;
It is fairly straightforward: we retrieve the profile associated with the event that triggered the rule and check whether it already has the properties we are interested in. If not, we create the associated property types and initialize the property values.
Note that it is not an issue to attempt to create the same property type multiple times as Unomi will not add a new property type if an identical type already exists.
Once this is done, we update our profile with the new property values based on the previous values and the metadata extracted from the event. We then return that the profile was updated as a result of our action and Unomi will properly save it for us when appropriate. That's it!
5 Personalized content API
5.1 Introduction
When integrating with some applications, you might want to use Marketing Factory’s personalization functionalities without serving full-page HTML content generated by Jahia’s Digital Experience Manager. For example, you might want to retrieve a list of images that are stored in DX, and make sure that personalization or even test optimizations (such as A/B testing) are applied to the elements of the list. In this case, the list of images is stored within DX’s CMS and the personalization configuration is stored within the data that is managed by Marketing Factory’s DX modules.
If we reduce the example from a list to a single variant element, this is actually very close to what an ad-server might look like, where you want to retrieve a single image for a specific user profile. This image will be delivered based on the criteria (such as segmentation, profile properties, location) that have been setup for personalization. We are in this scenario only interested in this (or these) resource, and not on a full-blown HTML page.
This is now possible in Marketing Factory through something called the content personalization rendering API (aka personalization API).
5.2 Content personalization rendering API
This API is primarily a content rendering API, and will not cover setting up or modifying existing personalization or test optimization components. These must simply be setup using Marketing Factory’s UI. This should be acceptable in most use cases, where it is acceptable to use a back-end UI to edit/setup things and then use an API to access the result of the applied personalization.
This rendering API output JSON structures, much in a similar way that DX’s REST API does, but it is a bit different in format and especially in functionality. It is also customizable since it uses DX views to perform its rendering, making it possible to adjust the final result output using custom modules (for example to customize the JSON output of a specific DX component).
Before going into the specific format of the JSON structures, let’s look at the URL format:
http://server:port/CONTEXT/PATH_TO_CONTENT.mf.json?QUERY_PARAMETERS
where:
- CONTEXT is the context in which the DX application is deployed (by default the ROOT context is used in which case CONTEXT should be empty)
- PATH_TO_CONTENT should be the typical path to a content object (without any extension), for example : /sites/digitall/home/texts
- QUERY_PARAMETERS are described in the following table.
| Name | Value type | Default value | Optional | Description |
|---|---|---|---|---|
| hidden | boolean | false | Yes | If activated, the JSON output will contain content properties marked as hidden |
| pretty | boolean | false | Yes | If activated, the JSON output will be indented to make it easier to read. This is useful for debugging but shouldn’t be used in production |
| depth | integer | 1 | Yes | This parameter controls the depth of the tree that is generated in the JSON output. Usually a depth of 2 might be useful when rendering a list of elements to avoid having to request the elements in seperate HTTP requests. |
| wemSessionId | string | null | Yes | This parameter contains a valid Unomi session ID (usually obtained from a previous requset). If not specified, it will first look in the server session for an object named "wemSessionId" and if it could not be found, a new sessionId will be generated by the context server. In all cases, the Unomi session ID will be part of the JSON result. |
| wemProfileId | string | null | Yes | This parameter contains a valid Unomi profile ID. If not specified, the API will try to find the value either in a cookie called "context-profile-id", or in a server-side session object named "wemProfileId" and setup by a previous request. |
| wemPersonaId | string | null | Yes | This parameter contains a valid Unomi Persona ID. If specified and valid, the persona ID will be used to perform personalization and test optimizations against the persona instead of the current profile. The list of personas may be retrieved using Unomi’s Persona API. |
Here is an example of such an URL :
http://localhost:8080/sites/digitall/home/texts.mf.json?hidden=true&pretty=true&depth=5
and here in an excerpt of the result (edited for compactness):
{
"path": "/sites/digitall/home/texts",
"parentPath": "/sites/digitall/home",
"identifier": "42e3db2a-6394-4f8d-9c0e-7d8ade34ca4d",
"index": 1,
"depth": "5",
"nodename": "texts",
"properties": {
"j:nodename": "texts",
"j:fullpath": "/sites/digitall/home/texts",
"jcr:createdBy": "root",
},
"types": {
"primaryNodeType": "jnt:contentList",
},
"title": "texts",
"classes": "selectable",
"hasChildren": true,
"childNodes": [
{
"path": "/sites/digitall/home/texts/rich-text",
"parentPath": "/sites/digitall/home/texts",
"identifier": "9769d43a-bc76-4681-90e1-633b863a9562",
"index": 1,
"depth": "4",
"nodename": "rich-text",
"properties": {
"j:nodename": "rich-text",
"j:fullpath": "/sites/digitall/home/texts/rich-text",
"jcr:createdBy": "root",
"text": "<p><strong>Bold Text<\/strong><\/p>\n\n<p> <\/p>"
},
"types": {
"primaryNodeType": "jnt:bigText",
},
"title": "Bold Text",
"classes": "selectable",
"hasChildren": false
},
{
"path": "/sites/digitall/home/texts/experience-rich-text-2/rich-text-1",
"parentPath": "/sites/digitall/home/texts/experience-rich-text-2",
"identifier": "5ab49763-18b3-4613-973f-c056bf8a3e8b",
"index": 1,
"depth": "3",
"nodename": "rich-text-1",
"properties": {
"j:nodename": "rich-text-1",
"j:fullpath": "/sites/digitall/home/texts/experience-rich-text-2/rich-text-1",
"jcr:createdBy": "root",
"wem:tab": "",
"wem:jsonFilter": "",
"text": "<p>fallback<\/p>"
},
"types": {
"primaryNodeType": "jnt:bigText",
"mixinTypes": ["wemmix:editItem"],
"parentPrimaryNodeType": "wemnt:personalizedContent",
"parentMixinTypes": []
},
"title": "fallback",
"classes": "selectable",
"hasChildren": false
},
{
"path": "/sites/digitall/home/texts/optimization-variant-a/variant-c",
"parentPath": "/sites/digitall/home/texts/optimization-variant-a",
"identifier": "3ea48051-6584-4493-9a21-edf72d98b495",
"index": 1,
"depth": "3",
"nodename": "variant-c",
"properties": {
"j:nodename": "variant-c",
"j:fullpath": "/sites/digitall/home/texts/optimization-variant-a/variant-c",
"text": "<p>variant-c<\/p>"
},
"types": {
"primaryNodeType": "jnt:bigText",
"mixinTypes": ["wemmix:editItem"],
"parentPrimaryNodeType": "wemnt:optimizationTest",
"parentMixinTypes": []
},
"title": "variant-c",
"classes": "selectable",
"hasChildren": false
}
],
"wemSessionId": "1fc2bcb8-99fe-47d1-8432-213ff495d6ff",
"wemProfileId": "0e4768b6-b129-45a7-a312-19544d112b7b",
"wemPersonaId": ""
}
In this example, there are multiple things to note:
- We are rendering a list of objects, so this is why we see a root object that has child nodes
- The first child is a regular rich text object with a text value.
- The second child is a personalized rich text object. As you can see it has a mixin type "wemmix:editItem" and a parent node type "wemnt:personalizedContent" that indicates we have actually rendered a variant of a personalized content list. Note that in this output you cannot see the top personalization node (the "wemnt:personalizedContent" personalization node) or the other variants, only the one that was rendered by Marketing Factory for the current profile is part of the output. This way integrators don’t have to understand all the inner workings of the personalization technology, they can just set it up and get the expected result in JSON format.
- The third child is an optimization test (aka A/B testing node) node. Again a variant was selected server-side and only the selected node is part of the output. The top optimization test node and the other variants are not part of the output.
5.3 Proper session and profile tracking
Whenever interacting with Unomi’s API, Digital Experience Manager’s API or Marketing Factory’s Personalization API, you must make sure that you are tracking and transfer any personalization identifiers that you may have retrieved as part of a request’s response.
For example, if you perform a context retrieval call using Unomi’s API such as :
http://UNOMI_HOST:UNOMI_PORT/context.json?sessionId=MY_SESSION_ID
You will probably retrieve a profileId as a result of this context retrieval. If you provided a new session ID in MY_SESSION_ID the session will be created in Unomi with this identifier and you will need to use that for all sub-sequent calls to any APIs. For exemple, if you use the personalization API to render content, you will need to do something like this:
where MY_PROFILE_ID is the profile ID that was returned as a result of the request to the context.json servlet.
It is also recommended that you use HTTP clients that can either handle cookies properly, or you will have to manually manage the cookies for proper DX server session tracking (e.g. the JSESSIONID cookie). Just as a general rule, check whether the HTTP client you will use supports cookies out of the box, and if not, you will need to parse the returned cookies and send them back when performing requests to both DX and Unomi. The following table gives you a list of the most important cookies and their usage:
| Name | Origin | Type | Description |
|---|---|---|---|
| JSESSIONID | DX | string | This cookie is used to track sessions server-side inside DX |
| context-profile-id | Unomi | string | Used by Unomi to track the profile id. If a wemProfileId parameter is specified it will override the cookie value but it would be best that they always be in sync. |
5.3.1 DX Login session integration
Marketing Factory also provides integration with DX’s login servlet. Again, in order for proper session and profile tracking to happen, you must add a request parameter to the /cms/login servlet when submitting a DX login. Here is an example
http://DX_HOST:DX_PORT/CONTEXT/cms/login?wemSessionId=MY_SESSION_ID
The body of the request is in typical multipart/form-data format (default type for HTTP POST Form submissions) that contains the following fields:
| Name | Origin | Type | Description |
|---|---|---|---|
| doLogin | boolean | Yes | Must be set to "true" for the login to be performed |
| username | string | Yes | The user unique name |
| password | string | Yes | The user’s password |
| restMode | boolean | Yes | Must be set to "true" for this use case |
| redirectActive | boolean | Yes | Must be set to "false" for this use case |
| site | string | Yes | The site against which to login, which is used mostly to redirect back to the site after the login. In the case of integration with Marketing Factory this is also used to know in which site to retrieve the Context Server configuration. |
Please note that the required column relates to requirements for the integration with Marketing Factory. In more general uses cases the requirements are different. Please refer to the Jahia REST API documentation for more precise login servlet information.
5.4 Typical personalization flows
5.4.1 Introduction
In the following sections, we will describe typical personalization flows that application developers might want to integrate. Also note that while the steps are quite detailed, most of them happen automatically when using the personalization API. For example all the interactions between DX and Unomi are handled by Marketing Factory. Other steps such as the login or the session ID generation must be explicitely integrated into the custom applications. We mark the implicit operations with a [I] and the explicit operations with a [E].
5.4.2 Conventions
"Get personalized JSON" or "Get test optimization JSON" are not really different requests, they are both requests to the personalization API we have described previously
"DX" refers to the Marketing Factory DX modules, not the DX server by itself.
"Unomi" refers to the Apache Unomi Context Server.
5.4.3 Anonymous personalization
The following diagram describes the flow of a typical integration of personalization WITHOUT authentication into a custom application:
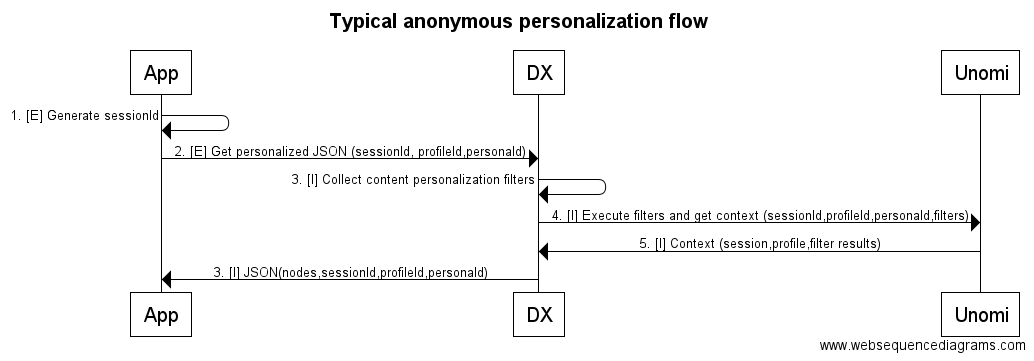
Here is a more detail description of the steps:
- [E] First the application generates a session ID. It may either be random, stored or anything. It is not recommended to re-use session IDs, although there could be some cases where it could be useful.
- [E] We can now request the personalized JSON content, passing in the session ID that was generated, as well as (optionally) any previously stored profile ID (from previous requests for example) and an optional personaId if we want to render the result for a given persona instead of the current profile.
- [I] The Marketing Factory DX modules collect all the filters setup for each variant, as well as the personalization configuration for each personalization content node.
- [I] DX then sends a request to Unomi that contains the filters to execute against the context that corresponds to the current session profile and persona).
- [I] The Unomi executes the filters and returns the context that contains the session and profile properties, along with the results of the filters execution.
- [I] The DX server uses the filter results to filter the content and returns the JSON with the filtered personalized content, as well as the sessionId, the profileId (warning it might change in the case of profile merging) and the personaId if one was used.
5.4.4 Authenticated personalization
The following diagram describes the flow of a typical integration of personalization WITH authentication into a custom application:
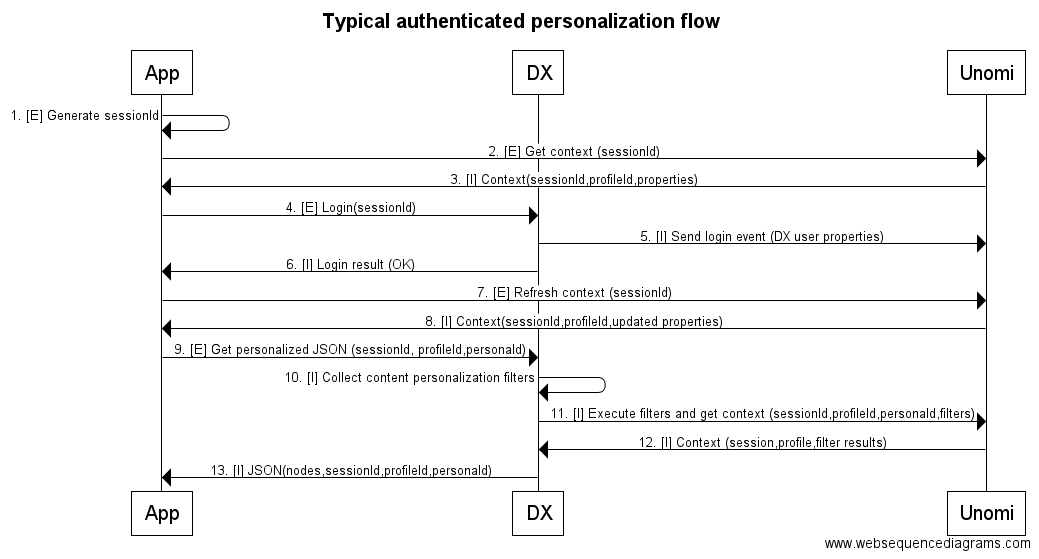
Here is a more detailed description of the steps:
- [E] First the application generates a session ID. It may either be random, stored or anything. It is not recommended to re-use session IDs, although there could be some cases where it could be useful.
- [E] This first context request is required because only the context servlet in Apache Unomi is allowed to create new sessions.
- [I] The context is returned as a response of the request, and it contains a JSON structure that contains the sessionId, the profileId, profile and session properties
- [E] A login POST request is sent to DX with the required login credentials.
- [I] Marketing Factory will detect the login and if it is successful, will generate a login event that it sends to Unomi. This event contains all the user properties except the password, to augment the existing Unomi profile. Also this may trigger profile merging operations inside Unomi if multiple profiles are referencing the same profile (this typically happens when a user logs in from different clients).
- [I] DX returns the result of login. If the login was successful it simply returns "OK" as a text response body.
- [E] The app issues a second context request to get the updated profile and session properties that were the result of the login request. This is necessary because the login event was send from server-to-server and we therefore don’t get access to the updated properties directly. Again the proper sessionId must be passed to the context request.
- [I] The updated context is returned. Important note: the profile ID might have changed because of merging. Make sure you read the profile ID and compare it to values you might have and update them with the profile ID returned in this response.
- [E] We can now request the personalized JSON content, passing in the session ID that was generated, as well as (optionally) any previously stored profile ID (from previous requests for example) and an optional personaId if we want to render the result for a given persona instead of the current profile.
- [I] The Marketing Factory DX modules collect all the filters setup for each variant, as well as the personalization configuration for each personalization content node.
- [I] DX then sends a request to Unomi that contains the filters to execute against the context that corresponds to the current session profile and persona).
- [I] The Unomi executes the filters and returns the context that contains the session and profile properties, along with the results of the filters execution.
- [I] The DX server returns the JSON with the personalized content, as well as the sessionId, the profileId (warning it might change in the case of profile merging) and the personaId if one was used.
5.4.5 Anonymous test optimization
The following diagram describes the flow of a typical integration of anonymous test optimization into a custom application:
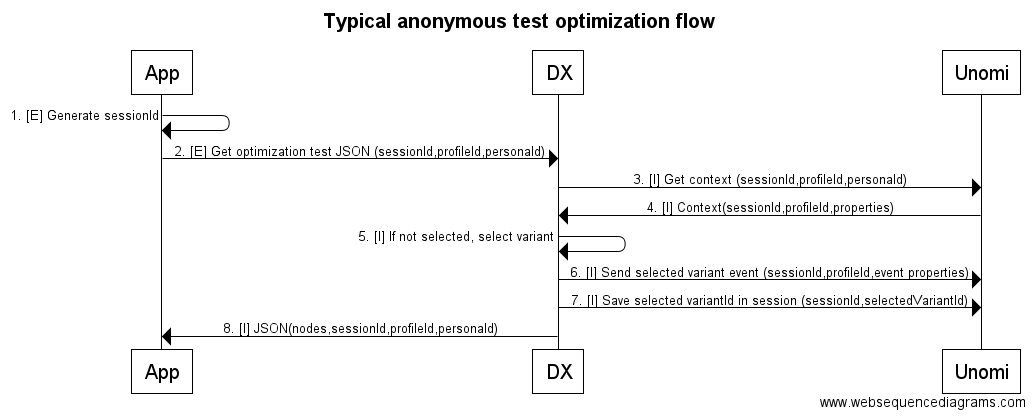
Here is a more detailed description of the steps:
- [E] First the application generates a session ID. It may either be random, stored or anything. It is not recommended to re-use session IDs, although there could be some cases where it could be useful.
- [E] The application then sends a request for the JSON structure resulting of the test optimization for the current profile, session and optional persona selected. Note that the only required parameter is the session ID.
- [I] DX then asks Unomi for the current context, because it uses a session property to store the selected variant ID for the test optimization. If it is found, then we skip directly to step 5
- [I] Unomi sends back the context corresponding to the request session, profile and persona.
- [I] If a variant was already selected, it is read from the session properties that were send in the context and we then skip to step 8. If no variant was selected, DX selects a variant using the configured test optimization setup.
- [I] If no variant was selected, DX send a variant selection event to Unomi to notify it and any rules related to variant selection are executed.
- [I] If no variant was selected, DX sends a request to save the selected variant ID in the session. Note: this still will probably disappear in future versions of Marketing Factory, and directly integrated into a rule in the Unomi server.
- [I] The JSON content corresponding to the test optimization for the current session, profile and persona is returned, along with the identifiers for the session,profile and persona.
6 Profiles import/export
6.1 Introduction
The profile import/export feature in Unomi is based on configurations and consumes or produces CSV files that contains the profiles to import / exported.
6.2 Import
6.2.1 Import UI
For a functional description of the UI, please see the marketers guide
Only ftp, sftp, ftps and file are supported in the source path.
eg. file:///tmp/?fileName=profiles.csv&move=.done&consumer.delay=25s
Where fileName can be a pattern eg 'include=.*.csv' instead of 'fileName=...' to consume all CSV files, by default the processed files are moved to '.camel' folder you can change it using the 'move' option.
consumer.delay is the frequency of polling. 20000 (in milliseconds) means 20 seconds. Can be also '20s' other possible format are: 2h30m10s = 2 hours and 30 minutes and 10 seconds.
See http://camel.apache.org/ftp.html and http://camel.apache.org/file2.html to build more complex source path.
6.2.2 Import API
Unomi provides REST Endpoints to manage import configurations:
- GET /cxs/importConfiguration
- GET /cxs/importConfiguration/{configId}
- POST /cxs/importConfiguration
- DELETE /cxs/importConfiguration/{configId}
This is how a oneshot import configuration looks like:
{
    "itemId": "importConfigId",
    "itemType": "importConfig",
    "name": "Import Config Sample",
    "description": "Sample description",
    "configType": "oneshot",        //Config type can be 'oneshot' or 'recurrent'
    "properties": {
      "mapping": {
        "email": 0,                 //<Unomi Property Id> : <Column Index In the CSV>
        "firstName": 2,
        ...
      }
    },
    "columnSeparator": ",",         //Character used to separate columns
    "lineSeparator": "\\n",         //Character used to separate lines (\n or \r)
    "multiValueSeparator": ";",     //Character used to separate values for multivalued columns
    "multiValueDelimiter": "[]",    //Character used to wrap values for multivalued columns
    "status": "SUCCESS",            //Status of last execution
    "executions": [                 //(RETURN) Last executions by default only last 5 are returned
      ...
    ],
    "mergingProperty": "email",         //Unomi Property Id used to check duplicates
    "overwriteExistingProfiles": true,  //Overwrite profiles that have duplicates
    "propertiesToOverwrite": "firstName, lastName, ...",      //If last is set to true, which property to overwrite, 'null' means overwrite all
    "hasHeader": true,                  //CSV file to import contains a header line
    "hasDeleteColumn": false            //CSV file to import doesn't contain a TO DELETE column (if it contains, will be the last column)
}
A recurrent import configuration is similar to the previous one with some specific information to add to the JSON like:
  {
    ...
    "configType": "recurrent",
    "properties": {
      "source": "ftp://USER@SERVER[:PORT]/PATH?password=xxx&fileName=profiles.csv&move=.done&consumer.delay=20000",
                // Only 'ftp', 'sftp', 'ftps' and 'file' are supported in the 'source' path
                // eg. file:///tmp/?fileName=profiles.csv&move=.done&consumer.delay=25s
                // 'fileName' can be a pattern eg 'include=.*.csv' instead of 'fileName=...' to consume all CSV files
                // By default the processed files are moved to '.camel' folder you can change it using the 'move' option
                // 'consumer.delay' is the frequency of polling. '20000' (in milliseconds) means 20 seconds. Can be also '20s'
                // Other possible format are: '2h30m10s' = 2 hours and 30 minutes and 10 seconds
      "mapping": {
        ...
      }
    },
    ...
    "active": true,  //If true the polling will start according to the 'source' configured above
    ...
  }
6.3 Exports
6.3.1 UI
For a functional description of the UI, please see the marketers guide
Only ftp, sftp, ftps and file are supported in the source path, (eg. file:///tmp/?fileName=profiles-export-${date:now:yyyyMMddHHmm}.csv&fileExist=Append)
As you ca notice in the example above we can inject variables in the produced file name ${date:now:yyyyMMddHHmm} is the current date formatted with the pattern yyyyMMddHHmm. fileExist option put as Append will tell the file writer to append to the same file for each execution of the export configuration. You cam omit this oprtion to write a profile per file.
See http://camel.apache.org/ftp.html and http://camel.apache.org/file2.html to build more complex destination path.
6.3.2 Export API
Unomi provides REST Endpoints to manage export configurations:
- GET /cxs/exportConfiguration
- GET /cxs/exportConfiguration/{configId}
- POST /cxs/exportConfiguration
- DELETE /cxs/exportConfiguration/{configId}
This is how a oneshot export configuration looks like:
{
    "itemId": "exportConfigId",
    "itemType": "exportConfig",
    "name": "Export configuration sample",
    "description": "Sample description",
    "configType": "oneshot",
    "properties": {
      "period": "2m30s",
      "segment": "contacts",
      "mapping": {
        "0": "firstName",
        "1": "lastName",
        ...
      }
    },
    "columnSeparator": ",",
    "lineSeparator": "\\n",
    "multiValueSeparator": ";",
    "multiValueDelimiter": "[]",
    "status": "RUNNING",
    "executions": [
      ...
    ]
}
A recurrent export configuration is similar to the previous one with some specific information to add to the JSON like:
{
    ...
    "configType": "recurrent",
    "properties": {
      "destination": "sftp://USER@SERVER:PORT/PATH?password=XXX&fileName=profiles-export-${date:now:yyyyMMddHHmm}.csv&fileExist=Append",
      "period": "2m30s",      //Same as 'consumer.delay' option in the import source path
      "segment": "contacts",  //Segment ID to use to collect profiles to export
      "mapping": {
        ...
      }
    },
    ...
    "active": true,           //If true the configuration will start polling upon save until the user deactivate it
    ...
  }
6.3 Configuration in details
First configuration you need to change would be the configuration type of your import / export feature (code name 'router'):
#Configuration Type values {'nobroker', 'kafka'}
router.config.type=nobroker
By default the feature is configured (as above) to use no external broker, which means to handle import/export data it will use in memory queues (In the same JVM as Unomi). If you are clustering Unomi, most important thing to know about this type of configuration is that each Unomi will handle the import/export task by itself without the help of other nodes (No Load-Distribution).
Changing this property to kafka means you have to provide the Apache Kafka configuration, and in the opposite of the nobroker option import/export data will be handled using an external broker (Apache Kafka), this will lighten the burden on the Unomi machines.
You may use several Apache Kafka instance, 1 per N Unomi nodes for better application scaling.
To enable using Apache Kafka you need to configure the feature as follows:
#Configuration Type values {'nobroker', 'kafka'}
router.config.type=kafka

#Uncomment and update Kafka settings to use Kafka as a broker

#Kafka
kafka.host=localhost
kafka.port=9092
kafka.import.topic=import-deposit
kafka.export.topic=export-deposit
kafka.import.groupId=unomi-import-group
kafka.export.groupId=unomi-import-group
kafka.consumerCount=10
kafka.autoCommit=true
There is couple of properties you may want to change to fit your needs, one of the is the import.oneshot.uploadDir which will tell Unomi where to store temporarily the CSV files to import in Oneshot mode, it's a technical property to allow the choose of the convenient disk space where to store files to import. It defaults to the following path under the Unomi Karaf (It is recommended to change the path to a more convenient one).
#Import One Shot upload directory
import.oneshot.uploadDir=${karaf.data}/tmp/unomi_oneshot_import_configs/
Next two properties are max sizes for executions history and error reports, for some reason you dont want Unomi to report all the executions history and error reports generated by the executions of an import/export configuration. To change this you have to change the default values of these properties.
#Import/Export executions history size
executionsHistory.size=5

#errors report size
executions.error.report.size=200
Final one is about the allowed endpoints you can use when building the source or destionation path, as mentioned above we can have a path of type file, ftp, ftps, sftp. You can make it less if you want to omit some endpoints (eg. you don't want to permit the use of non secure FTP).
#Allowed source endpoints
config.allowedEndpoints=file,ftp,sftp,ftps
7 DX components and Marketing Factory
For a DX component to support personalization and optimization, it shall be a droppable content and shall not be a content list.
In others words, "add personalization" and "add optimization test" features are enforced by the definition below. For any area where you want to be able to test or personalize content, you'll need to authorize the nodetypes "wemnt:personalizedContent" and "wemnt:optimizationTest".
<bean id="Toolbar.Item.Personalize" class="org.jahia.services.uicomponents.bean.toolbar.Item">
        <property name="actionItem">
            <bean class="org.jahia.ajax.gwt.client.widget.toolbar.action.ExecuteActionItem">
                <property name="action" value="personalize"/>
                <property name="forbiddenNodeTypes" >
                    <set>
                        <value>wemnt:personalizedContent</value>
                        <value>wemnt:optimizationTest</value>
                        <value>wemmix:editItem</value>
                        <value>jnt:contentList</value>
                    </set>
                </property>
                <property name="requiredNodeTypes" value="jmix:droppableContent"/>
            </bean>
        </property>
        <property name="titleKey" value="label.edit.personalize@resources.marketing-factory-core"/>
        <property name="icon" value="/modules/marketing-factory-core/images/icons/personalize"/>
        <property name="parent" value="editmode.contextMenu"/>
        <property name="requiredModule" value="marketing-factory-core"/>
        <property name="visibility">
            <bean class="org.jahia.services.uicomponents.bean.Visibility">
                <property name="permission" value="canPersonalizeWithMarketingFactory"/>
            </bean>
        </property>
    </bean>
8 Conclusion
We have seen three different ways to interact with Marketing Factory, either purely from a client-side perspective using the Unomi REST API but requiring authentication to do so, using a combination of client-side code and Unomi plugin, or using the personalization API. If you are building a web client, our recommended approach would be to use the second approach since it makes for a much simpler client and avoid "leaking" the Unomi authentication details to Digital Experience Manager modules. Moreover, the second approach also reduces the number of roundtrip with the server and affords you greater control over what is accomplished.
However if you’re building a custom application (such as a desktop, mobile native application or an integration with a complex external web site), the personalization API is also very useful since it offers an easy yet powerful way to integration personalized content without needing a strong integration with neither DX nor the Unomi server.
Either way, we barely scratched the power of what Marketing Factory can do and how it can be extended to suit your needs.