Create your first Jahia Module
Modules in Jahia are a powerful concept. Designed to be plug&play, modules allow you to create applications sourcing content from Jahia, create template sets that provide the digital framework for your web projects or create extensions to the Jahia product. Modules are easy to create, and can be hot deployed at any time.
Before you begin
Jahia modules rely on Java and Maven. The key requirements are as follows:
- Access to a local Jahia system (usually a Docker instance)
- Oracle JDK 11 or OpenJDK 11
- Maven 3.9+
What you will learn
This tutorial is intended to get you started working with modules.
- module creation,
- deployment
- some automation principles
Create your first module
To create a new module:
Open a shell terminal (Windows, Linux or MacOS) and run the following command:
mvn archetype:generate -DarchetypeGroupId=org.jahia.archetypes -DarchetypeArtifactId=jahia-module-archetype -DarchetypeVersion=4.6
The parameters in the above command simply specify the specific archetype (including its version) that we want to use as a template for our Maven project.
The CLI will prompt you for details:
- Choose 'n' to the next question, you want to specify the project name and version yourself as illustrated below
Confirm properties configuration:
artifactId: sample
moduleName: Sample Module
groupId: org.foo.modules
jahiaVersion: 8.0.0.0
version: 1.0.0-SNAPSHOT
package: org.foo.modules
 Y: : n
Define value for property 'artifactId' sample: : myFirstModule
Define value for property 'moduleName' Sample Module: : My First Module
Define value for property 'groupId' org.foo.modules: : org.myorg.modules
Define value for property 'jahiaVersion' 8.0.0.0: : 8.1.0.0
Define value for property 'version' 1.0.0-SNAPSHOT: :
Define value for property 'package' org.foo.modules: : org.myorg.modules
Confirm properties configuration:
artifactId: myFirstModule
moduleName: My First Module
groupId: org.myorg.modules
jahiaVersion: 8.1.0.0
version: 1.0.0-SNAPSHOT
package: org.myorg.modules
 Y: : y
A folder myFirstModule was created, containing the source code of your Jahia module. We will now assume $MODULE_NAME=myFirstModule
Build a module
In this section we will generate a JAR file from the source code for deployment into a Jahia server.
- Change to the module's directory using:
cd $MODULES_DIR/$MODULE_NAMEreplacing
$MODULE_DIRand$MODULE_NAMEwith their equivalents if you didn't set them up as env variables if the first tutorial. -
We will then use the following command to build the project:
mvn -DsourcesRoot=/var/jahia/sources/$MODULE_DIR clean installwhere
$MODULE_DIRmust be replaced with the directory name of your module unless you have set it up as an environment variable. By default it should be equivalent to this:
mvn -DsourcesRoot=/var/jahia/sources/myFirstModule clean install
The-DsourceRootparameter is used to overwrite the default source location since we will be deploying inside a Docker container that has mounted the source code to another location. By default the plugin will use the current directory as the source location but in this case we override it to work properly inside the container instance.
Once the build is completed you should see the following result:
[INFO] BUILD SUCCESS
Your new Jahia packaged JAR module can be found in target/myFirstModule-1.0-SNAPSHOT.jar.
Deploying your module
You can deploy your new module using the following command:
mvn jahia:deploy -Djahia.deploy.targetContainerName=jahia-dev
The -Djahia.deploy.targetContainerName=jahia-dev parameter tells the Jahia maven plugin that we want to deploy to a Jahia instance running inside a local Docker container that is named jahia-dev, which is the name we set in the first tutorial.
In your server logs, if everything was successful, you should see something like this:
2023-04-03 12:41:35,850: INFO  [Activator] - --- Finished starting DX OSGi bundle myFirstModule v1.0.0-SNAPSHOT [195] in 23ms --
2023-04-03 12:41:35,874: INFO  [ModulesSourceSpringInitializer] - Mounting source for bundle My First Module
2023-04-03 12:41:36,043: INFO  [ModulesDataSource] - Registering CND from source file /var/jahia/sources/myFirstModule/src/main/resources/META-INF/definitions.cnd
2023-04-03 12:41:36,044: INFO  [JCRStoreService] - Previously deployed myFirstModule was done at : Mon Apr 03 12:39:43 UTC 2023, ignoring version myFirstModule / 1.0.0-SNAPSHOT / Mon Apr 03 12:09:21 UTC 2023
2023-04-03 12:41:36,100: INFO  [JCRSessionFactory] - Added provider module-myFirstModule-1.0.0-SNAPSHOT at mount point /modules/myFirstModule/1.0.0-SNAPSHOT/sources using implementation org.jahia.modules.external.ExternalContentStoreProvider
2023-04-03 12:41:36,118: INFO  [ModuleManagerImpl] - Start operation completed for bundle org.myorg.modules/myFirstModule/1.0.0.SNAPSHOT on target null in 1158 ms. Operation result: org.jahia.services.modulemanager.OperationResult@4d76ac65[bundleInfos=[org.jahia.services.modulemanager.BundleInfo@26d78299[bucketInfo=org.jahia.services.modulemanager.BundleBucketInfo@64b9c1f5[groupId=org.myorg.modules,symbolicName=myFirstModule],version=1.0.0.SNAPSHOT]],message=Operation successful]
2023-04-03 12:41:36,150: INFO  [BundleStarter] - Finished starting 1 bundle(s)
2023-04-03 12:41:36,150: INFO  [ModuleFileInstallHandler] - Done processing FileInstall artifacts
Activating a module on a site
Once deployed on Jahia, modules can be activated on specific sites. By default, upon deployment, modules are not available to use on any site, and require activating them for use on any specific site. This allows for a granular deployment of features across a multi-site platform.
To activate a module on a site, follow these steps:
- Open a browser at the following URL: http://localhost:8080
- Login at the top right if needed (login : root/root1234)
- Click on "Root" and select "Page Composer"
- Once the UI as loaded click on the Gear icon at the bottom left of the screen (Administration)
- Click on "Modules and extensions" and then "Modules"
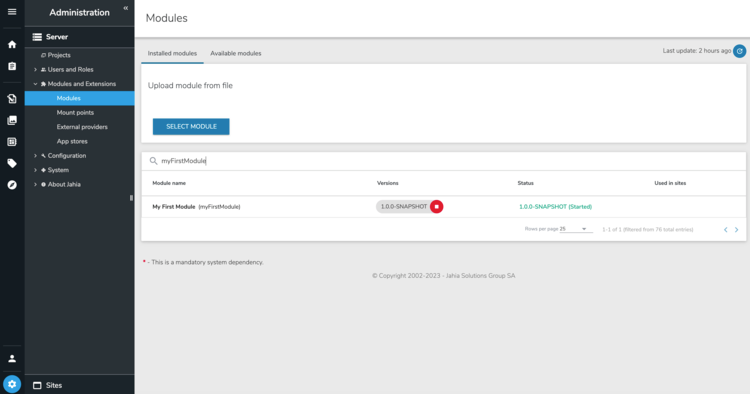
- In the search bar click on it and type: myFirstModule which should display your newly created module!
Look for the module myFirstModule and click on this name. The following section will list all sites available, and allows you to activate this module on specific sites. Click on the toggle at the right "digital" site to enable the module only for that site.

Now in your browser access the following URL : http://localhost:8080/cms/render/default/en/sites/digitall.myFirstModule.html.ajax
and you should see this output:
Now open the following file in the module's source: src/main/resources/jnt_virtualsite/html/virtualsite.myFirstModule.jsp
<html>

<h1>Settings example UPDATED</h1>
Now reload the page in the browser and you should see your changes directly as illustrated below:
Did you notice you didn't have to rebuild or redeploy anything to get this change? This is because of Jahia's Deploy-free coding technology that enables changes to be loaded directly from the source code! And it even works with Docker containers.


