Server and Site Settings
Server and site settings are configuration screens that can be displayed in the 'Administration' section of Jahia, or in the 'Settings' section while editing a site. Custom settings are very useful when implementing new features that need to be made configurable. Setting panels can also be used to display dashboards specific to a need. Site or server setting panels can be created using the Jahai Studio or via a simple XML file in the src/main/imports folder of a Jahia module.
Before you begin
Jahia modules rely on Java and Maven. The key requirements are as follows:
- Access to a local Jahia system or the free cloud trial from Jahia
- Oracle JDK 11 or OpenJDK 11
- Maven 3.3+
- Completion of the following tutorials:
- The IDE of your choice
- Access to the Jahia administration console
What you will learn
This tutorial will teach you how to build a site setting panel using the Jahia Studio, the same approach applies to creating a server setting panel
Create a setting panel
From a technical perspective, a setting panel is a specific type of content template created under a specific template node named site-settings-base. The Studio interface will guide you through the creation of this structure. The setting panel template is a regular Jahia template where content nodes can be contributed. These content nodes will display the views used to render the panel.
These are the steps to create a site setting panel:
- Create a content type and a view for the panel
- Create the site panel template
- Add the content type to the template
- Activate the module on the site(s) where the setting panel will be used
- Test the site setting panel
For this tutorial, we are going to use the following nodetype definition
[jnt:customSiteSettingPanel] > jmix:studioOnly, jmix:structuredContent
And the following associated view:
<%@ page language="java" contentType="text/html;charset=UTF-8" %>
<%@ taglib prefix="template" uri="http://www.jahia.org/tags/templateLib" %>
<%@ taglib prefix="c" uri="http://java.sun.com/jsp/jstl/core" %>
<%@ taglib prefix="fn" uri="http://java.sun.com/jsp/jstl/functions" %>
<%@ taglib prefix="fmt" uri="http://java.sun.com/jsp/jstl/fmt" %>
<%@ taglib prefix="jcr" uri="http://www.jahia.org/tags/jcr" %>
<%@ taglib prefix="ui" uri="http://www.jahia.org/tags/uiComponentsLib" %>
<%@ taglib prefix="functions" uri="http://www.jahia.org/tags/functions" %>
<%@ taglib prefix="query" uri="http://www.jahia.org/tags/queryLib" %>
<%@ taglib prefix="utility" uri="http://www.jahia.org/tags/utilityLib" %>
<%@ taglib prefix="s" uri="http://www.jahia.org/tags/search" %>
<%--@elvariable id="currentNode" type="org.jahia.services.content.JCRNodeWrapper"--%>
<%--@elvariable id="out" type="java.io.PrintWriter"--%>
<%--@elvariable id="script" type="org.jahia.services.render.scripting.Script"--%>
<%--@elvariable id="scriptInfo" type="java.lang.String"--%>
<%--@elvariable id="workspace" type="java.lang.String"--%>
<%--@elvariable id="renderContext" type="org.jahia.services.render.RenderContext"--%>
<%--@elvariable id="currentResource" type="org.jahia.services.render.Resource"--%>
<%--@elvariable id="url" type="org.jahia.services.render.URLGenerator"--%>
<h1>My Custom site setting</h1>
<p>A site setting panel can be used to develop custom dashboards or configuration panels for a site.</p>
<p>They are made of one or more components and assembled in the studio.</p>
<p>Site settings panels can be used to render configuration forms who will store parameters in the JCR, run queries, etc.</p>

<div>
 <form action="?">
   <div>
     Setting1: <input type="text" name="setting1" />
   </div>
   <div>
     Setting2: <input type="text" name="setting2" />
   </div>
   <div>
     Setting3: <input type="text" name="setting3" />
   </div>
   <div><input type="submit" value="Save configuration" />
   </div>
 </form>
</div>
Create a site panel entry
In order to create the site panel, access the studio and click on the second tab display the red page hierarchy in red. This will display the list of templates (if any).
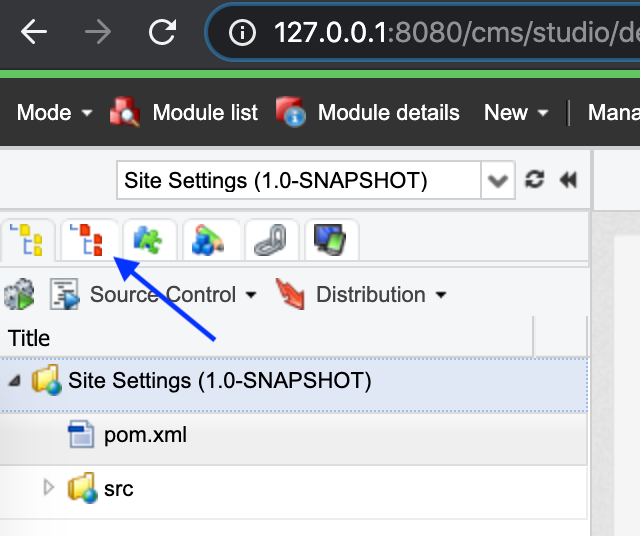
Then, right click on 'Templates', the menu on the left should appear. Click 'New Site Settings Base Template'
A new template folder called “site-settings-base” gets created with one child template “settings-panel” as shown:

Contribute the content type to the site panel
Once the site panel template has been created, click on it, enable its main content area by clicking the top-right corner of the area, and click Any content

Pick customSiteSettingPanel and save the new content.
Access the site setting panel
On jContent, click Settings. The new site setting panel should appear.
The only thing left is to fine tune of view of the content type that was created to have the site setting panel do something read.
