Jahia supports different formats for importing content, based on XML.
XML Import files can be packaged inside a zip file if multiple import files need to be imported, if binary files are present in the import, or if multiple workspace (default and live) needs to be imported.
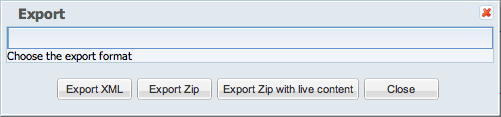
When exporting a node, multiple options are available :
Import also supports legacy formats, for migration of older versions of Jahia.
JCR Document view
The principal format that is used is based on the standard document view from the JCR specifications. In this simple format, each node is an XML tag, and each property is an XML attribute. This format directly reflects the structure that is used to store content inside the JCR.
A simple news from the ACME demo site will be exported like that :
<news_36 image="/sites/ACME22/files/images/generic-pictures/illustration8.jpg" j:defaultCategory="/sites/systemsite/categories/project"
j:lastPublished="2011-10-17T11:15:42.161+02:00" j:lastPublishedBy="root" j:originWS="default" j:published="true"
jcr:created="2011-02-01T16:40:07.725+01:00" jcr:createdBy="root" jcr:lastModified="2011-10-17T13:24:53.353+02:00"
jcr:lastModifiedBy="root" jcr:mixinTypes="jmix:accessControlled jmix:categorized" jcr:primaryType="jnt:news">
<j:translation_en desc="<p> From the concept to completion, it took 6 yecdscdsars for this building of 180-metres high ..."
j:lastPublished="2011-10-17T11:15:42.161+02:00" j:lastPublishedBy="root" j:published="true" jcr:language="en"
jcr:lastModified="2011-10-17T13:24:53.321+02:00" jcr:lastModifiedBy="root" jcr:lockIsDeep="false" jcr:lockOwner="root"
jcr:mixinTypes="mix:title" jcr:primaryType="jnt:translation" jcr:title="New 5 stars hotel in Hong Kong build by ACME Contruction"/>
<j:translation_fr desc="<p> De la conception à la réalisation, il a fallu 6 ans pour ce bâtiment de d..."
jcr:language="fr" jcr:lastModified="2011-02-01T16:40:14.671+01:00" jcr:lastModifiedBy="root" jcr:mixinTypes="mix:title"
jcr:primaryType="jnt:translation" jcr:title="Nouvel hôtel 5 étoiles à Hong Kong, construit par ACME International"/>
</news_36>
Export ZIP : Export with binaries
This option will include the binaries along with the XML export file.
The XML document view is called repository.xml. All binaries associated to nodes in repository.xml will be stored in a content sub-directory.
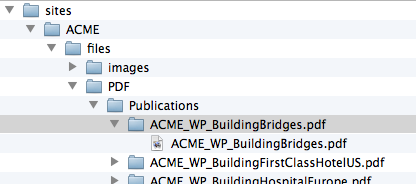
The path of the binary file is based on the path of the nt:resource node in the tree. As multiple binary resources can be associated to a single file node (for example for thumbnails), a folder with the name of the file node is created. For each nt:resource node, a file is created. The file corresponding to the jcr:content node will have the same name as the file node.
For a file node which path is /sites/ACME/files/PDF/Publications/ACME_WP_BuildingBridges.pdf, the export will look like :
Export ZIP with live content
In the case of an export containing live content, the document view file will be called live-repository.xml, and associated binaries will be in live-content .
Legacy formats
Content export files from Jahia prior to version 6.6 uses a different format, based on the page / container lists / container structure. This format is still supported for compatibility, and can eventually be used along with a mapping file for migration purpose.
Other legacy formats are supported for specific content import :
The file categories.xml allows to import categories in the system site
The file users.xml imports users and groups
The file filesacl.xml imports ACLs and metadata on files
Export types
Branch export
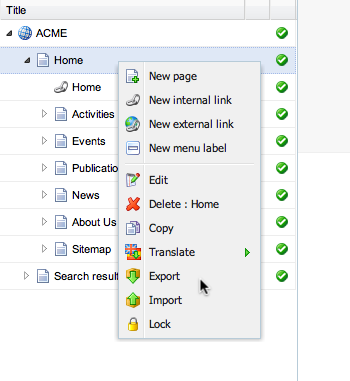
This is the standard export, which can be obtained on any node, with the export action in the context menus. It will contains a document view of the node and all its sub nodes.
Branch exports can be imported with the import option in the context menu - a new node will be created with all the content of the export file.
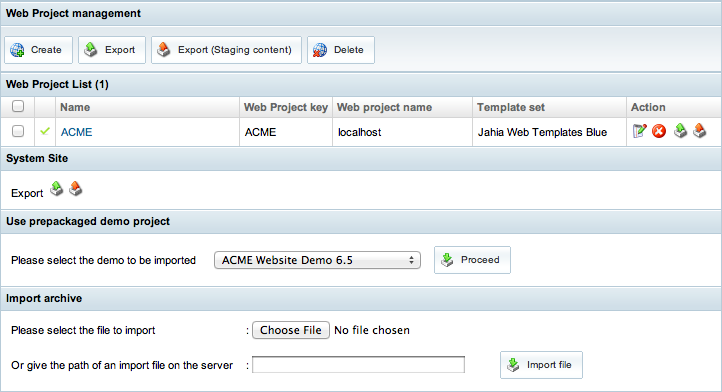
Site export
A site export can be obtained through the administration. Compared to the branch export, it contains additional information, stored in a site.properties file. A full export with live and staging content is available. It is also possible to export the staging content only.
The export file is packaged into a ZIP containing an export.properties file, one zip for the users, and one zip for each exported site.
A site export can be imported in the administration only, with the Import archive option.
Scripting export
You can directly call the Export service, for instance from a shell script, to automatize site or content exports.
Export can be used to backup a site or a full Jahia server. A full export with live content can be used for this purpose : the site will be restored in the same state as it was exported.
Note that content versions are not exported - only the current state of the web project is backed up.
Migration
As Jahia supports legacy import formats, it can be used to migrate content from a version prior to 6.6. The use of mapping files can help to map container and fields to a new content structure.
External content import
The format of the document view is easily understandable and can be generated by an external system.
Publication
The publication service allows you to transfer content from staging modes (edit/contribute) to live repository where this content will be available for end users.
Publication UI
Publish / Publish all / Publish site
Publication can be triggered by using the publication menu, with the different options :
Publish currently selected node : This option will publish the selected node and its subnode stopping when encountering a node marked has having a different publication process (by default pages have different publication processes).
Publish all under currently selected node. This option will publish the selected node and its subnode and will not stop on any node so it will publish the whole subtree.
Publish all site. Publish the complete site, with files and contents.
In all cases, the content is published only in the current language.
Unpublish content
Mark the selected node has not published anymore (marking it as not valid in live repository).
Show status
This option displays detailed status for the current page, showing which content has been modified or need publication.
Each content has its own individual status, as shown when displaying publication status or in the publication dialog :
Published : The content is currently published and unmodified
Modified : Staging content has been modified
Not published : Content has never been published yet
Mandatory language required : Mandatory content has not been filled in a mandatory language - cannot publish
Conflict : Different content with same name already exists - cannot publish
Unpublished : Content has been unpublished
Marked for deletion : Content will be deleted when publishing
Publication manager
This popup a window displaying the tree of nodes having different publication process (by default only pages). For each node you will see its status (including status of subnodes as an aggregate of the node status). If you can start a publication on the node the checkbox will be active.
Publication dialog
When starting a publication, a dialog appears. If a workflow is available, the first tab “action” and second tab “comments” lets you fill information that will be passed to the reviewer. The tab “publication infos” display the list of all items that are being published, with their current status. You can start the workflow or use “bypass workflow” to publish directly, if you’re allowed to do it.
Publication workflow
A workflow is associated to “publish” and “unpublish” action, and allows another user to review the publication before actually doing it. You can change the workflow at any level of the page tree by using the “workflow” tab.
Implementation
Workspaces
Workspaces are a JCR concept - a workspace is a persistent data store, containing all nodes and properties. Jahia defines two workspace - live and default. These two workspaces may contain the same nodes, but in different versions - each node has a version in default and/or a version in live. Content nodes are created in staging before going live. Publication service is responsible of copying content from default to live and maintaining the different versions.
Versioning concepts
Every versioned node has a version history node, which is stored in a special store, visible from all workspaces. This version history contains all node versions since the creation of the node. If a node exists in a workspace, it points to one specific version in the history. Each version has predecessors and successors.
New versions are created when “checking in” a node : a new entry is created in the version history, the previous versions is set as a predecessor, and the content of the node is copied into a “frozen node” under the version.
When a node is published, one version is created in default, the changes are applied to the live node, and a version is created in live. There are 2 parallels linear history, one per workspace.
Publication nodes tree
When the user asks to publish a page, Jahia gather the status of all sub-nodes in the same publication process and displays it in the “publication infos” tab. Nodes that have the “jmix:publication” mixin are marked as being part of another publication process. By default, pages, files and folders have this mixin.
The JCRPublicationService.getPublicationInfos() is responsible of building this tab - it returns the list of nodes to publish and their status, depending on the parameters being passed.
uuids : the list of identifiers from which the publication starts (page id, for example)
languages : the list of languages to publish , null for all languages
includeReferences : whether or not to include the referenced nodes
includeSubnodes : go down to the tree, stopping at nodes which are in a different publication process (nodes with jmix:publication mixin)
allsubtree : go down into the whole sub tree, including jmix:publication nodes (requires includeSubnodes=true)
sourceWorkspace : “default”
destinationWorkspace : “live”
This returns a PublicationInfo object, containing the tree of objects to publish, including the references if includeReferences was set to true. The getAllUuids() can be used to get all individual ids to publish.
Publication algorithm
The publication is done by calling the method JCRPublicationService.publish() method, with the following parameters :
uuids : the full list of individual node ids to publish - usually returned by the getPublicationInfos() method
sourceWorkspace : “default”
destinationWorkspace : “live”
checkPermissions : whether or not to check the “publish” permission for the current user on each node
updateMetadata : updates the publication metadata (usually true, except when importing content)
comments : publication comments
The publication service will then do the following:
Camel uses routes to define how your messages should be handled across your network. Jahia provides you two ways to register your routes from Spring inside the applicationcontext-camel.xml file, or using the API through the CamelNotificationService.
By default we provide a source to notify users through mails named seda:users?multipleConsumers=true you need to use the full URI to refer to it.
The CamelNotificationService allows you to call any route and send a message to this route.
Map<String, Object> map = new HashMap<String, Object>();
map.put("To", MailService.getInstance().getSettings().getTo());
map.put("From", MailService.getInstance().getSettings().getFrom());
map.put("Subject", "Camel rocks");

String body = "Hello.\nYes it does.\n\nRegards.";

camelNotificationService.sendMessagesWithBodyAndHeaders("seda:users?multipleConsumers=true",body,map);
There is also a shortcut to send a mail directly :
camelNotificationService.sendMail("seda:users?multipleConsumers=true","Camel Rocks",
  "<html><body><h1>Camel Rocks</h1><p>Camel Complex Mail Test</p></body></html>",
  "Camel Complex Mail Test", MailService.getInstance().getSettings().getFrom(),
  MailService.getInstance().getSettings().getTo(),null,null);
This way the notification system is more like a message system, now in your modules you can use this service to register your own routes and call them in your action or just use the default ones to send mails to users when an action is performed.
We provide consequences for the rules system that allows to send mails.
rule "notify user (create)"
    when
       A new node is created
                - the node has the type jnt:user
                - its name is not guest
                - its name is not root
    then
        Notify new user with mail template "/notifications/templates/mail/newUser.vm"
end
Sending Mail with templates
You can use a template written with your preferred script language to design your mails, each mail will use two templates. One for the body and one for the subject.
For example in the Jahia Form Builder modules we define a MailAction that will send the submitted form by mail. We have defined a mail template in /action/mail/body.vm for the body and jahia will assumed the subject template to be named /action/mail/body.subject.vm (same name, same extension).
Here how to send the mail from you action (extract from MailAction):
//Define where to send the mail
String toMail = UserPreferencesHelper.getEmailAddress(to);

//Define objects to be bound with the script engine to evaluate the scripts
//Same bindings for body and subject
Map<String,Object> bindings = new HashMap<String,Object>();
bindings.put("formDatas",formDatas);
bindings.put("formNode",node.getParent());
bindings.put("submitter",renderContext.getUser());
bindings.put("date",new DateTool());
bindings.put("submissionDate", Calendar.getInstance());
bindings.put("locale", resource.getLocale());

// Send the mail to the specified address from the account defined in the Jahia Settings
camelNotificationService.sendMailWithTemplate(mailTemplatePath,bindings,toMail, MailService.getInstance().getSettings().getFrom(),
                                              null,null,resource.getLocale(), "Jahia Form Builder");
Logging
Jahia includes a simple yet powerful logging service that can be used to generate traces of system events at a very high speed.
Architecture
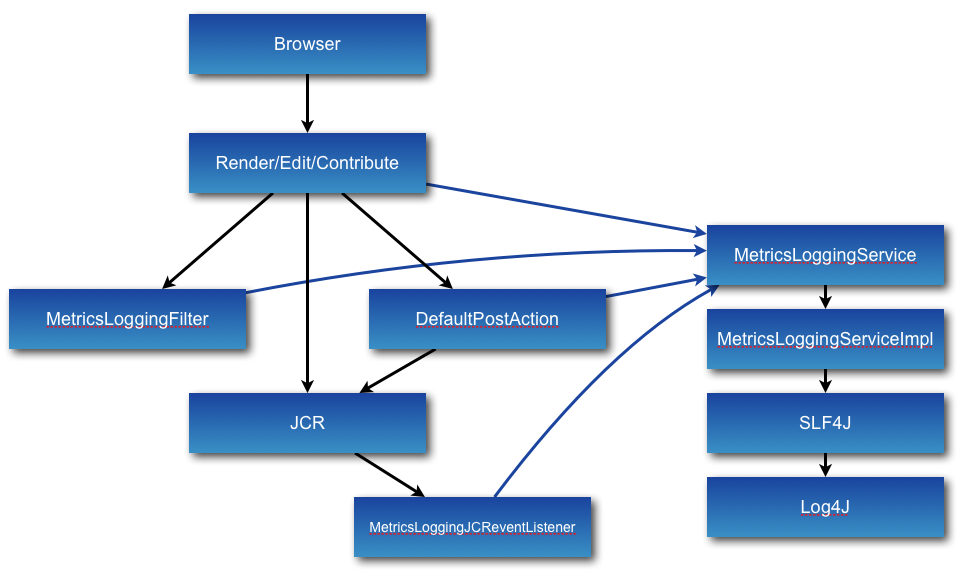
The figure below illustrates the architecture of the logging service. The main interface is the MetricsLoggingService API which includes methods to perform logging. The default implementation is the MetricsLoggingServiceImpl class.
The black arrows represent the actual path for content processing and rendering, while the blue arrows represent the calls to the logging service to trace the events being performed in the system.
As you can see, the default implementation uses the SLF4J Java library to perform the logging, but this could be modified by provided another implementation if the need be. SLF4J by default is configured to use the Log4J logging library that has been integrated in Jahia since its inception.
Below the JCR API, we have a listener class that will trace events as they are being performed directly on the JCR nodes, in order to trace modifications performed on the content tree either through the regular user interface or through custom JCR clients.
Default configuration
By default, Jahia will use the logging service to log the following information :
Content events : this could be module viewing, content being created, updated or removed. The log will be created in files named : jahia_access.log*
Profiling information : this log will contain profile information for the rendering times of different modules, very useful to track overall system performance. This logging has a minimal overhead (less than 5%). The log will be created in files named : jahia_profiler.log*
Examples
You can find example on how to post-process log files to extract usage data in the mod-default module. It features two examples - one contains a list of the top ten visited pages, based on site navigation by users, and the other is a recommendation system similar to what major online retailers feature that analyzes user sessions to build recommendations on content such as "users that have viewed this content has also viewed...". Please refer to that module's documentation for more details.
Event templates
Jahia's logging service uses the SLF4J library to perform it's logging, and therefore can use its formatting anchors to customize the logging messages. Jahia regroups similar message formats into what is called "event templates", that may be configurable, although we provided default formats out of the box (for more information see the configuration section below).
Here is a list of the used event templates inside Jahia's logging system :
pageViewed : indicates the processing of an HTTP GET request. This can be a request for a full content page or a simple node, but is not generated for child objects.
nodeCreated : indicates a JCR node has been created.
nodeUpdated : indicates a JCR node has been modified.
nodeDeleted : indicates a JCR node has been deleted.
moduleViewed : indicates that a module (or node) has been viewed. Contrary to the "pageViewed" event, this is generated for each node that is part of a global HTTP GET request.
Configuration
We present in this section the configuration files involved in settings up the logging service and it's various components. Please note that in general it is recommended to make as few changes as possible, as it will make migration to more recent versions of Jahia easier, since there will be less customization to merge.
This Spring configuration provides both the implementation of the Jahia logging API as well as the event templates setup. Unless you have a strong need for another implementation, we recommend you use the default service implementation, but you might have a need to customize the event templates, in order for example to ease post-processing of the logs.
    <bean id="loggingService" class="org.jahia.services.logging.MetricsLoggingServiceImpl" factory-method="getInstance">
        <property name="logTemplatesMap">
            <map>
                <entry key="moduleViewed" value="module viewed with template {}"/>
                <entry key="pageViewed" value="page viewed with {} from {}"/>
                <entry key="nodeUpdated" value="node updated with {}"/>
                <entry key="nodeCreated" value="node created with {}"/>
                <entry key="nodeDeleted" value="node deleted"/>
            </map>
        </property>
    </bean>
WEB-INF/etc/config/log4j.xml
The default configuration provides a Log4J XML configuration that provides two categories that are used by the logging service : loggingService and profilerLoggingService. The first is used to trace content event operations, while the second is used to log all profiling information.
Here below we present an extract of the log4j.xml file with the relevant sections. Note that the appenders, that are responsible for setting up the logging to the destination are presented first, and then the required categories simply have references to the declared appenders.
As you can see in the above configuration, the logging JCR event listener is configured only for the "default" workspace, which is the editing workspace. Also note that the event listener can take a nodeTypesList parameter that can contain a List<String> of JCR node types to listen to. If none are specified, all the node types will be logged.
History
By default, content history is kept for a year, and a job is executed every year to purge the content that is older than a year. This document explains how to modify this default configuration to fit your needs.
In Jahia 6
The following section in the WEB-INF/etc/spring/applicationcontext-scheduler-jobs.xml contains the configuration for the frequency of execution of the script that will purge the content history :
    <bean id="contentHistoryPurgeTrigger" class="org.springframework.scheduling.quartz.CronTriggerBean">
        <property name="jobDetail" ref="contentHistoryPurgeJob"/>
        <!-- run every minute to debug -->
        <property name="cronExpression" value="0 0 0 L DEC ? *"/>
    </bean>
The value you want to change is the cronExpression. For more information on the CRON syntax, please refer to the following URL : http://www.quartz-scheduler.org/docs/tutorials/crontrigger.html
Then in the WEB-INF/var/scripts/groovy/purgeContentHistory.groovy file, you can modify the date for purging the history. Here is the default configuration :
    // This removes all history older than a year.
    calendar.add(Calendar.YEAR, -1);
In the file "DIGITAL_FACTORY_HOME/digital-factory-config/jahia/applicationcontext-custom.xml", add between the tag "<beans>" the following code to change the frequency of execution of the script :
<bean parent="jobSchedulingBean">
        <property name="jobDetail">
            <bean class="org.springframework.scheduling.quartz.JobDetailBean" depends-on="settingsBean">
                <property name="name" value="ContentHistoryPurgeJob" />
                <property name="jobClass" value="org.jahia.services.scheduler.JSR223ScriptJob" />
                <property name="group" value="Maintenance" />
                <property name="description" value="Content history purge" />
                <property name="jobDataAsMap">
                    <map>
                        <entry key="userkey" value=" system " />
                        <entry key="jobScriptAbsolutePath" value="#{settingsBean.jahiaVarDiskPath}/scripts/groovy/purgeContentHistory.groovy" />
                    </map>
                </property>
            </bean>
        </property>
        <property name="trigger">
            <bean class="org.quartz.CronTrigger">
                <property name="name" value="ContentHistoryPurgeTrigger"/>
                <!-- run every year -->
                <property name="cronExpression" value="0 0 0 L DEC ? *"/>
            </bean>
        </property>
    </bean>
The value you want to change is the cronExpression. For more information on the CRON syntax, please refer to the following URL : http://www.quartz-scheduler.org/docs/tutorials/crontrigger.html
Then in the "DIGITAL_FACTORY_HOME/digital-factory-data/scripts/groovy/purgeContentHistory.groovy" file, you can modify the date for purging the history. Here is the default configuration :
    // This removes all history older than a year.
    calendar.add(Calendar.YEAR, -1);
Jahia CMS comes with a versioning system based on the JCR API.
The versioning system have two different behavior, one for files (binaries) and another one slightly different for other content types.
On files every time you upload a file with the same name we offer the possibility to create a new version of this file so you can always restore an older version or access it.
For content there is no version in the default workspace, versions are only created when publishing this content.
When you publish a batch of content and/or files we increment the version of the impacted elements (mainly all the modified contents that are part of this batch of publication).
To see how it works, import the ACME demo site in your Jahia 6.6, publish everything.
Now select the rich text under "How to use this demonstration ?", edit it go to the versioning tab, you will see only one entry displaying your date of publication.
Now go to the content tab and modify the rich text by adding some content or changing the existing one, then save.
To know that some content has been modified on this page we can refresh the left tree displaying the pages tree with there publication status, our home page should appear with a red dot next to it.
We can also display the publication status from the publication menu in the toolbar, this will highlight the zone where some content has been modified.
Edit once again this rich text and go to the versioning panel, we still have only one version as this content is not published yet, click on the "Compare with staging version" to compare you two version.
You can also select the content in the page and then use the compare menu entries from View menu in the toolbar. You can compare at the page level for example (select the page and click on "Compare staging vs live version" in the View menu.
Publish your modification. In the Versioning panel on your rich text you should see two version now. Compare the oldest version with the staging and restore it by clicking on the "Restore" button on the top left corner of the opened window, when you close everything your rich text is back to its original value, if you publish it again that will create a new version.
The restore function is only available on a content level, you can not restore a whole page directly to a certain state. Pages are much more complexed objects than what meets the eyes (If we restore a page what do we do of its child pages, do we restore also the templates, etc.)
You can display any version of an URL by passing a date (in a long format) as a parameter http://localhost:8080/jahia/cms/render/default/en/sites/ACME/home.html?v=1305815700000 Jahia 6.6 will retrieve the state of the content at this date and all displayed content we will be displayed at this date (files, etc.) the only exception is the queries that will return results from the present and not from the past, indexes have no version.
When you restore a file this will automatically create a new version, like you have uploaded a new version. This is not the case for the content, the only versioning on content is on publication.
Workflows
Jahia works with a business process engine to manage its workflows. It is mainly used for publication operation, which usually require user validation and eventual interaction with external systems. However, it is possible to use the process engine for other operations, either operations related to Jahia, or purely business oriented workflow.
Jahia is bundled and configured with the jBPM process engine.
Workflow declaration
Workflow processes need to be deployed into the process engine and declared in Jahia to be used by the site administrator and end-users.
See "Using jBPM" for information about how to create and deploy process with the jBPM process engine.
Once the workflow is available in the process engine, it has to be registered to the workflow service. This can be done by creating a spring bean org.jahia.services.workflow.WorklowTypeRegistration in the module. This bean has to declare multiple properties :
definition : the key of the process definition, as declared in jBPM.
type : the type of workflow , like publish , unpublish , or any other name. Each workflow need to be associated to a workflow type . Only one workflow per type can be associated to a node - for example, if multiple publication workflow exist, one need to be choosed at a specific level.
forms : a map from task name to task data node type. If a node type is associated to a task, a task data node will be created under the task, and will be available for modification by the user completing the task. The task data can be filled with task input parameters, and its values can also be mapped with output parameters to the process variables. In the user dashboard from edit mode, a form based on that node type will be displayed to the user when he will complete the task. In the "my tasks" components, the task data node is displayed with the view "taskData" of this type.
permissions : This is an optional map defining the mapping between workflow actions and Jahia permissions. The map contains the workflow action as the key, and the permission full path as the value. A user need to be part of a role containing that permission to be able to execute the workflow action (see Roles). Note that the permission name to use can be based on a custom variable that has been set previously in the workflow context : in the translationWorkflow, the permission jcr:modifyProperties_default_$translateTo will be replaced by jcr:modifyProperties_default_en if the variable translateTo has been set to en. If no permission is defined for a task, a specific permission will be automatically created.
canBeUsedForDefault (since Jahia 7) : If the workflow definition will be available by default on all nodes, without having to setup a workflow rule.
defaultPriority (since Jahia 7) : If multiple workflows have "canBeUsedForDefault" , the one with the highest priority will be taken.
Workflow can be started and executed on a node. Workflow are always tied to a node - it can be a page, user, or any simple node - workflow rules (which workflow can be started) and roles (who can execute the tasks) will be set on these nodes, or on parent nodes, and are inherited on all sub nodes.
Workflow rules
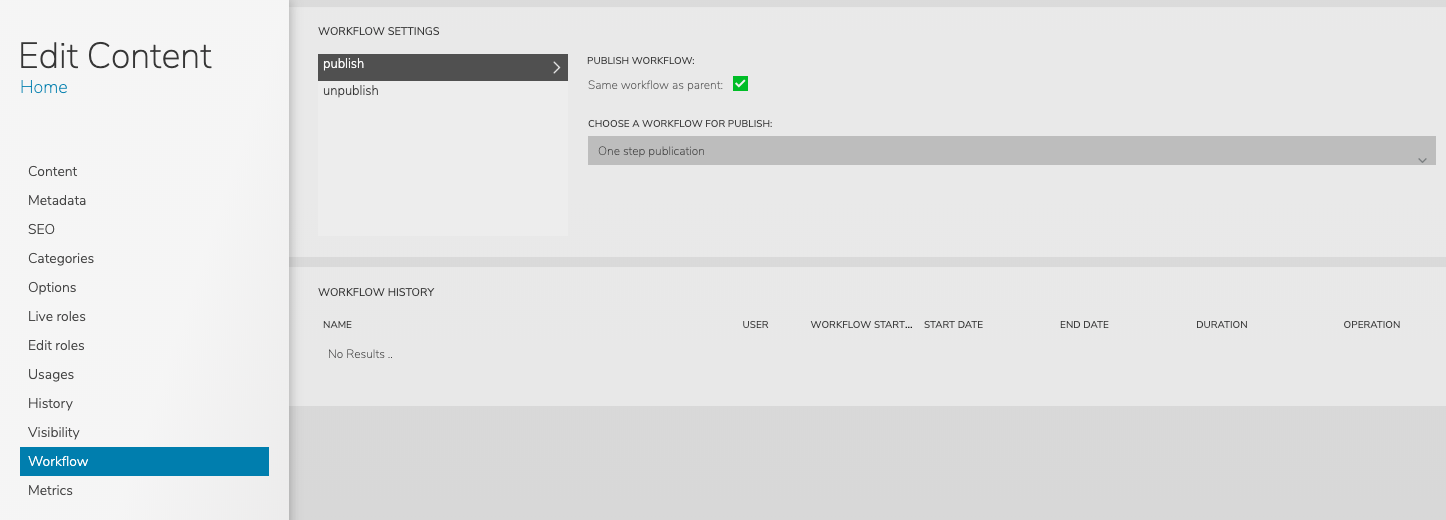
Workflow rules define which workflow can be started on which node. This can be set in the workflow tab of the edit engine.
For every workflow type listed on the left, a drop-down menu allows to select (or deselect) a workflow. The "same workflow as parent" checkbox must be unchecked to select a new workflow.
Once saved, the workflow will be available for the users having the permission to start it.
Roles
Workflow is about interaction between users - some users can start a workflow, which will require other action by other users. Jahia permissions and roles allow to set up the possible actions for every user and group in the system.
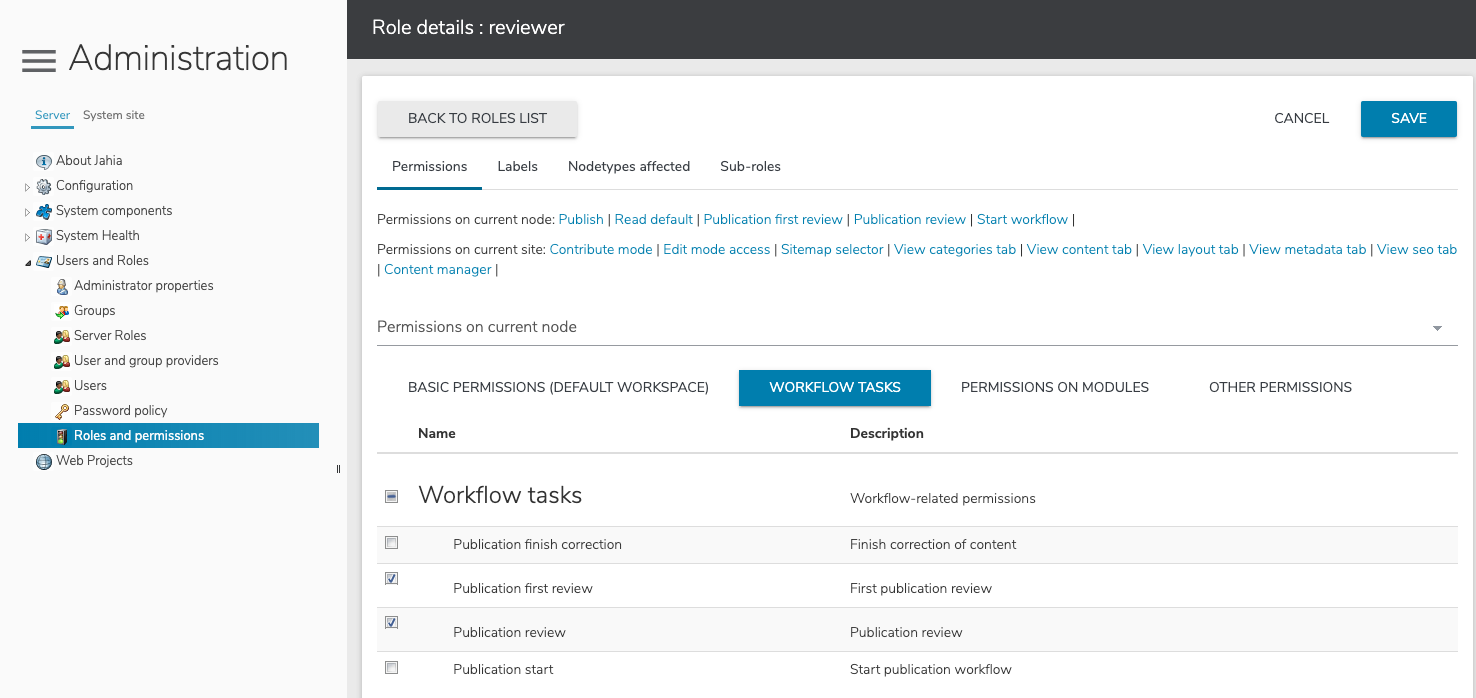
When declaring a workflow, a mapping between workflow actions and Jahia permissions is defined. In order to start a workflow or being able to assign and execute a task, a user must have the matching permission, via a role. If no specific mapping is specified, a permission is automatically created for every task in /permissions/workflow-tasks/. See Workflow declaration on how to declare a workflow and a custom permission mapping.
Workflow permissions, like other permissions, are assigned to roles via the roles manager in the administration :
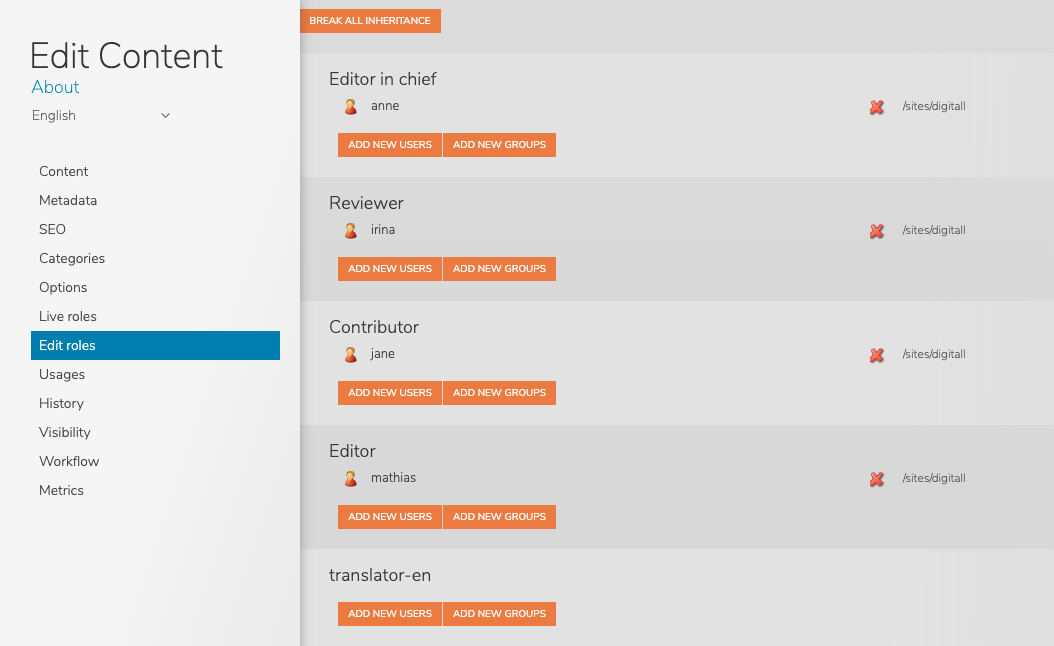
Users and groups are assigned to roles with the Roles tab of the edit engine.
Starting and executing the workflow
Once a workflow rule has been set, a user who has the right to start a workflow on a node should see it in the workflow / start workflow menu :
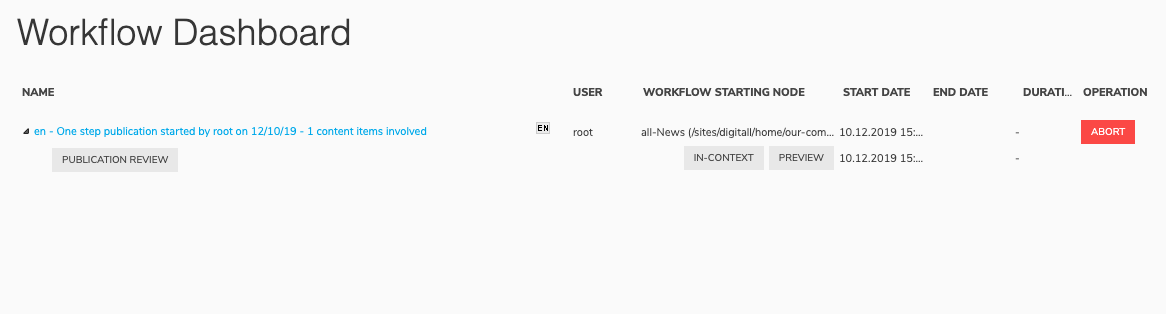
A workflow will probably create tasks that will be assigned to users who have a role matching the required permissions. A user who has waiting task can execute them by opening his dashboard in workflow / Workflow Dashboard :
A user can also check and execute its tasks in the "My tasks" section of the start page.
This file contains references to other services, the path used by jBPM to get the process definitions, and location of the jBPM configfile.
The JBPMModuleProcessLoader bean, which is loaded in the context of every module, defines where the system will look for the process definition files. This bean is defined in :
As you can see in the jBPM configuration file, we use a wildcard classpath lookup to search for the BPMN workflow process definition files. This means that you can simply put in your module in the proper package (by default under org.jahia.modules) a file with the extension bpmn2 and it will be picked-up on Jahia's startup. In order to be available in Jahia, the process must also be declared in a configuration file - see Workflow declaration
jBPM forms
jBPM allows to associate a form to a task - in Jahia, this form is actually defined by a simple node type. This node type will create the form, and the data will be stored like a standard JCR node in the process engine. Forms are associated to tasks by a mapping in the workflow registration - see Workflow declaration for more details
Here, the "request" task uses the "jnt:translationRequest" as a form :
The execution of this task will display a form in all the engine automatically that the user will need to fill. Data entered in this form can later be used in other work items.
For using/rendering your form in html pages using the tasks modules, you will need to define a view of that form.
To be used by the tasks module the view must have the name taskData, here's an example from the workflowRemotePublicationForm.taskData.jsp file :
jBPM needs to know how to assign new tasks to users when the task is created. Depending on the roles assigned to the node, the task won't be assigned to the same users and groups. Jahia will automatically assign the task to the users or groups who have the correct permission when the task is created. Subsequent changes to the roles won't be visible for existing tasks.
Using jBPM customs work items handlers
At one point of the process, it can be required that the process need to interact with Jahia services. For instance, a publication workflow will probably need to publish some nodes after a validation. There's multiple ways to do this with jBPM, but the simplest way is to create custom handlers - a few handlers are provided with Jahia, to lock/unlock nodes and publish/unpublish nodes. They are located in org.jahia.services.workflow.jbpm.custom.* .
Handlers need to be registered in your module spring file with a name, which will be used in the bpmn files in the drools:taskName property of a task. For instance, the following handler can be defined :
And it will be used in a process by the following task :
<bpmn2:task id="Task_16" drools:taskName="Unlock node" name="Unlock the node">
Sharing data between tasks
You can share variables between tasks using Input/Output variables. On Eclipse, when editing a task, just switch to the "I/O Parameters", and define your Input and Output variables.
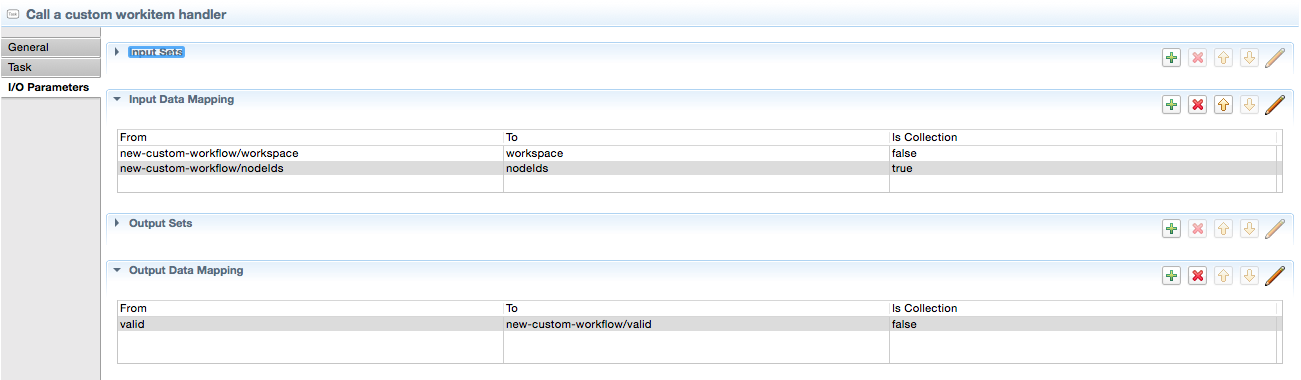
For example, if your task requires workspace and nodeIds as inputs, and needs to define a boolean "valid" as output, you should have the following configuration:
In the .bpmn2 file, it will be represented like this :
Using the WorkItem input variable, you can retrieve input data or set output data in your WorkItemHandler :
@Override
public void executeWorkItem(WorkItem workItem, WorkItemManager workItemManager) {
   // Retrieving input data
   List<String> nodeIds = (List<String>) workItem.getParameter("nodeIds");
   String workspace = (String) workItem.getParameter("workspace");

   /*
   ... Your code here ...
   */

   Boolean result = false;

   // Setting output data
   workItem.getResults().put("valid", result);

   workItemManager.completeWorkItem(workItem.getId(), null);
}
Internationalize workflow labels
An optional resource bundle file can be created along with the bpmn file to internationalize the name and labels of the process - the resource bundle must be named with the key of the jBPM process. If the process has the key "translation-workflow", the file need to be named translation-workflow.properties . This file can include resources for process name, actions, and action outcomes. You can also specified a key for completed tasks, add ".completed" to the task key.
Sending mail with jBPM
Sending a mail can be done by using the "Send mail" task handler provided by Jahia. You can define a task as in the following example :
This task require a few inputs variables to send a mail :
user : The user initiating the workflow
currentUser : The user whi has executed the last task
templateKey : Name of the mail template to use
workflow : The workflow definition
nodeIds : The list of nodes on which the workflow has been started
locale : The locale on which the workflow has been started
workspace : The workspace on which the workflow has been started
The templateKey input will define which template will be used to send a mail. Mail templates are found like workflows, in a path specified in the JBPMModuleProcessLoader bean. By default all resources in the package org.jahia.modules with the extension .mail are taken. The following example, start-publication-template.mail , defines a mail that will be sent when we start a publication workflow :
to: #if ($userNotificationEmail) $userNotificationEmail #end
to-users: assignableFor(review)
subject: Publication request by ${PrincipalViewHelper.getFullName($currentUser)} for $site.getDisplayableName()
text: Hello,

A publication workflow with one validation step has been started on ${date.format("short","short",$submissionDate,$locale)} by ${currentUser.getName()}, on the following items :
#foreach( $node in $nodes )
    #if( $velocityCount <= 10)
    - #if( $node.getDisplayableName().length() > 100) ${node.getDisplayableName().substring(0, 100)}... #{else} $node.getDisplayableName() #end
    #end
#end

html: Hello,
<br>
<br>
<div>
    ${PrincipalViewHelper.getFullName($currentUser)} has requested the publication of $publicationCount item(s) for $site.getDisplayableName() ($site.getServerName()) on
    ${date.format("short","short",$submissionDate,$locale)}:
</div>

#set( $fileCheck = "/$site.getSiteKey()/files/" )
#set( $contentCheck = "/$site.getSiteKey()/contents/" )
#set( $replace = "/sites/$site.getSiteKey()")
<div>
    <ul>
        <li>Language: $locale</li>
        <li>Publication title: $workflowTitle</li>
        <li>
            Publication items:
            <ul>
                #foreach( $entry in $publications.entrySet() )
                    #if( $entry.value.size() > 0 )
                        <li>
                            $entry.key
                            <ul>
                                #foreach( $nodeInfo in $entry.value )
                                    #set( $node = $nodeInfo.get("node") )
                                ##Determine the "open in" link (Open in Edit Mode OR Open in Content Media Manager)
                                    #if ( $site.getSiteKey() == "systemsite" || $node.getPath().indexOf($fileCheck) != -1 || $node.getPath().indexOf($contentCheck) != -1 )
                                        #define( $openIn )
                                        ##Determine which route will be used
                                            #if ( $node.getPath().indexOf($fileCheck) != -1 )
                                                #set( $prefix = "$cmmPrefix/browse-files")
                                            #{else}
                                                #set( $prefix = "$cmmPrefix/browse")
                                            #end
                                        #**
                                         We need to use the folder path when opening CMM. Check if this node is a folder,
                                         otherwise get the parent node which will be a folder.
                                         *#
                                            #if( $node.isNodeType("nt:folder") )
                                                #set( $contentNodePath = "$prefix$node.getPath().replace($replace, '')" )
                                            #{else}
                                                #set( $contentNodePath = "$prefix$node.getParent().getPath().replace($replace, '')" )
                                            #end
                                            <a href="$contentNodePath">Open in Content and Media Manager</a>
                                        #end
                                    #else
                                        #define( $openIn )
                                            #set( $displayablePath = $nodeInfo.get("displayablePath") )
                                            #define( $previewLink ) - <a href="${previewPrefix}${displayablePath}.html">Preview</a> #end
                                            <a href="${editPrefix}${displayablePath}.html">Open in Edit Mode</a>
                                        #end
                                    #end
                                    <li>
                                        ${nodeInfo.get("displayableName")} (${nodeInfo.get("type")}) ${openIn} #if( $previewLink ) $previewLink #end
                                    </li>
                                #end
                            </ul>
                        </li>
                    #end
                #end
                #if ($publicationCount > 10) <li>...</li> #end
            </ul>
        </li>
    </ul>
    <br>
</div>
##Display any comments that are apart of this workflow
#if ( $comments )
<div>
    <p>
        <strong>Comments</strong>
    </p>
    <ul>
        #foreach( $comment in $comments )
            <li>
                $comment.get("userName") on ${date.format("default", "default", $comment.get("time"), $locale)}
                <br/>
                $comment.get("comment")
            </li>
        #end
    </ul>
</div>
#end
The template contains both text and html versions of the mails, and use velocity language to get dynamic informations. Another script language (as defined by the JSR 223) can be used by using the key language: in the template file. The following variables are bound when executing the script : bundle, user, currentUser, date, submissionDate, locale, workspace, nodes.
It is also possible to declare one template per locale, by suffixing the template name by the language code : start-publication-template.fr.mail will be used when the workflow locale is french.
Example
In the following section we will implement from scratch a new Workflow. Most of the implementation will be done using Eclipse IDE and BPMN Modeler (an Eclipse plugin).
For the example, we are using Eclipse version 4.6.0 and the Eclipse plugin called "BPMN Modeler" version 1.3.0.
We will build the following process:
Workflow starts
Lock the node
Evaluate the content using a Java class which can Accept or Reject the publication:
Accept: the node is published
Reject: no publication, the node is unlocked
End of the workflow
Initialization of the workflow
Using Eclipse, open the module in which you want to define a new Workflow.
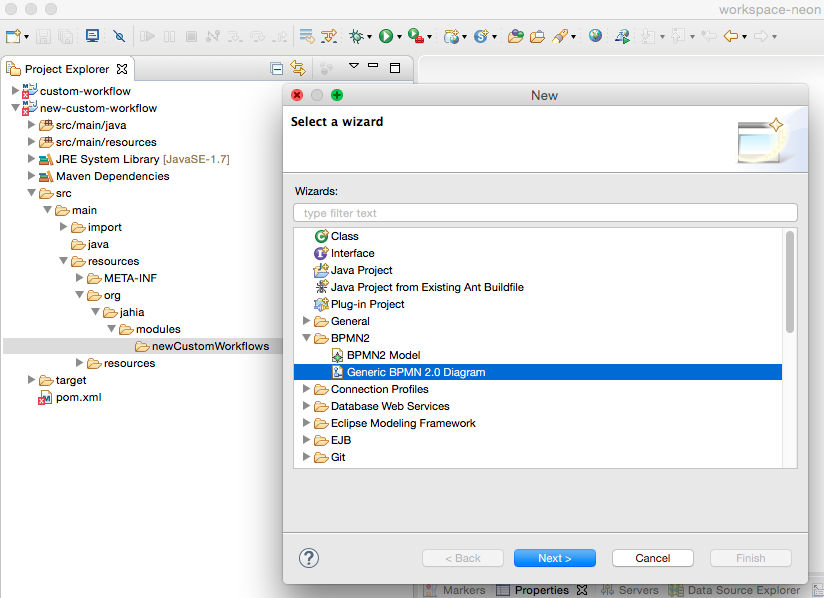
In the folder /src/main/resources, create a new package related to your module.
For example : org/jahia/modules/newCustomWorkflows
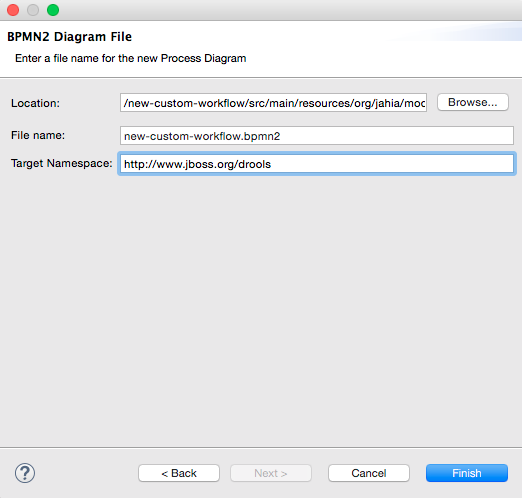
In this new folder, create a new file using the Eclipse wizard "Generic BPMN 2.0 Diagram" :
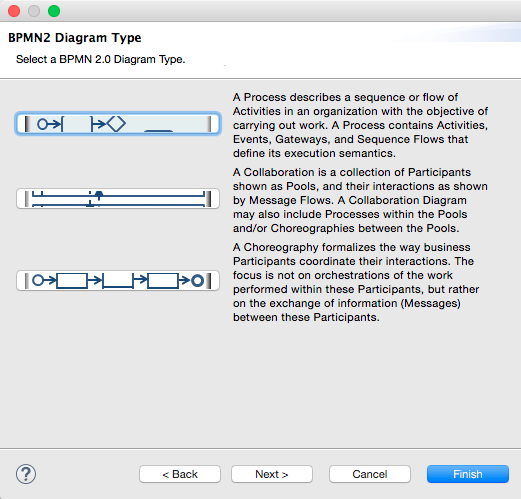
Select the type Process :
Fill the name as pleased and ensure the extension is .bpmn2 :
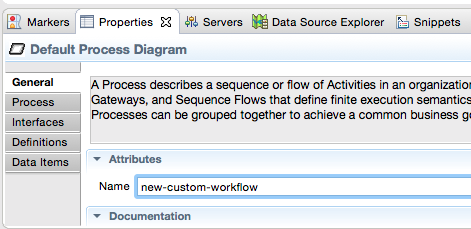
In the "Default Process" tab, change the name so it matches the file's name (e.g. "new-custom-workflow") :
Then change the Target Namespace to : http://www.jboss.org/drools and switch values for Type Language and Expression Language as following :
Declaring data types and variables
We need to declare the variables needed for our workflow. This is done on the "Data Items" tab, under "Variable list for Process". In our case, the following variables need to be defined :
Name
Data Type
nodeId
java.lang.String
nodeIds
java.util.List
workspace
java.lang.String
locale
java.util.Locale
workflow
org.jahia.services.workflow.WorkflowDefinition
user
java.lang.String
currentUser
java.lang.String
valid
java.lang.Boolean
You should have something like the following:
Diagram of the process
Using the BPMN graphic editor (right-click on your .bpmn2 file, "Open with"/"Bpmn2 diagram editor"), we should obtain the following diagram:
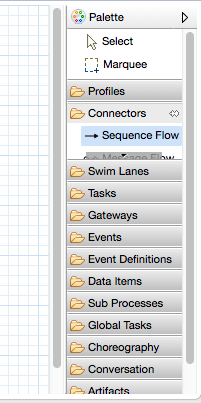
All the tools needed for this diagram are available on the palette :
Connectors/Sequence Flow: tool to link elements together
Tasks/Task: tool to display a task
Gateways/Exclusive Gateway: to represent two possible paths excluding each other
Example for the sequence flow:
Configuring input and output variables
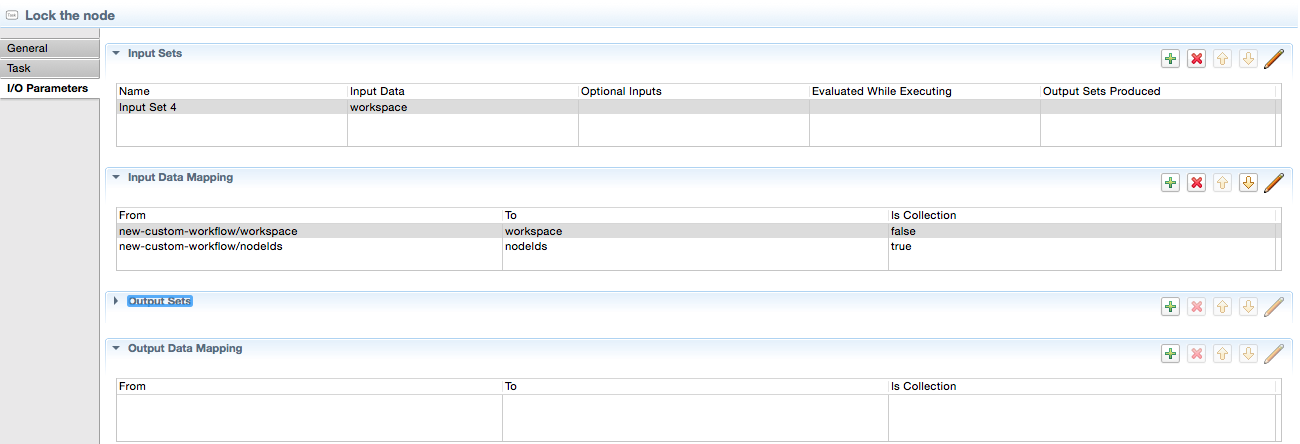
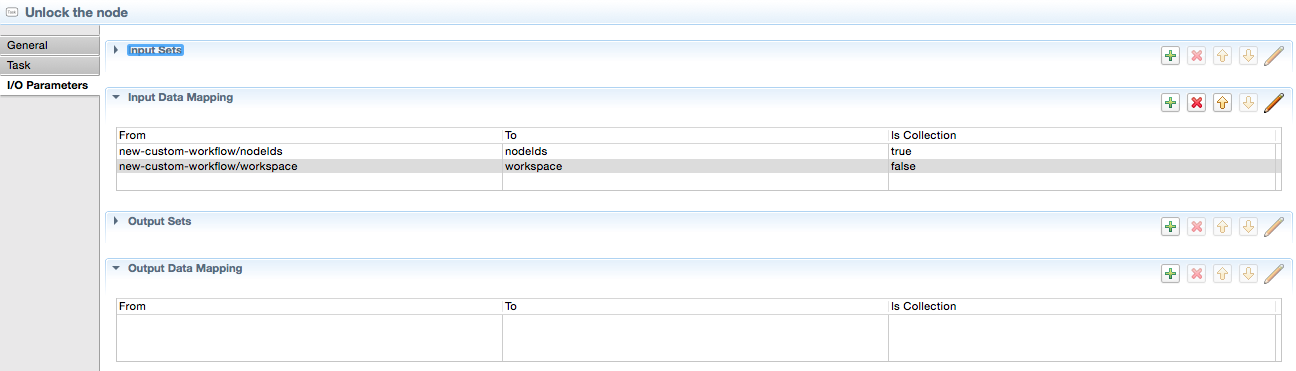
For each task, we need to define what input and output variables are needed by the task. For example, the "Lock node" task will not define output variables, but in order to work, it needs as input the "workspace" and "nodeIds" (=list of nodes on which the publication has been called) variables.
In order to define such variables, click on the task, and go into the tab "I/O Parameters".
You should define the following parameters for your tasks :
Lock the node
Custom work item handler
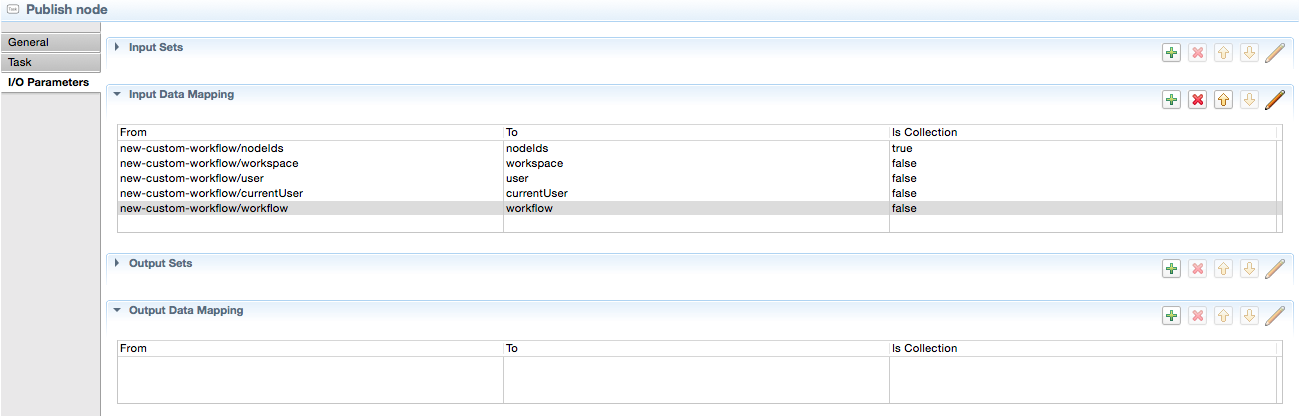
Publish node
Unlock node
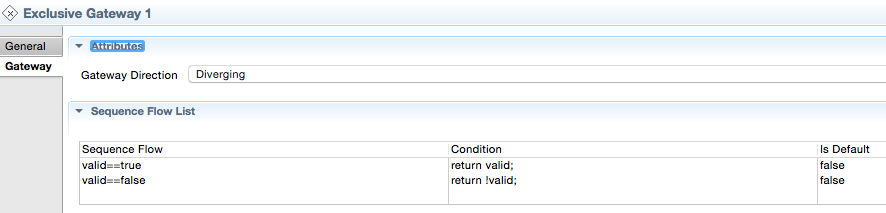
Configuring the gateways
The first gateway has to be a Diverging gateway. We here have two possible conditions to define, in order to automatically publish the content or reject the publication, depending on the output of our custom WorkItem Handler:
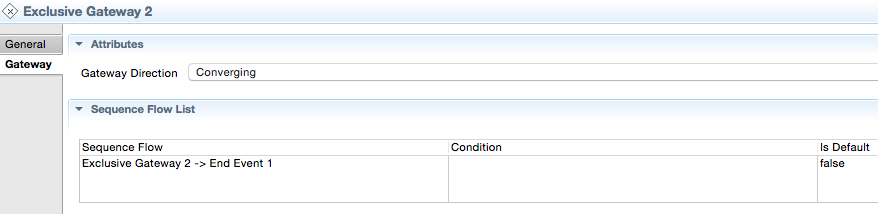
The second gateway should be a converging one. Nothing has to be configured there, if you specified the correct sequence flow the gateway should already be converging:
CREATING A CUSTOM WORKITEM HANDLER
We want to define a custom task which will be able to analyze the content trying to be published in order to automatically accept or reject it, based on business rules (possibly a call to a WebService). In order to do so we need to define a Java class extending AbstractWorkItemHandler and implementing WorkItemHandler.
Create the following Java package : org.jahia.modules.newCustomWorkflows
In this package, create the CustomWorkItemHandler class as following :
package org.jahia.modules.newCustomWorkflows;

import java.util.List;

import org.jahia.services.workflow.jbpm.custom.AbstractWorkItemHandler;
import org.kie.api.runtime.process.WorkItem;
import org.kie.api.runtime.process.WorkItemHandler;
import org.kie.api.runtime.process.WorkItemManager;
import org.slf4j.Logger;
import org.slf4j.LoggerFactory;

public class CustomWorkItemHandler extends AbstractWorkItemHandler implements WorkItemHandler {

 private transient static Logger logger = LoggerFactory.getLogger(CustomWorkItemHandler.class);

 @Override
 public void abortWorkItem(WorkItem workItem, WorkItemManager workItemManager) {
  logger.debug("CustomWorkItemHandler has been canceled");

  workItemManager.abortWorkItem(workItem.getId());
 }

 @Override
 public void executeWorkItem(WorkItem workItem, WorkItemManager workItemManager) {
  logger.debug("CustomWorkItemHandler has been called");

  // Retrieving input data
  List nodeIds = (List) workItem.getParameter("nodeIds");
  String workspace = (String) workItem.getParameter("workspace");

  Boolean result = false;

  /*
   * Write business code here and eventually modify the result
   * (call to webservices, checking data trying to be published, ...)
   */
  result = true;

  // Setting output data
  workItem.getResults().put("valid", result);
  workItemManager.completeWorkItem(workItem.getId(), null);
 }

}
You then need to declare the Spring bean related to your class. Edit your module Spring configuration file : src/main/resources/META-INF/spring/nameOfYourModule.xml
The following part requires to manually edit the .bpmn2 file. Be aware that any further modifications of this file using the BPMN Eclipse Modeler plugin could result in a rollback of your modifications.
Before configuring the task we set in your diagram, we need to specify some configurations related to Drools and to the schema location we are about to use.
Edit the <bpmn2:definitions...> element and add the two following attributes if they are not already existing/configured properly:
Then for each <bpmn2:task...> element you should add the attribute "drools:taskName" witht one of the following case sensitive value:
Task name
drools:taskName value
Lock the node
Lock node
Unlock the node
Unlock node
Call a custom workitem handler
Custom work item handler
Publish node
Publish node
As you can see, the value to fill for our custom task corresponds to the value we specified for its name when declaring it as a bean.
Depending on the version of the BPMN Modeler you are using, you may have to also redefine the id attribute of your properties elements.
For each <bpmn2:property...> element, replace the value of the id element with the value of the name element. Also replace the previous use of these ID values with the new value
For example, the following code:
Workflow processes need to be deployed into the process engine and declared in Jahia in order to be available to users.
Once the workflow is available in the process engine, it has to be registered to the workflow service. This registration is done by declaring a Spring bean in the module's Spring configuration file.
For our custom workflow, we need to add the following bean:
The following page describes common errors raised during the development of a custom workflow.
Prefix drools not bound
Error stacktrace
ERROR [ExtensibleXmlParser] - (null: 18, 78): The prefix "drools" for attribute "drools:taskName" associated with an element type "bpmn2:task" is not bound.
org.xml.sax.SAXParseException; lineNumber: 18; columnNumber: 78; The prefix "drools" for attribute "drools:taskName" associated with an element type "bpmn2:task" is not bound.
Explanation
You are using drools attributes but you have not specified an XML Schema Instance defining them. You must perform the two following steps:
In your <bpmn2:process...> element, add the attributes drools:version with value 1 and drools:packageName with your BPMN2 package as value. Example:
ERROR [scheduler_Worker-1] org.jbpm.workflow.instance.node.WorkItemNodeInstance: Could not find variable scope for variable Property_3
ERROR [scheduler_Worker-1] org.jbpm.workflow.instance.node.WorkItemNodeInstance: when trying to execute Work Item Lock node
Explanation
You probably used the BPMN Modeler Eclipse plugin to create your input/output task's variables. The variables IDs have been auto-populated. For each <bpmn2:property...> element, replace the auto-calculated value of the id element (e.g. "Property_6") with the value of the name element you specified (e.g. "user").
Jahia provides some keywords that you can use to define to which people you want to send the mail.
<mail name="done">
   <from users="jahiaSettingsProperty"/>
   <to users="currentWorkflowStarter"/>
   <cc users="previousTaskAssignable"/>
   <subject>Your request for translation has been accepted</subject>
   <text>Your request for translation has been accepted</text>
   <transition to="end"/>
</mail>
jahiaSettingsProperty will return the mail_from property defined in jahia.properties or the administration center.
currentWorkflowStarter refer to the person who have started the workflow.
previousTaskAssignable or nextTaskAssignable refer to the people that can participate to the previous task or the next one in your process flow.
Images Processing
The Jahia Image Processing Service is here to manipulate images from Jahia itself.
For licensing reasons, the service is, by default, using a Java native API named imageJ, but this is not a really powerful API nor really efficient.
So if you want to boost the quality of your thumbnails or the result of your other image manipulation operations, Jahia allows you to define the path to your ImageMagick installation so that we can use it instead of the imageJ API.
Modify your jahia.properties file to activate ImageMagick instead of the imageJ API.
######################################################################
### Image conversion Service #########################################
######################################################################
# The image service to use
# Native java service : "ImageJImageService"
# Set to "ImageMagickImageService" to use ImageMagick. You'll then have to set
# the imageMagick path
imageService = ImageJImageService
# The path to image magick and exiftools
# For windows : C:\\Programs\\ImageMagick;C:\\Programs\\exiftool
imageMagickPath = /usr/bin:/usr/local/bin:/opt/local/bin
Watch out for the path delimiter : on *NIX typically ":", on Windows ";".
How do I use the ImageService in my module ?
You can use the org.jahia.services.image.JahiaImageService API to manipulate your images.
Jahia uses Apache Camel an open-source integration framework to manage its interaction with many enterprise systems and network protocols.
In Jahia, Apache Camel is mainly used for sending mail as notifications (workflow event, subscription, user registration, form submission) and also make the system react in an asynchronous way to some event on the platform (page viewed, log history of content in database, etc.).
Send mail as notifications from Jahia
You can do that in two ways. The first and easiest way is to use the mail service from Jahia that will hide all Apache Camel calls from you. The mail service allows to send email with or without a dynamic mail template (written in any script languages supported on your platform (by default : groovy, velocity, freemarker)).
An example of code from the NewUser Action class that will send an email using a template on a new user registration :
public ActionResult doExecute(HttpServletRequest req, RenderContext renderContext, Resource resource,
                                  JCRSessionWrapper session, Map<String, List<String>> parameters, URLResolver urlResolver) throws Exception {

        String username = getParameter(parameters, "username");
        String password = getParameter(parameters, "password");
        if (StringUtils.isEmpty(username) || StringUtils.isEmpty(password)) {
            return ActionResult.BAD_REQUEST;
        }

        Properties properties = new Properties();
        properties.put("j:email",parameters.get("desired_email").get(0));
        properties.put("j:firstName",parameters.get("desired_firstname").get(0));
        properties.put("j:lastName",parameters.get("desired_lastname").get(0));
        for (Map.Entry<String, List<String>> param : parameters.entrySet()) {
            if (param.getKey().startsWith("j:")) {
                String value = getParameter(parameters, param.getKey());
                if (value != null) {
                    properties.put(param.getKey(), value);
                }
            }
        }

        final JahiaUser user = userManagerService.createUser(username, password, properties);

        // Prepare mail to be sent :
        boolean toAdministratorMail = Boolean.valueOf(getParameter(parameters, "toAdministrator", "false"));
        String to = toAdministratorMail ? mailService.getSettings().getTo():getParameter(parameters, "to");
        String from = parameters.get("from")==null?mailService.getSettings().getFrom():getParameter(parameters, "from");
        String cc = parameters.get("cc")==null?null:getParameter(parameters, "cc");
        String bcc = parameters.get("bcc")==null?null:getParameter(parameters, "bcc");

        Map<String,Object> bindings = new HashMap<String,Object>();
        bindings.put("newUser",user);

        mailService.sendMessageWithTemplate(templatePath,bindings,to,from,cc,bcc,resource.getLocale(),"Jahia User Registration");

        return new ActionResult(HttpServletResponse.SC_ACCEPTED,parameters.get("userredirectpage").get(0), new JSONObject());
    }
You can use the mail service from anywhere you want in your custom code (Actions, Tags, etc.). If you want to send some notifications in your custom rules, Jahia 6.6 provide a rules notifications service that you can use.
Send mail as notifications from a rule :
package org.jahia.services.content.rules

#list any import classes here.
import org.jahia.services.content.rules.*
import org.jahia.services.content.*
import javax.jcr.observation.Event
import org.slf4j.Logger

expander rules.dsl

#declare any global variables here
global User user
global Service service
global ImageService imageService
global ExtractionService extractionService
global RulesNotificationService notificationService
global Logger logger
global JCRStoreProvider provider

rule "notify user (create)"
    when
       A new node is created
        - the node has the type jnt:user
        - its name is not guest
        - its name is not root
    then
       Notify new user with mail template "/WEB-INF/notifications/templates/mail/newUser.vm"
end
Integration with other framework
If needed you can also call directly Apache Camel from the mail service to succeed on integrating an external system with Jahia 6.6, as an example we will show you how we use the mail service from Jahia to override the mail management in JBPM with our own :
public class JBPMMailSession implements MailSession, DisposableBean {
    private MailServiceImpl mailService;
    private ProducerTemplate template;

    public JBPMMailSession() {
        mailService = (MailServiceImpl) SpringContextSingleton.getBean("MailService");
        template = mailService.getCamelContext().createProducerTemplate();
    }

    public void send(Collection<Message> emails) {
        if (mailService.isEnabled()) {
            for (Message email : emails) {
                CamelContext context = mailService.getCamelContext();
                MailEndpoint endpoint = (MailEndpoint) context.getEndpoint(mailService.getEndpointUri());
                Exchange exchange = endpoint.createExchange(email);
                template.send("seda:mailUsers?multipleConsumers=true",
                        exchange);
            }
        }
    }

    public void destroy() throws Exception {
        if (template != null) {
            template.stop();
        }
    }
}
Here we use the mail service to get access to Apache Camel Context, create a ProducerTemplate from Apache Camel Context and use it to send email after transformation of javax.mail.Message object to Exchange object from Apache Camel and send them through the asynchronous channel dedicated to mail.
React asynchronously on events on the platform
Jahia redirect all its logs to Apache Camel through a log4j appender, this way you can define Apache Camel routes that will listen to this log channel and then filter it to only use a subtract of those logs or use them all like our Content History Service that store all logs in the Database.
For example there is two way to say that you want to send a notification on a specific type of content creation let us say that we will continue with the example of our new user registration.
We have already seen that there is a mail sent by the action to people defined inside the new user registration form component.
Now we want also to send a less specific email to some administrators to know that there is a new user in the system.
We just have to write a route that will listen to log channel then filter it to only react on user creation and then send an email.
Now you can use the MetricsLoggingService and configure it to make it act like you want and log what you need from your own code and then add a lot of system interaction in your enterprise with Apache Camel.
Use Camel to make Jahia interact with other systems
So far we have seen how to listen to Jahia 6.6 and send notifications or call external systems, let us do it the other way around.
For example we might want to allow our users to create content using mail :
First we create our route this one will checkmail on the inbox of a gmail account in imap, and send the message to our POJO bean myBean:
This bean will create a news in /sites/mySite/contents/news as soon as it detects a mail whose subject start with "create news:".
To go further we should lookup the user using the From part of the mail message, and use the date of the mail to create the date of the news for example.
We can also when we have found the user use its preferred language to enter the news in its language instead of Locale.ENGLISH.
This is just a simple example with Apache Camel you can do much more than that see Apache Camel Components page to have an idea of all the components you can use) but here you have an idea of how to use it inside Jahia 6.6, enjoy.
Tasks
Overview
The Tasks module add the possibility to create tasks for users. Tasks can be created through a form or by rules, triggered by the system.
A task list is available for the user to check what he needs to do.
Every task is assigned a default workflow - a task goes from "active" to "started" and "finished", and can be "suspended"
View the user task list
The task list of a user is viewable with a specific template of the user, tasklist. It can be viewed as a profile extension, in the user profile page.
Creating a new task
Using the tasks component
The components "Tasks" from "site components" displays a simple form that can be used to create and assign task to a user.
Using the rules
A task can be created by using the "Create task" consequence in a rule file - for example, the following rule create a new task when a new user is created :
rule "A welcome task for the new user"
   when
       A new node is created
                - the node has the type jnt:user
   then
       Log "Creating welcome task for new user: " + node.getName()
       Create task "Welcome to Jahia!" with description "We are glad to have you in our platform." for user node.getName()
end
Document conversion
Optionnal module: documentconverter
Overview
The Jahia Document Converter Service is aimed to provide transformation for documents in various formats.
The transformation tasks are delegated to the OpenOffice service, supporting multiple input/output formats.
Following sections describe service features in more details:
Configuration - system requirements and configuration options;
Usage - how to use the transformation service in templates.
Requirements
To use the converter service you need an OpenOffice v2.0.3 or higher (the latest stable 3.x version is recommended) installed. StarOffice 8, NeoOffice being based on OpenOffice.org should also work.
Supported formats
Jahia delegates the conversion tasks to the back-end OpenOffice service via the JODConverter library. Thus the list of supported conversion formats is defined by the target OpenOffice service.
Jahia Document Converter Service delegates conversion tasks to the OpenOffice instance, either to a local one or a remote service. To use the converter service you need an OpenOffice v2.0.3 or higher (the latest stable 3.x version is recommended) installed.
Enabling the conversion service
In order to enable the service the following setting should be set to true in jahia.properties file:
######################################################################
### Document Converter Service #######################################
######################################################################
# Set this to true to enable the document conversion service
documentConverter.enabled = true
Local OpenOffice instance
The converter service is capable of creating an OpenOffice process and using it, in case Jahia and OpenOffice are located on the same machine.
In such case converter service starts locally an instance of the OpenOffice service for processing conversion tasks.
The configuration in this case is pretty simple: a service needs to be enabled (see above) and a path to the OpenOffice folder has to be provided in the jahia.properties file:
######################################################################
### Document Converter Service #######################################
######################################################################
# Set this to true to enable the document conversion service
documentConverter.enabled = false
# The fiesystem path to the OpenOffice
# Usually for Linux it is: /usr/lib/openoffice
# for Windows: c:/Program Files (x86)/OpenOffice.org 3
# and for Mac OS X: /Applications/OpenOffice.org.app/Contents
documentConverter.officeHome = /usr/lib/openoffice
For an advanced configuration, the LocalOfficeManagerFactory supports specifying port number, template profile directory, task execution timeout, task queue timeout and maximum number of tasks per process. The default configuration is located in the org/jahia/defaults/config/spring/applicationcontext-doc-converter.xml file packaged inside the JAR WEB-INF/lib/jahia-impl-<version>.jar
and can be overridden from your custom module if needed.
Remote OpenOffice service
The converter service is capable of using an OpenOffice process started as a service on a remote machine.
This connection is configured as given below (snapshot of the applicationcontext-doc-converter.xml file):
Jahia exposes the document transformation API also through servlet API (apart from the Java API). The org.jahia.bin.DocumentConverter controller is responsible for communication with the conversion service.
Uploading and converting documents
The following code shows how the conversion API can be used in templates to upload and convert documents.
Uploaded document gets converted to the selected format and written back into the response by the DocumentConverter servlet:
For example to get a PDF version of a Microsoft Office Word file, located in the repository's default workspace (edit) under /shared/files/Report.doc, the following URL can be used:
And for generating a link to the PDF version of a file node one can use the code:
<a href="${url.convert}${fileNode.path}.pdf">${fileNode.name} as PDF</a>
Using Document-Converter component
Jahia provides a built-in UI component for rendering a document conversion form, which allows users to upload documents into their home folder, performing different type conversions on the fly.
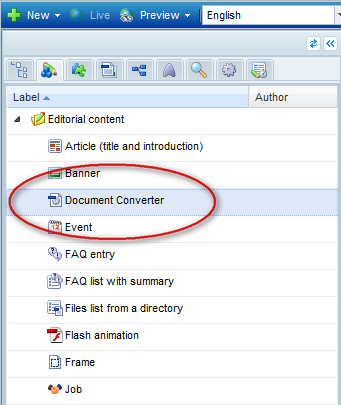
The component is available in the edit mode selector (left-side panel) in the Editorial content group:
The form with a table of converted document is rendered as shown below:
Conversions in business rules
It is also possible to use document conversion service directly from business rules to e.g. perform automatic conversions when a document is uploaded or updated. An example of a rule the /templates/docConverter/rules.drl file, which automatically creates a PDF version of the uploaded/modified document is given below:
rule "Auto-convert to PDF"
  when
    A file content has been modified
      - the mimetype is not application/pdf
    then
      Convert node to type "application/pdf"
end