Installing Augmented Search
Elasticsearch
The Elasticsearch search provider module currently supports Elasticsearch 7.4.2, available here. If your Elasticsearch cluster is using X-Pack, please consult our dedicated page related to X-Pack configuration.
Support for additional languages
Some deployments may require support for less common languages (or to be more specific, analyzers and tokenizers not provided by default with Elasticsearch). We implemented support for such languages in Augmented-Search 2.1.0+ and 1.2.0+.
You can find more details about analysis plugin in Elasticsearch's documentation.
Configuring Elasticsearch
You can easily add the necessary plugin by executing the following command on each node of your Elasticsearch cluster:
/usr/share/elasticsearch/bin/elasticsearch-plugin install --batch --verbose analysis-stempel
/usr/share/elasticsearch/bin/elasticsearch-plugin install --batch --verbose analysis-kuromoji
Then restart your Elasticsearch node.
With Docker
If you're running Elasticsearch in Docker, this can be done easily with this command:
docker exec -ti elasticsearch /usr/share/elasticsearch/bin/elasticsearch-plugin install --batch --verbose analysis-stempel
docker exec -ti elasticsearch /usr/share/elasticsearch/bin/elasticsearch-plugin install --batch --verbose analysis-kuromoji
docker restart -t 5 elasticsearch
Assuming "elasticsearch" is the name of your running Elasticsearch container.
Jahia modules
The required modules can be deployed on your Jahia environment by using the Augmented Search - Distribution package available on our store, or by installing its modules individually:
- Database connector
- Elasticsearch connector
- Augmented Search
- Augmented Search UI
Connection to an Elasticsearch cluster
Augmented Search uses Elasticsearch as a data store, when started with Augmented Search, one of the first actions is to point it to an Elasticsearch cluster, which is configured through our Database connector module.
In the Jahia administration UI, go into "Administration>Configuration>Database Connector", and create a new connection by clicking New connection.
Select the elastic database type and create a new Elasticsearch connection by filling the following settings:
- Host
The IP/hostname of your Elasticsearch server - Port
The port used by your Elasticsearch server - Id
The name of the Elasticsearch connection you are creating, this unique ID is then used by Augmented Search to identify the Elasticsearch cluster to use.
Secured connection to Elasticsearch cluster
If your Elasticsearch cluster uses security, go on the Advanced tab and type the username, it will show a new input for password, if using https also toggle the switch for HTTPS.
Once your connection is configured, click Test to verify that your settings are correct. If the test is successful (it will display "Connection is valid!"), click on "Create" to create the connection.
Select the database connection
Augmented Search currently only supports the connection to one single Elasticsearch cluster, which has to be selected in the administration panel.
In the Jahia administration UI, go into Administration>Configuration>Augmented Search and select the database connection you want to use.
If plugins are installed on your Elasticsearch cluster (such as stemmers for additional languages) those would be displayed here.
Note that although it is possible to change the database connection, all sites will need to be re-indexed.
Enable Augmented Search on your site(s)
Augmented Search 3.0+
By default, Augmented Search is not enabled on existing sites.
To enable Augmented Search on a site:
- Navigate to Administration>Configuration>Augmented Search.
- In Sites indexation, click Add Site.
- After adding a site, click Start Indexing beside the site to trigger indexing for the site. You can click on the button on the top-right corner to trigger indexing for all sites at once.
Indexing will start right after clicking on the button and results will progressively become available for search.
Augmented Search 1.4+
Augmented Search 3.0+ and 1.4+ are essentially the same codebase with the exception of the Administration UI.
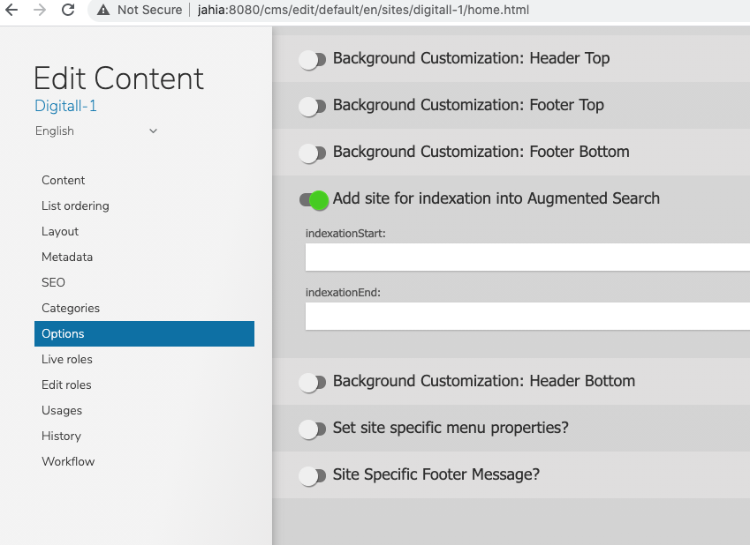
In Augmented Search 1.4+, sites are added by navigating into Content Editor > Edit Content (right-click on the site) > Options, and selecting "Augmented Search Indexable Site.
Your site will then be listed in the list of sites in Augmented Search configuration under Jahia Administration.
Alternatively, sites can be added through our GraphQL API using the following query:
mutation {
  admin {
    search {
      addSite(siteKey: "digitall")
    }
  }
}
Note: Please restart your Augmented Search module if a site is not present in Augmented Search right after upgrading to version 1.4.0.
Verify configuration
At that point and before continuing further, it's a good idea to run a simple search query via the GraphQL playground (in "Tools" > "GraphQL") to validate the availability of data.
query {
  search (q: "jahia"){
    results {
      hits {
        displayableName
      }
    }
  }
}
You can begin by modifying the above query to your liking, replacing "jahia" with any other search term relevant to your site. You can also pass a "siteKeys" parameter to the "search" node to restrict the search to a single site.
