Creating custom actions
This topic shows how to create a custom action.
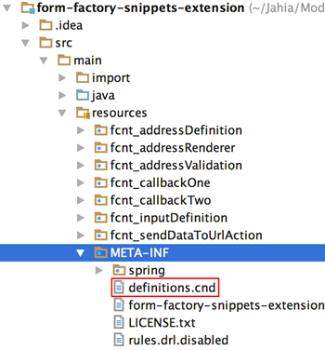
Creating an entry in the definition.cnd
Create an entry in the definition.cnd file located in: [ module_name ]/src/main/resources/META-INF/
Ensure that the definition name contains: fcmix:action
<fcmix fc="" http:="" jahia="" mix="" www.jahia.org="">
<fcnt fc="" http:="" jahia="" nt="" www.jahia.org="">
//-----------------------------------------------
// Form Center actions Definition
//-----------------------------------------------
[fcnt:sendDataToUrlAction] > jnt:content, fcmix:action, mix:title, jmix:droppableContent, jmix:hiddenType
Modify the pom.xml file
Add Forms dependency into your pom.xml file "<dependencies/>" section
<dependency>
  <groupid>org.jahia.modules</groupid>
  <artifactid>form-factory-core</artifactid>
  <version>[2.0,3.0)</version>
  <scope>provided</scope>
</dependency>
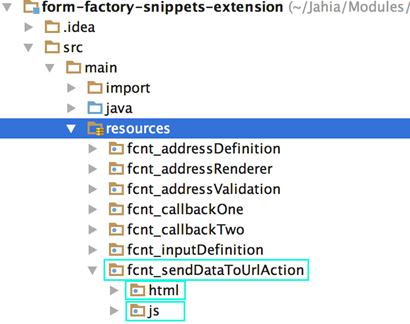
Creating the folder structure
With the definition created, we can now create the folder structure that houses the necessary files. Create a folder within [ module_name ]/src/main/resources/ that matches your action’s definition name and within that folder create two more folders named ‘html’ and ‘js’(optional) respectively:
Wizard and view files
Within the html folder there will reside 2 files (1 being optional) :
actionName.wzd- contains the defined properties for your actionactionName. designView .jsp(optional) - used to edit any of the specified properties
actionName.wzd contents:
package fcnt_sendDataToUrlAction.html

action {
    label "Send Data To Url"
    wizard "<ff-send-data-to-url view-type='designView'></ff-send-data-to-url>"
    properties {
        actionname "senddatatourl"
        sendto ""
        parametername "formData"
    }
}
The wzd file is composed of:
package(This is the action’s definition name)action(mandatory): encloses all the action propertieslabel(mandatory): The human readable name of your action (used to generate a system name for the action)wizard(optional): Used in order to define the view for the action.
The value of the wizard property corresponds to the action’s directive name, and view-type corresponds to the name given to the view (in our case it is designView)properties(optional): declare properties that should not be internationalized within this container.propertiesI18n(optional): declare properties that should be internationalized within this container.
actionName. designView .jsp contents:
<div class="side-panel-body-content">
      <div class="row">
          <div class="col-sm-12">
              <label message-key="fcnt_sendDataToUrlAction.designView.label.sendDataToUrl"></label>
              <input type="text" class="form-control" ng-model="action.sendto">
          </div>
      </div>
      <div class="row">
          <div class="col-sm-12">
              <label message-key="fcnt_sendDataToUrlAction.designView.label.parameterName"></label>
              <input type="text" class="form-control" ng-model="action.parametername">
          </div>
      </div>
</div>
The view has a basic structure that contains a div with the class side-panel-body-content which encompasses all displayable content.
Any properties that are configurable for the action can be specified within this view and should be bound to action.[propertyName].
The message-key directive (seen in the label element) is used to retrieve any key that is defined within the resource bundle.
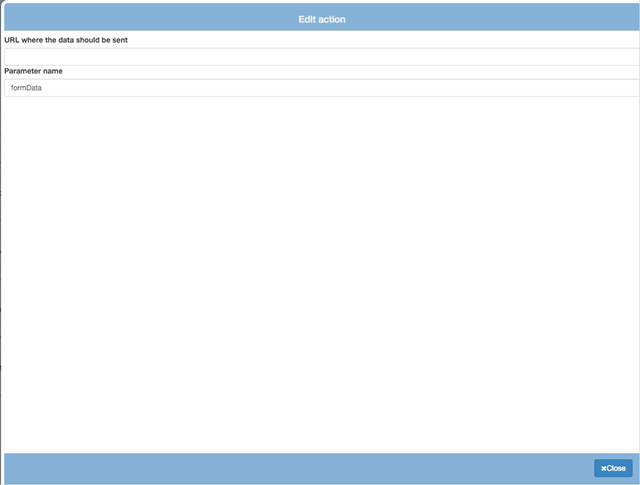
The above designView corresponds to the following image:
js folder
Within the js folder resides the directive for the action:
This directive is only necessary if you wish to create a view for manipulating the action’s available properties. The directive name is the name of the action’s definition:
[ actionDefinitionName ].directive.jsp content
<%@ page contentType="text/javascript" %>
<%@ taglib prefix="formfactory" uri="http://www.jahia.org/formfactory/functions" %>

(function () {
    'use strict';

    //Define the action directive
    var sendDataToUrlAction = function($log, ffTemplateResolver) {
    var directive = {
    restrict: 'E',
    templateUrl: function(el, attrs) {
    return   ffTemplateResolver.resolveTemplatePath(
    '${formfactory:addFormFactoryModulePath('/form-factory-actions/send-data-to-url/', renderContext)}', attrs.viewType
    );
},
    link: linkFunc
};
    return directive;

    function linkFunc(scope, el, attr) {
    /**
                * Any initialization of action properties or any other variables
                * can be done within this function.
                */
}
};
    //Attach the directive to the module
    angular
    .module('formFactory')
    .directive('ffSendDataToUrl', ['$log', 'ffTemplateResolver', sendDataToUrlAction]);
})();
Illustrated above is the general implementation of the action’s directive which is necessary when creating a view.
As mentioned in the comment above, any initialization of the action’s properties can be done within the linking function.
Note: AngularJS normalizes an element's tag and attribute name to determine which elements match which directives. Directives are referred to by their case-sensitive camelCase normalized name. However, since HTML is case-insensitive, directives are referred to in the DOM by lower-case forms, typically using dash-delimited attributes on DOM elements. In this example, directive ffSendDataToUrl becomes ff-send-data-to-url. This needs to be considered when naming the elements, especially when you may have to use acronyms.
Java action class
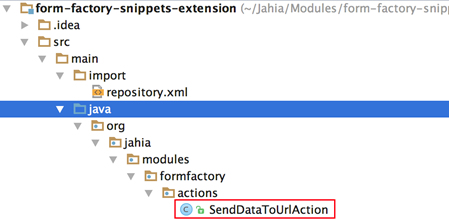
All that is left is to create the Java action class that will handle the desired functionality of our implemented action.
Create the action class in [module_name]/src/main/java/[namespace]/actions/
The custom action class will be required to extend
Action (org.jahia.bin.Action) abstract class and implement the required doExecute abstract method that returns an ActionResult object.
Remember to create the associating bean for the above created action in the [module_name].xml file located in [module_name]/src/main/resources/META_INF/spring:
<?xml version="1.0" encoding="UTF-8"?>
<beans xmlns="http://www.springframework.org/schema/beans"
       xmlns:xsi="http://www.w3.org/2001/XMLSchema-instance"
       xsi:schemaLocation="http://www.springframework.org/schema/beans http://www.springframework.org/schema/beans/spring-beans-3.0.xsd">
    <bean id="SendDataToUrlAction" class="org.jahia.modules.formfactory.actions.SendDataToUrlAction"/>
</beans>
After completing the aforementioned steps, upon redeploying of the module, the newly created action will be visible in the actions side panel.


