Managing roles and permissions
Jahia’s authorization system is based on granular and low-level permissions. A permission defines an action that can be performed on a node like reading, writing, deleting, publishing, and on specific areas of the UI such as accessing a specific tab or using a specific template to create a page. Permissions are defined by the application or modules and used when they need to check if a user is allowed to perform an action. Permissions cannot be modified or customized by the administrator.
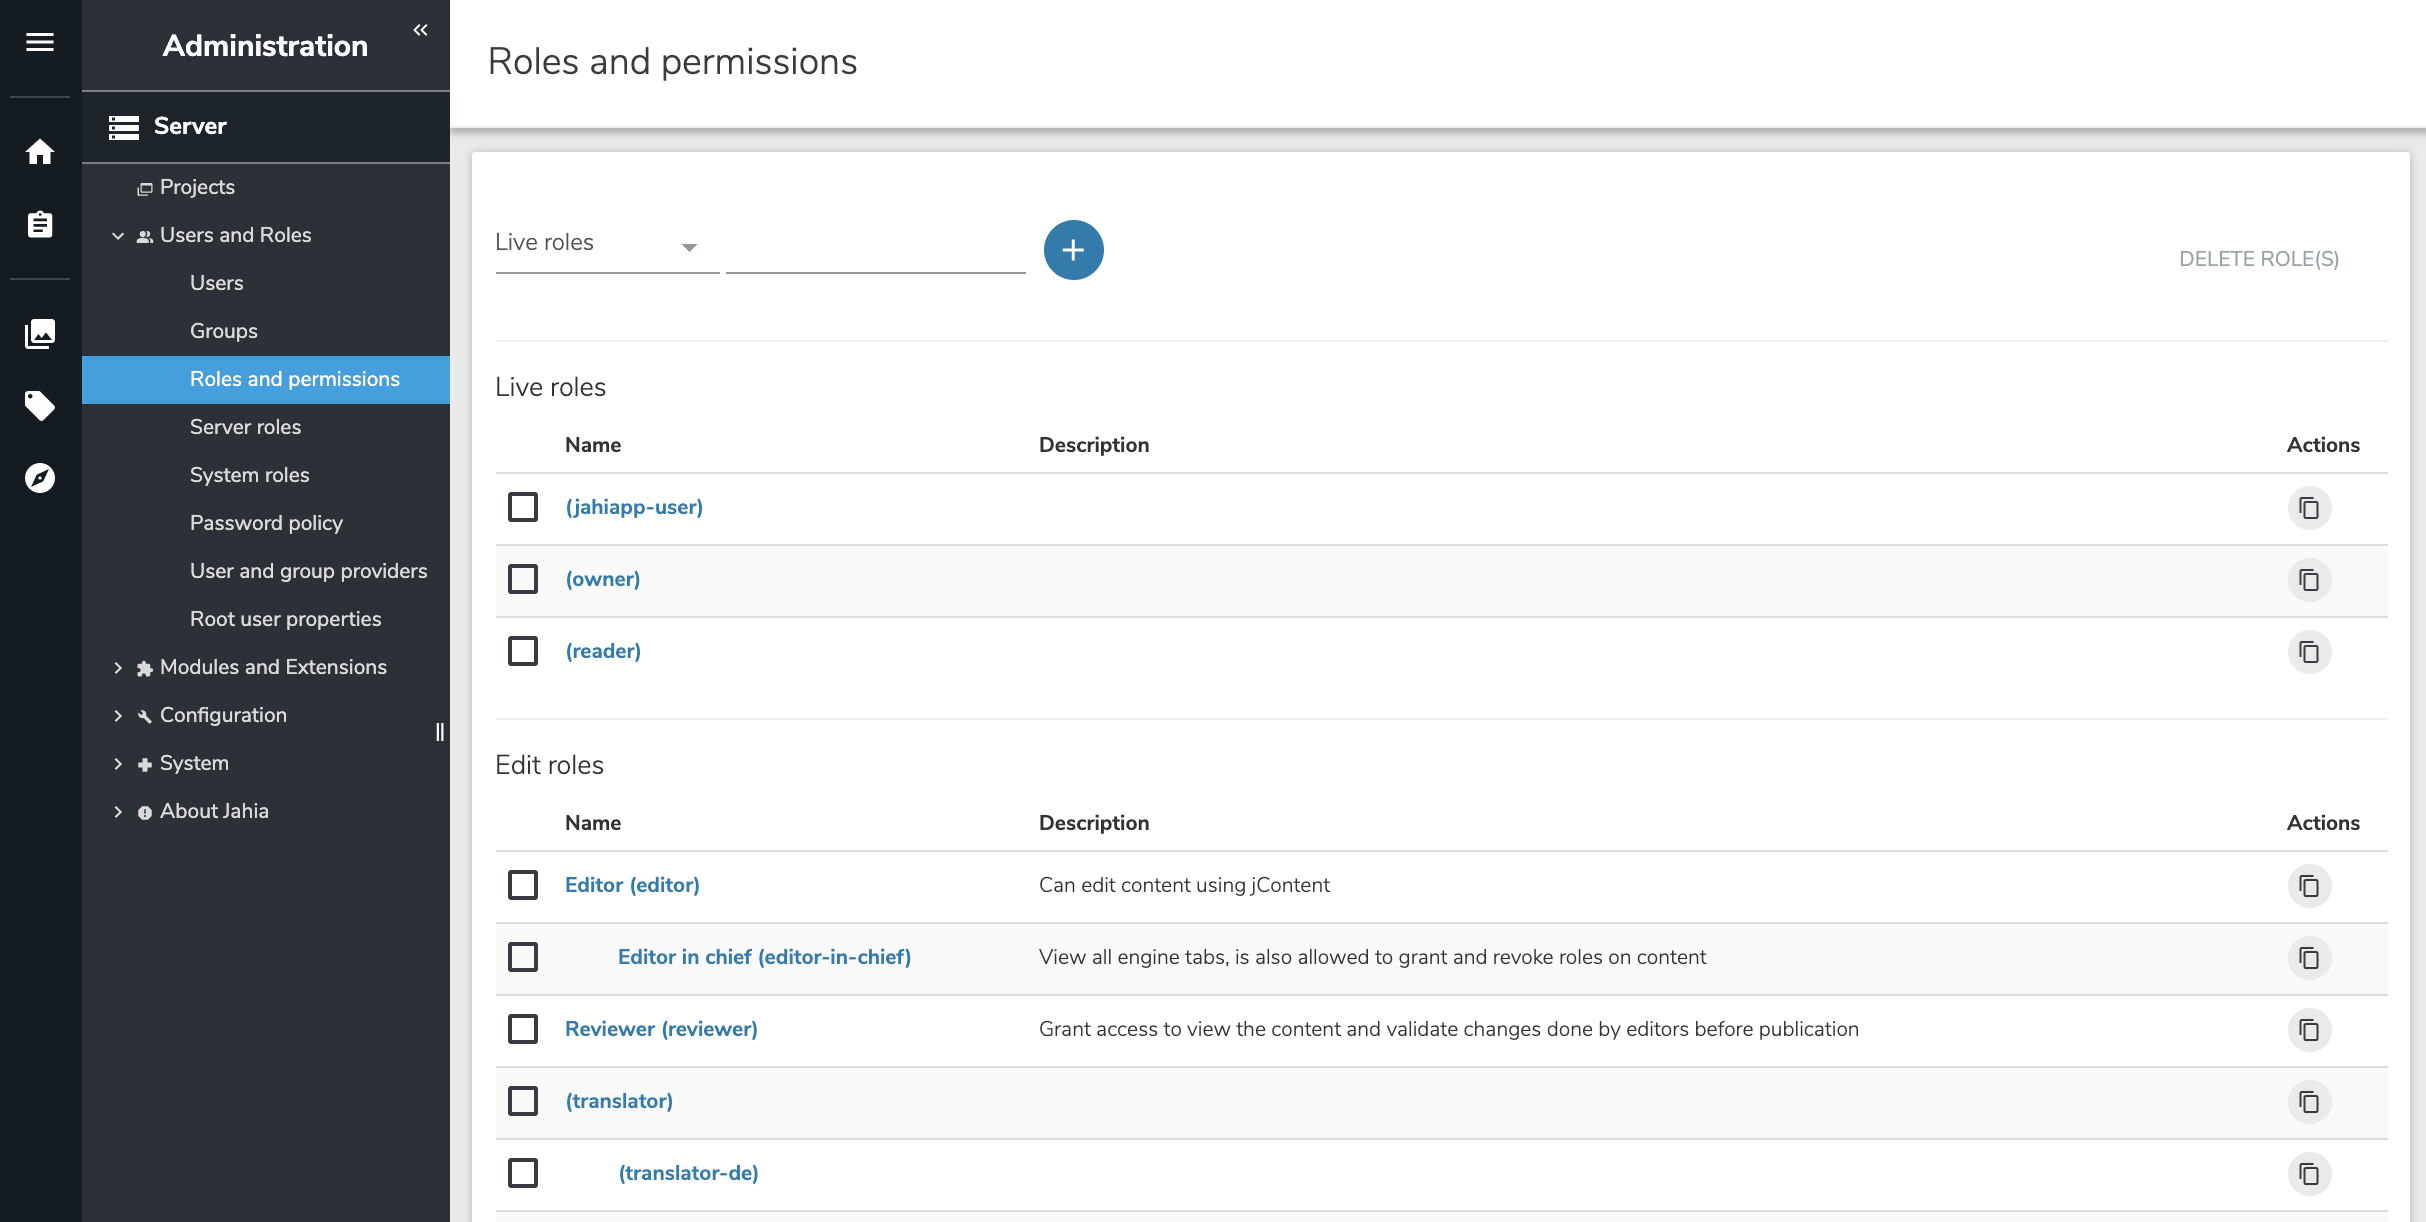
A role is a collection of permissions. Jahia comes with predefined roles, but you you can also create your own roles to meet your particular needs. Jahia provides a default set of roles and permissions to enable fine-grained access control and separation of concerns. You manage permissions in Administration>Server>Users and Roles>Roles and permissions. Modules providing additional panels and feature can also come with their own set of permissions. Module permissions are also available here.
Setting permissions for a role
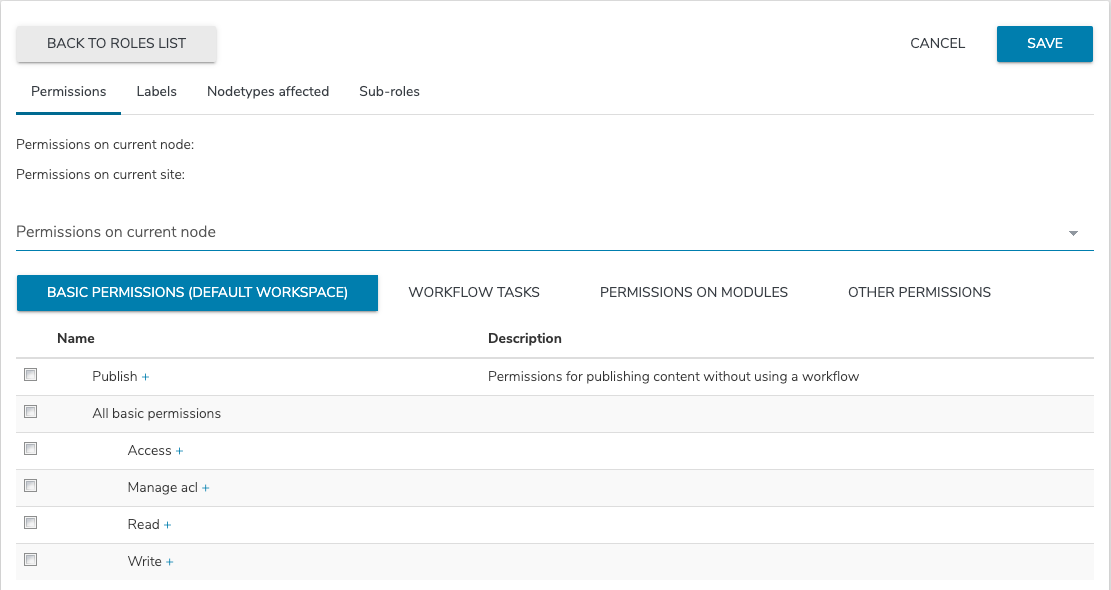
You can define permissions for a role when creating or editing it.
To set permissions for a role:
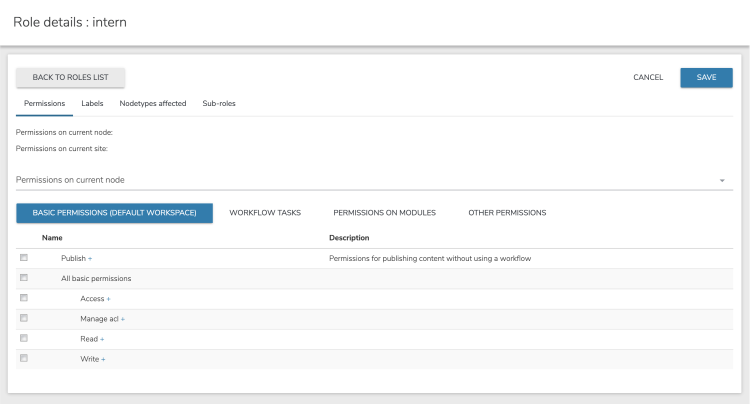
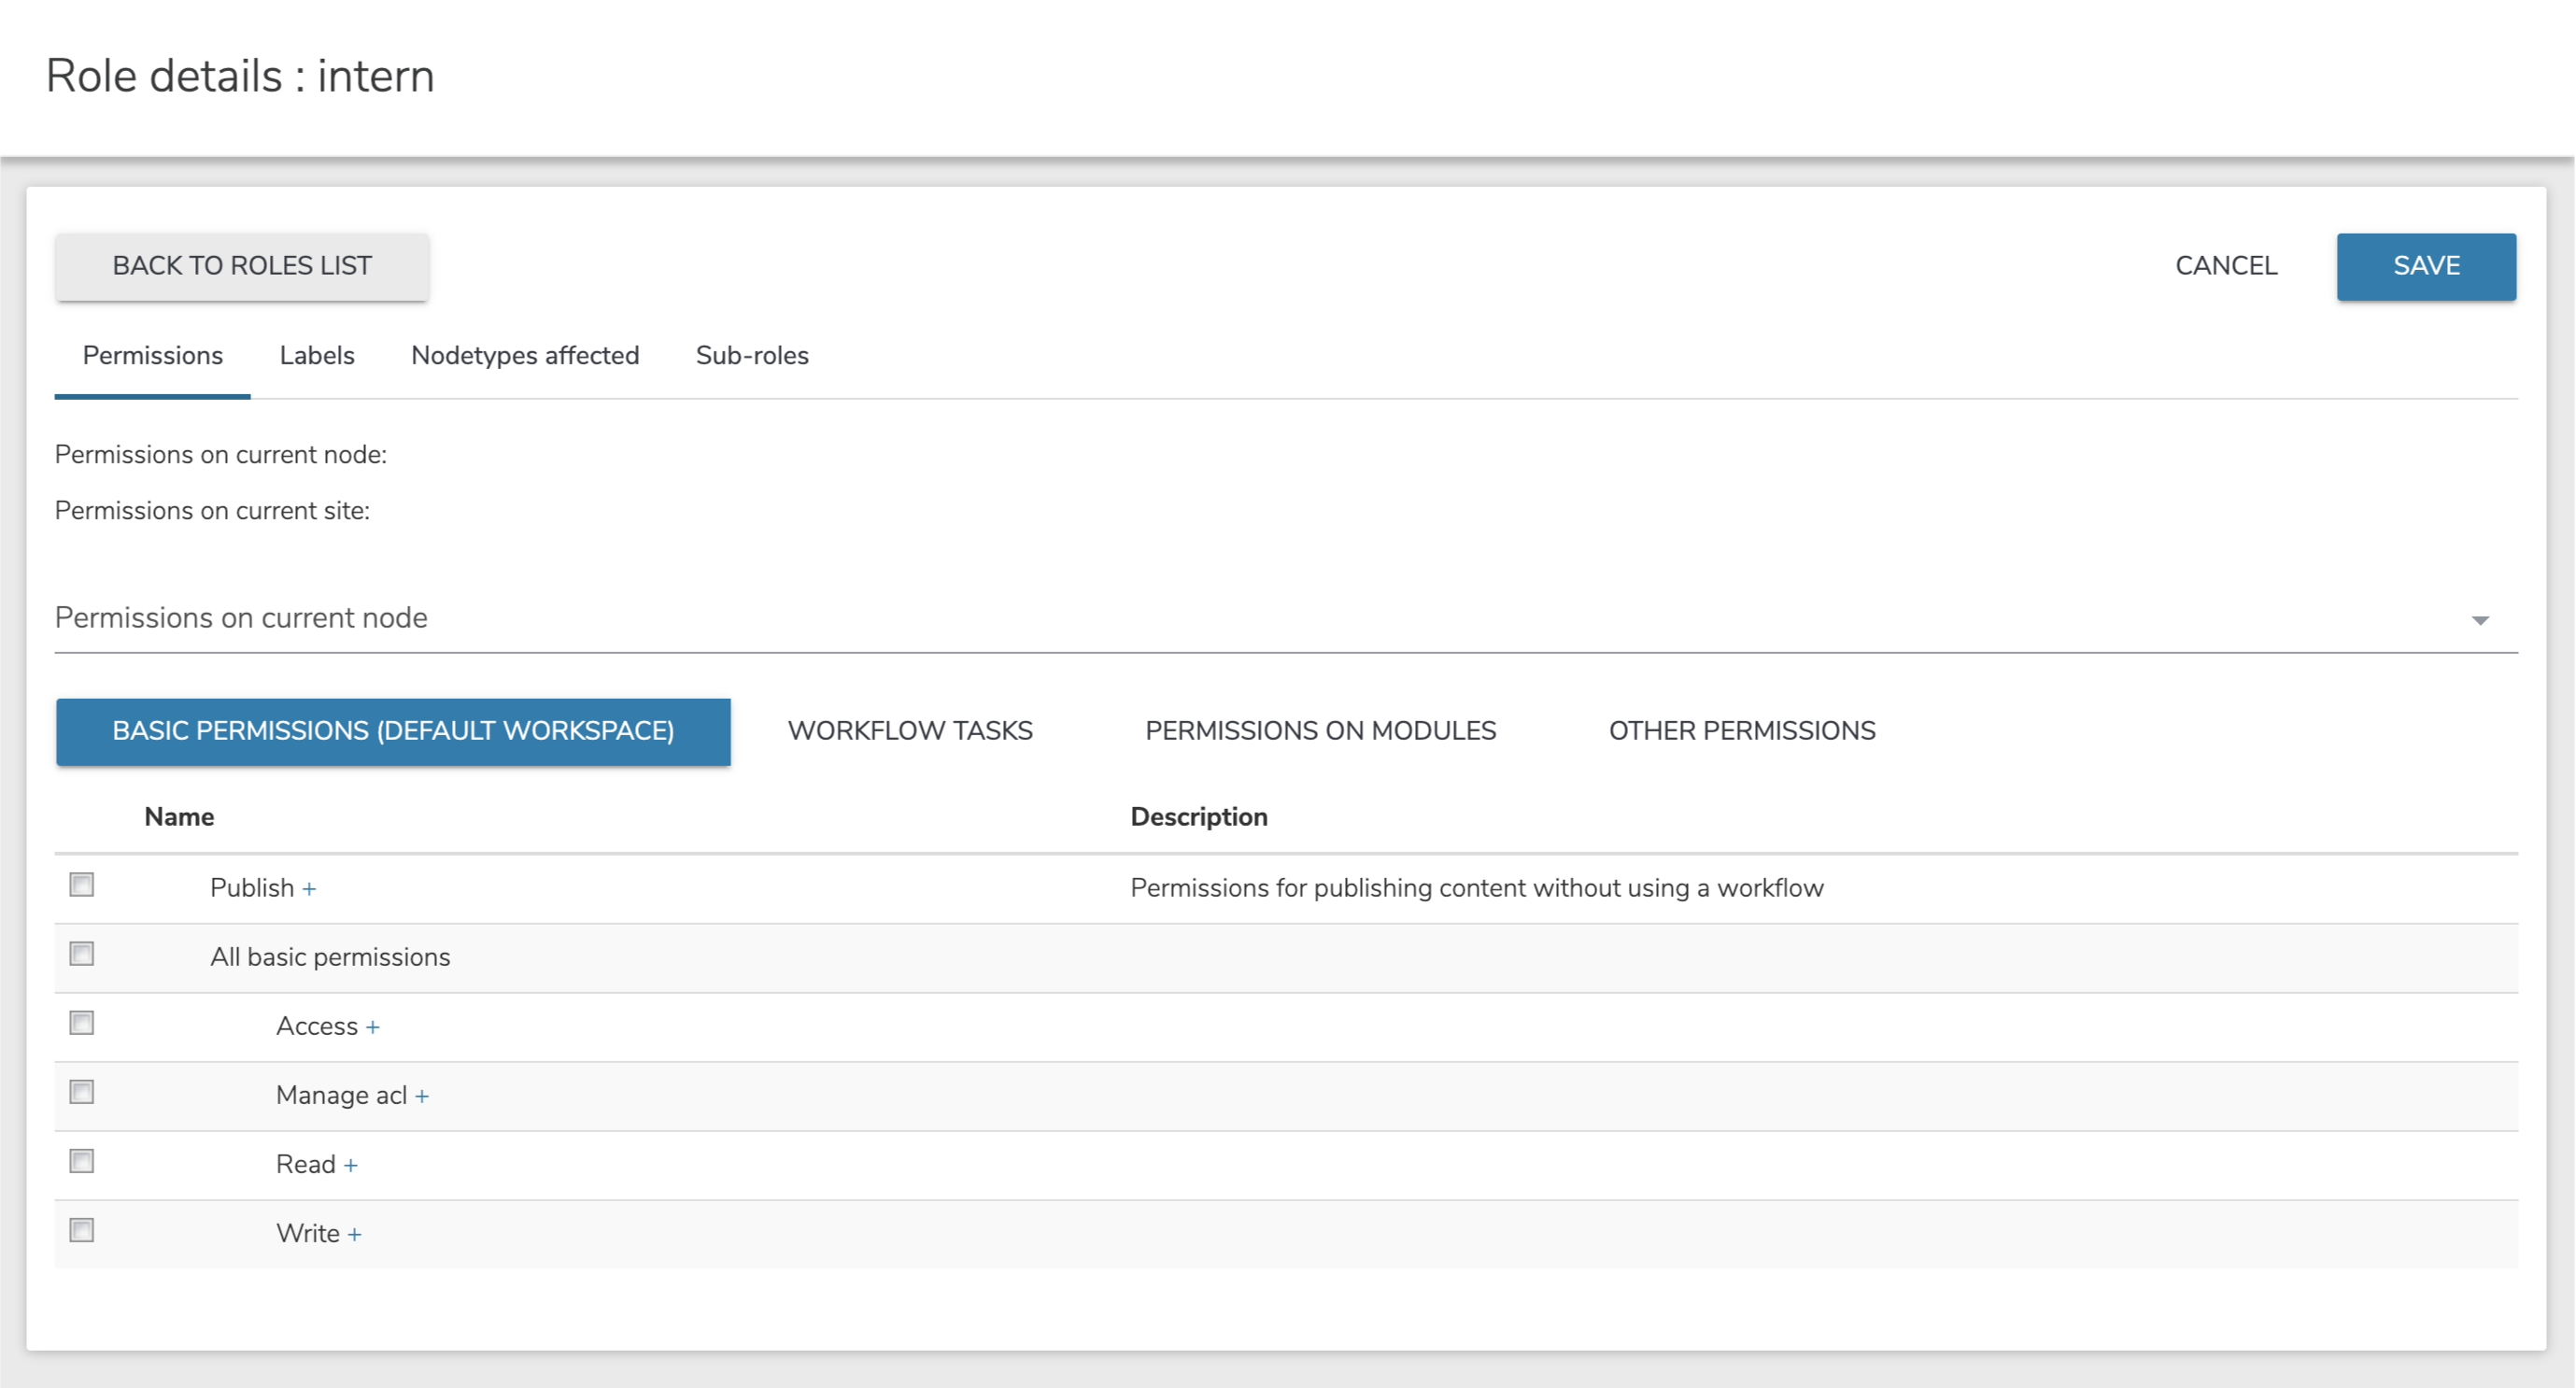
- Select the Permissions tab. The summary view shows current permissions for this role.

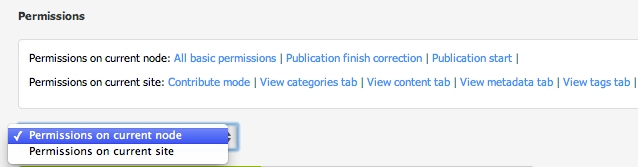
- In the dropdown list, specify whether to the set permissions for the current node, site, or server. Note that server permissions are only available for Server roles. The permission sets that are available differ depending on what you selected in the dropdown. Each permission set contains its own specific categories of rights.

- Click on the plus sign (+) beside a permission to show its subpermissions. Selecting the checkbox next to a parent permission also selects all its subpermissions, which can then be unchecked on an individual basis.
- To set permissions on current node, specify permissions in one of the following tabs. Permissions apply to content items, pages, and more, as opposed to permissions global to a site.
- Basic permissions
Permissions include read, write and system-related, node-specific access control list (ACL) on the default workspace. Basic permission apply mainly to editing interfaces. - Workflow tasks
Permissions define the steps in the workflow that are allowed for this role. - Permissions on modules
Permissions grant access to specific modules and their features, for example, Blog, Forum, and Wiki. - Other permissions
All permissions including permissions that are usually not relevant for the current role on the current scope. Typically you do not need to assign permissions here, unless you have a unique use case.
- Basic permissions
- To setting permissions on current site, specify permissions in one of the following tabs. Permissions apply to site level.
- User Interface
Permissions manage access to sections of the editing interface, for example, editing and management interfaces. - Templates and Components
Permissions allow creating content using certain content types (for example basic, social, and multimedia content) and creating pages using specific layout templates. - Site administration
Permissions grant access to the administration panels of the Site Settings menu, for example Groups, Languages, and HTML settings. For more information about Site Settings, please see the features described in section two.
Note: This tab is only visible to roles that have been created as Site roles. - Other permissions
All permissions including permissions that are usually not relevant for the current role on the current scope. Typically you do not need to assign permissions here, unless you have a unique use case.
- User Interface
- To set permissions on entire server, specify permissions in one of the following tabs. (only accessible to Server roles). These are the permissions global to the server.
- Basic permissions
Permissions define simple read, write and system-related ACL permissions on the default workspace. - Server administration
Permission grant access to the different panels in Server Administration settings. - Other permissions
All permissions including permissions that are usually not relevant for the current role on the current scope. Typically you do not need to assign permissions here, unless you have a unique use case.
- Basic permissions
- When you are finished setting permissions, click Save.

Roles types
When you add a role you decide which role type to create the role in. The role types define the scope of a role, where it is useful and can be used. There are four role types:
- Live roles
- Edit roles
- Site roles
- Server roles
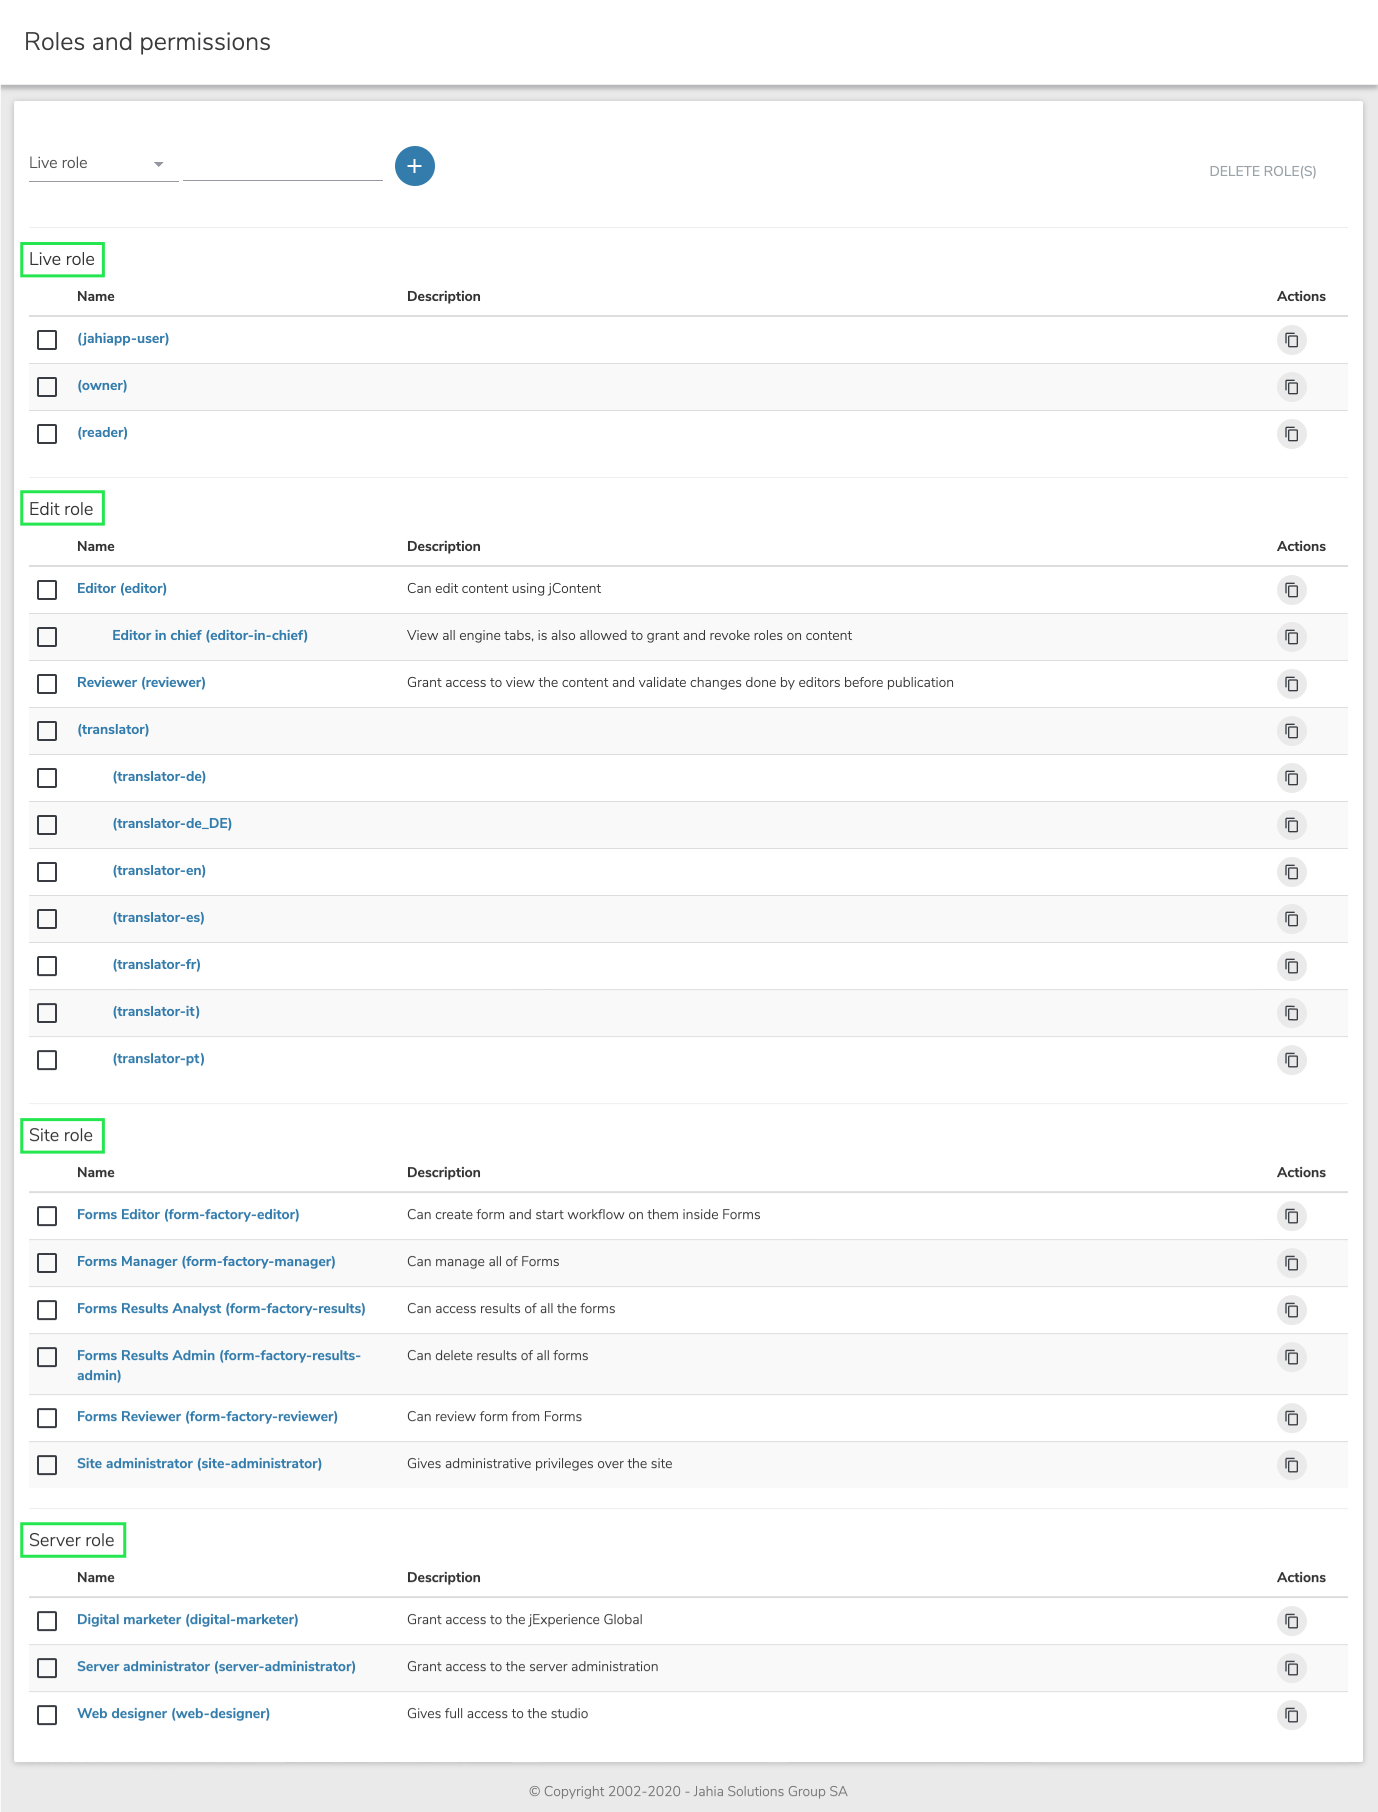
Live roles
Live roles define what can a user do in live mode. For example, the Read live permission allows your authenticated and non-authenticated visitors to see a published page or published content in a page. The default Reader role has this permission.
Live roles can be used to grant users the permissions to perform specific actions and access specific features. For example, a custom permission can allow or restrict a user from commenting on a blog entry.
You can also assign groups and users to live roles using Content Editor.
Edit roles
Edit roles define how users can interact with content and use the Jahia backoffice. By default, Jahia provides a set of edit roles:
- Editor
Users with this role can create content in a site, and request their publication (they cannot directly publish the content themselves). Editors do not have access to all Content Editor advanced options. - Editor in chief
This role inherits from Editor, meaning that it provides Editor permissions and additional permissions. Editors in chief can create content and also directly publish sites and validate publication requests. Editors in chief have access to all advanced options in Content Editor, for example, they can assign users and groups to edit and live roles, set restrictions on the type of content to create in a list or in a content folder, and more. - Reviewer
A reviewer can only publish or validate publication request. A reviewer cannot create or edit content. - Translator roles
Translator can only edit content in a given language and request a publication.
You can use these edit roles to give access to your users to the Additional features in jContent. You can also assign groups and users to edit roles using Content Editor.
Site roles
Site roles have site-wide permission settings, for example, access to the site administration panel or some additional features in jContent. By default, Jahia includes the Site administrator role. Find out more about Site administration and how to assign site roles to your users and groups.
Server roles
Server roles have permission settings on the server itself, including access to the Server Administration panel. By default, Jahia provides the following server roles:
- Server administrator
This role provides administrator privileges, including access to the different server administration panels - Web designer
This role enables the Developer Tools entry in the navigation menu and access to Studio. Note that Studio only available when Jahia is started in development mode. For more, see Using Developer Tools.
You can assign users to these roles in Administration>Users and Roles>Server Roles. For information, see Assigning users to server roles.
System roles
System roles have permission settings related to system administration, including access to Jahia Tools and the Karaf console. By default, Jahia provides the following system role:
- System administrator
This role provides administrator privileges, including access to different server administration panels, Jahia Tools, and the Karaf console. The role allows access to Jahia tools through theSystem tools accesspermission. Jahia Tools enable you to perform maintenance and troubleshooting on your platform. For more information on using Jahia Tools, see Troubleshooting tools.
Only a root user can assign users to the System administrator role. For information on assigning users to a system role, see Assigning users to system roles.
Creating a role
When you create a role, you select a role type and name and then specify permissions for the role. After specifying permissions, you can optionally create localized role names, restrict the role to specific node types, and create subroles that inherit setting from the parent role.
To create a new role:
- Choose a role type (Live, Edit, Site or Server) in the dropdown list and enter a role name. The role name is the system name. The role name is also the default name as long as no specific labels are created. It is recommended to enter a short and descriptive title. You will not be able to change this value later on.

- Click Add role to create the new role.
- On the next page, you can now edit the new role’s properties.

Subroles
You can create subroles which inherit from an existing role and its set of permissions. A subrole can only have extended permissions compared to its parent role. Permissions from the parent role are copied and inherited automatically, including subsequent changes made to the parent role’s permissions.
To add a subrole:
- Click the Sub-roles tab, and enter a name for the new subrole.
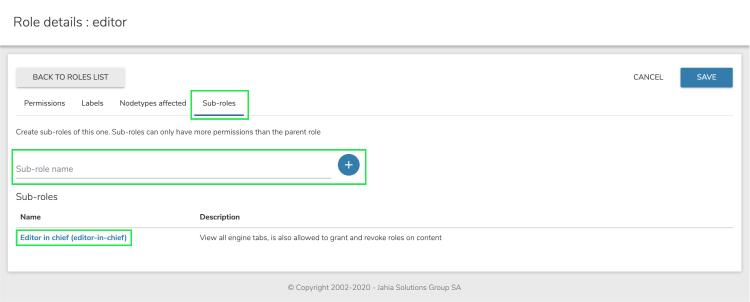
The newly created subrole is visible in the Roles list. - Edit the role by clicking on its name.


Editing an existing role
To change the permissions for an existing role, click on the role’s name in the Roles list to edit its properties.

The screen displayed is the same as the properties screen shown after a new role is created. See "Creating a New Role" for more details. Click "Save" to reflect any changes.
Specifying localized role names
A role is first defined by a system name, but can have an internationalized title. This title will be used in most screens preferably to the system-name. You can add a description for this role in multiple languages.
To specify localized role names:
- Click the Labels tab, choose a language and click the add icon.
- Provide a title and description to define how the role displays in this locale. You can also edit existing labels.
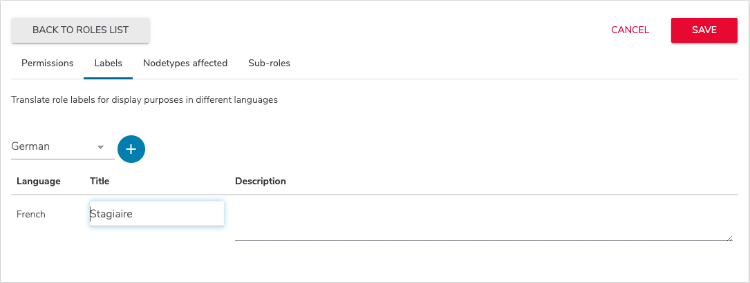
- Click Save.

Restricting a role to a node type
You can define the node types (content types) in which a role applies. By default, a role can be granted to a user or group on any type of content type. By selecting specific types of content, the role appears in the access rights management interfaces for these types of content and is not available for others types. This prevents Access Rights management interfaces from being overloaded and from confusing users by making available roles that would have strictly no effects on the targeted object.
To restrict a role to a node type:
- Select the Nodetypes affected tab.
- Select one or more node types in the list. For example, for an Article editor role, only grant permissions to edit content items with the article type.
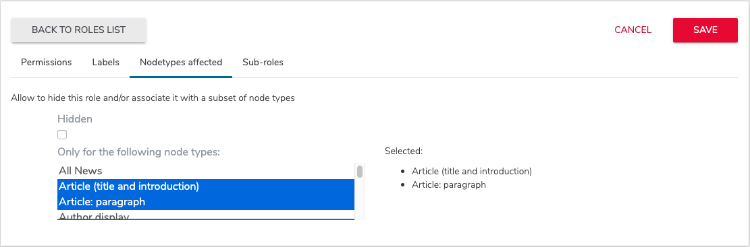
- Click Save.

Deleting a role
Select one or more roles by checking the box next to them, then click on the "Delete Role(s)" button:
The next screen asks you for confirmation. Deleting a role cannot be undone; please proceed with caution.
If the role that is to be deleted has sub-roles, they will be deleted as well.
Assigning users to server roles
Server roles are a specific type of roles that have permissions on the server itself, including access to the Server Administration interface. By default, only root has Server Administration privileges.
Permissions for server roles can be set like for any other role in Roles and permissions in the left navigation menu. The Server Roles administration panel allows you to add users to existing server roles.

To add or edit the members of one of the available server roles:
- Login as user who is a member of the Server administrator role or who has the Admin server roles permission.
- Select Edit beside the role that you want to modify. For example, select Server administrator.
- In the Users or Groups tab, select or clear the users or groups that you want to add or remove.
- Click Save.
The updated list of members displays on the Server Roles page.
Assigning users to system roles
System roles are a specific type of roles that have system administrator permissions on the server itself, including access to the Jahia Tools.
root can assign users to a system role.Permissions for system roles can be set like for any other role in Roles and permissions in the left navigation menu. The System Roles administration panel allows you to add users to existing system roles.
To add or edit the members of one of the available system roles:
- Login as the
rootuser. - Select Edit beside the role that you want to modify. For example, select System administrator.
- In the Users or Groups tab, select or clear the users or groups that you want to add or remove.
- Click Save.
The updated list of members displays on the System Roles page.
Privileged roles
Privileged access gives users edit or contribute access to the default workspace. This access allows users to read templates, files, and other site resources from the default workspace.
A site-privileged group is created for every site. This group has read access on the root node of the site through the privileged system role. This role is inherited for all sub-nodes of the site. If a section or a folder needs to be set as private, then the break all inheritance flag should be used. The shared privileged group has read access on all shared resources, such as the system site, categories, and templates. Every site-privileged group is member of this group. Any user member of a site-privileged group can also get shared resources.
Depending on its role type, a role can define the j:privilegedAccess property. Any user who is granted a role with privileged access is also added as a member of a site-privileged group. The edit-role, site-role, and server-role types have privileged access. As long as a user is granted a privileged access role on any node, they will be part of the site-privileged group and will have privileged access.
In the following example, the user is author of section 1. The user is then member of the site-privileged group of siteA and has read access on siteA. They also have read access on shared resources.

Role scopes and external permissions
A role is always granted on a specific node and gives permissions to the user on that node, specifically the context node. However, a role can also have additional scopes and give global permissions on the associated site or on the server. Depending on the role type, additional scopes are pre-configured. For example, in an edit-role, you’ll find 2 scopes, the current node and current site. Basic permissions are given on the context node. As the UI permissions are only valid on a site, they will be given on the context site. These UI permissions, which are not applied on the context node but on another node, are called external permissions.
Access control lists
An ACL (Access Control List) defines which roles are granted to a user or group on a specific node. The ACL defines the access policy on a node and its sub-tree. ACLs are inherited on all sub-nodes. ACLs are structured in multiple Access Control Entries, with one entry for every user and every group that needs to have a role.
ACLs are stored as a jnt:acl sub-node on the node where it is set. It contains a list of jnt:ace.
Roles are assigned to users and groups by an editor in the Roles tab of the node engines. Each line in the table corresponds to an entry in the ACL. A user will have a specific permission if they (or a group they are a member of) has been assigned at least one role containing that permission.
You can partially break the role inheritance at one level by "removing" the role from a user or a group. In this case, the ACE node will contain DENY in the j:aceType property.
To completely redefine ACL on a node, the "Break all inheritance" can be used. The property j:inherit is set to false, and the permission check will not look into the ancestors ACLs.