Forms architecture overview
This document introduces the architecture and design of Forms. Forms is an application that makes it easier for you to create forms on your platform. Forms provides the following set of functionality:
- Building custom forms
- Managing your forms
- Rendering and submitting forms
- Analyzing results
Server side architecture
The JCR structure of the form has not changed. New functionality works the same way as previous ones, meaning that logic, for example, is stored and defined like validations.
Structure
The JSON serialization of a Forms form is quite straightforward. Here an example of Forms serialization:
{
  "jcrId": "0b7f45fb-081a-4be5-b72f-7bb9d6165d46",
  "formName": "architecture",
  "buildingLang": "en",
  "cssClassName": null,
  "formDescription": null,
  "afterSubmissionText": null,
  "modified": "2016-04-04T14:02:50.320-04:00",
  "steps": [
    {
      "jcrId": "72898fce-effb-4dcf-b6d0-567673bd48b9",
      "label": "Step 1",
      "inputs": [
        {
          "name": "email-input_0_1",
          "label": "Email input",
          "tab": "input",
          "template": "<ff-email></ff-email>",
          "wizard": "<ff-email view-type ='designView'></ff-email>",
          "nodeType": "fcnt:emailDefinition",
          "jcrId": "7714bafe-7226-4bcd-ba15-4780a5eb7e3e",
          "choiceField": null,
          "value": null,
          "layoutUUID": "510917c2-0ea0-47c6-a717-2aa1d545c303",
          "inputsize": "input-md",
          "helptext": "Please enter a valid email here",
          "placeholder": "aaa@aaa.com",
          "definitionOptions": [
            "inputsize"
          ],
          "definitionOptionsTranslatable": [
            "helptext",
            "placeholder"
          ],
          "validations": {
            "required": {
              "nodeType": "fcnt :requiredValidation",
              "jcrId": "ef343f97-a59b-4382-9424-adf9a06118ab",
              "message": "This field is required",
              "definitionOptions": [
              ],
              "definitionOptionsTranslatable": [
                "message"
              ]
            },
            "email": {
              "nodeType": "fcnt:emailValidation",
              "jcrId": "7c9f48b7-8ffb-4b96-a46c-6935cbc21997",
              "message": "Please enter a valid email address",
              "definitionOptions": [
              ],
              "definitionOptionsTranslatable": [
                "message"
              ]
            }
          }
        },
        {
          "name": "checkboxes-matrix_0_2",
          "label": "Checkboxes Matrix",
          "tab": "checkbox",
          "template": "<ff-checkboxes-matrix></ff-checkboxes-matrix>",
          "wizard": "<ff-checkboxes-matrix view-type='designView'></ff-checkboxesmatrix>",
          "nodeType": "fcnt:matrixCheckBoxesDefinition",
          "jcrId": "0ef30bc8-ba51-460e-8241-0ee7f3c72ca0",
          "choiceField": "rows,columns",
          "value": null,
          "layoutUUID": "d2a15b06-0187-486d-a9f2-8869d0bcc32d",
          "helptext": "Help",
          "rows": [
            {
              "key": "q1",
              "value": "Question One"
            },
            {
              "key": "q2",
              "value": "Question Two"
            },
            {
              "key": "q3",
              "value": "Question Three"
            }
          ],
          "columns": [
            {
              "key": "a1",
              "value": "Answer One"
            },
            {
              "key": "a2",
              "value": "Answer Two"
            },
            {
              "key": "a3",
              "value": "Answer Three"
            }
          ],
          "definitionOptions": [
          ],
          "definitionOptionsTranslatable": [
            "helptext",
            "rows",
            "columns"
          ],
          "validations": {
            "matrix-required": {
              "nodeType": "fcnt:matrixRequiredValidation",
              "jcrId": "3f38c426-add4-438c-8b21-78cf2ab9f8f3",
              "message": "Enter your error message here",
              "definitionOptions": [
              ],
              "definitionOptionsTranslatable": [
                "message"
              ]
            }
          },
          "logics": [
            {
              "name": "if-field-is-valid_0",
              "nodeType": "fcnt:ifFieldIsValidLogic",
              "jcrId": "16b30c64-9e00-45ec-ac66-6179700b3ed4",
              "fieldName": "email-input_0_1",
              "noview": "true",
              "definitionOptions": [
                "fieldName",
                "noview"
              ],
              "definitionOptionsTranslatable": [
              ]
            }
          ]
        }
      ]
    }
  ],
  "actions": [
    {
      "jcrId": "1b8226f7-8898-4099-ae61-b61fcab6960b",
      "nodeType": "fcnt:saveToJcrAction",
      "actionname": "savetojcr",
      "apiEntryPoint": "/modules/formfactory/results",
      "definitionOptions": [
        "actionname",
        "apiEntryPoint"
      ],
      "definitionOptionsTranslatable": [
      ]
    }
  ],
  "missingLanguages": null,
  "existingLanguages": {
    "en": "English"
  },
  "progressBar": null,
  "callbacks": null,
  "displayableName": "architecture",
  "layoutJson": "{\"active\":false,\"layoutEmpty
  \
  ":true,\"steps\":[{\"rows\":[],\"inputPositionManagement\":{\"colIndex\":null,\"
  rowIndex
  \
  ":null,\"activeInputFieldName
  \
  ":null,\"activeInputExists\":false},\"inputMovementHistory\":[]}]}",
  "token": null,
  "trackUser": true,
  "callbackName": null,
  "displayCaptcha": true,
  "theme": null
}
The structure is a form is metadata, an array of steps, and another array of actions. Each steps contains an array of inputs with their validations and logic.
Rest API
The API is defined with “JAX-RS”, each entry point manages certain parts of the application. The main entry points are:
/forms/builder
All the sub resources for form creation/management/forms/settings
All the sub resources for Forms settings/forms/live
All the sub resources for form rendering/submission/forms/results
All the sub resources to load/analyze the submissions
OSGI/Extendability
Once Forms is deployed on your platform, it reacts on every module deployment and scans their definition file, looking for node types specific to Forms. To declare a new input, you just declare the type in the definition file, then you create a “WZD” view (it’s a file following a specific DSL in groovy to ease the creation of extensions for Forms).
Example of a WZD file, from Input Text definition:
input {
    label "Text input"
    template "<ff-input-text></ff-input-text>"
    wizard "<ff-input-text view-type='designView'></ff-input-text>"
    supportedValidationTypes "required", "equal", "length", "number", "regex"
    supportedLogicTypes "valid", "input"
    properties {
        inputsize "input-md"
    }
    propertiesI18n {
        helptext "Help"
        placeholder "Text input"
    }
}
An input like this one, will need a few other files to be working with Forms.
Client side architecture
Each input in Forms is an AngularJS directive. Forms aggregates JS files inside one JS file so that the application loads with the least requests possible. All resource bundles from your module are aggregated together and merged in a dictionary available in the builder so that you can use them in JS without worrying about how to load them across modules. This structure allows Forms to have custom templates for each input, either for rendering or editing. You can design panels the way you want.
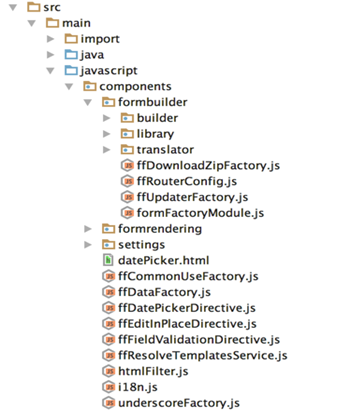
The build system of Forms aggregates all JS libraries into one file _forms3.js. Forms does the same for the AngularJS application, by aggregating each components in its own JS file, including forms-core.js, forms-builder.js, forms-rendering.js, and forms-settings.js. Forms uses NPM, Bower and Grunt in conjunction with Maven. Here is what a typical input structure look likes:
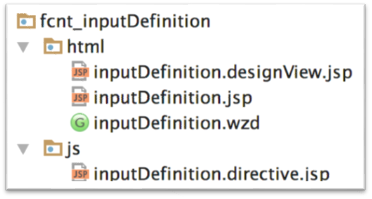
As you can see we need four files to define a new input. Actions and validations will need even less files (it is possible to declare a new action with just a “wzd” file).
- The “wzd” file is the properties of your input (label, properties, i18n properties, validations, logics, etc.)
- The directive view is the AngularJS directive defining how and which template to load and if needed some specific behavior.
- Then the default view is used to render the input in the builder/preview/live mode, this is the view your visitor will see when they fill the form.
- And last view is the “designView” which will be visible by your form designer when they create/modify a form and update an input.
The builder is build as a Single Application Page (SAP) every redirection is done internally using AngularJS UI-Router. The main routes are the library, the builder, and the translation mode.
angular.module('formFactory').config(function(contextualData, $stateProvider, $urlRouterProvider) {
...
   $stateProvider
      .state('library', {
         url: '/library',
         templateUrl:...
      })
      .state('builder', {
         url: '/builder',
         template: '<ff-controller>',
         params: {...}
      })
      .state('translator', {
         url: '/translator',
         template: '<ff-form-translator>',
         params: {...}
      });
}, ['contextualData', '$stateProvider', '$urlRouterProvider']);
On the preview/live side each form is bootstrapped individually so that they do not collide on the same page. There is no routing on the preview/live side, we load the whole form at once from the REST API and then navigate between all the steps, until submission. The module in preview/live is much lighter and with less dependencies than in the builder side.
Live module declaration:
ff.app = angular.module('formFactory', ['i18n', 'formFactory.validation', 'formFactory.logic', 'ngFileUpload',
    'checklist-model', 'formFactory.commonUseFactory', 'formFactory.templateResolver', 'ui.bootstrap',
    'formFactory.dataFactory', 'vcRecaptcha']);
Builder module declaration:
angular.module('formFactory', ['ui.router', 'formFactory.dataFactory', 'datatables', 'datatables.bootstrap',
               'i18n', 'ui.bootstrap', 'ui.bootstrap.tooltip', 'formFactory.commonUseFactory', 'ngResource',
               'formFactory.downloadZipFactory', 'formFactory.updaterFactory', 'checklist-model',
               'uiSwitch', 'formFactory.templateResolver', 'toaster', 'ngAnimate'],
               function ($uibTooltipProvider) {
                   $uibTooltipProvider.options({
                       placement: 'bottom',
                       popupDelay: 200,
                       popupCloseDelay: 0,
                       appendToBody: true
                   });
               });
Library
The library is the main entry point to your form creation and lifecycle management. Users need to be part of the role “Forms Manager”, “Forms Editor” or “Forms Reviewer” to access the library.
Creation
When you want to create a new form we validate that there is no form existing with the same name already. The UI is calling the entry point:
/formfactory/builder/checkformnameavailability/{language}
If name is available and valid then upon click we route you to the builder with a predefined form composed of one input text and one action (“Save To JCR”).
Management
Once you have created a form and saved it in the builder, when you return to the library you will see it in the list of forms you can manage.
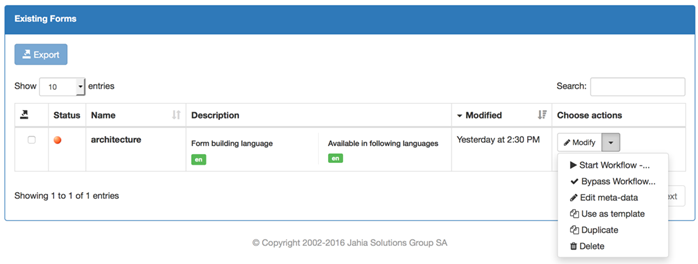
You can easily modify the form, or by expanding the menu you have access to some other actions like publishing the form, deleting it. There is a shortcut to go directly to the metadata edition, this will route you the builder and open up the metadata side panel automatically.
Use as template
This function creates a virtual copy of the form with its new name and then you can edit/save it. If you are working with multiple languages, it will copy only the current language.
Duplicate
Duplicate helps you create an exact copy of an existing form, by duplicating it on the server side, meaning that as soon as you duplicate the form this one is saved on the server. Duplicate allows you to duplicate a form that has been created in English for say into French and then start modifying it in French. The duplicate process will switch the building language of your form to your current one. This way you can duplicate a form and modify its structure in another language.
Import/Export
Forms allows you to export one or multiple form(s) at the same time. If you export multiple forms, Forms aggregates all the zip files in a parent zip file. You can then import the forms inside another platform. The import/export is otherwise using the usual archive format of Jahia import/export services.
Builder
The form building is with the submission analysis the main components of Forms. The building process can be tear down to multiple phases/functionalities. We are going to go through them one by one.
Inputs
Inputs are key to your forms. The builder allows you to select which inputs to add to your form. An input is comprised of multiple sub elements:
- Node type definition
- WZD file to declare the properties of this input
- AngularJS directive to define the behavior of this input and how to load the different template
- A default template for rendering in preview/live of this input
- A “designView” to edit the defined properties in the builder
Definition example from country selection:
[fcnt:countryListDefinition] > jnt:content, fcmix:definition, mix:title, jmix:droppableContent, jmix:hiddenType
 - country (string, choicelist[country, sort])
//Here we are declaring a 'fake’' country property at the cnd level so that we can use Jahia choicelist
//initializer capabilities
WZD file allows to define all the properties of your input, from the same country selection example:
select {
    label "Select Country"
    template "<ff-select-country></ff-select-country>"
    wizard "<ff-select-country view-type='designView'></ff-select-country>"
    supportedValidationTypes "required"
    supportedLogicTypes "valid", "country"
    properties {
        inputsize "input-md"
        topSelections {
            values "US", "FR"
        }
    }
    propertiesI18n {
        helptext "Help"
        placeholder "Select country"
    }
}
In this file you are defining the template you want to use for the default view and for the wizard. See the appendix for a more detailed description of this WZD format. Then you list the validation and logic rules that this input support. After that you need to list all your properties, there is non I18N properties and I18N properties. The I18N properties are the only one that can be edited in translation mode.
Forms is using the label property of you “WZD” file to create the node, the node name is the label in lowercase and with the whitespaces hyphenated. So that “Select Country” become “select-country”. See how the node name is referenced in the next file (the directive to resolve the different views from Jahia).
The AngularJS directive is the one defining the behavior of your input when the user interacts with it:
<jcr:propertyInitializers var="countries" nodeType="fcnt:countryListDefinition" name="country"/>
angular
    .module('formFactory')
    .directive('ffSelectCountry', ['$log', 'ffTemplateResolver', function ($log, ffTemplateResolver) {
        var directive = {
            restrict: 'E',
            require: ['^ffController'],
            templateUrl: function(el, attrs) {
                return ffTemplateResolver.resolveTemplatePath('${formfactory:addFormFactoryModulePath('/form-factory-definitions/select-country', renderContext)}', attrs.viewType);
            },
            link: linkFunc
        };

        return directive;

        function linkFunc(scope, el, attr, ctrl) {
            var countryList = [
                <c:forEach items="${countries}" var="country" varStatus="s">
                {
                    country:
                    {
                        key: '${country.value.string}',
                        name: '${functions:escapeJavaScript(country.displayName)}'
                    },
                    rendererName: 'country'
                }<c:if test="${not s.last}">, </c:if>
                </c:forEach>
            ];
        ...
        }
    }]);
In this directive we are initializing the list of country from Jahia country initializer, this way we do not need to get the country list from another service than Jahia, but it will be possible to do some asynchronous request to an external service to get the list of countries. We then build a JavaScript structure to use as a source for our AngularJS dropdown list. The directive template is calculated upon runtime depending on your context ffTemplateResolver.resolveTemplatePath, but the view itself is rendered once and only, for the builder and for the live mode, per site and per language the results are stored in a JS file in digital-factory-data/generated-resources, if you are in development mode then this file is generated every time:

This means that calling the initializer is done only once for everybody, whereas if we were using an external services it will called for every user, so depending on the type of data each solution as its benefits. Now the UI part, the default view, this is the one your users will see when they submit the form, or when they build it:
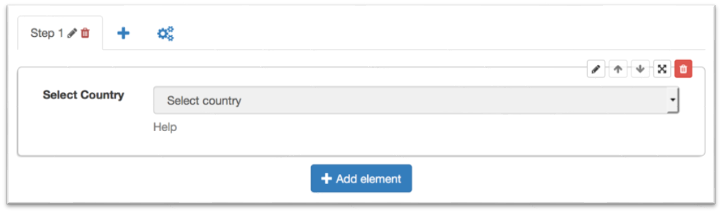
Here is the code for this input:
<div class="form-group"
     ng-class="{'has-error': form[input.name].$invalid&&form.$dirty}"
     ng-show="resolveLogic()">
    <label class="col-sm-2 control-label">
        {{input.label}}
    </label>
    <div class="col-sm-10">
        <select name="{{input.name}}"
                class="form-control"
                ng-model="input.value"
                ng-required="isRequired()"
                ng-options="country as country.country.name for country in countries"
                ng-disabled="readOnly"
                ff-validations
                ff-logic>
            <option value="">{{input.placeholder}}</option>
        </select>
        <span class="help-block"
              ng-show="input.helptext != undefined">
            {{input.helptext}}
        </span>
        <span class="help-block"
              ng-repeat="(validationName, validation) in input.validations"
              ng-show="form[input.name].$error[(validationName | normalize)]&&form.$dirty">
            {{validation.message}}
        </span>
    </div>
</div>
When AngularJS is compiling this template, you will have access to the form controller “form” and to the current input itself “input”.
The ng-show="resolveLogic() instruction mean that we want to display this div only if the logic rules are true (works only in live/preview mode, will do nothing in builder mode).
The ng-class="{'has-error': form[input.name].$invalid&&form.$dirty}" will apply Bootstrap 3 error classes on this div if the field is invalid and if the form has been started by the user.
On your input itself you need to map the model to “input.value”, and add the directives “ff-validations” and “ff-logic” if you want to have access and apply all the logic/validations rules defined on your input by the form designer.
The wizard view:
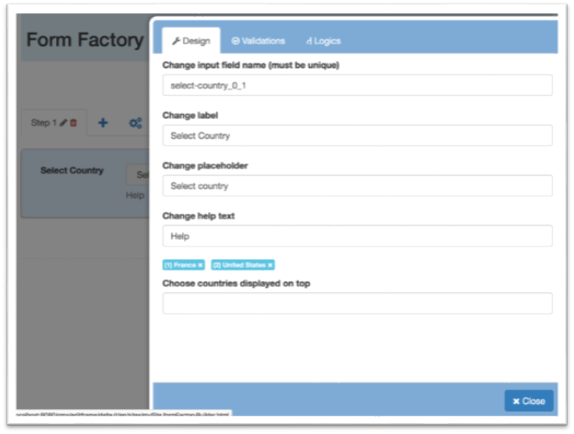
is defined by a JSP view like this one:
<div class="row">
    <div class="col-md-12">
        <div class="row" ng-if="!inTranslateMode">
            <div class="col-md-12">
                <label>
                    <span message-key="ff.label.changeInputFieldName"></span>
                </label>
                <input class="form-control" ng-model="input.name"/>
            </div>
        </div>
        <br/>
        <label>
            <span message-key="ff.label.changeLabel"></span>
        </label>
        <input class="form-control" ng-model="input.label"/>
    <br/>
    <label>
        <span message-key="ff.label.changePlaceholder"></span>
    </label>
        <input type="text" class="form-control" ng-model="input.placeholder"/>
    <br/>
    <label>
        <span message-key="ff.label.changeHelpText"></span>
    </label>
        <input type="text" class="form-control" ng-model="input.helptext"/>
    <br/>
        <ff-country-top-selection countries="countries"
                                  top-selections="input.topSelections"
                                  ng-if="!inTranslateMode">
        </ff-country-top-selection>
    </div>
</div>
Here again we inject some object in the scope of your directive, so you have access to your current input object “input”, there is also a flag that is very useful:
- “ inTranslateMode ” will be true during translation, should be used on every non I18N property to avoid changing it.
In the wizard it is possible to use other directives to have complex input and very helpful wizard. In this example we are using a dedicated directive to allow to select a list of countries that will appear on top of the list of countries instead of having them all sorted alphabetically.
<ff-country-top-selection countries="countries" top-selections="input.topSelections"
    ng-if="!inTranslateMode">
</ff-country-top-selection>
Actions
Actions are a much simpler element for Forms. The actions are standard Jahia actions, to use a Jahia action in Forms you need to declare a specific node type, a “WZD” file and an AngularJS directive. You can also but it is not mandatory have a wizard view for your action (if you need to setup some properties for the action). List of files for declaring a working action:
- Node type definition
- WZD file to declare the properties of this input
- AngularJS directive to define the behavior of this action and how to load the different template
- An optional wizard view to edit the defined properties in the builder
- And of course a Java class (the action is found by its action name, so it is possible to map easily any available action to be used inside Forms)
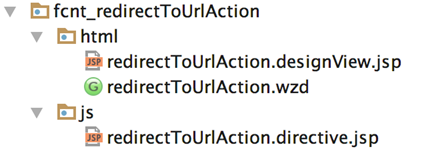
Here is the example from the core action “Redirect To URL”, first the definition:
[fcnt:redirectToUrlAction] > jnt:content, fcmix:action, mix:title, jmix:droppableContent, jmix:hiddenType
now the “WZD” file:
action {
    label "Redirect To Url"
    wizard "<ff-redirect-to-url view-type='designView'></ff-redirect-to-url>"
    properties {
        actionname "redirecttourl"
    }
    propertiesI18n {
        redirectto ""
    }
}
then the directive:
(function () {
    'use strict';

    var redirectToUrl = function($log, $compile, contextualData, ffDataFactory, ffTemplateResolver) {
        var directive = {
            restrict: 'E',
            templateUrl: function(el, attrs) {
                return ffTemplateResolver.resolveTemplatePath('${formfactory:addFormFactoryModulePath('/form-factory-actions/redirect-to-url', renderContext)}', attrs.viewType);
            },
            link: linkFunc
        };
        return directive;

        function linkFunc(scope, el, attr) {}
    };

    angular
            .module('formFactory')
            .directive('ffRedirectToUrl', ['$log', '$compile', 'contextualData', 'ffDataFactory', 'ffTemplateResolver', redirectToUrl]);
})();
And finally the wizard view:
<div class="side-panel-body-content">
    <label message-key="fcnt_redirectToUrlAction.designView.label.redirectTo"></label>
    <input type="text" class="form-control" ng-model="action.redirectto">
</div>
Steps
Steps are really only managed by the designer of the form. There is no specific code associated to them. The live controller enforce that all steps are valid before allowing to go to the next one or to submit the form.
Validations
Validations are simple JavaScript function receiving the new and the previous value of the field they are validating; each field can have multiple validation active at the same time. This means that contrary to inputs or actions, validations do not always need a specific directive, in fact if they need a directive it will be for their wizard view, to achieve more complex scenarios. At minimum, a validation requires:
- A node type in the CND file
- A WZD file to define its properties
- A JavaScript file for the rule itself (loaded only in live/preview mode)
- A view for the wizard (validation have no views in live/preview mode) use in the builder
- Optionally they can have an associated AngularJS directive to allow more complex input in the builder
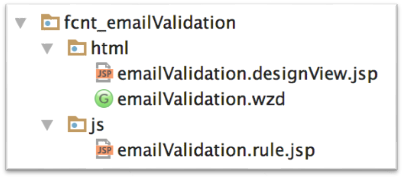
Example code from the email validation rule, this rule ensure that the input text is matching a specified regex email:
ff.validationRules.email = function(rule, scope, el, attr, ctrls) {
    'use strict';
    var model = ctrls[1];
    //Regexp taken from http://www.regular-expressions.info/email.html
    var regexp = /^[A-Z0-9._%+-]{1,64}@(?:[A-Z0-9-]{1,63}\.){1,125}[A-Z]{2,63}$/i;

    return function(modelValue, viewValue) {
        return model.$isEmpty(viewValue) || regexp.test(viewValue);
    };
};
When Forms render an input it is calling every validation defined on it and register the returned function in the ngModel.$validators array of the AngularJS model, this will automatically ensure that the whole AngularJS form controller behave as expected from AngularJS point of view.
Also this validation is a standard view of Jahia it is easy to override it by redefining the exact same view in a module with a higher priority for rendering. This way you can easily override all your email validation for a specific site by deploying another module. No need to tell your users to use the regex validation with a specific rule, just override the email one.
Logic
Logic rules are defined exactly the same way as validations, what differs is how they are called in the system. Every time an input value change, Forms check if this input is used as a source for logics rule on other inputs in the current active step (as it is the only step where values can change). If if it is then we call every logic rule on the found input, until a rule is failing. If all the rule pass the field is flagged as visible.
To declare a logic this is all the files you will need:
- A node type in the CND file
- A WZD file to define its properties
- A JavaScript file for the rule itself (loaded only in live/preview mode)
- A view for the wizard (validation have no views in live/preview mode) use in the builder
- Optionally they can have an associated AngularJS directive to allow more complex input in the builder (after the beta)
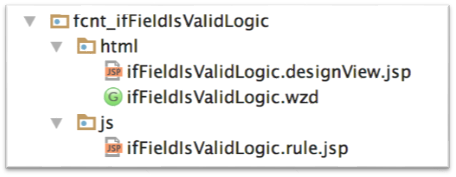
Example code of “if field is valid logic”:
ff.logicRules.ifFieldIsValid = function(rule, scope, el, attr, ctrls) {
    'use strict';
    var model = ctrls[1];
    var ffFormController = ctrls[0];
// Try to find the input in a previous step if not found it must be in the current step
    var searchedInputValue = ffFormController.getPreviousStepInputValue(rule.fieldName);
    return function(scope,fieldValue) {
        if (_.isUndefined(searchedInputValue) && !_.isUndefined(scope.form[rule.fieldName])) {
                        return scope.form[rule.fieldName].$valid
                                && scope.form[rule.fieldName].ffVisible
                                && scope.form[rule.fieldName].$dirty;
        } else if (!_.isUndefined(searchedInputValue)) {
            //we have a valid result from a previous step.
            return (searchedInputValue != null);
        }
    }
};
Logic and validation rules are not loaded by the builder. The only way to test those rules is to load the form in Preview or in Live.
Layout
The layout of the form once activated is defined at the form level, and serialized as a JSON property:
layoutJson: {
  "active": true,
  "layoutEmpty": true,
  "steps": [
    {
      "rows": [
        {
          "row": [
            {
              "col": "col-sm-6",
              "layoutUUID": "510917c2-0ea0-47c6-a717-2aa1d545c303",
              "offset": "col-sm-offset-0",
              "moveActive": true,
              "activeClass": "activeColumn"
            },
            {
              "col": "col-sm-6",
              "layoutUUID": "d2a15b06-0187-486d-a9f2-8869d0bcc32d",
              "offset": "col-sm-offset-0",
              "moveActive": false,
              "activeClass": "inActiveColumn"
            }
          ]
        }
      ],
      "inputPositionManagement": {
        "colIndex": 0,
        "rowIndex": 0,
        "activeInputFieldName": "510917c2-0ea0-47c6-a717-2aa1d545c303",
        "activeInputExists": true
      },
      "inputMovementHistory": [
        {
          "rowIndex": 0,
          "colIndex": 0,
          "createdColumn": false
        }
      ]
    }
  ]
}
The layout is a structure listing the rows per steps and for each rows the number of cells and if there is an input in the cell.
Input that are not dispatched in a cell won’t be visible by the user. Use preview mode to test your layout
Metadata
As layout, metadata is stored at the form level. They contain:
- the list of languages for this form
- its title
- its description
- CSS class
- submission message
- progress bar
- tracking
- captcha
- themes
Themes
Themes allows user to override the default views of Forms for every input, allowing user to switch from our default Bootstrap 3 theme to another one like Material CSS for example. This way you will be able to have forms matching your website theme/CSS engine. Those themes are just sets of views allowing a quick overhaul of Forms forms in your site, not in the builder and not how they behave. Themes are an integrated part of Forms so you can have multiple modules defining multiple themes. To declare a theme, you just need to declare a view of fcnt:form and use the same name for all the views you want to overhaul. Once the theme is selected it will be injected into the form as an attribute called view-type, this happening only in live/preview mode, excerpt from form.angular.jsp
<div id="formFactory${identifier}">
    <ff-controller view-type="${currentNode.properties['theme'].string}" id="'${identifier}'" data-locale="'${currentNode.resolveSite.language}'" data-show-form-title="${currentResource.moduleParams.showFormTitle}"></ff-controller>
</div>
Then we are calling your main entry point form.theme-name.jsp
<c:if test="${jcr:isNodeType(currentNode, 'fcmix:formTheme')}">
    <template:include view="${currentNode.properties['theme'].string}" templateType="html"/>
</c:if>
This way you can initialize any framework you are using if needed. The theme property is also used in the ffInputFormDirective during form rendering.
var formController = ffControllerCtrl[0];
            scope.form = formController.getFormController();
            scope.readOnly = !formController.isLiveMode();
            el.append($compile(angular.element(scope.input.template).attr('view-type', !_.isUndefined(formController.currentForm.theme) && formController.currentForm.theme !== null ? formController.currentForm.theme : ''))(scope));
Progress Bar
Progress Bar shows information like steps name or percentage of completion along your form. They are composed of a definition, a WZD file, a directive and a template.
Definition
//-----------------------------------------------
// Form Center Progress Bar Definition
//-----------------------------------------------

[fcmix:hasProgressBar] mixin
 + progressBar (fcmix:progressBar) = fcmix:progressBar

[fcmix:progressBar] mixin
 - template (string) mandatory
 - wizard (string) mandatory
 - position (string, choicelist) = "top" mandatory < "top", "bottom", "both"
 + * (fcnt:definitionOptions) = fcnt:definitionOptions

[fcnt:percentProgressBar] > jnt:content, fcmix:progressBar, mix:title, jmix:droppableContent, jmix:hiddenType
The mixin fcmix:hasProgressBar will be applied on the form if there is a progress bar for this form. The mixin fcmix:progressBar is the mixin your progress bar definition should extend to be found by the system.
WZD
progressBar {
    label "Percent Progress Bar"
    template "<ff-percent-progress-bar></ff-percent-progress-bar>"
    wizard "<ff-percent-progress-bar view-type='designView'></ff-percent-progress-bar>"
    position "top"
}
Directive
angular
    .module('formFactory')
        .directive('ffPercentProgressBar', ['$log', 'ffTemplateResolver', '$filter', function ($log, ffTemplateResolver, $filter) {
        var directive = {
            restrict: 'E',
            templateUrl: function (el, attrs) {
                return ffTemplateResolver.resolveTemplatePath('${formfactory:addFormFactoryModulePath('/form-factory-progress-bars/percent-progress-bar', renderContext)}', attrs.viewType);
            },

            link: linkFunc
        };

        return directive;

        function linkFunc(scope, el, attr, ctrl) {
            scope.roundValue = function(value) {
               return $filter('roundValue')(value);
            };
        }
    }]);
View/Template
<div class="row">
    <div class="col-md-12">
        <div class="progress">
            <div class="progress-bar progress-bar-success" role="progressbar"
                 aria-valuemin="0" aria-valuemax="100" aria-valuenow="{{roundValue((currentStep+1)/form.steps.length*100)}}"
                 style="min-width: 2em; width: {{roundValue((currentStep+1)/form.steps.length*100)}}%;">
                {{roundValue((currentStep+1)/form.steps.length*100)}}%
            </div>
        </div>
    </div>
</div>
Captcha
Forms is using reCaptcha from Google instead of the Jahia captcha by default. This need to be configured by setting up your API key. The integration is done on the client side, there is no server call to Google. This integration use Angular ReCaptcha to validate the form or not, as long as the captcha is not validated the submit buttons are not activated. The JS files are loaded if needed in form.angular.jsp and the captcha is displayed on the last step with this code from formDefinition.formView.jsp. Here is the code.
<div class="row" ng-if="vm.getCaptchaKey() !== null && vm.currentForm.steps.length-1 === vm.currentStep && vm.currentForm.displayCaptcha">
    <div class="col-sm-12 text-right">
        <div vc-recaptcha theme="'light'" key="vm.getCaptchaKey()" on-create="vm.notifyOfCaptchaLoad()"></div>
    </div>
</div>
Tracking
The tracking option will save the user IP upon submission or not.
Preview/Live
The Preview and Live mode allows you to test/submit your form. In Preview you can validate your validations, logic and layout. Actions can be only tested in Live mode.
Rendering
During the rendering first we bootstrap every form separately. This way you could have different forms on the same page. Once every app has been bootstrapped, we load the form data. We are using Jahia Assets management capabilities so that the JavaScript files are loaded only once, even the one aggregating every element at your disposal.
Inputs
We render every inputs of the current step. For each type of input we request compile the template, by default it means rendering the default view of this input. The HTTP request for the view should happen only once per type as AngularJS should cache the result of the template locally. Then for each input AngularJS will apply the model of the input into its template.
Validations
Validations are executed on every field upon every changes in the model of the current step. So every time the user enters a new data or select a new entry all the fields are validated. When moving between steps, we restore the status of every input/validation upon re-entering, this will flag the form as dirty and touched once again.
Logics
Every change in the values of the input will trigger an evaluation of the logic rules on the current step, to show or hide fields depending on the current state of the model.
All invisible inputs are considered valid.
A field can be required and invisible, as long as it is invisible it will not block the validation of the form, if it become visible then it will block the user to move forward until it fills this input.
Logic directive and Logic service
The logic directive is in charge of listening to the changes of values on the current step and evaluate all the logic rules define on those fields. The directive is in charge of finding the fields values in the previous steps or in the current one, apply all the rules on a field. The Logic service is the repository of rules available, same as the Validation service.
In preview/Live we load only the rule for Validation and Logic, we do not load any template
Submission
Reaching the last step, as long as the form is valid, it is possible to submit it. Upon submission the user will submit only the ids of the inputs along with there value, we do not submit the whole model to the server.
Actions
Those are regular Jahia Actions, by default Forms provide the following actions:
- Save to JCR
Will save the data submitted in the JCR backend - Send Email
Will send an email to the configured emails address, the email will contain the data submitted by the user - Redirect to Page
Will redirect the user to a specific page after submission - Redirect to URL
Will go to another website upon submission All actions are called in the backend whatever their result is. So you will always receive in the response a message from each action
Callbacks
Per form callback
At the form level, you can define which callback function you want to apply when actions are called. This lets you customize the way you handle errors, redirection and more on a per form basis.
Here is an example of a callback that will automatically redirect to the page selected in “Redirect to a page” action but also display a message to the user and let it choose between waiting or clicking, the callback also detects if there is a “Redirect to URL” and in that case offer a link to the URL instead of an automatic redirect.
angular
        .module('formFactory')
        .directive('callbackTwo', ['$log', 'ffTemplateResolver', '$interval', function ($log, ffTemplateResolver, $interval) {
            var directive = {
                restrict: 'E',
                require: ['^ffController'],
                scope: {
                    actionData: '=',
                    callback: '&'
                },
                templateUrl: function(el, attrs) {
                    return ffTemplateResolver.resolveTemplatePath('${formfactory:addFormFactoryModulePath('/form-factory-callbacks/callback-two', renderContext)}', attrs.viewType);
                },
                link: linkFunction
            };

            return directive;

            function linkFunction(scope, el, attr, ctrl) {
                scope.url = '#';
                scope.page = '#';
                scope.secondsToRedirect = 5;

                for (var i in scope.actionData) {
                    if ('actionName' in scope.actionData[i] && scope.actionData[i].actionName[0] === 'redirectToUrl') {
                        scope.url = scope.actionData[i].redirectUrl[0];
                    }
                    if ('actionName' in scope.actionData[i] && scope.actionData[i].actionName[0] === 'redirectToAPage') {
                        scope.page = scope.actionData[i].redirectUrl[0];
                    }
                }

                scope.countDown = function() {
                    if (scope.secondsToRedirect === 0) {
                        window.location.assign(scope.page);
                        return;
                    }
                    scope.secondsToRedirect -= 1;
                };

                $interval(scope.countDown, 1000);
            }
        }]);
Forms API JS callback
This type of callback is the one used to integrate Forms forms with other systems, they are used in our own products like jExperience or Marketo module. Those integrations work in two steps, first those tools allow a tighter integration with Forms for their form mapping functionalities, allowing to map multiple steps form easily to their own sets of fields. Once the mappings are defined those products register themselves as callback for Forms, doing so they will receive all the data submitted.
<script type="text/javascript">
   document.addEventListener("ffFormReady", function(e) {
   var formInfo = e.formInfo;
   window.ffCallbacks.registerCallback(formInfo, testObject.testFunction, testObject);
});

var testObject = {
   testFunction : function(data, formInfo) {
       var self = this;
       setTimeout(function() {
           formInfo.notifyFormFactoryOfCompletion("testFunction");
       }, 3000);
   }
}
</script>
Results
Form submits are saved in the Live workspace, under the formFactory/results folder. In all the cases, whatever the destination of the form submitted data, the form metadata are saved in this folder. The actual data are saved in JCR only when the form contain the Save to JCR action.
We can see that the Results are fetched from JCR directly by the API which return JSON objects to pages. The structure of the returned JSON object is:
{
  "status" : <"success" || "error">,
  "code" : <HTML CODE>,
  "message" : <String Message>,
  "data" : <Data Object>
}
The results are wrapped in an object under the “data” key.
Actions/Results Bound
In the Form Center, the actions have to be mapped to the results display methods to be able to fetch view data from the good source (for exmaple JCR or Database). Form Center actions bounding is based on three entities:
- Backend type
A constant to define where the results are saved. - API
An API name (this represent how results can be fetched) - Mapping view
A file defined for each API/Backend couple that returns the API entry points for each request of the view - Views
View to display results fetched from a given API to the user
To know which API to map on each action, the Form Center watches for the ResultsProviderService implementations which map a list of API on a backend type. As each actions declares a Backend type implementing the APIBackendType interface, the org.jahia.modules.formfactory.api.subresources.FormResults get the backend type for each action and watches for ResultsProviderService implementation with this backend type. Then, it gets the corresponding list of API and from there can access all the views of the APIs.
APIBackendType Interface
The interface org.jahia.modules.formfactory.api.APIBackendType is implemented by the action class to declare the Action Backend type. This action Backend type is a String constant that has to be reused in the class that will implement org.jahia.modules.formfactory.api.ResultsProviderService to map the backend to the right API.
ResultsProviderService Interface
The Interface org.jahia.modules.formfactory.api.ResultsProviderService is implemented for each couple Action / API to map an API to a given Backend type. For the action SaveToJCRAction, the class org.jahia.modules.formfactory.impl.SaveToJcrRawResultsImpl is doing this mapping :
public class SaveToJcrRawResultsImpl implements ResultsProviderService {
    @Override
    public String getAPINames() {
        List<String> APINames = new ArrayList<String>();
          APINames.add("rawResults")
          return APINames;
    }

    @Override
    public String getBackendType() {
   return "JCR";
    }
}
We can see here that the Backend type is the same than the one declared in the SaveToJCRAction class.
Implementations Fetching
The function getViewsByAction of SaveToJCRResultAPI.java return all the view and the APIs by action. To do so, it gets the list of actions in the formed saved in JCR and from this list it gets all the API by action:
//Putting in the map all the views for each [backend,API] couple
for (ResultsProviderService providerService : resultsProviderServices) {
    String providerBackEndType = providerService.getBackendType();
    if (providerBackEndType.equals(((APIBackendType) action).getBackendType())) {
        List<Map<String, String>> prefixedViews = new ArrayList<Map<String, String>>();
        for(String APIName : providerService.getAPINames()){
            prefixedViews.addAll(prefixViews(providerBackEndType, viewMap.get(APIName)));
        }
        actionViewMap.put("views", prefixedViews);
    }
}
Then it gets the list of views for each API. Finally, it returns the list of views for each action.
Views
A view is linked to an API because it has to submit to the format of the results returned. To declare this bound, each view name has to contain the API name. A results view is a view of the node submissions (of type fcnt:submissions) and its name has to respect a rule:
submissions.<APIName>.<viewName>
A resource bundle property is used to properly display this view name to a user, this property key has to be defined precisely:
fcnt_submissions.viewName.<APIName>.<viewName>
For example the the view datatable of the rawResults API will be named:
submissions.rawResults.dataTable
And its property key will be:
fcnt_submissions.viewName.rawResults.dashboard
API Mapping JSP file
The last link between the actions and the API is the JSP file that map the view fetch keys to the API entry points. The different views that displays results call getFetchURL function :
//Generate an URL from parameters
function getFetchURL(urlParameters) {
    return APIMethods[urlParameters.APIMethodName](urlParameters);
}
This function takes the following object as parameter:
{
    formId:this.model.formId,
    APIMethodName:"results_submissiontime",
    fromDate: this.model.fromDate,
    toDate: this.model.toDate
}
The parameter APIMethodName is a constant used to map API entry points thanks to the object APIMethods :
{
    "results":function(parameters){
        if(parameters.fromDate!=null && parameters.toDate!=null){
            return APIURLBase + parameters.formId + "/from/" + parameters.fromDate + "/to/" + parameters.toDate + "/results";
        }
        else{
            return APIURLBase + parameters.formId + "/results";
        }
    },
        "results_submissiontime":function(parameters){
        return APIURLBase + parameters.formId + "/results/submissiontime";
    },
        "results_submissionpage":function(parameters){
        return APIURLBase + parameters.formId + "/results/submissionpage";
    },
        "results_submissionempty":function(parameters){
        return APIURLBase + parameters.formId + "/results/submissionempty";
    },
        "results_choicelabel":function(parameters){
        return APIURLBase + parameters.formId + "/results/choicelabel";
    },
        "results_label":function(parameters){
        return APIURLBase + parameters.formId+"/results/labels";
    },
        "results_choice":function(parameters){
        return APIURLBase + parameters.formId+"/results/choice/"+parameters.choiceId;
    },
        "total":function(parameters){
        return "${url.context}/modules/formcenter/results/total/"+parameters.formId;
    },
        "lastDays":function(parameters){
        return "${url.context}/modules/formcenter/results/${renderContext.UILocale.language}/totallastdays/"+parameters.formId;
    },
        "groupTotal":function(parameters){
        return "${url.context}/modules/formcenter/results/${renderContext.UILocale.language}/groupTotal/"+parameters.formId;
    }
}
This object map the different String keys to API get URLs.
This system make possible:
- The creation of new view for each API in separated module (by naming the views the right way).
- The mapping of a Backend type to new API in any separated module (implementing org.jahia.modules.formfactory.ResultsProviderService).
- The creation of new APIs for a given backend type in any separated module (Implementing the API and org.jahia.modules.formfactory.ResultsProviderService).
Results API
The results API is developed using JAX-RS, the source of API different function (All HTTP GET methods ) is localized in the org.jahia.modules.formfactory.api.subresources.FormResults class.
This class uses different Spring injected variables:
renderService
Jahia RenderService used to get views of node submissionsrepository:jcrSessionFactory
used to get current sessionresultsProviderServices
List of implementations of the interfaceResultsProviderService.templateManagerService
Jahia TemplateManagerService used to get the actions available on the server.
The API class contains a certain number of methods (all HTTP Get) that return JSON object.
Some of these methods will always be used even if the form results are not saved in JCR :
getViewsByActions : Returns an object containing the views for each action basing on the existing Form center actions.
For example:
{<actionname>:{<view1Name>:<view1Label>, <view2Name>:<view2Label>}}
[{"views":[{"viewName":<viewName>,"viewLabel":<viewLabel>}],"actionName":<actionName>}]
The view name is composed the following way:
<APIName>.<viewName>, so the name of dashboard view of rawResults API will be rawResults.dashboard.
The view Label is a resource bundle with a key composed the following way : fcnt_submissions.viewName.<APIName>.<viewName>, so the resource bundle key for the dashboard view of the RawResult API is:
- fcnt_submissions.viewName.rawResults.dashboard
- getActionsProviders: Returns the list of actions id in an array
- getFormsDetails: Returns in an object the details (metadata) from a given form
Views
The results section contains multiple pages. The first page (that we can call results home page) displays the list of forms that have at least one result already saved: 
The JCR Results API (org.jahia.modules.formfactory.api.subresources.FormResults) is called to fill this table. The function getViewsByActions is called with the API entry point /views to fill the view selection of the Form Display column. The columns Name and Date are filled with the getFormsDetails function. This table is displayed using a Backbone view (FormsResultsView) based on a collection (FormsCollection). All the Backbone Views definitions are localized in the main-results.js file. Each table line contains a form that is submitted to the same page. On the page load, if a form and a view have been submitted the form results are displayed in the selected view. The form center comes with the RawResult API and its JCR implementation. The rawResult API contains 3 views :
Metadata view
The metadata view is made to display only metadata of the submitted results (Source, user and date) and its code is in the submissions.rawResults.metadata.jsp file. 
It uses the Backbone view MetadataResultsView which initializes a Datatable fetching backbone model. In each line the submission date value is clickable and display the submitted result in a popover which is defined by the function displayData of the JSP file.
Datatable view
The Datatable view render results in a table managed by Datatables .

The Backbone model used is a pageable collection called PageableResults from the framework Backbone.Paginator defined in the results.js file under the collections folder. The view implemented to display this collection is PageableResultsView (from main-results.js). The size of the page is 500 results per page.

The view defines a Datatable with unlimited scroll using Scroller datatable extension. The columns labels are requested from server by the JavaScript function getLabelsFromResults located in the fcResultsUtils.js file. This function then calls the RawResultAPI entry point.
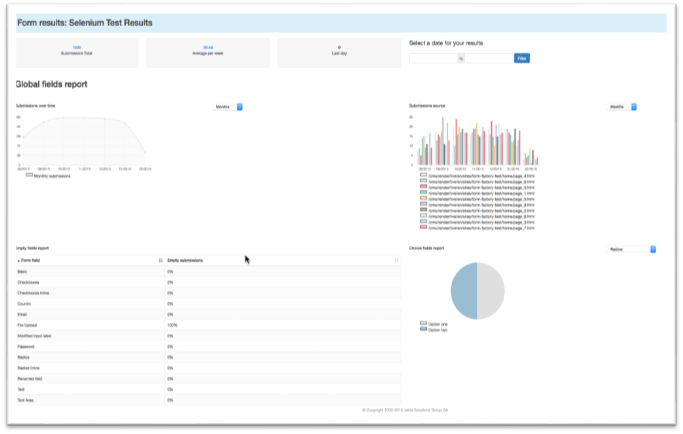
Dashboard view
The dashboard view is using Charts.JS (1.0.2), each chart is doing some specific queries to get the data and aggregate them for visualization.
Project Structure
As Forms is mainly written in JavaScript, there is a more dedicated build cycle for the JavaScript source code. The JavaScript source code of the main AngularJS components are stored at the same level as the Java source code. The build system is then using GruntJS to aggregate all the components files in one file per component.
Forms is also using NodeJS , NPM , Bower and Grunt . To avoid building issues on developer environment, we are using a maven plugin, this will download all the necessary JavaScript tools/frameworks for the project.
<plugin>
    <groupId>com.github.eirslett</groupId>
    <artifactId>frontend-maven-plugin</artifactId>
    <version>0.0.29</version>
    <!-- executions go here -->
    <executions>
        <execution>
            <id>npm install node and npm</id>
            <phase>generate-resources</phase>
            <goals>
                <goal>install-node-and-npm</goal>
            </goals>
        </execution>
        <execution>
            <id>NPM install</id>
            <phase>generate-resources</phase>
            <goals>
                <goal>npm</goal>
            </goals>
        </execution>
        <execution>
            <id>bower update</id>
            <phase>generate-resources</phase>
            <goals>
                <goal>bower</goal>
            </goals>
            <configuration>
                <arguments>update -F</arguments>
            </configuration>
        </execution>
        <execution>
            <id>bower install</id>
            <phase>generate-resources</phase>
            <goals>
                <goal>bower</goal>
            </goals>
            <configuration>
                <arguments>install -F</arguments>
            </configuration>
        </execution>
        <execution>
            <id>grunt build</id>
            <goals>
                <goal>grunt</goal>
            </goals>
            <phase>generate-resources</phase>
            <configuration>
                <arguments>default</arguments>
            </configuration>
        </execution>
    </executions>
</plugin>
This way just doing the usual mvn install will download all required resources, both Java backend and JavaScript frontend ones. The default GruntJS task will concatenate files and uglify them.
GruntJS tasks
First we concatenate all our developments in 4 components: forms-formbuilder.js, fforms-formrendering.js, forms-settings.js and forms-core.js. Then all the bower dependencies are concatenated in _forms3.js and _forms3.css.
The uglification process creates 4 compressed files for the JS:
files: {
    'src/main/resources/javascript/lib/_ff2.min.js' :
        ['src/main/resources/javascript/lib/_ff2.js'],
    'src/main/resources/javascript/lib/_ff-rendering.min.js' :
        ['src/main/resources/javascript/angular/components/ff-formrendering.js',
            'src/main/resources/javascript/angular/components/ff-core.js'],
    'src/main/resources/javascript/lib/_ff-builder.min.js' :
        ['src/main/resources/javascript/angular/components/ff-formbuilder.js',
            'src/main/resources/javascript/angular/components/ff-core.js'],
    'src/main/resources/javascript/lib/_ff-settings.min.js' :
        ['src/main/resources/javascript/angular/components/ff-settings.js',
            'src/main/resources/javascript/angular/components/ff-core.js']
}
Before release we change the options of the uglification tasks to compress the JavaScript, instead of just concatenating them. The JS frameworks are compressed in two different files for builder and for live.
Appendix
WZD files definitions
Here you will find the syntax and explanation for all the WZD files we have introduced. A WZD file always starts with a keyword that is defining which object we are declaring to use. On the server side each Forms node type is associated with a specific parser. The WZD file are following a DSL (Domain Specific Language) defined in Groovy, more detail about it following. All the parsers are declared in Spring like this:
<bean id="formFactoryDefinition" class="org.jahia.modules.formfactory.bundle.DefinitionService">
    <property name="jcrTemplate" ref="jcrTemplate"/>
    <property name="publicationService" ref="jcrPublicationService"/>
    <property name="renderService" ref="RenderService"/>
    <property name="templateManagerService" ref="JahiaTemplateManagerService"/>
    <property name="jahiaUserManagerService" ref="JahiaUserManagerService"/>
    <property name="settingsBean" ref="settingsBean"/>
    <property name="dslExecutor" ref="dslExecutor"/>
    <property name="dslHandlerMap">
        <map key-type="java.lang.String" value-type="org.jahia.modules.formfactory.dsl.DSLHandler">
            <entry key="input" value-ref="ffInputHandler"/>
            <entry key="validation" value-ref="ffValidationHandler"/>
            <entry key="logic" value-ref="ffLogicHandler"/>
            <entry key="action" value-ref="ffActionHandler"/>
            <entry key="progressBar" value-ref="ffProgressBarHandler"/>
            <entry key="renderer" value-ref="ffRendererHandler"/>
            <entry key="callback" value-ref="ffCallbackHandler"/>
        </map>
    </property>
</bean>
<lang:groovy id="dslExecutor" script-source="classpath:org/jahia/modules/formfactory/dsl/DSLExecutorImpl.groovy">
</lang:groovy>
<lang:groovy id="ffInputHandler" script-source="classpath:org/jahia/modules/formfactory/dsl/InputHandler.groovy">
<lang:property name="jcrTemplate" ref="jcrTemplate"/>
<lang:property name="packageRegistry" ref="org.jahia.services.templates.TemplatePackageRegistry"/>
</lang:groovy>

<lang:groovy id="ffValidationHandler" script-source="classpath:org/jahia/modules/formfactory/dsl/ValidationHandler.groovy">
<lang:property name="jcrTemplate" ref="jcrTemplate"/>
<lang:property name="packageRegistry" ref="org.jahia.services.templates.TemplatePackageRegistry"/>
</lang:groovy>

<lang:groovy id="ffLogicHandler" script-source="classpath:org/jahia/modules/formfactory/dsl/LogicHandler.groovy">
<lang:property name="jcrTemplate" ref="jcrTemplate"/>
<lang:property name="packageRegistry" ref="org.jahia.services.templates.TemplatePackageRegistry"/>
</lang:groovy>
A parser is a Groovy script creating content in the JCR, something like this (simple one from the renderer):
class RendererHandler implements DSLHandler {
    private static final Logger logger = LoggerFactory.getLogger(RendererHandler.class);
    def JCRTemplate jcrTemplate;
    def TemplatePackageRegistry packageRegistry

    def renderer(@DelegatesTo(FormFactoryWizardParser) Closure cl) {
        parseDeclaration(cl)
    }

    def parseDeclaration(Closure cl) {
        def rendererType = new FormFactoryWizardParser()
        def code = cl.rehydrate(rendererType, this, this)
        code.resolveStrategy = Closure.DELEGATE_FIRST
        code()
        logger.info("Declared renderer structure: " + rendererType.toString());
        def result = rendererType.contentMap
        createWizard result, cl.owner.currentPackage, cl.owner.currentNodeType
    }

    def createWizard(Map<String, Object> map, JahiaTemplatesPackage currentPackage, ExtendedNodeType currentNodeType) {
        assert map.containsKey("label")
        assert map.containsKey("name")
        jcrTemplate.doExecuteWithSystemSessionAsUser(JahiaUserManagerService.instance.lookupRootUser().jahiaUser, Constants.EDIT_WORKSPACE, Locale.ENGLISH, new JCRCallback() {
            @Override
            Object doInJCR(JCRSessionWrapper jcrSessionWrapper) throws RepositoryException {
                JCRNodeWrapper bundleRootNode = jcrSessionWrapper.getNode(currentPackage.rootFolderPath + "/" + currentPackage.getVersion().toString())
                def rNodeWrapper = bundleRootNode.getNode("templates").getNode("contents")
                if (!rNodeWrapper.hasNode("form-factory-renderers")) {
                    rNodeWrapper.addNode("form-factory-renderers", "jnt:contentFolder")
                }
                def rendererRootNode = rNodeWrapper.getNode("form-factory-renderers")
                def nodeName = JCRContentUtils.generateNodeName(map["label"], 32)
                if (rendererRootNode.hasNode(nodeName)) {
                    rendererRootNode.getNode(nodeName).remove();
                    jcrSessionWrapper.save()
                }

                def node = rendererRootNode.addNode(nodeName, currentNodeType.name)
                node.setProperty(Constants.JCR_TITLE, map["label"])
                map.remove("label")
                node.setProperty("rendererName", map["name"])
                map.remove("name")

                jcrSessionWrapper.save()
                return null
            }
        })
    }
}
Let’s describe the DSL:
handler-name {
   label
   template/wizard/etc. DSL properties
}
Inputs
To declare an input, you need to write a WZD file looking like this:
checkbox {
    label "Checkboxes"
    template "<ff-checkboxes></ff-checkboxes>"
    wizard "<ff-checkboxes view-type='designView'></ff-checkboxes>"
    supportedValidationTypes "required", "checkbox", "number"
    supportedLogicTypes "valid", "checkbox"
    choiceField "checkboxes"
    propertiesI18n {
        helptext "Help"
        checkboxes {
            values "checkboxone":"Checkbox One","checkboxtwo":"Checkbox Two"
        }
    }
}
or from a text input:
input {
    label "Text input"
    template "<ff-input-text></ff-input-text>"
    wizard "<ff-input-text view-type='designView'></ff-input-text>"
    supportedValidationTypes "required", "equal", "length", "number", "regex"
    supportedLogicTypes "valid", "input"
    properties {
        inputsize "input-md"
    }
    propertiesI18n {
        helptext "Help"
        placeholder "Text input"
    }
}
Inputs DSL
| Property Name | Value | Mandatory |
|---|---|---|
| handler/type | input/checkbox/select/radio | yes |
| label | String | yes |
| template | String | yes |
| wizard | String | yes |
| supportedValidationTypes | List<String> | no |
| supportedLogicTypes | List<String> | no |
| properties | Map | no |
| propertiesI18n | Map | no |
| choiceField | String | no |
Properties DSL
To declare the properties of your element you can use simple key, value:
properties {
    inputsize "input-md"
}
propertiesI18n {
    helptext "Help"
    placeholder "Text input"
}
You can also use a list of string:
properties {
    inputsize "input-md"
    topSelections {
        values "CA", "FR"
    }
}
Or a more complex map:
propertiesI18n {
    helptext "Help"
    checkboxes {
        values "checkboxone":"Checkbox One","checkboxtwo":"Checkbox Two"
    }
}
There is no need for you to define the list of options in the WZD, just list the properties you want the user to fill and their default value. After that it is in the wizard view that you will define the possible values or validations
For example, the property inputsize of a regular text input can be designed as this in the wizard view:
<div class="col-md-12">
    <label>
        <span message-key="ff.label.changeInputSize"></span>
    </label>
    <select class="form-control" ng-model="input.inputsize">
        <option value="input-lg" message-key="ff.label.large"></option>
        <option value="" message-key="ff.label.medium"></option>
        <option value="input-sm" message-key="ff.label.small"></option>
    </select>
</div>
choicefield property
This property is used to declare the list of your properties that are using a key/value system, so that for the results we know how to map the key (saved upon submission) to the label in your current language. Forms does not save the label themselves but just the key, this way whatever the language your user submit you will be able to see the label in your language of choice (as long as the form is translated in this language). Example from simple checkboxes:
propertiesI18n {
    checkboxes {
        values "checkboxone":"Checkbox One","checkboxtwo":"Checkbox Two"
    }
}
choiceField "checkboxes"
Example from matrix fields:
propertiesI18n {
    rows {
        values "q1":"Question One","q2":"Question Two","q3":"Question Three"
    }
    columns {
        values "a1":"Answer One","a2":"Answer Two","a3":"Answer Three"
    }
}
choiceField "rows,columns"
Actions
| Property Name | Value | Mandatory |
|---|---|---|
| handler/type | action | yes |
| label | String | yes |
| wizard | String | yes |
| properties | Map | no |
| propertiesI18n | Map | no |
In the properties of an action you have to declare the actionname property at least as it is the bound between your Forms declaration and the action class in Jahia. Remember that you can refer/bound to any action in the system without module dependencies.
Example from “Redirect to a page” action:
action {
    label "Redirect To A Page"
    wizard "<ff-redirect-to-a-page view-type='designView'></ff-redirect-to-a-page>"
    properties {
        actionname "redirecttoapage"
    }
    propertiesI18n {
        redirectto ""
        pagename ""
    }
}
or more simply from “Save to JCR” action (this one has no wizard associated):
action {
    label "Save To Jcr"
    properties {
        actionname "savetojcr"
        apiEntryPoint "/modules/formfactory/results"
    }
}
Validations
| Property Name | Value | Mandatory |
|---|---|---|
| handler/type | validation | yes |
| label | String | yes |
| types | String or List<String> | yes |
| wizard | String | no |
| properties | Map | no |
| propertiesI18n | Map | no |
The label is use to retrieve the rule in the JavaScript environment, by being transformed to Camel Case and also use for the resource bundle key mapping, in this case the label is transformed with the following rule as always:
Label -> lower case -> whitespace converted to hyphen
So that label “Equal to” become:
ff.label.validation.equal-to=Equal to
ff.validationRules.equalTo = function (rule, scope, el, attr, ctrls)
Minimal example from “Required” validation:
validation {
    label "Required"
    types "required"
    propertiesI18n {
        message "This field is required"
    }
}
And a more complex validation declaration for the “File” validation rule:
validation {
    label "File"
    types "files"
    wizard "<ff-file-wizard  view-type='designView'></ff-file-wizard>"
    properties {
        filetype {
            values "all": ".*/.*", "image":"image/.*", "audio":"audio/.*", "video":"video/.*", "pdf":"application/pdf", "doc":"application/(pdf|.*word.*|.*openxmlformats-officedocument.*|.*opendocument.*|.*excel.*|.*powerpoint.*)"
        }
        filesize ""
        unit type {
            values "KB", "MB", "GB"
        }
    }
    propertiesI18n {
        message "Enter your error message here"
    }
}
This validation declares a wizard template, so that we can use some specific behavior for this validation rules.
types property
The types property allows you to declare a list of type for your validation rule, which will be used to display this rule for every input supporting this type of validation. This means that you can extend the validation of every existing input by declaring a new validation being part of the existing types. Or you can declare a very private validation for your new input by binding them through a new validation type.
List of predefined types
| equal | files | checkbox |
| matrix | selections | length |
| number | date | |
| required | regex |
Example
ff.validationRules.required = function(rule, scope, el, attr, ctrls) {
    'use strict';
    var model = ctrls[1];
    var formController = ctrls[0].getFormController();
    scope.$watch(function () {
        return scope.form[rule.fieldName].$valid;
    }, function () {
        model.$validate();
    });
    attr.required = true; // force true in case we are on non input element

    return function (modelValue, viewValue) {
        var input = formController[rule.fieldName];
        if (input.$valid && input.$dirty) {
            if (angular.isUndefined(viewValue)) {
                return false;
            }
            return !model.$isEmpty(viewValue);
        } else {
            return model.$isEmpty(viewValue);
        }
    };
};
Logics
| Property Name | Value | Mandatory |
|---|---|---|
| handler/type | logic | yes |
| label | String | yes |
| types | String or List<String> | yes |
| properties | Map | no |
The label is use to retrieve the rule in the JavaScript environment, by being transformed to Camel Case and also use for the resource bundle key mapping, in this case the label is transformed with the following rule as always:
Label -> lower case -> whitespace converted to hyphen
So that label “If field is valid” become:
ff.label.logic.if-field-is-valid =Equal to (Resource Bundle)
ff.logicRules.ifFieldIsValid = function (...) (JavaScript)
Example from “if Field is Valid” logic rule
logic {
    label "If field is valid"
    types "valid"
    properties {
        fieldName "Enter the Name of the field you want to be valid."
        noview "true"
    }
}
The noview property indicates that this logic rules do not have any specific wizard (it has no configuration).
types property
The types property allows you to declare a list of type for your logic rule, which will be used to display this rule for every input supporting this type of validation. This means that you can extend the validation of every existing input by declaring a new validation being part of the existing types. Or you can declare a very private validation for your new input by binding them through a new validation type.
List of predefined types
| input | files | checkbox |
| country | selections | valid |
| radio | date | select |
| selectmultiple | switch |
Example
ff.logicRules.ifFieldIsValid = function(rule, scope, el, attr, ctrls) {
    'use strict';
    var model = ctrls[1];
    var ffFormController = ctrls[0];
    var searchedInputValue = ffFormController.getPreviousStepInputValue(rule.fieldName);
    return function(scope,fieldValue) {
        if (_.isUndefined(searchedInputValue) && !_.isUndefined(scope.form[rule.fieldName])) {
            return scope.form[rule.fieldName].$valid
                && scope.form[rule.fieldName].ffVisible
                && scope.form[rule.fieldName].$dirty;
        } else if (!_.isUndefined(searchedInputValue)) {
            //we have a valid result from a previous step.
            return (searchedInputValue != null);
        }
    }
};
Renderers
| Property Name | Value | Mandatory |
|---|---|---|
| handler/type | renderer | yes |
| label | String | yes |
| name | String | yes |
Progress Bars
| Property Name | Value | Mandatory |
|---|---|---|
| handler/type | progressBar | yes |
| label | String | yes |
| template | String | yes |
| wizard | String | yes |
| position | String | yes |
| properties | Map | no |
| propertiesI18n | Map | no |
Roles/Permissions
Forms defines new roles and permissions to allow access to its different functionalities.
Roles
| Manager |
|
| Editor |
|
| Reviewer |
|
| Results |
|
Permissions
All the permissions of form factory are stored under the global scope of ‘Site Administration’ permissions. Those permissions limit the access to the menu entries, in site settings.
| Forms | Global access to form factory (mandatory for seeing the menu) |
| Forms Editor | Access to the builder panel |
| Forms Results | Access to the results panel |
| Forms Settings | Access to the settings panel |