Adding your custom kibana dashboard to Jahia UI
Prerequisites
- You need to have a good understanding of jExperience analytics capabilities
- If you're not using Jahia cloud, jExperience analytics modules need to be installed and configured
- You already built a custom Kibana dashboard.
- You have access to jExperience and jContent, including the system site
Accessing the list of dashboards
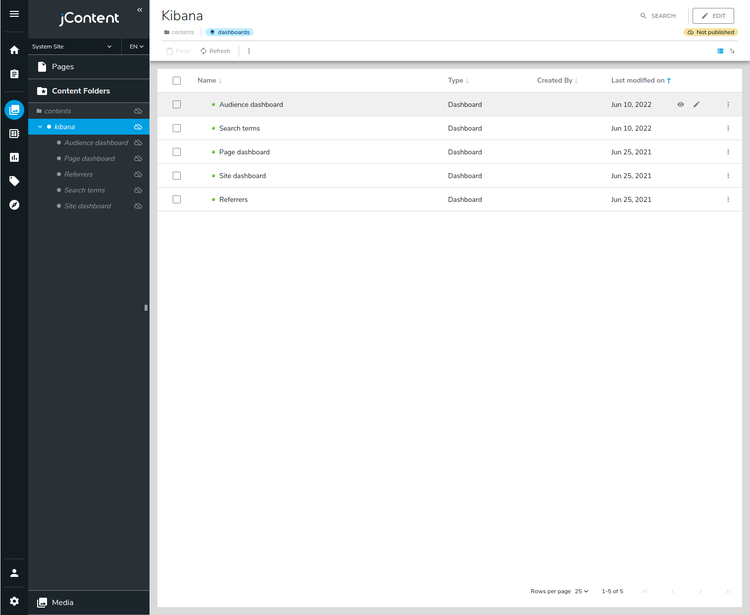
All dashboards built in Kibana are loaded via the Kibana Dashboards provider. They are available as external nodes in /sites/systemsite/contents/kibana/. To acess the list of dashboards, you can either go to:
- jContent: Select "System Site" => "Content Folders" => "content "=> "kibana"
- jExperience: Global => Settings => Manage dashboards button “CONFIGURE DASHBOARDS”
In addition to the jExperience built-in dashboards, this list also will also contain your new custom dashboard. There might be a slight delay before your dashboard is available, wait one to two minutes before refreshing the page.
Once your dashboard is available, click on the “Edit” icon to befin integrating your new Dashboard within Jahia Administration UI.
Defining the location of your dashboard in Jahia UI
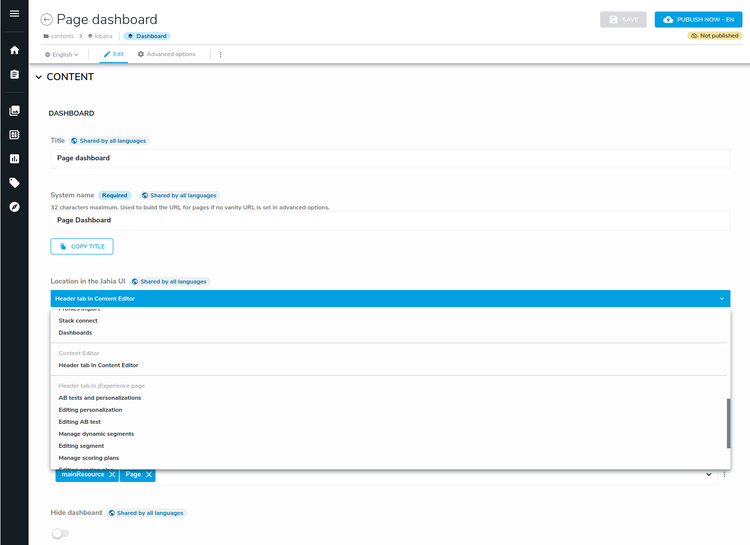
Using the “Location in the Jahia UI” selector, you can specify where your dashboard will be displayed in the Jahia Administration UI. By default, all the new custom dashboards are made available in “jExperience => Projects => Dashboards”.
You can choose from 3 main categories to position your dashboard:
- An entry in jExperience menu
- A header tab in a jExperience page
- Content editor
Entry in jExperience menu
This category corresponds to all the entries in the jExperience left menu. For example, the built-in "Audience dashboard" is located by default in the "Audience" entry jExperience menu
Header tab in jExperience page
This category corresponds to all header tabs available in jExperience pages. For example, the custom dashboard “events and profile id” is located in Header tab of “Manage dynamic segments jExperience page.
Content Editor
This category allows you to display your custom dashboard in the header tab of Content Editor. For example, the pre-built "Page dashboard" is located by default in the header tab of the Content Editor.
For dashboards related to the data page and displayed in the header tab of Content Editor, you can also choose to display your dashboard when a specific content type of the page is being edited.
For instance you can choose to display a dashboard only when a user edits a RichText.
List of all available locations in Jahia UI:
|
Entry in jExperience menu |
Header tab in jExperience page |
Content Editor |
| Manage dashboards AB tests and personalizations Metrics Goals Campaigns tracking Profiling tools Scoring plans Dynamic segments Static lists Form mappings Consent Manager Tracking information Audience Profiles Preview personas Settings Profile Properties Manager Connection to jCustomer Integrations Rules Profiles export Profiles import Stack connect Dashboards |
AB tests and personalizations Editing personalization Editing AB test Manage dynamic segments Editing segment Manage scoring plans Editing scoring plan All visitors profiles Visitor profile Manage form mappings Editing form mapping Goal report |
Header tab in Content Editor |
Disabling a dashboard
You can disable (or hide) a dashboard by activating the corresponding option when editing a dashboard.
Using dynamic filters
Elasticsearch stores data sharing a common model in the form of documents placed in a container called an “index”. Since this index contains data from multiple sites, kibana dashboards relies on dynamic filters to limit data to the current context (for example the site you selected). This filtering logic cann apply to site selection, a page dashboard, a segment dashboard, a profile dashboardm, etc…
Note that for this example, jexperience-dashboards, were created using a site named: jExperience-demo-project and the related home page: /sites/jExperience-demo-project/home
When you create your custom dashboard, make sure that you filter the data accordingly: if you create a site dashboard, add a filter on the scope (the scope is the name of the site key in jCustomer). In the example below, the scope is "myWebsite".
In Jahia UI, edit your dashboard, set the value “myWebsite” in the field "Dynamic filtering with current site key".
This will ensure that the scope filter is up to date, by replacing "myWebsite" by the the site being selected by the user in the Jahia UI:
The dynamic filters available will depend on the selected location for the dashboard: For instance if we choose to create and put a dashboard in the header tab in the jExperience page of “Visitor profile”, it's not the scope or site key that will be replaced, but the profile ID.
List of all available dynamic filter associated to the locations in Jahia UI:
|
Location type |
Location in the UI |
Dynamic filter available |
| Entry in jExperience menu | Manage dashboards | |
| Entry in jExperience menu | AB tests and personalizations | sitekey - recommended |
| Entry in jExperience menu | Metrics | sitekey - recommended |
| Entry in jExperience menu | Goals | sitekey - recommended |
| Entry in jExperience menu | Campaigns tracking | sitekey - recommended |
| Entry in jExperience menu | Profiling tools | sitekey - recommended |
| Entry in jExperience menu | Scoring plans | sitekey - recommended |
| Entry in jExperience menu | Dynamic segments | sitekey - recommended |
| Entry in jExperience menu | Static list | sitekey - recommended |
| Entry in jExperience menu | Form mappings | sitekey - recommended |
| Entry in jExperience menu | Consent Manager | sitekey - recommended |
| Entry in jExperience menu | Tracking information | sitekey - recommended |
| Entry in jExperience menu | Audience | sitekey - optional |
| Entry in jExperience menu | Profiles | sitekey - optional |
| Entry in jExperience menu | Preview personas | sitekey - optional |
| Entry in jExperience menu | Settings | sitekey - optional |
| Entry in jExperience menu | Profile Properties Manager | sitekey - optional |
| Entry in jExperience menu | Connection to jCustomer | sitekey - optional |
| Entry in jExperience menu | Integrations | sitekey - optional |
| Entry in jExperience menu | Rules | sitekey - optional |
| Entry in jExperience menu | Profiles export | sitekey - optional |
| Entry in jExperience menu | Profiles import | sitekey - optional |
| Entry in jExperience menu | Stack connect | sitekey - optional |
| Entry in jExperience menu | Dashboards | sitekey - recommended - default location |
| Header tab in jExperience page | AB tests and personalizations | |
| Header tab in jExperience page | Editing personalization | Personalization ID |
| Header tab in jExperience page | Editing AB test | AB Test ID |
| Header tab in jExperience page | Manage dynamic segments | |
| Header tab in jExperience page | Editing segment | Segment ID |
| Header tab in jExperience page | Manage scoring plans | |
| Header tab in jExperience page | Editing scoring plan | Scoring Plan ID |
| Header tab in jExperience page | All visitors profiles | |
| Header tab in jExperience page | Visitor profile | Profile ID |
| Header tab in jExperience page | Manage form mappings | |
| Header tab in jExperience page | Editing form mapping | Form mapping ID |
| Header tab in jExperience page | Goal report | Goal ID |
| Content Editor | Header tab in Content Editor | Site key & page Path |
Embedding a Kibana dashboard into a jahia module
Once your dashboard is created and integrated in Jahia UI, you may want to embed it inside a Jahia module. Adding your dashboard to a jahia module has two main advantages:
It ensures that the dashboard is saved in your source code and facilitates restoring it
It makes it easier to deploy your dashboard on several environment and ensure that the dynamic filtering configuration is kept along the way
Step 1: Export your dashboard from Kibana
UI method: On kibana go to Stack Management
Then go to Kibana ⇒ Saved Objects and select the dashboard you want to export then export it.
The export will be in a format ndjson.
Alternative using the Kibana API :
$ curl -X POST myKibanaHost:5601/api/saved_objects/_export -H 'kbn-xsrf: true' -H 'Content-Type:
application/json' -d '
{
  "objects": [
    {
      "type": "dashboard",
      "id": "myDashboardID"
    }
  ]
}'
Step 2: Add your exported dashboard ndjson file to your module, inside the directory:
src/main/resources/META-INF/kibana-dashboard/dashboards/
Step 3: Export the JCR node from jContent, by going to the nodes created by the kibana dashboard provider: /sites/systemsite/contents/kibana): Click on the corresponding Dashboard row’s 3-vertical-dot button and export your node (select “Staging content only” and “Export as an XML file” must be checked)
If needed you can clean the xml file and close it just after the kibana:target value.
For instance:
<?xml version="1.0" encoding="UTF-8"?>
<Site_x0020_dashboard xmlns:jcr="http://www.jcp.org/jcr/1.0"
xmlns:kibana="http://www.jahia.org/jahia/jexperience/kibana/1.0"
jcr:lastModified="2021-06-25T12:38:05.949+02:00"
jcr:lastModifiedBy="root"
jcr:title="Site dashboard"
jcr:mixinTypes="jmix:externalProviderExtension"
jcr:primaryType="jnt:externalProviderExtension"
kibana:target="{"kibanaTarget":"jExperienceMenuEntry","targets":["kibanaDashboards"],"placeholders":[{"key":"siteKey","value":"jExperience-demo-project"}]}"
/>
Step 4: Add the xml file to your module, inside the folder:
src/main/resources/META-INF/kibana-dashboard/override/
Step 5: Build and deploy your module and that’s it.

