Configuration and Fine Tuning
1 Overview
1.1 What’s in this documentation?
This document is intended to give an overview of the various aspects of advanced installation, configuration and the fine-tuning of Marketing Factory.
It is intended for system administrators and advanced users.
This guide is structured in the following way:
- Chapter "2 - Prerequisites": prerequisites and system requirements
- Chapter "3 - Installation": Installation of ElasticSearch, Apache Unomi and Marketing Factory as well as the description of how to start and stop the server.
- Chapter "4 - Configuring main Apache Unomi features": Configuring main Apache Unomi features
Should you have questions, please do not hesitate to contact us as mentioned on our website (http://www.jahia.com).
2 Prerequisites
2.1 Introduction
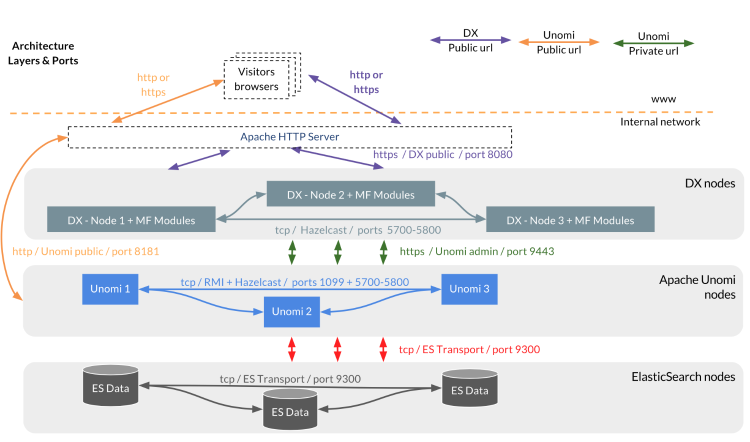
Let’s first look at an example of a typical architecture diagram:
Note: in the above schema, when there are arrows between groups of nodes, it means that these arrows actually go to each node, but are not repeated to make the diagram easier on the eyes.
Basically you can see four layers of nodes:
- Apache Web HTTP servers: usually a single node can be used, but it is also possible to setup a cluster of web servers. It will be used to proxy the requests to the DX and Unomi nodes, as well as protect the resources from being accessed from the open web. It is also a good idea to use HTTPS to proxy the requests, so that all the external traffic only uses HTTPS, while the "internal" traffic may use HTTP or HTTPS. Currently Apache Unomi only supports HTTP for the public endpoint, so you will need to setup HTTPS-to-HTTP proxying using Apache HTTP (or another equivalent) if you need to have your public traffic secured.
- DX nodes: these are instances of the CMS that have the Marketing Factory modules deployed on them. They communicate between each other using Karaf Cellar (starting with DX 7.2) which itself uses Hazelcast as the library for node-to-node communication.
- Apache Unomi nodes: the Unomi nodes also use Karaf Cellar and Hazelcast to communicate, but also use JMX to retrieve node health information and communicate it back to the Marketing Factory modules for load distribution and configuration.
- ElasticSearch nodes: the ES nodes use the custom networking protocol specific to ElasticSearch to communicate both between ES nodes and Unomi nodes.
Please note that in order to reduce the amount of hardware needed, it is possible to deploy the Unomi and ElasticSearch nodes on the same (physical or virtual) machines, meaning that in the above graph only 6 (physical or virtual) machines could be used. However in high load scenarios, it might be interesting to separate each node in order to be able to better control the resources the nodes need and maximize resistance to failure.
2.1.1 Ports used
As illustrated in the cluster diagram, a collection of ports is used by a typical Marketing Factory installation. The following summary table lists the ports that will need to be open in firewalls at various layers in the deployment to make sure everything will work as expected.
| Port | Name | Visibility | Type | Description |
|---|---|---|---|---|
| 1099 | JMX over RMI | Unomi | TCP | Used by Apache Unomi to exchange JVM information to provide cluster health information |
| 44444 | JMX over RMI | Unomi | TCP | Server port used by Unomi to retrieve cluster node information |
| 5700-5800 | Hazelcast | Unomi | TCP | Used by Apache Karaf Cellar to keep track of cluster nodes and exchange configuration information |
| 8181 | Unomi Public (HTTP) | Web | TCP | Apache Unomi Public endpoint (exposed to the Internet) for event collection and context serving (profile, session, segments, …) |
| 9443 | Unomi Admin (HTTPS) | DX | TCP | Apache Unomi Administration endpoint, used to manage all Apache Unomi objects (segments, profile editing, etc…), also the Unomi secure address (Endpoint used in a secure environment) |
| 9200 | ElasticSearch HTTP | DX | TCP | ElasticSearch HTTP interface, used by clients such as Kibana or other applications |
| 9300 | ElasticSearch Transport | Unomi | TCP | ElasticSearch Transport TCP interface, highly optimized, used by Apache Unomi to talk to ElasticSearch, as well as between ElasticSearch nodes to exchange data (replications, …) |
The visibility column describes the highest layer the application architecture that must have visibility to that port. So for example for port 8181, a "Web" visibility indicates that the port must be visible to the world, although this doesn’t mean it necessarily is exposed directly, it could still be relayed through a proxy (for an example with Apache mod_proxy, see section 4.4)
2.1.2 Solution overview
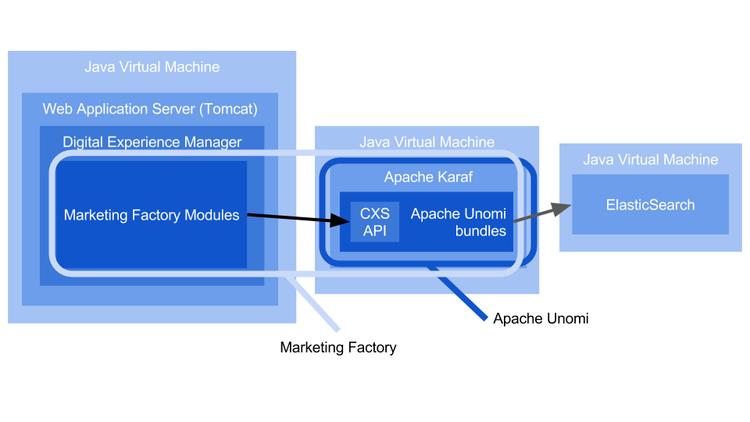
Now let’s look at an overview of the elements that compose Marketing Factory.
- Marketing Factory DX modules: a collection of modules that provide the integration of Apache Unomi with Jahia’s Digital Experience Manager (DX) platform. These modules will offer functionality ranging from setup and administration, digital marketing tools and finally on-page personalization and A/B testing.
- Apache Unomi: an open source personalization and A/B testing server that is an implementation of the OASIS Context Server specification. Throughout this document we will refer to it as "Apache Unomi". Jahia distributes a custom package of Apache Unomi for integration with Marketing Factory that is tested and supported and that must be paired with the corresponding version of the Marketing Factory DX modules. Apache Unomi is responsible for data collection, rule execution, and serving the personalization context back to the Marketing Factory components so they may build personalized experiences. Apache Unomi itself has the following sub-components:
- Apache Karaf: an OSGi runtime that contains a lot of enterprise ready features such as fine-grained logging, clustering, SSH shell console, provisioning, server-side REST framework (CXF) and many more advanced enterprise capabilities. You might think of it as the equivalent of what Tomcat is to Web Application Server but in this case for OSGi Application servers. It is a standalone package that is executed within a Java Virtual Machine.
- CXS API: The Context Server API is an implementation of the on-going work of the OASIS Context Server Technical Committee to define a standardized API to collect and serve personalization and A/B testing data. As the specification is still not completed, this API might change but both Marketing Factory and Apache Unomi will be adapted to follow any modifications.
- Apache Unomi OSGi bundles: these are the actual components that implement the services that are exposed by the CXS API. They range from cluster management to data collection, rules processing, profile and session management and many other back ends that deliver the personalization and A/B testing functionality.
- ElasticSearch: Apache Unomi uses ElasticSearch to store, index and retrieve all the objects that are needed to deliver personalization and A/B testing. All the events, profiles, sessions, definitions, … are stored as JSON documents within the ElasticSearch cluster. As ElasticSearch can scale to dozens or sometimes even hundreds of nodes, it offers a highly scalable data and search back-end.
This chapter lists requirements for the Apache Unomi itself. Please, refer to the dedicated document ("Configuration and fine tuning Guide - Digital Experience Manager 7.1.0.0") for the Digital Experience Manager requirements. For ElasticSearch requirements, you may find them here: https://www.elastic.co/guide/en/elasticsearch/guide/current/deploy.html
2.2 Minimal System Requirements
Please find below the minimum system requirements to properly run Marketing Factory. You can refer to the document ‘Marketing Factory performances metrics" for more information about system requirements & sizing. This document can be requested to the sales or support team.
OS:
- Windows
- Linux
- Solaris
- Mac OSX
Suggested Min. Production Environments:
- Quad Core (64 bit CPU and OS)
- 8 GB RAM
- 100 GB HDD (SSD recommended)
2.3 Java Virtual Machine
In order to run Marketing Factory, you first need to install an Oracle’s Java SE (Java Platform, Standard Edition) in version 8 on your system. Marketing Factory requires the JDK (Java Development Kit) package to run.
To check if Java is already installed on your system, type the following command line at the prompt of your system:
java -version
You should get a message indicating which Java version is installed on your system. Please note that the same message will be displayed if you only have a JRE installed. If an error is returned, you probably don't have a Java Platform installed. If you have installed other versions of the Java Platform, Java Runtime Environment or other Java servers on your system, we recommend that you run a few checks before starting the installation in order to be sure that Digital Factory will run without problems. If you need to obtain and install a new Java SE, you can find both Linux and Windows versions on the Oracle Web site: http://www.oracle.com/technetwork/java/javase/downloads/index.html. To install a Java Virtual Machine on a Windows system, you need to have administrator rights on your computer. Please contact your system administrator if you don’t have sufficient permissions. Although the Apache Unomi tries to detect the location of the installed Java SE, we recommend setting the JAVA_HOME environment variable explicitly to the directory, where you have installed the Java SE. To setup this variable, follow the steps, described in next sections.
2.3.1 Under Windows
i) Open the Control Panel, and the System option. In Windows 7 and Vista it is: Control Panel _ System and Security _ System _ Advanced System Settings. Then, depending on your system: - Select the Advanced tab and click on the Environment Variables button (Windows 7/Vista/XP/2000) - Select the Properties tab and click on the Environment button (Windows NT) ii) Click on New in the "System variables" section to add a new environment variable. Enter the following information: - Variable name: JAVA_HOME - Variable value: c:\Program Files\Java\jdk1.8.0_60 (replace this value with the correct path) Click on OK to validate your entry. The Java Virtual Machine should now be correctly set-up. Please note that on Windows NT you will need to restart your computer to apply the changes.
2.3.2 Under Linux
Set the JAVA_HOME variable to the root directory of your JDK installation. Both examples below suppose you have installed the JDK version 1.8 in your /usr/java directory. The classpath is usually set by typing: In bash or ksh:
export JAVA_HOME=/usr/java/jdk1.8
In csh or tcsh:
export JAVA_HOME /usr/java/jdk1.8
2.3.3 Under Solaris
Set the JAVA_HOME variable to the root directory of your JDK installation. Both examples below suppose you have installed the JDK version 1.8 in your /usr/java directory. The classpath is usually set by typing: In ksh:
export JAVA_HOME=/usr/java
In sh:
JAVA_HOME=/usr/java;export
In csh or tcsh:
setenv JAVA_HOME /usr/java
2.4 Digital EXPERIENCE MANAGER
Marketing Factory 1.7 requires an installation of a Digital Experience Manager 7.1.2.0 or later. For installation instructions and system requirements, please, refer to the "Configuration and fine tuning Guide - Digital Experience Manager 7.1.2.0" document.
3 Installation
The Apache Unomi official and nightly builds are distributed as packages (ZIP or TAR/GZ), which contain the Apache Karaf server with all the Apache Unomi services bundled and pre-configured. A second distributable is the Marketing Factory Package itself (JAR file), which includes modules to be deployed on the Digital Experience Manager instance. Next sections describe the installation of both parts.
3.1 Elasticsearch server
Marketing Factory 1.7 works with Apache Unomi 1.1.2-Jahia that requires ElasticSearch 5.1.2. Therefore you will need to install a standalone ElasticSearch using the following steps:
- Download an ElasticSearch 5.x version (5.1.1 or a more recent 5.1.x version, but not 5.2.x) from the following site: https://www.elastic.co/downloads/past-releases/elasticsearch-5-1-2
- Uncompress the downloaded package into a directory (we will refer to it in the documentation as the
<elasticsearch-install-dir>) - In the file
<elasticsearch-install-dir>/config/elasticsearch.ymlreplace the cluster.name parameter here by your own cluster name.# ---------------------------------- Cluster ----------------------------------- # # Use a descriptive name for your cluster: # cluster.name: YourOwnClusterName #You can note this cluster name in order to configure your Unomi instance to point on it later.
- launch the server using
bin/elasticsearch(Mac, Linux)bin\elasticsearch.bat(Windows) - Check that the ElasticSearch is up and running by accessing the following URL: http://<your-server-hostname>:9200
3.1.1 Starting and stopping ElasticSearch
Change to the <elasticsearch-install-dir>/bin and launch ElasticSearch simply by using the command:
./elasticsearch
You can then stop the server simply by issuing a CTRL+C inside the console where you launch the ElasticSearch server. Leave it running for now as we will need it running before starting Apache Unomi. If you want to install ElasticSearch as a background service on a specific operating system, you may use other packages. You can find documentation on how to do this here: https://www.elastic.co/guide/en/elasticsearch/reference/current/install-elasticsearch.html
3.2 Apache Unomi
3.2.1 Compatibility
Depending on the Marketing Factory version that you are deploying on your DX Instance, you must get the compatible corresponding Apache Unomi. This information should be on the Marketing Factory download page. Do not download Apache Unomi directly from the public Apache website as these versions are not supported. Marketing Factory will not work if it used with a non-compatible version of Apache Unomi
3.2.2 Installation
As a reminder, you can find the Jahia supported version of Unomi on jahia.com website. The installation of Apache Unomi consists of one unique step, which requires uncompressing the content of the context-server-package-X.X.X.tar.gz (Linux / Solaris / Mac OSX) or context-server-package-X.X.X.zip into your target installation folder. It will create the folder context-server-package-X.X.X, which we will reference later in this document as <cxs-install-dir>. Whether you’re installing Unomi and ElasticSearch locally, remotely, in cluster or not, you need to specify an ElasticSearch cluster name, it is recommended to do this before you start the server for the first time, or you will lose all the data you have stored previously. You can also change the host and port if they need to be modified from the default values.
To change these settings, you will need to modify for each cluster node a file called <cxs-install-dir>/etc/org.apache.unomi.persistence.elasticsearch.cfg with the following contents:
cluster.name=YourOwnClusterName
# The elasticSearchAddresses may be a comma separated list of host names and ports such as
# hostA:9300,hostB:9300
# Note: the port number must be repeated for each host
elasticSearchAddresses=localhost:9300
index.name=context
3.2.3 Directory layout
The directory layout of an installed Apache Unomi (after first startup) is as follows:
/bin: control scripts to start, stop, login etc./data: working directory/cache: OSGi framework bundle cache/generated-bundles: temporary folder used by the deployers/log: log files
/deploy: hot deploy directory/etc: configuration files/instances: directory containing instances/lib: contains the bootstrap libraries/ext: directory for JRE extensions/endorsed: directory for endorsed libraries
/system: OSGi bundles repository, laid out as a Maven 2 repository The data folder contains all the working and temporary files for Apache Unomi. If you want to restart from a clean state, you can wipe out this directory, which has the same effect as using the clean option (see next section). You will also want to clear the<elasticsearch-install-dir>/datadirectory if you want to purge the stored data.
3.2.4 Starting and stopping Apache Unomi
Apache Unomi supports different start mode:
- the "regular" mode starts CXS in foreground, including the shell console.
- the "server" mode starts CXS in foreground, without the shell console.
- the "background" mode starts CXS in background. You can also manage CXS as a system service (see "Integration in the operating system: the Service Wrapper" section of the Apache Karaf documentation located here: https://karaf.apache.org/manual/latest/wrapper). Various run modes are described in details on the "Start, stop, restart, connect" page (https://karaf.apache.org/manual/latest/#_start_stop_restart_connect) of the Apache Karaf documentation. For development, demo and quick test purposes the "regular" mode is appropriate, whereas for a production run the "background" mode is suited best.
3.2.4.1 Regular mode
For Linux / Solaris / Mac OSX:
./bin/karaf
For Windows:
bin\karaf.bat
This starts CXS as a foreground process, and displays the shell console. Note, please, closing the console or shell window will cause Apache Unomi to terminate. In regular mode you could type 'system:shutdown' or 'logout' in the console to shutdown CXS.
3.2.4.2 Starting a CXS server in a background mode
For Linux / Solaris / Mac OSX:
./bin/start
For Windows:
bin\start.bat
You can connect to the shell console using SSH or client (see the next section).
3.2.4.3 Connecting using a client
Even if you start CXS without the console (using server or background modes), you can connect to the console. This connection can be local or remote. It means that you can access the Apache Unomi console remotely. To connect to the console, you can use the bin/client Unix script (bin\client.bat on Windows). In order to connect to a local process you should use for Linux / Solaris / Mac OSX:
./bin/client –h localhost –u karaf
For Windows:
bin\client.bat –h localhost –u karaf
3.2.4.4 Stopping Apache Unomi
When you start Apache Unomi in regular mode, the logout command or CTRL-D key binding helps you logout from the console and shutdown the Apache Unomi instance. When you start Apache Unomi in background mode, you can use the bin/stop Unix script (bin\stop.bat on Windows). More generally, you can use the shutdown command (on the CXS console) that works in any case.
karaf@root()> shutdown -h
Confirm: halt instance root (yes/no):
The shutdown command asks for a confirmation. If you want to bypass the confirmation step, you can use the -f (--force) option:
karaf@root()> shutdown -f
You can also use directly halt which is an alias to shutdown -f -h.
3.3 Marketing Factory Package
3.3.1 Deploy modules
The Marketing Factory Package is delivered as a JAR named EnterpriseDistribution-MarketingFactory-1.7.0.jar, which must be deployed on your Digital Experience Manager server. While your Digital Factory server is running, go into the Server Administration UI _ System components _ Modules and use the "Upload action" choosing the EnterpriseDistribution-MarketingFactory-1.7.0.jar file to install the package. The package installs three modules: - marketing-factory-core - marketing-factory-angular - marketing-factory-components
3.3.2 Enable the modules on your site
You should enable those two modules on a site, where you would like the Marketing Factory feature to be enabled:
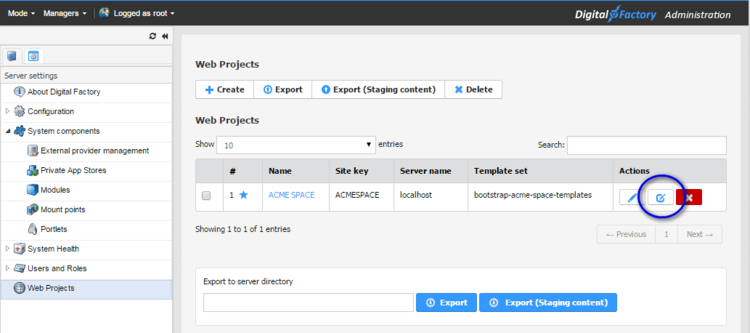
- Use the Server Administration UI _ Web Projects
- Choose your Web project and click on "Edit site" icon (second in the actions)
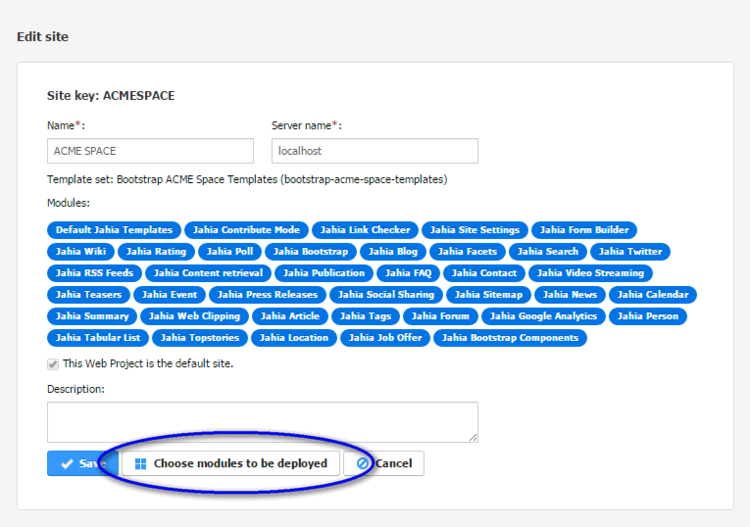
- 3. Click on "Choose modules to be deployed" button
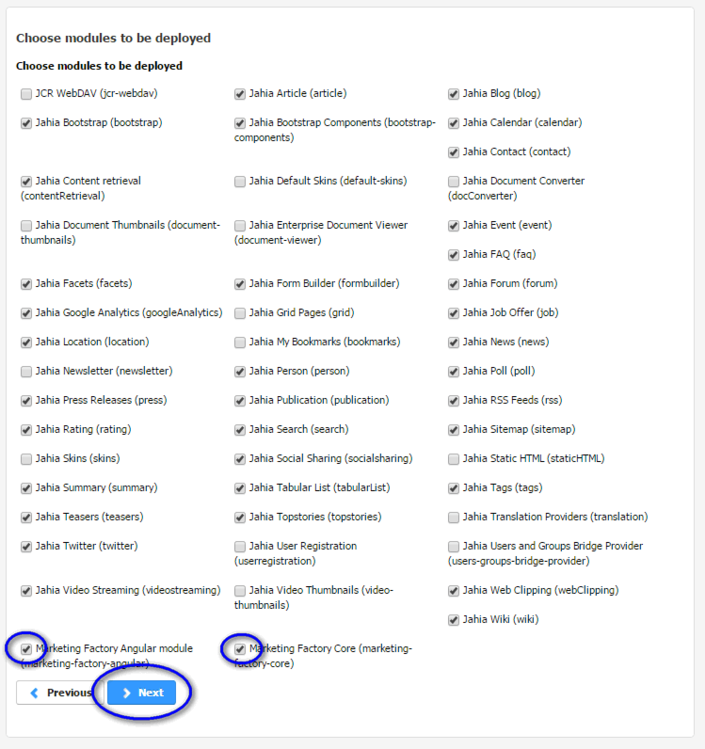
- 4. On the next screen select the Marketing Factory Angular module (marketing-factory-angular) and Marketing Factory Core (marketing-factory-core) module and click "Next" to save the changes.
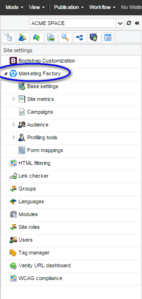
- Now you could switch into Edit mode for the site and go to the Site Settings tab (left side panel in edit module). A new section will be available there, which contains Marketing Factory related management pages:
Please, refer to the next section for the description of how to setup Marketing Factory.
3.3.3 Setup
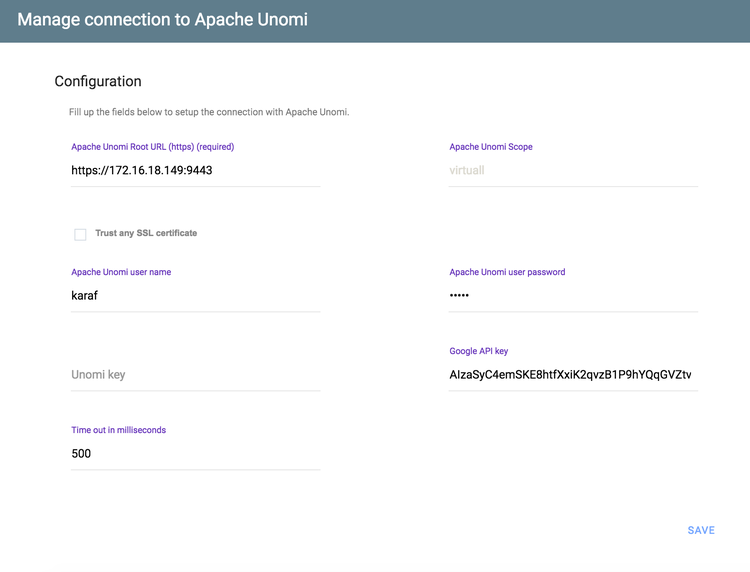
Once the Marketing Factory modules are installed and enabled on your site, the next step is to connect the Marketing Factory modules to the Apache Unomi instance, which should be also up and running at that point. In the Edit mode navigate to the Site settings tab (left-side panel) of your site and open the Marketing Factory Settings screen. Here you should provide the following information:
- Apache Unomi Root URL: this should be the base administration URL of Apache Unomi. This address must use https protocol, for instance: https://localhost:9443 . See section 4 for more information about Unomi addresses configuration.
- Trust any ssl certificate: activate this checkbox if you are using SSL connection and if you are using self-signed (provided by default) or certificates that are not by a trusted certificate authority (not recommended). This is useful for test installations but should not be used for production installations. For your tests though you must know that the Apache Unomi package is configured with a default SSL certificate.
- Apache Unomi user name: Apache Unomi requires a login to access the administration REST API. By default it is accessible with the "karaf" user.
- Apache Unomi password: the default password for the "karaf" user is "karaf".
- Time out in milliseconds: this value defines the default Javascript timeout for request going from the Marketing Factory modules to Apache Unomi. If Apache Unomi doesn’t answer to requests fast enough, and the timeout value is reached, the modules will fallback to default variants and behave "cleanly" under the circumstances. This helps protect the system against network issues or potential Apache Unomi slowdowns or failures. The value of the timeout is a balance to find between your organization expectations on the response time of the content and the infrastructure.
- The default value is 1500ms which is adapted to local environments where Unomi typically respond in this delay. For production installations, we recommend to set this value so that it doesn't downgrade the customer experience while still being reasonable in your environment. Our tests show that 300ms is a good balance.
- Google API Key: this key is used by the preview feature and by the geolocation by point feature. The rest of Marketing Factory can work without this key to be filled. Please refer to google documentation for more information: https://developers.google.com/maps/documentation/javascript/get-api-key
- Apache Unomi key : The Unomi key is optional in the Marketing Factory settings and should only be set if it has been configured on the Unomi side.
And click on a "Save" button.
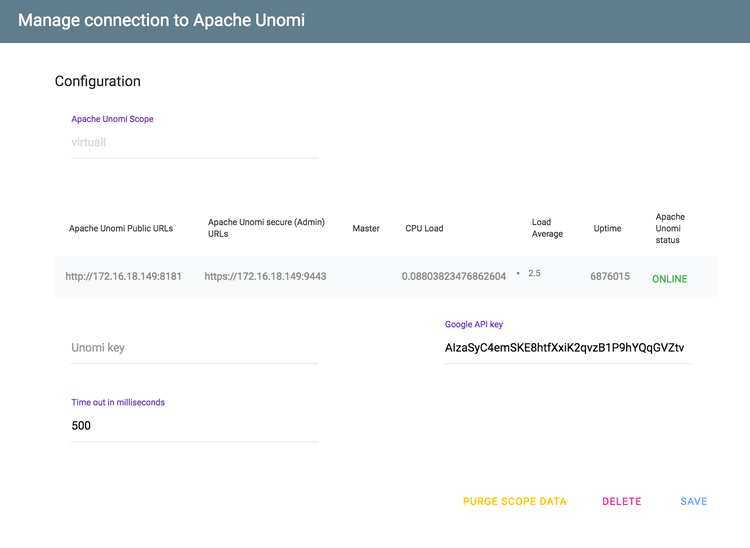
After the settings are successfully saved, the screen shows the configured Apache Unomi instance:
On this step the setup of the Marketing Factory is finished and you could start managing the Web experience using various entry points in the Marketing Factory administration menu.
3.3.4 Roles and permissions
When deploying Marketing Factory modules, 3 permissions are added on the Editor in chief role.
if you have created your own role, you will have to add theses 3 permissions to access the Marketing Factory administration interface.
4 Configuring main Apache Unomi features
This chapter covers the configuration of main features of Apache Unomi.
4.1 Changing the default configuration
Before doing other modifications, please ensure that you set your own cluster name (section 3.2).
If you want to change the default configuration, you can perform any modification you want in the <cxs-install-dir>/etc directory.
Apache Unomi configuration is kept in the <cxs-install-dir>/etc/org.apache.unomi.cluster.cfg file. It defines the addresses and ports where it can be found:
group=default
jmxUsername=karaf
jmxPassword=karaf
jmxPort=1099
contextserver.address=172.16.18.149
contextserver.port=8181
contextserver.secureAddress=172.16.18.149
contextserver.securePort=9443
cluster. from the properties names if you want to modify their value (i.e. use jmxUsername instead of cluster.jmxUsername)4.2 Installing the MaxMind GeoIPLite2 IP lookup database
Apache Unomi requires an IP database to resolve IP addresses to user location. The GeoLite2 database can be downloaded at MaxMind from the following location:
http://dev.maxmind.com/geoip/geoip2/geolite2/
Simply download the GeoLite2-City.mmdb file and copy it into the <cxs-install-dir>/etc directory.
4.3 Installing Geonames database
Apache Unomi includes a geocoding service based on the geonames database (http://www.geonames.org/). It can be used to create conditions based on countries or cities. In order to use it, you need to install the Geonames database. Get the "allCountries.zip" database from here:
http://download.geonames.org/export/dump/
Download it and put it in the <cxs-install-dir>/etc directory, without unzipping it.
Edit <cxs-install-dir>/etc/org.apache.unomi.geonames.cfg file and set request.geonamesDatabase.forceImport to true. The data import should start right away. Otherwise, import should start at the next startup. Import runs in background, but can take about 15 minutes.
At the end, you should have about 4 million entries in the "geonames" ElasticSearch index.
4.4 Integrating with an Apache HTTP Web Server
In some production setup, you will often need to redirect the port 8181 and 9443 to the default HTTP (80) and HTTPS (443) ports. To do so, you will need to setup an Apache HTTP web server in front of Apache Unomi.
Here is an example configuration using mod_proxy and the DNS name "unomi.apache.org":
In your Unomi package directory, in <cxs-install-dir>/etc/org.apache.unomi.cluster.cfg:
contextserver.address=unomi.apache.org
contextserver.port=80
contextserver.secureAddress=unomi.apache.org
contextserver.securePort=443
contextserver.domain=apache.org
and you will also need to change the contextserver.domain in the <cxs-install-dir>/etc/org.apache.unomi.web.cfg file
contextserver.domain=apache.org
Main virtual host config:
<VirtualHost *:80>
        Include /var/www/vhosts/unomi.apache.org/conf/common.conf
</VirtualHost>
<IfModule mod_ssl.c>
    <VirtualHost *:443>
        Include /var/www/vhosts/unomi.apache.org/conf/common.conf
        SSLEngine on
        SSLCertificateFile /var/www/vhosts/unomi.apache.org/conf/ssl/24d5b9691e96eafa.crt
        SSLCertificateKeyFile /var/www/vhosts/unomi.apache.org/conf/ssl/apache.org.key
        SSLCertificateChainFile /var/www/vhosts/unomi.apache.org/conf/ssl/gd_bundle-g2-g1.crt
        <FilesMatch "\.(cgi|shtml|phtml|php)$">
            SSLOptions +StdEnvVars
        </FilesMatch>
        <Directory /usr/lib/cgi-bin>
            SSLOptions +StdEnvVars
        </Directory>
        BrowserMatch "MSIE [2-6]" \
        nokeepalive ssl-unclean-shutdown \
        downgrade-1.0 force-response-1.0
        BrowserMatch "MSIE [17-9]" ssl-unclean-shutdown
    </VirtualHost>
</IfModule>
common.conf:
ServerName unomi.apache.org
ServerAdmin webmaster@apache.org
DocumentRoot /var/www/vhosts/unomi.apache.org/html
CustomLog /var/log/apache2/access-unomi.apache.org.log combined
<Directory />
    Options FollowSymLinks
    AllowOverride None
</Directory>
<Directory /var/www/vhosts/unomi.apache.org/html>
    Options FollowSymLinks MultiViews
    AllowOverride None
    Order allow,deny
    allow from all
</Directory>
<Location /cxs>
    Order deny,allow
    deny from all
    allow from 88.198.26.2
    allow from www.apache.org
</Location>
RewriteEngine On
RewriteCond %{REQUEST_METHOD} ^(TRACE|TRACK)
RewriteRule .* - [F]
ProxyPreserveHost On
ProxyPass /server-status !
ProxyPass /robots.txt !
RewriteCond %{HTTP_USER_AGENT} Googlebot [OR]
RewriteCond %{HTTP_USER_AGENT} msnbot [OR]
RewriteCond %{HTTP_USER_AGENT} Slurp
RewriteRule ^.* - [F,L]
ProxyPass / http://localhost:8181/ connectiontimeout=20 timeout=300 ttl=120
ProxyPassReverse / http://locahost:8181
4.5 Cluster Setup
4.5.1 Discovery
4.5.1.1 Overview
Discovery must be configured on every layer of the cluster architecture. In this document we will only detail the discovery configuration that is possible for the Marketing Factory elements, that is to say the Apache Unomi and ElasticSearch components. For DX cluster discovery setup, please refer to the DX "Configuration and Fine Tuning Guide" documentation. Apache Unomi relies on Apache Karaf Cellar, which in turn uses Hazelcast to discover and configure its cluster. You just need to install multiple Apache Unomis on the same network, and then (optionally) change the Hazelcast configuration in the following file: <cxs-install-dir>etc/hazelcast.xml
All nodes on the same network, sharing the same cluster name will be part of the same cluster. You can find more information about how to configure Hazelcast here: http://docs.hazelcast.org/docs/3.4/manual/html/networkconfiguration.html For the actual ElasticSearch configuration however, this must be done using the following file:
<elasticsearch-install-dir>/config/elasticsearch.yml
The documentation for the various discovery options and how they may be configured is available here: https://www.elastic.co/guide/en/elasticsearch/reference/current/modules-discovery.html Depending on the cluster size, you will want to adjust the following parameters to make sure your setup is optimal in terms of performance and safety. Here is an example of a typical ElasticSearch cluster configuration:
script.engine.groovy.inline.update: on
# Protect against accidental close/delete operations
# on all indices. You can still close/delete individual
# indices
#action.disable_close_all_indices: true
#action.disable_delete_all_indices: true
#action.disable_shutdown: true
discovery.zen.ping.unicast.hosts: ["es1-unomi.apache.org","es2-unomi.apache.org","es3-unomi.apache.org", "es4-unomi.apache.org"]
network.host: es1-unomi.apache.org
transport.tcp.compress: true
cluster.name: contextElasticSearchExample
http.cors.enabled: true
http.cors.allow-origin: "*" (edited)
4.5.1.2 Multicast
Multicast makes it easier to setup cluster node in an "automatic" discovery, which can be very useful for setting up environments quickly such as test environments. However it is not recommended for production or even environments where multiple installs might co-exist in the same network, unless the installers have some solid experience with multicast network setups.
4.5.1.2.1 Apache Unomi
For multicast configuration in Apache Unomi, you will need to modify the <cxs-install-dir>/etc/hazelcast.xml file, more specifically the following section:
<join>
    <multicast enabled="true">
        <multicast-group>224.2.2.3</multicast-group>
        <multicast-port>54327</multicast-port>
    </multicast>
4.5.1.2.2 ElasticSearch
For the multicast discovery you just need to install multiple Apache Unomis on the same network, and enable the discovery protocol in <elasticsearch-install-dir>/config/elasticsearch.yml file:
discovery.zen.ping.multicast.enabled=true
All nodes on the same network, sharing the same cluster name, will be part of the same cluster.
4.5.1.3 Unicast
4.5.1.3.1 Apache Unomi
The configuration for Unicast must be done in the <cxs-install-dir>/etc/hazelcast.xml file on all nodes:
<join>
    <multicast enabled="false">
        <multicast-group>224.2.2.3</multicast-group>
        <multicast-port>54327</multicast-port>
    </multicast>
    <tcp-ip enabled="true">
        <interface>127.0.0.1</interface>
    </tcp-ip>
4.5.1.3.2 ElasticSearch
In production, it is recommended to use unicast instead of multicast (see https://www.elastic.co/guide/en/elasticsearch/guide/current/_important_configuration_changes.html#_prefer_unicast_over_multicast). This works by providing ElasticSearch a list of nodes that it should try to contact. Once the node contacts a member of the unicast list, it will receive a full cluster state that lists all nodes in the cluster. It will then proceed to contact the master and join. The unicast protocol is activated by disabling the multicast and providing a list of hosts (IP + port number) to contact. The following changes have to be applied to the <elasticsearch-install-dir>/config/elasticsearch.yml file:
discovery.zen.ping.multicast.enabled=false
discovery.zen.ping.unicast.hosts=["es1-unomi.apache.org:9300", "es2-unomi.apache.org:9300"]
4.5.2 Recommended configurations
In this section we provide examples of some ElasticSearch settings for different cluster sizes. This concerns mostly replication, which makes the setup more resistant to failures. For more information about ElasticSearch replication, please consult the following resource: https://www.elastic.co/guide/en/elasticsearch/guide/current/replica-shards.html
4.5.2.1 2 node cluster
In this setup we don’t have enough ElasticSearch nodes to properly benefit from replicas (notably because of their impact on performance) so we deactivate them. Node A:
numberOfReplicas=0
monthlyIndex.numberOfReplicas=0
Node B:
numberOfReplicas=0
monthlyIndex.numberOfReplicas=0
4.5.2.2 3 node cluster
This setup sets up one replica since we have enough nodes to be able to use replicas without affecting performance too much. Node A:
numberOfReplicas=1
monthlyIndex.numberOfReplicas=1
Node B:
numberOfReplicas=1
monthlyIndex.numberOfReplicas=1
Node C:
numberOfReplicas=1
monthlyIndex.numberOfReplicas=1
4.5.3 Cluster troubleshooting
In Apache Unomi, you might want to look at the cluster command lines available in Apache Karaf. Depending on how you launched Karaf, you may either use them directly on the console, or through an SSH connection to the server. To connect through SSH simply do:
ssh –p 8101 karaf@unomi
The default password is "karaf". You should really change this upon installation by modifying the <cxs-install-dir>/etc/users.properties file. To get a list of available commands, simply type on the command line:
help
In order to monitor the state of your Unomi ElasticSearch Cluster, 2 URLs are quite useful: - Error! Hyperlink reference not valid. : This command retrieves the health of your ElasticSearch cluster (green is good). If you face communication issues between your cluster nodes, it will be orange or red. Make sure that all the nodes of your cluster are started in order to get a better idea of your cluster health. - Error! Hyperlink reference not valid. : This command gives you a detailed state of your Unomi node in the cluster.
Caused by: org.elasticsearch.action.UnavailableShardsException: [context][1] Not enough active copies to meet write consistency of [QUORUM] (have 1, needed 2). Timeout: [1m], request: index[2017-02-08T10:15:23,571][WARN ][o.e.d.z.ElectMasterService] [RlyE1OZ] value for setting "discovery.zen.minimum_master_nodes" is too low. This can result in data loss! Please set it to at least a quorum of master-eligible nodes (current value: [-1], total number of master-eligible nodes used for publishing in this round: [2])Please refer directly to ElasticSearch documentation for more information: https://www.elastic.co/guide/en/elasticsearch/reference/current/modules-discovery-zen.html
4.5.4 Clustering on Amazon Web Service
One critical thing when setting up ElasticSearch clusters on EC2 is the value of network.host in <elasticsearch-install-dir>/config/elasticsearch.yml. The trick is to use the VPN/internal IP as network host (For instance, network.host: _eth0:ipv4_" - see https://www.elastic.co/guide/en/elasticsearch/reference/1.6/modules-network.html) to be sure to get the right IP if it’s dynamic and the public IP in the unicast discovery. The default value "192.168.0.1" doesn’t work on AWS.
4.6 Security aspects
4.6.1 Administrator username and password
The Apache Unomi REST API is protected using JAAS authentication and using Basic or Digest HTTP auth. By default, the login/password for the REST API full administrative access is "karaf/karaf". It is strongly recommended that you change the default username and password as soon as possible. This can be done by modifying the following configuration file <cxs-install-dir>/etc/users.properties:
adminUserName = adminPassword,_g_:admingroup
_g_\:admingroup = group,admin,manager,viewer,webconsole
In-depth details for the JAAS security in the CXS’ Karaf server can be found at: http://karaf.apache.org/manual/latest/security.
4.6.2 SSL certificate
The Apache Unomi package is configured with a default SSL certificate. You can change it by following these steps: 1. Replace the existing keystore in file <cxs-install-dir>/etc/keystore by your own certificate. See http://wiki.eclipse.org/Jetty/Howto/Configure_SSL for details. 2. Update the keystore and certificate password in <cxs-install-dir>/etc/custom.properties file:
org.osgi.service.http.secure.enabled = true
org.ops4j.pax.web.ssl.keystore=${karaf.etc}/keystore
org.ops4j.pax.web.ssl.password=changeme
org.ops4j.pax.web.ssl.keypassword=changeme
org.osgi.service.http.port.secure=9443
You should now have SSL setup on Apache Unomi with your certificate, and you can test it by trying to access it on port 9443.
4.6.3 Securing a production environment
Before going live with a project, you should absolutely read the following sections that will help you setup a proper secure environment for running your Apache Unomi.
4.6.3.1 Install and configure a firewall (port numbers)
You should setup a firewall around your cluster of Apache Unomis and/or ElasticSearch nodes. If you have an application-level firewall you should only allow the following connections open to the whole world:
http://localhost:8181/context.jshttp://localhost:8181/eventcollector
All other ports should not be accessible to the world. For your Apache Unomi client applications (such as the DX Marketing Factory), you will need to make the following ports accessible to the client machine:
8181- Apache Unomi HTTP port9443- Apache Unomi HTTPS port For your Apache Unomis and for any standalone ElasticSearch nodes you will need to open the following ports for proper node-to-node communication:1099- RMI JMX port44444- RMI JMX port5700 - 5800Hazelcast cluster protocol9200- ElasticSearch REST API9300- ElasticSearch TCP transport
Of course, any ports listed here are the default ports configured in each server, you may adjust them if needed in the "Network And HTTP" section of the <elasticsearch-install-dir>/config/elasticsearch.yml file or in the <cxs-install-dir>/etc property files.
Note that if you need a temporary SSL certificate for a pre-production environment for example, you can generate one using Certbot (https://github.com/certbot/certbot) until a proper one is delivered from IT.
4.6.3.2 Secure Elasticsearch
Follow industry recommended best practices for securing ElasticSearch. You may find more valuable recommendations here:
- https://www.elastic.co/blog/found-elasticsearch-security
- https://www.elastic.co/blog/scripting-security
4.6.3.3 Setup a (SSL) proxy
As an alternative to an application-level firewall, you could also route all traffic to Apache Unomi through a proxy and use it to filter any communication.
A relatively straight-forward way to do this is to use an Apache HTTP server in front of the public-facing Apache Unomi endpoint. You could even setup this proxy connection to use SSL-only and proxy to the http://UNOMI_HOST:8181/ port. Configuration could look something like this:
Listen 443
NameVirtualHost unomi.org:443
<VirtualHost unomi.org:443>
    SSLEngine On
    # Set the path to SSL certificate
    # Usage: SSLCertificateFile /path/to/cert.pem
    SSLCertificateFile /etc/apache2/ssl/file.pem
    ProxyPass / http://UNOMI_HOST:8181/
    ProxyPassReverse / http://UNOMI_HOST:8181/
</VirtualHost>
This way all the traffic to the http://unomi.org:443 endpoint will be secured using SSL, and then will proxy the requests to Apache Unomi on the HTTP port 8181.
4.6.4 Search robots and crawlers
By default Apache Unomi includes a /robots.txt file with the following content:
User-agent: *
Disallow: /
meaning, it disallows search bots and crawlers to access the content. On top of it you could block the known search bots on your front-end Apache HTTPD server using the following rewrite rules:
RewriteCond %{HTTP_USER_AGENT} Googlebot [OR]
RewriteCond %{HTTP_USER_AGENT} msnbot [OR]
RewriteCond %{HTTP_USER_AGENT} Slurp
RewriteRule ^.* - [F,L]
4.7 Marketing Factory & Remote Publication
Jahia Marketing Factory is fully compatible with a remote publishing architecture. Though a precise method must be applied. Here are the steps: - Start ElasticSearch - Start Apache Unomi - Start DX: both contribution / remote server in "development mode" (jahia.properties) On the contribution server:
- Create the desired site (eg. ACME SPORT)
- Install and enable the MF-modules
- Configure MF in site settings On the remote server:
- Create a new site with the same template set
- Install MF-modules
ATTENTION: do NOT activate MF-modules for this site
- Then set up the remote publication on the contribution node and execute (check logs / should be good) - Stop both DX-server - Set contribution node to "operationMode=production" (jahia.properties) - Set remote server has to be set to "operatingMode=distantPublicationServer" (jahia.properties) - Restart - Open remote site in a new private window and browse the page - Back in site settings / MF (contribution node) check that the profile was created - OK.
4.8 Email action configuration
In Marketing Factory Rules, an action is available to send email. The emails will be sent using an SMTP server that needs to be configured in the following Apache Unomi file :
mail.server.hostname=<smtp server host name>
mail.server.port=<smtp server port>
mail.server.username=<smtp server username>
mail.server.password=<smtp server password>
mail.server.sslOnConnect=<use ssl>
In the email template, you can use the following pattern to display any profile property value in the email that will be sent: $profile.properties.("propertyId")$
5 Maintenance and upgrades
5.1 Logging
The logging is configured in the <cxs-install-dir>/etc/org.ops4j.pax.logging.cfg file, so that by default the logging it routed into the <cxs-install-dir>/data/log/karaf.log file. More details on how to tune logging settings and also on the log-related console commands is given here: https://karaf.apache.org/manual/latest/#_log. One of the most useful console commands (especially in development) is:
log:tail
which continuously displays the log entries in the console.
5.2 How to backup Apache Unomi?
Backing up your system is useful in many cases as it minimizes the risk of losing all your data and a backup is a mandatory step in case of an upgrade or migration process. Apache Unomi by default is configured to write its runtime data directly into the ElasticSearch server, which itself writes information in its <elasticsearch-install-dir>/data directory. There are several backup types, which serve different purposes:
- Full Apache Unomi and ElasticSearch backup: is done by archiving the whole
<cxs-install-dir>/and<elasticsearch-install-dir>folders, with Apache Unomi and ElasticSearch processes stopped. - Configuration backup: is done by archiving the
<cxs-install-dir>/etcand<elasticsearch-install-dir>/conf folders. Usually done, before/after planned configuration updates. - Runtime data file system backup: is performed by archiving the
<elasticsearch-install-dir>/datafolder. Useful for incremental (nightly) backups and allows rolling back to a previous stable/consistent state in case of data corruption/loss. - ElasticSearch snapshots: ElasticSearch also offers a built-in backup mechanism known as snapshots. You can find more information about this here: https://www.elastic.co/guide/en/elasticsearch/reference/current/modules-snapshots.html
In order to trigger the data replication to a new node (for the sake of a backup), you could start a new Apache Unomi cluster node with parameters (see chapter "4.4 Integrating with an Apache HTTP Web Server)
After startup, this node will start receiving replicated ElasticSearch data from other nodes. After the replication is done, you can stop this node. It contains the full backup.
5.3 Upgrading Apache Unomi
To check if there is any specific instruction related to the upgrade, please check our extranet documentation for upgrading between versions of Apache Unomi. Below are the usual steps :
5.3.1 Between minor versions (X.X.Y -> X.X.Z)
In order to upgrade Apache Unomi to a new version or "migrate" the data to a new installation it is right now sufficient to perform the following steps:
1. Stop the old Apache Unomi
2. Stop the ElasticSearch server
3. Install a new version (or a new copy) of Apache Unomi
4. Install a new version of the ElasticSearch version corresponding to the new version of Apache Unomi (if necessary)
5. Copy the following folder from the old installation into a new one: <elasticsearch-install-dir>/data
6. Apply any custom changes in the configuration (file in the <cxs-install-dir>/etc folder) to a new instance of Apache Unomi
7. Start the new instance of the ElasticSearch server.
8. Start the new instance of Apache Unomi to complete the migration.
5.3.2 Between major versions (X.Y -> X.Z)
Please check our extranet documentation for upgrading between major versions of Apache Unomi.
5.4 Background jobs
This section contains a list of the background jobs that may be executed either by the Marketing Factory DX modules (5.4.1) or by the Apache Unomi (5.4.2).
5.5.1 Marketing Factory Jobs
| Name | Frequency | Details |
|---|---|---|
| ContextServerClusterPollingJob | Every minute | Retrieve cluster information from Apache Unomi (nodes, hosts, load, …) in order to be able to distribute load to all Apache Unomi nodes |
| WemActionPurgeJob | Every hour at 10 minutes | Cancels (unschedules) and removes orphaned Marketing Factory action jobs in case the corresponding content node is no longer present |
|
OptimizationTestHitsJob |
Every hour |
Ask Apache Unomi to see if max hits are reached for optimization tests |
5.5.2 Apache Unomi Jobs
| Name | Frequency | Details |
| Refresh all property types | Every 5 seconds | Reloads all the property types from ElasticSearch every 5 seconds, in case there were new deployments done from Marketing Factory UIs or modules |
| Inactive profile purge | Every X days (180 by default) | Removes profiles from Apache Unomi that have been inactive for a specified amount of time (by default 180 days). |
| Update profiles for past event counting | Every 24h | Recalculates past event counts for all the profiles that match the setup conditions |
| Refresh segment and scoring definitions | Every second | Reloads the segment and scoring definitions from ElasticSearch in case another Apache Unomi node has performed modifications |
| Refresh index names (technical) | Every 24h | Updates the list of ElasticSearch indices cached in memory to make sure there are no inconsistencies with the actual back-end indices. |
