Understanding UI extension projects
Leverage UI features
When building custom components for UI extensions, the framework provides a wide range of features that can be leveraged:
-
Authentication: by default, the components will execute in an authenticated (or visitor) context, making it possible to access information about the current user if needed.
-
Permissions: as illustrated in the example below, components can be protected by permissions, making it transparent for component developers to be able to restrict access to its functionality.
-
(Minor) Transparent upgrades of Jahia UI: Jahia UI components use semantic versioning, so they should be compatible with minor updates of components, making it possible to use custom components with more recent versions of the UI transparently.
-
Component registry: as explained in detail in its relevant section, the component registry can be both helpful in registering components to be used by others or to leverage to provide extensibility to your components
-
Existing Jahia components: existing UI components may also be used within custom components to add functionality quickly. Using a picker is an excellent example of reusing a built-in component.
-
Maven packaging: using the provided Maven packaging, generating modules ready for deployment on any Jahia server is straightforward.
-
Internationalization: the UI framework includes everything that is needed for internationalization out of the box; it is pretty easy to add resources inside custom components provided by custom modules
-
Content Editor form overrides: if components need to integrate with the Content Editor form, the override mechanism makes it easy to define how the components should be used to edit specific node properties
Here is an example of a custom navigation component that leverages some of the above features:
import {registry} from '@jahia/ui-extender';
registry.add('primary-nav-item', 'jcontentGroupItem', {
   targets: ['nav-root-top:2'],
   requiredPermission: 'jContentAccess',
   render: () => <CmmNavItem/>
});
Building and packaging
To build and package custom components inside a Jahia module, a set of tools are combined to offer a robust solution that can provide both functionalities for Java and Javascript projects.
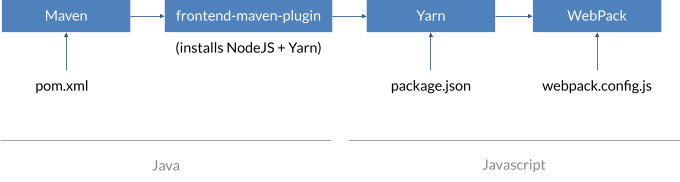
Maven
Maven is a build automation tool primarily used for Java projects. It manages a project's build, dependencies, and documentation. Maven uses an XML file called pom.xml (short for "Project Object Model") to manage project information and configuration. This file contains information about the project, such as its dependencies on other libraries and modules and the build order of the project's modules. Maven is designed to simplify the build process for Java projects and make them more consistent across different projects. It helps developers manage the dependencies of their projects, build the project, and package it for deployment. Maven also provides a central repository for developers to share and reuse code, which makes it easier to build and maintain Java projects.
The frontend-maven-plugin Maven Plugin
The frontend-maven-plugin is a Maven plugin that allows you to efficiently run Webpack, Yarn, and other frontend build tools as part of your Maven build process. It provides a set of goals that can be used to install Node.js and NPM, run Webpack, Yarn, Gulp, and other build tools, and copy the generated assets to the appropriate location in your project. The plugin can be configured to run these tools automatically as part of the Maven build process, so you don't have to run them manually. It is useful for Java developers who want to include frontend build steps in their Maven projects without learning a new build system or for Javascript developers to integrate with Java build systems.
<plugin>
   <groupId>com.github.eirslett</groupId>
   <artifactId>frontend-maven-plugin</artifactId>
   <version>1.6</version>
   <executions>
       <execution>
           <id>npm install node and yarn</id>
           <phase>generate-resources</phase>
           <goals>
               <goal>install-node-and-yarn</goal>
           </goals>
           <configuration>
               <nodeVersion>v16.15.0</nodeVersion>
               <yarnVersion>v1.22.10</yarnVersion>
           </configuration>
       </execution>
       <execution>
           <id>yarn install</id>
           <phase>generate-resources</phase>
           <goals>
               <goal>yarn</goal>
           </goals>
       </execution>
       <execution>
           <id>yarn post-install</id>
           <phase>generate-resources</phase>
           <goals>
               <goal>yarn</goal>
           </goals>
           <configuration>
               <arguments>${yarn.arguments}</arguments>
           </configuration>
       </execution>
   </executions>
</plugin>
More advanced usages of the plugin are also possible, including configuring proxies for downloading NodeJS & Yarn and using proxied NPM repositories. For more details, check out the plugin's official documentation.
Yarn
Yarn is a package manager for JavaScript. It is an alternative to npm (Node Package Manager) created by Facebook. Yarn offers several features not present in NPM, such as faster and more consistent dependency management, offline mode, and the ability to automatically fix specific errors. It also uses a lock file to ensure that the installed packages are the same across all machines, providing a deterministic installation algorithm. In general, Yarn manages the dependencies and packages of JavaScript projects, similar to NPM.

WebPack

Webpack is a JavaScript module bundler that takes modules with dependencies and generates static assets representing those modules. It is used to bundle JavaScript files for usage in a browser, yet it can also transform, bundle, or package just about any resource or asset. It is commonly used in web development to bundle JavaScript files, CSS, and images.
Module federation
Webpack module federation is a feature that allows multiple Webpack projects to share code and run as a single app. It exposes remote components as local and allows a shared state between them. Jahia uses federation for its UIs to avoid pulling the same dependencies in each project. Each module is a new “remote” and this is reflected in the default Webpack module configuration illustrated below:
// const requires
module.exports = (env, argv) => {
   let config = {
       entry: // Javascript app entry points for dependency analysis
       output: // Javascript app output bundle locations
       module: {
           rules: [
...
               {
                   test: /\.jsx?$/,
                   include: [path.join(__dirname, 'src')],
                   use: {
                       loader: 'babel-loader',
                       options: { ... }
                   }
               },
...
           ]
       },
       plugins: [
           new ModuleFederationPlugin({
               name: "dashboard",
               library: { type: "assign", name: "appShell.remotes.dashboard" },
               filename: "remoteEntry.js",
               exposes: {
                   './init': './src/javascript/init',
               },
               remotes: {
                   '@jahia/app-shell': 'appShellRemote',
               },
               shared
           }),
...
       ],
   };

   return config;
};
You can learn more about module federation here.
Deployment, registration, loading & initialization
As the Jahia UI is a dynamic and modular system, it is important to understand how it registers and loads the various Javascript modules.
Deployment & registration
Jahia’s module deployment system will look for remote declarations in the package.json file. It is perfectly fine to use the same declaration as the ones illustrated below for your project; as usual, each module will have a single app declaration. The key part of the remote, in this case, jahia, is the name of the front-end application for which we want to register a remote, and the value part is the relative path to the Javascript file that will be prepended with the module’s name to load them (see the following section about loading).
When the module system finds the remotes entries in the package.json, it will register them in the AppShell servlet, containing all the remotes collected from all the modules deployed on the system. Once this is done, the loading is processed at request time, so nothing more happens at deployment/registration time.

Loading / Request processing
The loading is done at request time. In the example below, we request a URL starting with /jahia/dashboard. This gets rewritten using a URL rewrite rule to call the appshell module with the jahia app name.
Application names are a way to separate the loading since all declared remotes will always be loaded for an application. So if you need to make the applications minimal, it is better to use different application names to avoid loading all the scripts, even if they are not needed. However, the scripts are needed for most of Jahia UI since many things are done on the client instead of going back and forth to the server. Also note that the scripts will be cached once they are loaded, so subsequent requests to the scripts will not trigger a load from the server again.
Once the request reaches the AppShell servlet, it will expose the remotes corresponding to the request application and pass them to a JSP that will output the HTML to load the scripts for all the remotes.

Initializing

Once loading of all the remotes is complete, the root.jsp file loads the appshell.js script, a WebPack bundle package of the jahia.js, and appShell.js files of the AppShell. The jahia.js script will call a function called startAppShell (from the appShell.js file) that will first call in parallel (and in any order) the init.js file of all the remotes, and once all of those have completed successfully, will call any registered callbacks in order of priority.
It is quite common for the init.js file of a module to register a callback, as in the following example:
export default function () {
    registry.add('callback', 'moduleA', {
        targets: ['jahiaApp-init:2'],
        callback: register
    });
}
The reason to use a callback is to control the order of execution of the initialization code. The register function can then perform all kinds of registrations, either components in navigation or registering routes.
Routing
Routing is the system that allows mapping URLs to components, making it possible to know how to navigate between components. Jahia UI uses react-router to accomplish this and explicitly uses version 5, which uses a switch-based rendering engine.
Here is an example of how routing is integrated with the component registry. First, we register components in the registry (note the path property):
export const jContentRoutes = registry => {
   registry.add('route', 'jcontent-search-route', {
       targets: ['jcontent:99'],
       path: '/jcontent/:siteKey/:lang/search',
       component: ContentRoute
   });
   registry.add('route', 'jcontent-sql2Search-route', {
       targets: ['jcontent:99'],
       path: '/jcontent/:siteKey/:lang/sql2Search',
       component: ContentRoute
   });
}
And then, when rendering the components, we use the react-router Switch component to select the proper route to render:
export const JContent = () => {
   const routes = registry.find({type: 'route', target: 'jcontent'});

   return (
       <LayoutModule
           navigation={<ContentNavigation/>}
           content={
               <LoaderSuspense>
                   <ErrorBoundary>
                       <Switch>
                           {routes.map(r => r.component ? (
                               <Route key={r.key}
                                      path={r.path}
                                     render={p => <ErrorBoundary>{React.createElement(r.component, p)}</ErrorBoundary>}
                               />
The route component type that will match the incoming path will be the only one to be rendered, actually producing the desired output.
For more information about react-router v5, you can find it here.
Internationalization
Providing internationalization in custom components is quite straight-forwarded as all the necessary pieces are already provided by the UI framework. A module can simply put the resources bundles in JSON format in the src/main/resources/javascript/locales/LOCALE.json file as in the following example:
{
  "label": "Dashboard"
}
The framework will automatically expose those files and can then be accessed using imports or direct Javascript calls. Here’s an example of using an import:
import React from 'react';
import {useTranslation} from 'react-i18next';
import {PrimaryNavItem} from '@jahia/moonstone';
import Constants from './Dashboard.constants';
export const DashboardGroup = () => {
   const {t} = useTranslation('jahia-dashboard');
   …
   return (
       <PrimaryNavItem key={Constants.ROUTE}
                       label={t('label')}
       />
   );
};
The parameter to the useTranslation function is a namespace that must match the module’s name, as it will be used to know from which module the resources should be loaded.
Without using Javascript imports, it is also possible to load namespaces directly, as in the following example:
window.jahia.i18n.loadNamespaces('jahia-dashboard');
The above example will ensure that the resources for the module are loaded and made available to the i18next and react-i18next frameworks that are loaded in the current HTML page. It is then possible to use standard useTranslation or translate calls to access resource bundle labels.
Troubleshooting
Javascript Browser Developer tools
The browser’s Javascript developer tools are powerful tools for understanding what is going on in the various frameworks and libraries loaded in a single-page application. It is highly recommended to become familiar with them and use them as much as possible to understand the actual workings of the system. Plugins such as the React plugin for Chrome can also help understand the framework-specific objects and their values. In the illustration below, we show the React components navigation view, which also gives you access to the component's properties and hooks.

Also, in most of the Yarn package.json files, you will find scripts that can be very useful, such as :
-
watch: to launch the project in file watch mode. This is possible if you are using deploy-free coding (meaning that both your module and Jahia server are running on the same local machine and that the module has been compiled and deployed from the source at least once). This way as soon as a file is modified the package is rebuilt and directly available for testing in the browser
-
other project specific scripts that might help with various tasks (see examples below)
  "scripts": {
    "test": "env-cmd --no-override jest",
    "testcli": "jest",
    "build": "yarn lint:fix && yarn webpack",
    "build:nolint": "yarn webpack",
    "dev": "yarn webpack --watch",
    "webpack": "node --max_old_space_size=2048 ./node_modules/.bin/webpack",
    "build:analyze": "yarn build --analyze",
    "build:production": "yarn build --mode=production",
    "build:production-analyze": "yarn build --mode=production --analyze",
    "clean": "rimraf *.log src/main/resources/javascript/apps",
    "clean:all": "yarn clean && rimraf node_modules node",
    "lint": "./node_modules/.bin/eslint --ext js,jsx .",
    "lint:fix": "./node_modules/.bin/eslint --ext js,jsx --fix ."
  },
Frameworks & versions
Since the Webpack module federation plugin allows for multiple versions of the same dependencies to be loaded, but only one version to be active, it is usually good to know what has actually been loaded by the framework and which is the active version.
For example to check which library are registered and where they are coming from your can use the browser developer tools to inspect the following object:
jahia.webpackShareScopes.default
Which will produce an output similar to this:

Here we can see all the shared scope libraries as well as their version. To know which version is actually loaded and active you can execute the following command in the browser’s Javascript console:
Object.entries(jahia.webpackShareScopes.default['@jahia/moonstone']).find(f => f[1].loaded)
Which will produce an output that looks like this:
