Creating navigation menus
By default, Jahia provides a system for creating navigation menus. The system is responsible for executing the logic behind the menu (retrieving the navigation structure of nodes) and the rendering (such as displaying submenus in drop-downs). You can tailored it to your needs, primarily by acting on the CSS and classes.
About menu rendering
A menu is a list of nodes typed as jmix:navMenuItem. To add a menu item, simply create a new node with that type. To display a menu, all the nodes with that mixin are simply rendered.
As with any other content, you can customize how nodes are filtered, added, and displayed. The node type for menu is jnt:navMenu. Its definition (in modules/default/META-INF/definitions-nav-menu.cnd) is :
  [jnt:navMenu] > jnt:content, mix:title, jmix:siteComponent
   orderable
   - j:baselineNode (string,choicelist) < 'home', 'currentPage'
   - j:maxDepth (long) = 2
   - j:startLevel (long) = 0
   - j:menuItemView (string,choicelist[templates='jmix:navMenuItem,menuItem',resourceBundle,image]) = menuElement
   - j:styleName (string) nofulltext
   - j:layoutID (string) nofulltext
The associated default JSP file is jnt_navMenu/html/navMenu.jsp in the default module.
An entry is a mixin jmix:navMenuItem set on any type.
[jmix:navMenuItem] mixin
The associated default JSP file is jmix_navMenuItem/html/navMenuItem.menuElement.jsp in the default module.
You must specify the view that you want to use to display the mixin, not the default rendering of the node. If not specified, the menuElement view is used. This will search for jmix:navMenuItem under the baseNode and display items that match the set restrictions, such as the level or specified menu.
All menus use the <ul><li> structure
Jahia provides several examples of views for menus:
- oneLevel
one level menu without any style other than those set by the webmaster - simple
recursive menu without any styles (inpath, selected, etc) - default
complete menu with styles
Creating a navigation menu
You can create a navigation menu in the templateSet from Studio by setting a menu in a template.
Users can also add entries to navigation menus from Page Composer. For more information, see Managing pages in Page Composer.
Setting a menu in a template from Studio
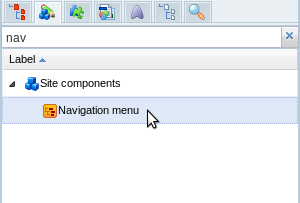
In any area, simply drag-and-drop the navigation menu component into your template.
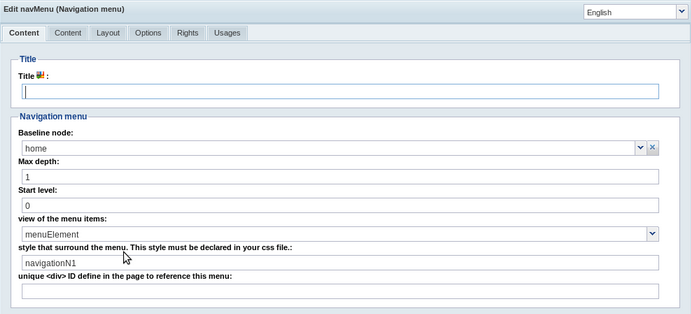
You can set the following properties:
- Baseline Node
Sets whether the menu is absolute (home) or relative (current page) - Max depth
Sets the maximum depth level of menu items - Start level
Defines which page level to use as the parent page in the menu. Set to0to use home as the parent page or a higher value to specify another page in the hierarchy (relative to the home page). - view of the menu items
Defines the view used to display menu items (menuElement is the default) - style that surrounds the menu
Defines the class around the menu. This style must be declared in your CSS file. - unique <div> ID define in the page to reference this menu
Defines the ID around the menu
After saving and deploying, the menu will display in the pages that use this template.
Customizing menu items
You can customize menu items at two different levels: the menu structure itself (navMenu.jsp), and the rendering of items (navMenuItem.menuElement.jsp).
Customizing the menu structure
You can add a view for your jnt:navMenu menu to change its structure or to add Javascript. The view will become available in the Layout tab’s view selector of the menu. You just have to create a new file under the jnt_navMenu/html folder or create the folder tree in your module directory, named navMenu.<yourView>.jsp where <yourView> is your view name. In the navMenu.yourView.properties file, you must set two properties for this view that manage cache dependency:
cache.mainResource = true
cache.mainResource.flushParent = true
The best practice is to copy the predefined menu that is closest to your needs and customize it. The beginning of the file sets the properties to display the menus. The display section is contained between <ul> tags.
Customizing the rendering of items
The default view for items in a menu is defined in the menuElement view. The rendering is applied on jmix:navMenuItem, which means the default JSP file used for rendering items is:
jahia/modules/default/jmix_navMenuItem/html/navMenuItem.menuElement.jsp
If you want a custom display, create a new menuElement view for your type definition. For example, Jahia uses a custom view for jnt:page items. This choice lets you add properties such as icons (reference to a file) or alternate text for a menu item.
[jnt:navMenuText] > jnt:content, mix:title, jmix:navMenuItem
+ * (jmix:navMenuItem)
or
[jnt:page] > nt:base, jmix:nodenameInfo, jmix:observable, jmix:basemetadata, mix:title, jmix:publication, jmix:tagged, jmix:navMenuItem, jmix:hasTemplateNode
orderable
- jcr:title (string) i18n mandatory
- j:templateNode (weakreference,choicelist[templatesNode]) mandatory < jnt:template
+ * (nt:base) = nt:base version
+ * (jmix:navMenuItem)
+ * (jmix:navMenuItem) let you add sub menu items under your current menu.
You can also define your own view for items. You must define a default view for it. This view will be available to be set in jnt:navMenu from Studio.
To define an available view, you have to define it in the property file of the view. The view property of jnt:navMenu is defined as:
- j:menuItemView (string,choicelist[templates='jmix:navMenuItem,menuItem',resourceBundle,image]) = menuElement
meaning that the type must be set as menuElement. To do that, near the view, create a .properties file with the same name as the view and put in it:
type = menuItem
All items in the menu will use the same view.

