Creating modules in Jahia Studio
The Jahia Studio is a tool that helps you learn about developing with Jahia, by building modules from the ground up, from custom components definition to template design. Despite integrating with Source Control Management systems, advance users will tend to use it as an addition to their prefered IDE.
To open Studio:
- In Jahia, click on Developer Tools
 in the left navigation.

- Select Studio. Studio opens.
Here are the different parts of the Studio interface:

Main panel: Displays the current template, file or content. When entering the Studio the first time, the list of modules with available sources is displayed.Toolbar: Contains the Mode switcher, buttons to display in the main panel the Modules list or the current Module details, the New menu to create modules, plus more usual menus. See Start working.Module selector: Allows selection from modules with available sources. When selecting a module, the module details are displayed in the main panel and all side panel tabs are enabled.- Sources tab: Displays the file system structure of the module. From the source tree, you can add new node type definitions, views, resource bundles, etc. This tab gives also access to the module compilation, source control and distribution operations. See Sources.
Templatestab: Allows to create and edit templates.Contenttab: Allows to manage content automatically imported on a site when the module is enabled on it.Content creationtab: Allows you to create content, as in editing interfaces, here in templates.Dependenciestab: Provides a simple interface to manage module dependencies. For example, if you want to add in your template a content of a type defined in another module, you will need to add a dependency to the latter.Channelstab: Same as in editing interfaces.Template mode switcher: Allows to change the mode the current template is displayed in. See Template mode switcher.
Getting started
Creating a new module
To create a new module:
- Click on New Module in the New menu of the toolbar. The Maven Archetype plugin is used to generate a skeleton of module. A dialog appears to input the information needed by the archetype.
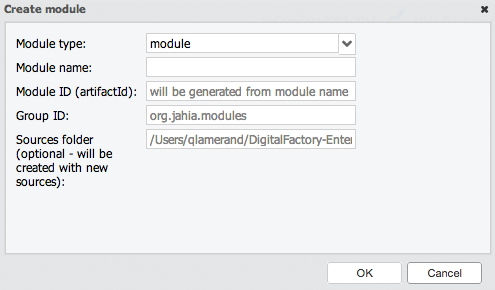
- Choose the module type to select the corresponding archetype.
- The module name is mandatory.
- The module Id (
artifactId) if not specified, is generated from the module name. - The
groupIdis by defaultorg.foo.modulesand should be change to match your organization. - Finally, you can set a specific path for the module sources. If not specified, your module sources are saved by default in your application server under
/digital-factory-data/sources/. See Sources.
Working on an existing module
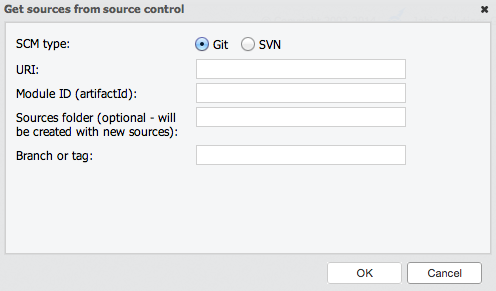
You can get an existing module sources from a Subversion (SVN) or GIT repository. Click on New > Get module from sources. Choose the type of repository and set the repository URI. Specifying the module Id is only necessary if the module is a submodule of the one living at the specified URI. The optional Branch or tag input can be used on a GIT repository to checkout a specific branch or tag. Finally, you can set a specific path for the module sources. If not specified, your module sources are saved by default in your application server under /digital-factory-data/sources/. See Sources.
Note that in the Modules section of the Administration, you can download the sources of deployed modules. The SCM (Source Control Management) information present in the module POM is used to download from the associated repository. See Source control.
Sources
The sources path of a module is stored in its manifest when it is compiled. That way, the Studio always knows if sources are available for a deployed module, whether it has been compiled and deployed manually, created from the Studio or fetched from a source control repository.
Also, the sources are watched so any modification is taken into account. It is used to keep source control status up to date, register new node type definitions and views, flush labels, etc.
Every text based file is editable in the Studio from the main panel, and in a code editor when clicking Edit in the context menu of a file. Specific engines exist though for creating and editing node type definitions, view and resource bundles.
You can at any time compile and deploy your module from the Sources tab.
Node type definitions (Modeler)
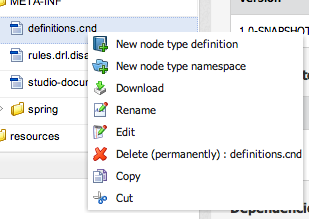
When right-clicking on a .cnd file, you have the possibility to add a new node type definition and a node type namespace. These options will actually write new entries in the .cnd file, avoiding you any syntax error.
Before adding any definitions, a good practice is to create two namespaces, one for primary node types, one for mixins. A namespace is just a prefix and a URI that will be written in the header of the definition file.
When adding a new node type definition, you have the possibility to create a primary node type or a mixin. Both have a dedicated engine. These engines allows you to edit all the available JCR and Jahia-specific options.
The engines are composed of three tabs. The first one is for editing the base attributes of the definition, like the name, a namespace prefix, a supertype, etc. The two other ones are respectively for property and child items definition. In these, you can add, move and delete them and edit their attributes (name, type, etc). Note that to create an unstructured item, you will just have to name it *.
Adding a title and description to a node definition or any of its items will automatically generate the corresponding label and description in the edited language. See Resource bundles.
After saving it, a node type definition is immediately registered without any compilation needed.
Here are two screenshots of a node type definition creation:


Alternatively, it is possible to edit directly the .cnd file. A validation is performed at save time to avoid any syntax problem.
Views (Composer)

Right-clicking on a node type definition allows you to add a new view for it. The dedicated engine for view edition is composed of two tabs, one with a JSP specific code editor, and one to edit the view properties (e.g. the different cache options).
Another possibility for creating a new view is to right-click on the root of the sources tree, then Add view. It will open the standard content type selector to choose the node type for which you want to create a view. Once you double-clicked on the chosen type, the engine will open.
The JSP specific code editor features syntax highlighting, indentation and code snippets to insert easily in your code properties assignation and display, conditionals, loops and resources such as javascript and css. Stubs allows to directly have the necessary code when you start an empty view. There is even a “loader” stub available when you create a view for a list type (i.e. extending jmix:list). For your information, the available code snippets and stubs are configured in the folder <jahia_webapp>/WEB-INF/etc/snippets/jsp/.
Here is a screenshot of this editor:

Clicking on Save as… will open a dialog to set the name and the template type of the view. This will automatically generate the correct filename and path for the view and the associated .properties file. Furthermore, the dialog allows to select another module where you want to save your view. This is useful if you want to create in a different module a new view, starting from an existing view.

Resource bundles
Edit any resource bundle .properties file will open a dedicated engine. The resource bundle editor allows to edit the different labels in several language at once. You can add, delete, rename or duplicate them. New languages can be added on the fly and you can still edit the raw .properties files if you want to.
Here what it looks like :

Source control - Deprecated
The Source Control menu allows to push a new module on a SCM repository. Once this is done, or if the module sources are already coming from an SCM repository (see On an existing module), the Commit and Update options are enabled. They are for respectively sending and getting changes to and from the associated repository.
SCM status are displayed along the sources tree. They reflect the fact that a file has been added, modified or deleted and not yet committed. When applying changes coming from the remote repository on a file that has been also modified locally, an automatic merge is sometimes not possible. In this case, the file is marked as conflict and a commit will not be possible as long as it is in this state. You will have to merge manually the changes then once it is done, right-click on the file and click on Resolve conflict. Note that for navigation purposes, all the parents of a file with a status appear as modified until the tree root.
Here are the icons representing the different SCM status :
 Added
Added Modified/renamed/copied
 Unmerged
 Untracked
(Deleted files are not displayed but their parents are modified)
Template Editor - Deprecated
The template editor allowing you to visually build your templates is deprecated, as it appeared to not be suitable for modern site designs.
For information on how to create and design your templates, see the Templating tutorial. You will still be able to use the Template Editor in the studio afterwards.
Template mode switcher
You can use the template mode switcher to view templates in the following modes:
- Structure mode
Wireframe interface that is ideal for creating the template layout. All non-list components (not extendingjmix:list) display as boxes without rendering applied. - In-Context mode
Visual interface that renders the different CSS defined in the template-set.