Creating Custom Configurations
Introduction
As Jahia has evolved over the years, many different configuration systems were introduced in the system, but in this document, we will focus on the recommended practices to introduce and manage configuration for your custom modules.

What are configurations?
Configurations are basically values that are passed to a Java class to change their behavior. Configurations may be deployed using default values and then be modified - even in real-time and over a cluster of Jahia servers - to fit varying needs. The value may range from simple values such as integers, booleans, or strings all the way to more complex structures such as lists or JSON strings.
About (legacy) Jahia.properties configurations
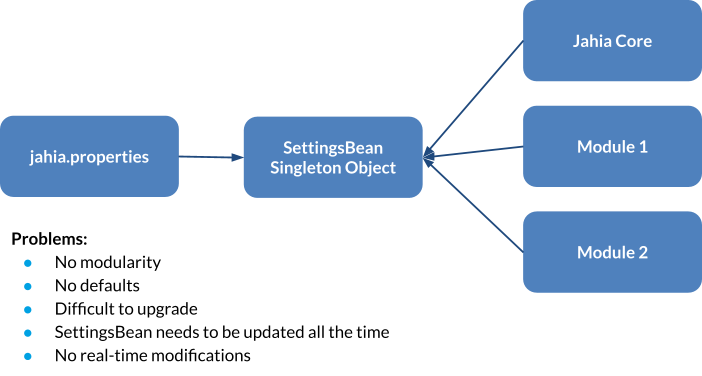
It is not recommended to use jahia.properties files; these were the previous custom configuration standard in Jahia. They have been replaced by OSGi configuration files, providing more modularity and more features. OSGI configuration files are the recommended way to manage configurations.
OSGi configurations
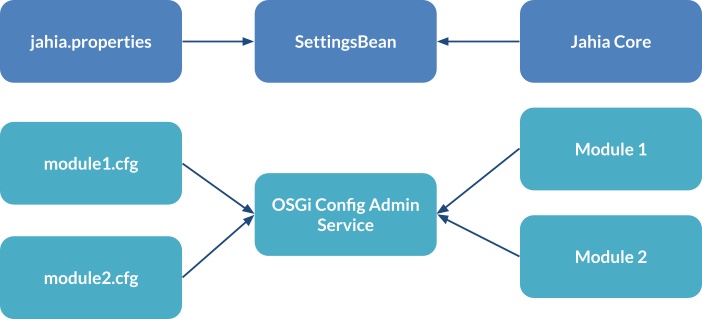
As Jahia modules are also OSGi bundles, they can leverage the OSGi configuration administration service to provide configuration for the classes packaged in the bundle. Here’s an example of OSGi configuration properties for a file with a name such as org.acme.example.config.cfg :
key=customChoiceList1
values.test1=Test 1
values.test2=Test 2
values.test3=Test 3
Property lists of key/value pairs will be passed to an OSGi service once it is activated. Here’s an example of how this is passed to a service:
@Component(name = "my-component", immediate = true, configurationPid = "org.acme.example.config")
public class MyComponent {

    @Activate
    public void activate(ComponentContext context) {
        Dictionary<String, Object> properties = context.getProperties();
        Enumeration<String> keys = properties.keys();
        while (keys.hasMoreElements()) {
            String key = keys.nextElement();
            System.out.println(key + " = " + properties.get(key));
        }
    }
}
In this example, OSGi declarative service annotations are used to declare an OSGi service. On the activate method, an object is passed that will contain the properties as well as other component context information coming from the declarative services implementation as well as the configuration administration service.
You might wonder how the configuration admin knows which configuration must be sent to a service. This is done through the usage of a PID (Persistent IDentity) that is specified in the componentId parameter of the @Component annotation. In this example, it means that it will look for a configuration with the org.acme.example.config PID. You can find a complete example in our OSGi module samples here.
The configuration admin service is responsible for storing configurations in files, and in the case of Jahia’s Karaf OSGi engine, this will happen in the karaf/etc directory. Any .cfg or .yaml/.yml files deployed in that directory will be registered in the configuration admin service and will update any service if the configurations are deployed or modified. You can find much more information about the possibilities of the Karaf configuration on its website.
It is also possible to structure the configuration by using Java interfaces and annotations to map the properties to the annotation interfaces, as in the following example:
@Component(configurationPid = "org.foo.modules.samples.config.metatype.example", immediate = true)
@Designate(ocd = MetatypeConfigExample.Config.class)
public class MetatypeConfigExample {

    private static final Logger logger = LoggerFactory.getLogger(MetatypeConfigExample.class);

    @ObjectClassDefinition(name = "Metatype configuration", description = "An example of configuration with metatype")
    public @interface Config {
        @AttributeDefinition(name = "Simple key", defaultValue = "nokey", description = "Simple key value")
        String key() default "nokey";

        // Dropdown
        @AttributeDefinition(name = "Dropdown", options = { @Option(label = "Option 1", value = "option1"),
                @Option(label = "Option 2", value = "option 2"), @Option(label = "Option 3", value = "option3") })
        String dropdown() default "option1";

        @AttributeDefinition(name = "Values.test1", defaultValue = "none", description="Key with . character in it")
        String values_test1() default "none";
    }

    @Activate
    public void activate(Config config) {
        logger.info("key={}", config.key());
        logger.info("dropdown={}", config.dropdown());
        logger.info("values.test1={}", config.values_test1());
    }
}
As you can see, this is quite powerful, even offering the possibility of providing options that can represent dropdowns. The Felix Web Console OSGi configuration UI (available in the Jahia Tools) will then be able to use this metatype (metadata) information to customize the UI when modifying configuration. It also takes care of all the type conversions automatically. Here is a screenshot of what the UI looks like:

An example configuration for such a structure can look like this:
key=customChoiceList1
dropdown=option2
values.test1=Test 1
If interested, you can find a complete example here.
Creating, Editing, and Deleting Configurations
There are many different ways of creating/editing and deleting configurations. We first give an overview of what is supported and if it is available in the Jahia Cloud offering.
| In server deployed config files | Jahia Tools Config Admin UI | Karaf Command SSH Shell | Jahia GraphQL API | JSP Taglib | Config Admin OSGi Service (Java) | Provisioning API | |
| Officially supported by Jahia | Yes | Yes | No | Yes | Yes | Yes | Yes |
| Available on Jahia cloud | No | Yes | No | Yes | Yes | Yes | Yes |
The table below gives a good overview of the different possibilities and their strengths and weaknesses. We, of course, only include the options supported by Jahia.
| Actions / features | In server deployed config files | Jahia Tools Config Admin UI | Jahia GraphQL API | JSP Taglib | Config Admin OSGi Service (Java) | Provisioning API |
| Read value | Yes | Yes | Yes | Yes | Yes | No |
| Edit existing value | Yes | Yes | Yes | No | Yes | Yes |
| Create new entry | Yes | No | Yes | No | Yes | Yes |
| Create new file/config | Yes | No | Yes | No | Yes | Yes |
| Available without root access | Yes* | Yes | Yes** | Yes | Yes | No |
*Provided you have file-system write permissions
**You will need some GraphQL-specific permissions at a minimum
In server-deployed configuration files
Possibly the simplest way to create, edit, and delete configurations is to manage them at the filesystem level. This is done in the karaf/etc directory. Files within the directory have the following naming conventions:
configurationPid.cfg or configurationPid.yaml
Or in the case of factories:
factoryPid-factoryIdentifier.cfg or factoryPid-factoryIdentifer.yaml
Creating or editing such files in that directory will immediately trigger configuration admin changes and push the changes to the related OSGi services. This is especially useful during development, where quick changes must be tested frequently.
Any changes done through any other means listed below will also update the deployed files so everything is always kept in sync.
In the OSGi console config administration UI
The OSGi console web UI to administer configurations is provided by the Apache Felix Web Console project and generates a UI based on existing configuration files to allow modification. It has some limitations as it is not able to create new configurations and cannot create new configuration entries, but it can be very useful to quickly view and perform small modifications that will be applied in real time on a server. The UI is accessible through the UI:
http://localhost:8080/tools/osgi/console/configMgr

Using the GraphQL API
Jahia’s GraphQL API also provides a way to manipulate configurations through its configuration node, and more documentation can be found by directly accessing the GraphQL Playground at the following URL:
http://localhost:8080/jahia/developerTools/graphql-playground
For more information about Jahia’s GraphQL API, please check the related documentation.
In the following example, we use a GraphQL mutation to the Jahia admin API to add a configuration with PID org.jahia.modules.kibana_dashboards_provider with specific value pairs that we identify using GraphQL aliases (url, user, password,... in this example)
mutation {
 admin {
  jahia {
   configuration(
    pid: "org.jahia.modules.kibana_dashboards_provider"
   ) {
    url:value(name:"kibana_dashboards_provider.kibanaURL",value: "http://kibana:5601" ),
    user:value(name:"kibana_dashboards_provider.kibanaUser",value: "elastic"),
    password:value(name:"kibana_dashboards_provider.kibanaPassword",value: "thepassword" ),
    enable:value(name:"kibana_dashboards_provider.KibanaProxy.enable",value: "true" ),
    cloud:value(name:"kibana_dashboards_provider.KibanaProxy.cloud",value: "false" )
   }
  }
Using the provisioning API
Jahia’s provisioning API is a great way to initialize a Jahia installation, for example, in cases of continuous integration and continuous delivery (CI/CD) deployments. A docker image can be used as a base, and then modules and configurations can be deployed to deliver a final custom installation. You can find more information about the provisioning API in the related documentation, but in this section, we will focus on the parts that are specific to the OSGi configuration.
Installing a configuration
Installing a configuration using the provisioning API can be done remotely by using a request that will upload a local file to the remote server using a request such as the one provided in the example below:
curl -X POST 'http://localhost:8080/modules/api/provisioning' \
-u 'root:root1234' \
--form 'file=@"<local-folder-of-file>/org.foo.modules.example.conf.cfg"' \
--form 'script="[{\"installConfiguration\":\"org.foo.modules.example.conf.cfg\"}]"'
As you can see, the file's name is present twice because it is possible to rename the configuration if needed (but we don’t do it in this example).
It is also possible to install a configuration by providing a link to a file already available on the Jahia server filesystem.
Example:
- installConfiguration: "file:/tmp/org.jahia.services.usermanager.ldap-config-rqa5.cfg"
Editing a configuration
You can create or edit configurations by using editConfiguration with the configuration PID. If the PID is a factory PID, you must specify the factoryIdentifier value or use the <factory-pid>-<factoryIdentifier> syntax. For example:
- editConfiguration: "org.jahia.modules.jexperience.settings"
  configIdentifier: "global"
  properties:
    jexperience.jCustomerURL: "https://jcustomer:9443"
    jexperience.jCustomerUsername: "karaf"
    jexperience.jCustomerPassword: "karaf"
    jexperience.jCustomerTrustAllCertificates: "true"
    jexperience.jCustomerUsePublicAddressesForAdmin: "false"
    jexperience.jCustomerKey: "670c26d1cc413346c3b2fd9ce65dab41"
You can also put the content of the properties file in the script (the formatting will be maintained for config creation only):
- editConfiguration: "org.jahia.modules.test"
  configIdentifier: "id1"
  content: |
    # LDAP configuration
    user.uid.search.name:dc=jahia,dc=com
    group.search.name:dc=jahia,dc=com
    url=ldap://rqa5.jahia.com:389/
Using the Configuration Admin Java OSGi service
The last (and most powerful) way to manipulate configuration is to directly access the Configuration Admin OSGi service through its Java interface. We won’t go into all the details of its interface, but here is a quick example of how to create a configuration using Java code:
ConfigurationAdmin configAdmin = // obtain a reference to the Config Admin Service, for example using a @Reference
Configuration config = configAdmin.createFactoryConfiguration("org.jahia.modules.test");
Dictionary<String, Object> properties = new Hashtable<>();
properties.put("user.uid.search.name", "dc=jahia,dc=com");
config.update(properties);
Factory configurations
Until now, we have always presented configurations as a direct one-to-one relationship with the classes that will receive them from the Configuration Administration service. However, OSGi allows for another type of configuration: factories.
Let’s have a look at various use cases for factory configurations:
- Providing multiple configurations for connectors
- LDAP
- Database
- Providing different configurations for different sites
- jExperience
- …
- Providing different configurations for a single code base (generic)
Compared to a singleton instance of services, factories make it possible to instantiate a service multiple times and provide it with different configurations.

For example, a service factory could provide an LDAP connector, and each configuration to a different LDAP server could be managed as a configuration of that same LDAP connector service implementation. This is actually how the LDAP connector module is implemented for Jahia.
It is possible to use Declarative Services annotations to create factory implementations, such as in the following example:
@Component(service = {SiteConfig.class}, configurationPid = "org.foo.modules.samples.config.factory.site", configurationPolicy = ConfigurationPolicy.REQUIRE)
@Designate(ocd = SiteConfigImpl.Config.class, factory=true)
public class SiteConfigImpl implements SiteConfig {

    private Config config;

    @ObjectClassDefinition(name = "Site configuration", description = "A configuration for a site")
    public @interface Config {

        @AttributeDefinition(name = "Site key", defaultValue = "siteKey", description = "The identifier for the site")
        String key() default "siteKey";

        // Dropdown
        @AttributeDefinition(name = "Site type", options = { @Option(label = "Landing page", value = "landing"),
                @Option(label = "Marketing", value = "marketing"), @Option(label = "Support", value = "support") })
        String type() default "marketing";
    }

    @Activate
    public void activate(final Config config) {
        this.config = config;
    }

    @Override
    public String getKey() {
        return config.key();
    }

    @Override
    public String getType() {
        return config.type();
    }
}
In this example (that also uses meta-type annotations), it is a basic component that will be instantiated multiple times if multiple configurations are detected with the proper naming convention. You might have noticed that we set up a configuration policy. The default policy (optional) means that the system may create instances of the component even if no configuration is provided, which can be a bit surprising or unexpected. By changing the policy to REQUIRE, we ensure that the component will only be created if a configuration has been added. This ensures better control of the lifecycle of the component instances.
Configuration files for factory configurations follow a different naming convention:
factoryPID-factoryIdentifier.cfg/.yaml
The factoryPID is the persistent identifier for the factory, usually something like org.acme.modules.sample.connector and the factoryIdentifier will be an identifier for the specific instance of the factory. Because a dash (-) character separates the PID and the identifier, you should never use dashes in PIDs or factory identifiers to avoid potential deployment problems. Examples of factory identifiers might include : default, global, server1. It is up to the implementation of the factory to use the identifiers as it sees fit. The configuration will be delivered to a factory implementation through the activation method, exactly in the same way as for regular configurations, except that two properties will be automatically added:
component.name: the name of the componentcomponent.factory: the factory identifier
This way, the factory implementation will be able to retrieve the factory identifier and use it to perform custom configuration handling.
Site-local configurations
A good usage of a factory configuration is to build site-local configurations. For example, jExperience uses this method to provide default and site-specific configurations. Here, the convention is to use the siteKey as a factory identifier and then implement the server-side logic to map the factory configuration to the proper site. This is by no means the only way to do this, and for example, configurations could be made to match siteKeys using regular expressions or any other means. But in general, factory configurations will be useful to provide configurations that must differ from site to site.
Example
Reusing the example component from the factory example, we can then create new configuration files named:
org.foo.modules.samples.config.factory.site-site1.cfg
org.foo.modules.samples.config.factory.site-site2.cfg
org.foo.modules.samples.config.factory.site-site3.cfg
With for example the following content:
key=mySite
type=landing
The key will be the actual site identifier, the factoryIdentifier used in the file name is not used to identify the site, to differentiate the configuration. Usually, it’s a good idea to have them both equal to the key to make things easier to find, but in this example, we wanted to explain that they don’t have to be the same as the factoryIdentifier is not accessible to the Java implementation.
Now, what remains is using the configurations to actually do something with them, so here is an example of a configuration consumer:
@Component
public class SiteConfigConsumer {

    private static final Logger logger = LoggerFactory.getLogger(SiteConfigConsumer.class);

    private List<SiteConfig> siteConfigs = new ArrayList<>();

    // The GREEDY policy makes sure that ALL the instances of the configuration are instantiated, otherwise only one would be created.
    // Making it DYNAMIC also avoids the component to activate/deactivate for each config binding.
    @Reference(cardinality = ReferenceCardinality.MULTIPLE, policy = ReferencePolicy.DYNAMIC, policyOption = ReferencePolicyOption.GREEDY)
    public void addSiteConfig(SiteConfig siteConfig) {
        this.siteConfigs.add(siteConfig);
        logger.info("Adding site key={} type={}", siteConfig.getKey(), siteConfig.getType());
    }

    public void removeSiteConfig(SiteConfig siteConfig) {
        this.siteConfigs.remove(siteConfig);
        logger.info("Removing site key={}", siteConfig.getKey());
    }

}
As the code comments explain, the @Reference configuration is important because it will force all configurations to be properly instantiated. Without these settings, only one configuration would be instantiated, which is not what we (usually) would want. You can find a complete working example here.
Embedding module configuration
Sometimes, you want to be able to deploy OSGI configuration files when you deploy modules. You can add your configuration files to your module source folder under the /src/main/resources/META-INF/configurations directory.
The following example comes from the OSGi-modules-samples module.

This automatically deploys the configuration files in the /digital-factory-data/karaf/etc folder. The OSGI framework automatically registers the configuration during runtime.
Note that, by default, a configuration file is overridden each time the module is deployed. This is useful if the configuration file needs to evolve in future module versions. If you want to avoid the override of the configuration file during the module upgrade, you need to start the first line of the configuration file being deployed with the module with the # default configuration marker.
Here is a simple example of such a configuration file:
# default configuration
testValue=123

Here is the deployment mechanism: if a module contains configuration files, then they are deployed if:
- No existing configuration already exists in
digital-factory-data/etc/deploy - Or if the configuration file being deployed does NOT start with the line
# default configuration
If the file is not a default configuration, the following line will be added to the beginning of the configuration file on deployment:
# Do not edit - Configuration file provided by module, any change will be lost
Use cases for different (default, non-default) configuration files
Default configuration:
- Provide initial/partial configuration
- Provide example
- Module upgrade without resetting config (provide default config)
Non-default, non-user editable configuration:
- Configuration of external OSGi services (GraphQL servlet, …)
- Security and permissions configs (CSRF, API permissions, …)
- Provide commented-out sample files (inactive sample)
Properties (.cfg) versus Yaml file formats
Jahia supports two formats for configuration files (by default, OSGi only supports the properties file format):
- Property files that use extension .cfg or .config
- Yaml files that use the extension .yaml or .yml
Usually, if possible, properties files should be used as they are an OSGi standard and simpler to use. But in some cases, when complex structures are needed, Yaml files can make things easier to manage.
Properties vs. Yaml
Here is a table comparing properties files with Yaml files.
| Properties (.cfg) | Yaml (.yaml, .yml) | |
| Default Encoding | ISO-8859-1 | UTF-8 |
| Structured keys | No | Yes |
| Standard configuration format | Yes | No |
| Complex case readability | No | Yes |
| Available in UI/APIs | Yes | No |
| Recommended for simple cases | Yes | No |
Here is an example of a typical Properties (.cfg) configuration file:
# default configuration - won't be overriden
# Legacy configuration - only used if org.jahia.bundles.api.security / security.legacyMode is set to true

// All API calls allowed on the configured node types inside /sites/*
permission.siteResources.nodeType=jnt:folder,jnt:page,jnt:portlet,jnt:navMenuText
permission.siteResources.pathPattern=/sites/.*

// All API calls allowed on jnt:category
permission.category.nodeType=jnt:category

// treeRootItem json view allowed for virtualsite
permission.treeRootItem.api=view.json.treeRootItem
permission.treeRootItem.nodeType=jnt:virtualsite
permission.treeRootItem.pathPattern=/sites/.*

// No permission check by default for html views
permission.htmlviews.api=view.html
permission.htmlviews.priority=99998

// Require write permission by default, if no other rule matches
permission.global.access=restricted
permission.global.priority=99999

// Graphql
permission.gql.api=graphql
permission.gql.pathPattern=/
permission.gql.requiredPermission=jcr:read_default
permission.gql.priority=99997
Yaml files, when loaded, are “flattened,” meaning that their properties are internally transformed from something like this:
apiVersion: apps/v1
kind: Deployment
metadata:
  name: my-app
  labels:
    app: my-app
spec:
  replicas: 3
  selector:
    matchLabels:
      app: my-app
  template:
    metadata:
      labels:
        app: my-app
    spec:
      containers:
        - name: my-app
          image: my-app:latest
          ports:
            - containerPort: 80
          env:
            - name: ENV
              value: prod
          resources:
            limits:
              cpu: "1"
              memory: "1Gi"
            requests:
              cpu: "0.5"
              memory: "512Mi"
        - name: sidecar
          image: my-sidecar:latest
          env:
            - name: ENV
              value: prod
      initContainers:
        - name: init-my-db
          image: busybox
          command: ['sh', '-c', 'until nslookup my-db; do echo waiting for my-db; sleep 2; done;']
        - name: init-my-config
          image: busybox
          command: ['sh', '-c', 'until nslookup my-config; do echo waiting for my-config; sleep 2; done;']
To something like this:
   apiVersion = apps/v1
   felix.fileinstall.filename = file:/var/jahia/karaf/etc/org.jahia.modules.test.complex.yml
   kind = Deployment
   metadata.labels.app = my-app2
   metadata.name = my-app
   service.pid = org.jahia.modules.test.complex
   spec.replicas = 3
   spec.selector.matchLabels.app = my-app
   spec.template.metadata.labels.app = my-app
   spec.template.spec.containers[0].env[0].name = ENV
   spec.template.spec.containers[0].env[0].value = prod
   spec.template.spec.containers[0].image = my-app:latest
   spec.template.spec.containers[0].name = my-app
   spec.template.spec.containers[0].ports[0].containerPort = 80
   spec.template.spec.containers[0].resources.limits.cpu = 1
   spec.template.spec.containers[0].resources.limits.memory = 1Gi
   spec.template.spec.containers[0].resources.requests.cpu = 0.5
   spec.template.spec.containers[0].resources.requests.memory = 512Mi
   spec.template.spec.containers[1].env[0].name = ENV
   spec.template.spec.containers[1].env[0].value = prod
   spec.template.spec.containers[1].image = my-sidecar:latest
   spec.template.spec.containers[1].name = sidecar
   spec.template.spec.initContainers[0].command[0] = sh
   spec.template.spec.initContainers[0].command[1] = -c
   spec.template.spec.initContainers[0].command[2] = until nslookup my-db; do echo waiting for my-db; sleep 2; done;
   spec.template.spec.initContainers[0].image = busybox
   spec.template.spec.initContainers[0].name = init-my-db
   spec.template.spec.initContainers[1].command[0] = sh
   spec.template.spec.initContainers[1].command[1] = -c
   spec.template.spec.initContainers[1].command[2] = until nslookup my-config; do echo waiting for my-config; sleep 2; done;
   spec.template.spec.initContainers[1].image = busybox
   spec.template.spec.initContainers[1].name = init-my-config
   spec.template.spec.volumes[0].configMap.name = my-config
   spec.template.spec.volumes[0].name = config-volume
   spec.template.spec.volumes[1].name = data-volume
   spec.template.spec.volumes[1].persistentVolumeClaim.claimName = my-pv-claim
And, if edited in the OSGi Configuration Administration interface, it will be presented like this:

Any changes to a Yaml configuration will then be re-transformed back into the Yaml syntax when updating the configuration file.
Using configuration in views
It is possible to access OSGi configuration in JSPs using JSP functions. In this section, we give some examples of what is possible. This may also be used to surface configurations to single-page applications (SPAs) that would be initialized using a view or a template.
Retrieving a complete configuration as a map of properties from its config PID:
<c:set var="configValues" value="${functions:getConfigValues('org.jahia.modules.test')}"/>

<p>configValues.configKey1=${configValues.configKey1}</p>
<p>configValues.configKey2=${configValues.configKey2}</p>
Get a specific configuration entry from a specific configuration PID:
<c:set var="configKey1Value" value="${functions:getConfigValue('org.jahia.modules.test', 'configKey1')}"/>
<p>configKey1=${configKey1Value}</p>
Retrieve a factory configuration using a factory PID and an default identifier:
<c:set var="defaultFactoryConfigs" value="${functions:getConfigFactoryValues('org.jahia.modules.test.factory', 'default')}"/>
<p>defaultFactoryConfigs.configKey1=${defaultFactoryConfigs.configKey1}</p>
<p>defaultFactoryConfigs.configKey2=${defaultFactoryConfigs.configKey2}</p>
Retrieving all the configuration PIDs:
<c:set var="configPIDs" value="${functions:getConfigPids()}"/>

<h1>All Config PIDs</h1>
<p>allConfigPIDs=${configPIDs}</p>
Retrieving all the identifiers for a given factory PID:
<c:set var="testModuleFactoryIdentifiers" value="${functions:getConfigFactoryIdentifiers('org.jahia.modules.test.factory')}"/>

<h1>Test Module Factory Config Identifiers</h1>
<p>testModuleFactoryIdentifiers=${testModuleFactoryIdentifiers}</p>
Container-compatible (Docker) configuration
To have configurations that will work well in container environments such as Docker, this usually implies:
- Being able to access environment variables to pass configuration values
- Be compatible with multiple instances and clustering
Accessing environment variables from OSGi configuration
It is possible in configuration files to access environment variables using the following syntax in a configuration file:
property=${env:ENV_VARIABLE}
You can combine this, of course, with the default value system provided by Karaf:
property=${env:ENV_VARIABLE:-default_value}
Here’s an example:
userHomeDirectory=${env:HOME:-/tmp}
The above example will try to read the user running the server home directory from the HOME environment variable, and if it is not set, it will use /tmp as a default value.
Note: This method of accessing properties could also be very useful to access passwords that would be passed as environment variables, preventing the need to store them unsafely in configuration files.
Clustered configurations
Clustering support is built into the Jahia OSGi configuration implementation. Any configuration changes done through anyway to modify configurations will be automatically propagated through the cluster to all the Jahia nodes. In general, when performing modifications to a cluster configuration, it is a good idea to wait for propagation to be completed to all the nodes before making further changes. Checking the server logs should be the simplest way to do that, or checking the values using the Karaf Web Console OSGi Configuration on the different nodes.
JCR vs. OSGi Config
In some cases, it might be interesting to store configuration inside of the JCR instead of in the OSGi configuration admin service. The following table summarizes the differences and the cases where it might be interesting to use one or the other.
This document will not detail storing configuration inside the JCR in detail as it is no different from handling regular content. The only recommendation is that usually, it makes sense to store JCR configuration either at the /settings level of the JCR if it is system-wide or underneath a site node (/sites/SITEKEY) if it is site-specific. Content definitions can be provided in CND files for configuration so that you can enforce the structure and use the content editor to edit configurations.
In general, OSGi configurations should be preferred, and JCR configurations should only be used when really needed, for example, when letting end-users directly edit the configuration. Using both in the same module, nothing is preventing that.
| Lives with source code | Hot reload | Environment variables access | Cluster replication | APIs | UI Editing | |
| OSGI | Yes | Yes | Yes | Yes | Yes | Yes (Tools) |
| JCR node | Yes | Yes | No | Yes | Yes | Yes (Content Editor) |
Resources
- Apache Karaf configuration: https://karaf.apache.org/manual/latest/#_configuration_3
- Apache Felix Fileinstall configuration: https://felix.apache.org/documentation/subprojects/apache-felix-file-install.html#_configurations
- OSGi Configuration Admin specification: https://docs.osgi.org/specification/osgi.cmpn/7.0.0/service.cm.html
- Github:
- Jahia OSGi examples: https://github.com/Jahia/OSGi-modules-samples/tree/master/config-samples
- Karaf Config examples: https://github.com/apache/karaf/tree/main/examples/karaf-config-example