Configuring OAuth modules and social login
OAuth is an open standard for authorization, commonly used as a way for users to log into websites by reusing their Facebook, Linkedin, Google, or FranceConnect account. You can add a social login to your website with the Jahia OAuth module.
What can you do with the OAuth modules?
With the OAuth modules you can:
- Allow your visitors to login to your website via their social login and remove friction for your customers when they login
- Collect data from social networks through login and reuse them for analytics or personalization (with jExperience)
- Easily add login buttons by dragging-and-dropping them on your pages
No code is required to use these modules and the login buttons can be added to any webpage with a simple drag and drop.
Supported logins
The Jahia OAuth module, compatible with Jahia 8.0.1+, currently supports the following providers:
- FranceConnect
- GitHub
About the authentication modules
The Jahia Authentication, Jahia OAuth, and JCR Authentication provider modules are required to add a social login to your site. If you are using jExperience and want to leverage data of the social profile of visitors to perform personalizations, you also need the jExperience Auth data mapper module. You can find links to the modules on the Jahia store here:
- Jahia Authentication
The backbone of SSO solutions - Jahia OAuth
The OAuth connectors - JCR Authentication provider
Provides authentication to Jahia and lets you map each visitor attribute coming from the connectors to a Jahia user attribute - jExperience Auth data mapper
Lets you map each visitor attribute from the connectors to jExperience visitors profiles. Relying on jCustomer Customer Data Platform, this module is more adapted to heavy data collection (and allows analytics and personalization based on this data through jExperience)
The following schema shows how the modules interact with the JCR and jCustomer.
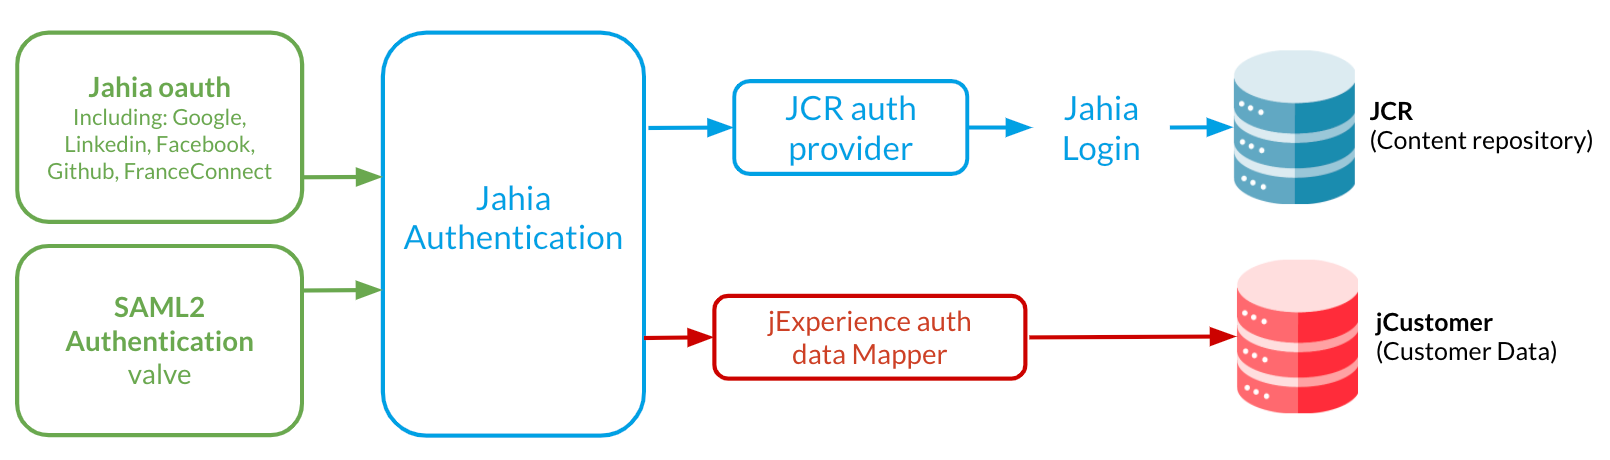
- Modules in blue are always needed if you use OAuth or SAML.
- Choose one module in green depending on your authentication strategy.
- Module in red is optional. It brings value if you use jExperience.
Authentication modules naming in Jahia 7 and 8
Between Jahia 7 and 8, most of Jahia authentication related modules were renamed. This has been done because the separation of concern between authentication and Oauth protocol wasn't fully consistent. The table below lists the modules with their v7 and v8 names:
| v7 naming | v8 naming |
|---|---|
| Not available | New: Jahia Authentication |
| SAML Authentication valve | SAML Authentication valve (now relies on Jahia Authentication) |
| Jahia Oauth | Jahia Oauth, including: Google, Facebook, Linkedin, Github, and FranceConnect |
| JCR OAuth provider | JCR Auth provider |
| jExperience OAuth data mapper | jExperience Auth data mapper |
| Google connector | Included in Jahia Oauth |
| Facebook connector | Included in Jahia Oauth |
| Linkedin connector | Included in Jahia Oauth |
| Github connector (community) | Included in Jahia Oauth |
Prerequisites
Modules have the following prerequisites:
- Jahia OAuth module requires Jahia 8.0.1 and jahia-authentication.
- jExperience Auth data mapper requires jExperience 2.0 or above
- For each connector (for example, Google and FranceConnect) that you'll use, you need the corresponding working application
Creating applications
For more information on how to create your application, refer to:
- Application configuration
https://console.developers.google.com/apis/credentials/oauthclient - Documentation
https://support.google.com/googleapi/answer/6158849
FranceConnect (in French)
- Application configuration
https://partenaires.franceconnect.gouv.fr/fcp/fournisseur-identite - Documentation
https://api.gouv.fr/les-api/franceconnect
- Application configuration
https://developers.facebook.com/apps/ - Advanced documentation
https://developers.facebook.com/docs/facebook-login
- Application configuration
https://www.linkedin.com/developers/ - Advanced documentation
https://docs.microsoft.com/fr-fr/linkedin/shared/authentication/authorization-code-flow?context=linkedin/context
GitHub
- Application configuration
https://github.com/settings/developers - Advanced documentation
https://docs.github.com/en/free-pro-team@latest/developers/apps/authorizing-oauth-apps
Configuring the OAuth module
First, install and deploy the modules that you need on your Jahia website. For more information on deploying modules, see Installing a module tutorial. When you deploy the modules, multiple authentication providers are available for you to configure. The available configuration options differ depending on the individual provider.
To configure the OAuth module:
- Navigate to Administration>Sites>Jahia Authentication. The lists of OAuth connectors that you can configure displays under Jahia Authentication settings.

- Click the down arrow
 to expand the connector that you want to configure. This example shows the Google Connector expanded.
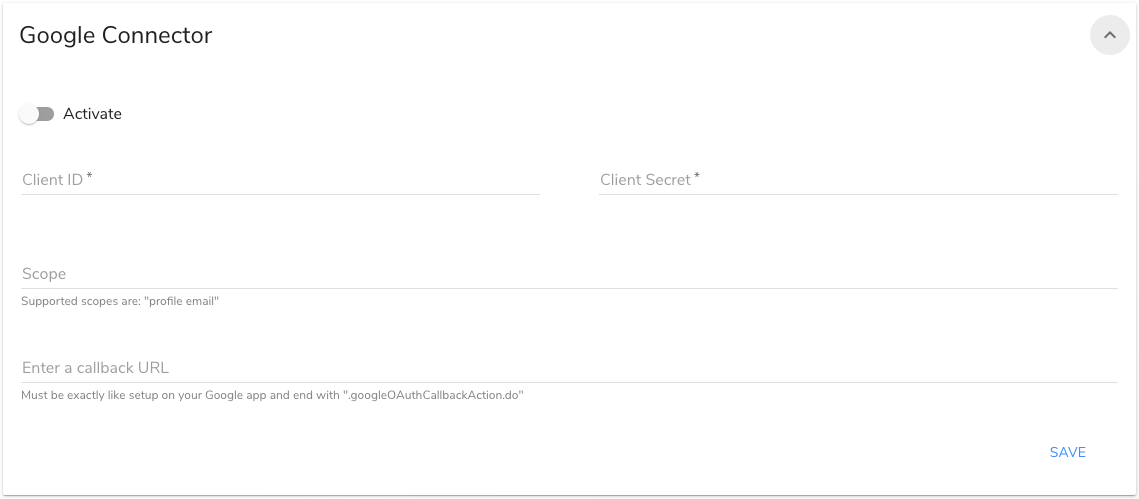
- Toggle the Activate slider to enable
- For the Google Connector, provide the following values:
- ID Client
The ID of your application - Secret client
The "secret" of your application - Scope
Defines which data you'll ask to your visitors. This needs to be the same on your application and in this screen.
Each connector supports a given scope and the supported scope is listed below the textbox. If you type in a larger scope, the additional data won't be collected. Please contact Jahia if you have specific needs and want to collect more data than what is currently supported.- Github scope example : profile email
- Facebook scope example : public_profile
- LinkedIn scope example : r_emailaddress r_liteprofile
- Callback url
The URL where the user is redirected when the login is a success. It must end in a specific way such as.googleOAuthCallbackAction.do, for examplehttp://virtuallvr.com/sites/digitall/home.googleOAuthCallbackAction.do. There can be several callback URLs.
Do not forget to remove the extension of the page before adding the suffix. For example,http://virtuallvr.com/sites/digitall/home.html.googleOAuthCallbackAction.dodoes not work.

- ID Client
- Click Save.
After saving your configuration, the Actions buttons become available at the bottom of the page. You use Actions to map the fields that authenticate users in your social login to the fields used to authenticate users in Jahia.
Mapping users
For each connector, you'll need to map fields that authenticate users in your social login to the fields that authenticate users in Jahia. The JCR OAuth provider is always available and jExperience Auth data mapper only appears if you deploy the module on your website. jExperience must be deployed as well.
When you map fields, you select the social login fields used as the username. Then you map it to the appropriate username field in Jahia.
To map users:
- In Jahia Authentication settings>Google Connector page, click Actions.

The Google Connector page opens. - On the Google Connector page, click the down arrow to expand the JCR OAuth provider section.

- Toggle the Activate slider to enable.
- In Field from connector, select the fields to map from the social account that you want to configure. For example, select First name, Last name, and Google ID.

- In Field from provider, select the fields to map to in Jahia. For example, select First name, Last name, and Login username mandatory.

- Click Save.
Now users will be able to access Jahia when logged into their social logins.
jExperience Auth data mapper
The jExperience Auth data mapper allows you to map each attribute coming from your connector to jExperience profile properties. You can use this data for analytics or personalization. Keep in mind that jExperience works with jCustomer and allows you to create as many profiles properties as you want, on the fly.

Adding the social login button to a page or template
You can add the social logins buttons as you would with any Jahia component, under Jahia OAuth button connector in the Select Content Type dialog.

Publishing the Authentication Results page
When you enable Jahia OAuth, the Authentication Results page is created in sites/your-project/oauth-result. The page contains a confirmation message that displays to users when open authentication is complete. You must publish the page to complete Jahia OAuth setup. You should also personalize the message to match the look and feel of your website.
The following shows an example of the page in the Digitall project.
