Creating website templates in Jahia tutorial
In this tutorial, you will learn how to build a website from scratch using Jahia. It is assumed that you have an instance of Jahia up and running. If not, see the First steps with Jahia tutorial to run Jahia in a Docker image or Discovering Jahia to perform a local install.
You will build a site with a carousel that looks similar to this:

Learning the basics
Basics of content definitions and rendering
A content object is a small structured piece of content that you add to a page for display in a browser or mobile device. Object properties compose the single content element. For example, an article content object is composed of a title, an abstract and body, as well as optional metadata such as author, publishing date, description, and tags. All content objects stored in Jahia have an associated definition and view. For example, a content object of type jnt:article could have the following definition:
- A Title property
- An Intro property
- Paragraphs and subnodes (there can more than one)
As you can see, a type definition can include properties or subnodes. Each content object is stored as a node. Subnodes are simply content objects stored under a parent node, which creates a tree structure. If you’re wondering what the jnt: prefix stands for, it is a namespace that means Jahia Node Type. You can and should define your own namespaces (but let’s not get into that now).
After defining a type, you can create a view to render the content object into HTML, as shown in the following example:
<h2>${currentNode.properties.title.string}</h2>
 <div class="intro">
  ${currentNode.properties.intro.string}
 </div>
<c:forEach items="${currentNode.nodes}" var="paragraph">
 <template:module node="${paragraph}" view="default"/> <!-- this will render the paragraph sub-node -->
</c:forEach>
Views are JSP tags that use custom HTML tags to output content object properties. Alternatively, you can access content objects in a “headless” way using our GraphQL API.
Jahia includes many predefined content object types, known as node types, and associated views. Modules can define new types and views. In this tutorial, you do not need to define any new types or views. Instead, you use existing types that are available in modules from the public Jahia App Store. If you’re interested in learning more about node types and views, see Where to go from here at the end of this tutorial.
Content pages and templates
Content pages are similar to HTML pages, meaning that for each content page there is a full HTML page that is rendered. Pages can be organized in a tree structure, just the same as for content objects. Pages are actually content objects with a jnt:page node type.
The mechanism for rendering a page is a bit different than for regular content objects. Pages use layout templates, and a template is also a content object that has its own view. As templates instances all share the same view, this makes it easy to define common HTML headers, scripts, CSS, and other resources as shared dependencies between them.
Templates can then be packaged in a Jahia module that is called a template set. You will now learn how to build your first template set, set up layout templates, create default content, package everything up and finally how to create a site using this template set.
Installing the Bootstrap 4 modules
First you install the modules that you will use as building blocks for your template set. You use the following modules that are freely available on Jahia’s App Store:
- Popper.js
Embeds the Javascript library to calculate the positioning of HTML elements - Bootstrap 4 Core
Embeds the Bootstrap 4 CSS and Javascript libraries - Bootstrap 4 Components
Uses the Bootstrap 4 Core module and offers a library of Jahia components that wrap Bootstrap 4 components
To install the modules:
- Access Jahia at the following URL: http://localhost:8080 and log in using the “root/root” credentials.
- Click the Jahia logo in the upper-left corner to open the Jahia menu and click Administration.
- Select System components>Modules.
- Select the Available modules tab to connect to the Jahia Public App Store.
- In the search module field, enter
Popperand click the download arrow under Download. - Search for
bootstrap4and download the Bootstrap4 Core and Bootstrap4 Components modules.
Creating a template set module using the Jahia Studio
- In Jahia, click the Jahia logo in the upper-left corner to open the Jahia menu and click Studio.
- In the Jahia Studio and in the top toolbar, select New>New module.
- In the Create module dialog, change the module type to templatesSet.
- In Module name, name your module
template-tutorial. - Click OK to create the module. This typically takes 5-10 minutes as Jahia generates a new module, downloads all its dependencies and compiles it. Dependencies are only downloaded for the first module and creation time depends on your connection speed.
- Once the module is generated, in the left panel, navigate to and select the following file: src/main/resources/jnt_template/html/template.template-tutorial.jsp
- This is the “view” for your pages. Note the <template:area path="pagecontent” /> tag in the <div> tags. This is where the actual layout template will be used. You don’t need to modify this file, just have a look at the path of the area because you will see how it relates to page templates. You will return to this view in a later tutorial to learn how to customize the template set even more.
- Next, you must declare that your template set will use the newly installed Bootstrap 4 module and its dependencies. Select the Dependencies tab
 in the left panel. Move the bootstrap4-core, bootstrap4-components and popper.js modules from the Module to the Dependency section using the Click to add a dependency down arrow. When you are finished, the Dependencies tab should look like this:

Creating the base page template
Page templates can inherit objects from other templates. You can use the tabs in the left menu navigation to switch to other objects.
Notice the base template with two page templates below it. Anything defined in the base template is inherited by all the templates defined below it.

You will now set up the components in the base template:
- Select the Templates tab and open the templates folder. Select the base template.
- Click the arrow at the right of the PAGECONTENT box to enable the zone, which is known as a template area.
- Click Any content and select Bootstrap 4>Navbar. Click OK.
- Select Advanced settings and select Add a container within the navbar and Add the login button. Select Brand and enter
ACMEin the Brand text field. Click Save. - You will now add a Bootstrap 4 Grid component to adjust the layout to be center in the middle of the page. Click Any content and select the Bootstrap 4>Grid component and click OK.
- In Select a predefined grid, select the container-fluid option of 12.
Note: Bootstrap Grid options specify the number of columns in the grid and the relative width of columns. For example, 4/4/4 specifies three columns of equal width. - Select the Create Container checkbox but don’t modify any of its settings. This setting centers the layout of the container on the page. If you’re interested in learning more about Bootstrap Containers and Layout, you can read the official documentation.
- Select the Create row checkbox but don’t modify any of its settings. Click Save.
A center-aligned, grey box named GRID-MAIN displays in the pagecontent area. - Activate the GRID-MAIN box by clicking the down arrow button to the right of the box’s title.
- Click Any content and add the Bootstrap 4>Breadcrumb component and click OK.
- Select the Advanced settings checkbox and remove the float-left class and click Save.
- You will now add a template area. You add content into an area using subtemplates or page instances. The initial PAGECONTENT area that you activated earlier in this tutorial is also a template area. To add the area, click Any content button in the GRID-MAIN box again, and this time select the Layout Components>Area component (make sure you don’t use the Absolute Area as this area is quite different in the way it works). Click OK.
- In the Add: Area dialog, enter
pagecontentin the System name field. You can ignore all the other component settings. Click Save.
Your base template should look like this:

Creating the home and simple page templates
Now that the base template is set up, you will use the basic layout defined by the template to populate the home and simple page templates, and define the more precise layouts that these pages will use.
- Select the home page template in the left menu.
- Activate the PAGECONTENT box by clicking the down arrow at the right of the box. Note that the box is centered because it inherits its position from the base template. The other components that you set up do not display in this view. You can see how they render by selecting the In-context view in the upper right.
- Make sure you are back in the Structure view. Click Any content and add a Bootstrap 4>Grid component. Click OK.
- Select a predefined grid of size 12 and select the Create row checkbox. In Classes set on this row block enter
mb-4to add a margin at the bottom of the box. The margin will clearly separate this content from other content that displays below. If you are wondering what this value is you can read Bootstrap 4’s documentation about spacing. Don’t change any other settings and click Save. - Click Any button again and add a Grid component again.
- This time select the 4/4/4 predefined type and select the Create row checkbox again. Click Save.
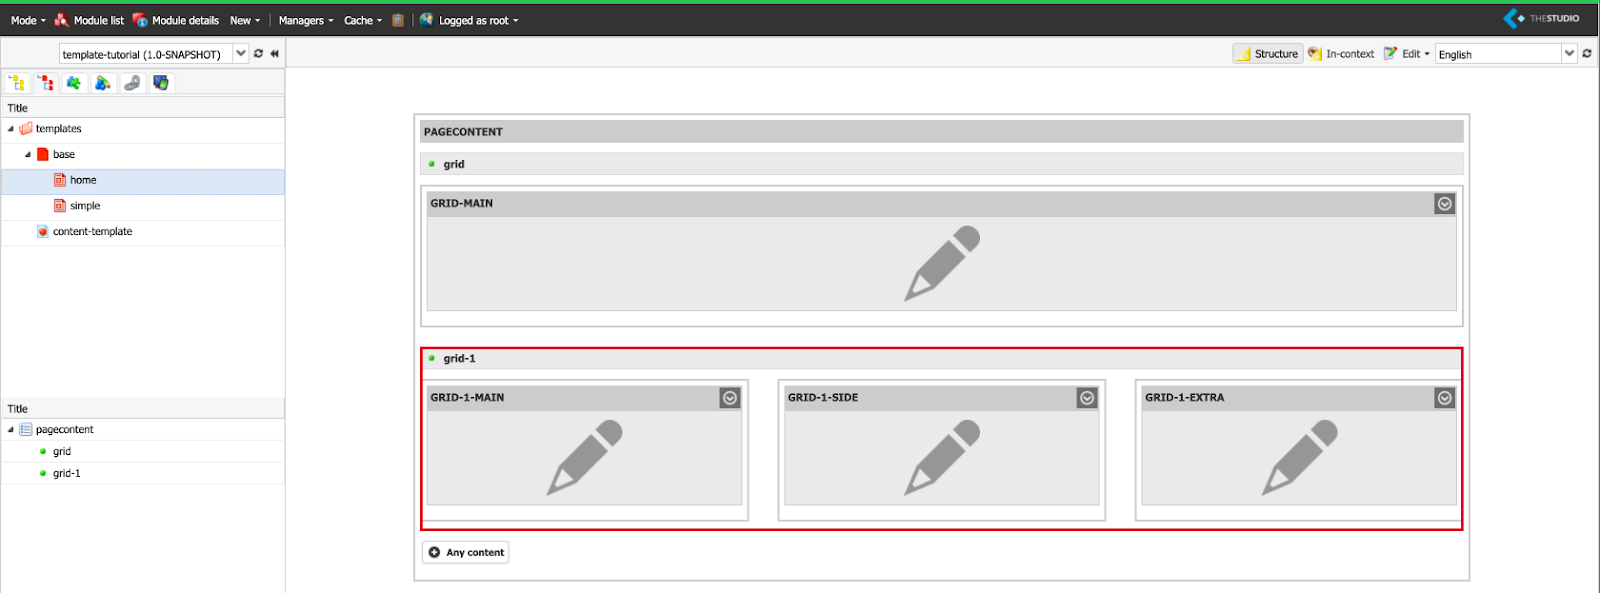
You have created the home page template. The template should look like this:
Now you will set up the simple page template:
- Select the simple page template in the left menu.
- Click the down arrow at the right of the PAGECONTENT area box to activate or open it.
- Click Any content, select the Bootstrap 4>Grid component and click OK.
- Select the 4/8 predefined grid type and select the Create row checkbox and click Save.
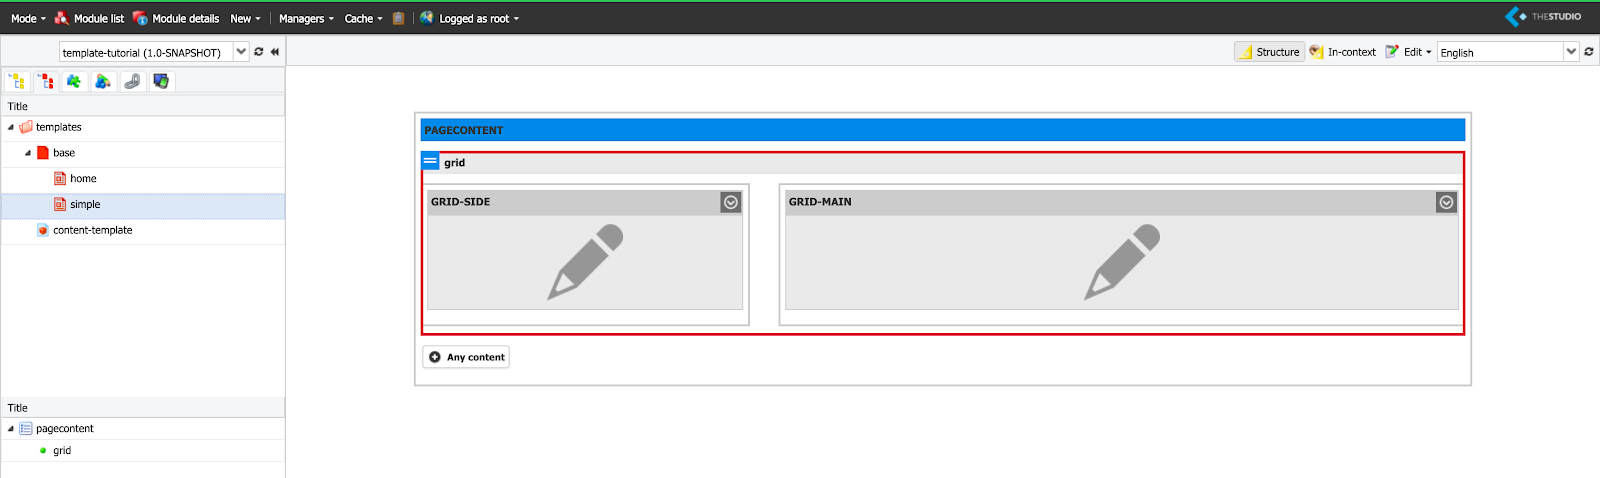
This is all that’s needed for the simple page template. Your template should look like this:
This completes the templates setup. Next, you define a prebuilt page with content that can be used to import content directly into a website upon creation.
Adding default content to the template set module home page
In a module, you define prebuilt content that will be imported as default content when a site is created. You will use this feature to populate a default home page with content that can then be modified by content editors. This feature also serves as a great way to illustrate how to use the home page template that you have defined.
To edit the default home page content, select the Content tab  in the left menu and select template-tutorial>Home to view the content.

As you can see, a Home page already exists. Notice that it has the grid components that you just defined for the home page template.
To add content to the default Home page:
- Activate the GRID-MAIN area by clicking the down arrow at the top right of the box.
- Click Any content, select the Bootstrap 4>Carousel component and click OK.
- In the Add: Carousel dialog, accept the default settings and click Save. Have a look at the advanced settings if you’re curious but don’t activate them. A new Slide button appears.
- Click the Slide button to add a carousel slide.
- In the Title field, enter
Welcome to Jahia. - In the Slide section and in the image field, click the down arrow. In the Image selection dialog, navigate to the default directory and click the upload button
 .
. - Upload two images in a resolution close to 1024x468. You can use the following two images:
https://drive.google.com/file/d/1CMbQjruV9TNLrpcwQanH7rlgY3hsP2p1/view?usp=sharing
https://drive.google.com/file/d/1IoQgsrJVXSmhXAaPvoMLE8CBTxtz1r5D/view?usp=sharing - Select one of the images and click Save.
- In Caption enter this placeholder text:
Cras justo odio, dapibus ac facilisis in, egestas eget quam. Donec id elit non mi porta gravida at eget metus. Nullam id dolor id nibh ultricies vehicula ut id elit.Then click Save. - Repeat the steps 4-9 to add another slide, selecting the second image and entering any slide caption and title you want.
- The next step is to add content in the three boxes underneath the carousel. Activate the left GRID-1-MAIN box using the down arrow and click Any content.
- Select the Content:Basic>Rich text component and click OK.
- In the Rich text editor, enter
Headingand select the H2 paragraph format (the third dropdown from the left). Enter some text below tagged with the Normal paragraph format. It should look like this:

- Click Save.
- For the next two boxes, instead of adding content again, you will use copy and paste functionality. Select the rich-text box, right-click and select Copy.
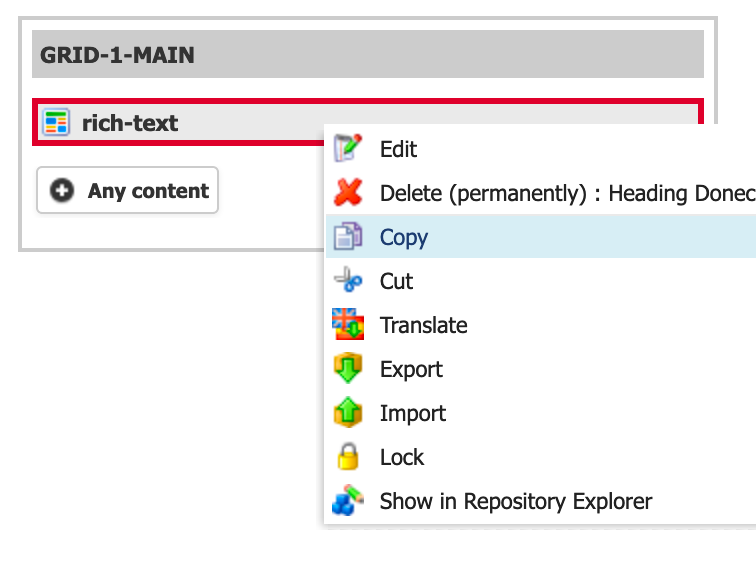
- Now activate the GRID-1-SIDE next box and click Paste.
- Do this again for the GRID-1-EXTRA box, copying content from either of the first two boxes.
- Your home page content should now look like this:

- If you click the In-context button on the upper-right you should see something that looks like this:

Don’t worry if the carousel looks different, this is the Edit mode view of the carousel. The carousel renders differently in Preview or Live mode.
You have setup of your first template set. Congratulations, you are now ready to create as many sites as you like, reusing what you have set up. But before you do that, you must deploy the template set to make it available in the system.
Deploying your template set module & creating a site with it!
Deploying a template set means that you make the template set available for creating new web sites. In the case of this tutorial, you have created the template set in the Jahia Studio on the same server instance that we will be using, but this doesn’t need to be the case. The template set could have been created on a separate Jahia instance dedicated to development, or it could have been downloaded from a public or private module store.
To deploy your first template set module:
- Switch batch to the File system tab
 in the left navigation pane.
 - Click Compile and deploy module
 .
.
Wait until the module compiles and deploys. Note: Compilation is required because your module could also contain some Java code. In this case, the compilation phase will not find any Java code to process.
To create your first site with your new template set:
- In the top navigation bar, select Mode>Administration.
- Click Web Projects and click CREATE at the top of the Sites Management section.
- On the next page, accept the default values or enter your own name for the site and site key. Then, click Next.
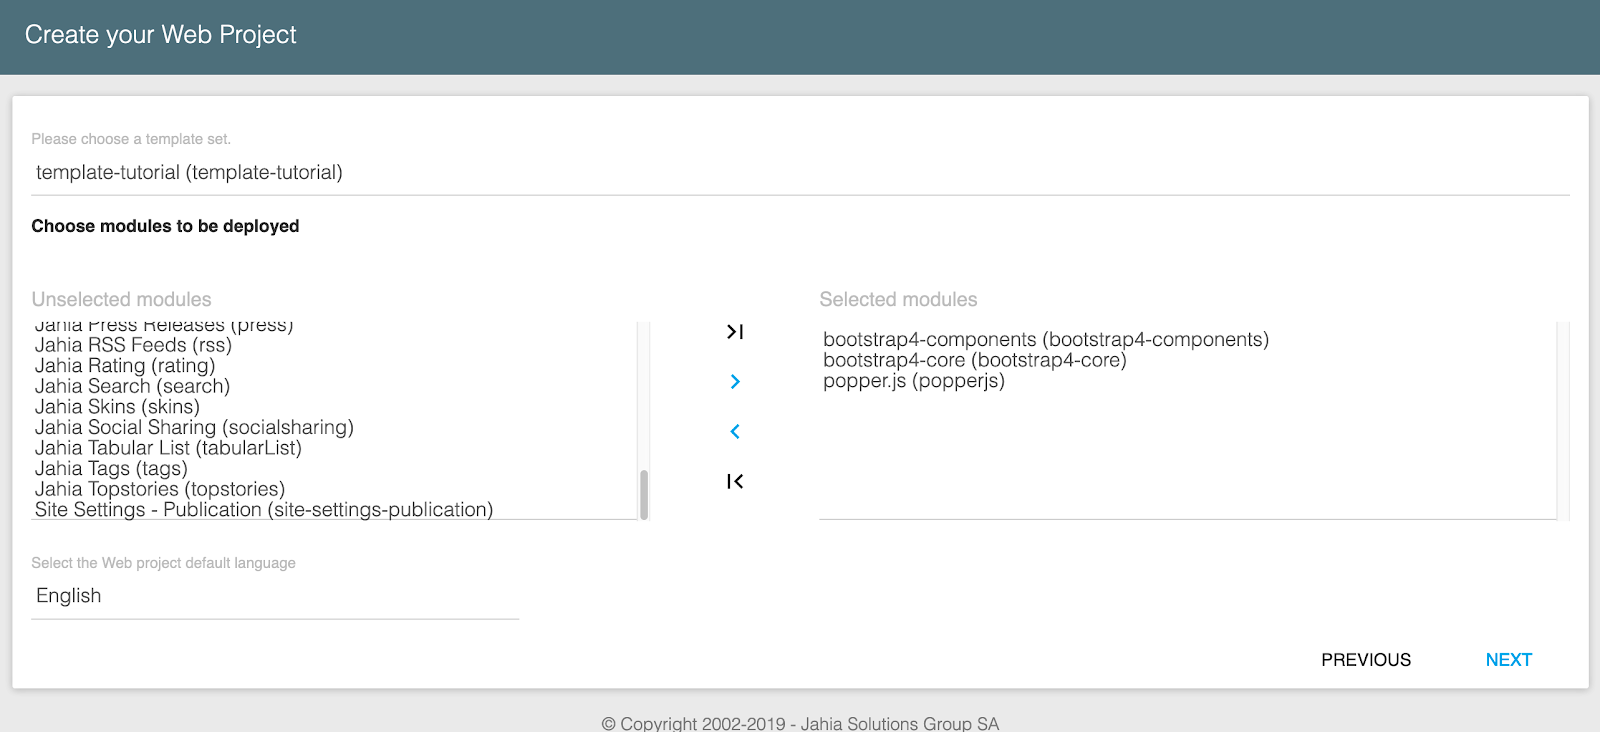
- Click Please choose a template set and select template-tutorial. If you don’t see your template set here, check the logs during deployment.
Note: For more information on Docker logs, see the Docker documentation.
For a local install of Jahia, you can find logs in tomcat/logs for macOS or Linux or in the Windows Shell window for Windows. - Use the Add selected modules button
 to move the bootstrap4-components, bootstrap4-core, and popper.js modules to the Selected modules list. Your screen should now look like this:
- Click Next.
- Click Save. A new site is created that uses your new template set.
- Once the site is created, the Web Projects page displays. Click the Go to Edit Mode button
 in the Actions column.
Your screen should now look like this:

Click the Preview button at the top-right of Jahia to see what it will look like for end users:

Let’s add a new “About us” page, using the simple template you defined earlier.
To add an About us page:
- Go back to the Edit mode page which should be open in another tab in your browser, and click Pages in the left navigation menu.
- Select the Home page, right-click and select New page.
- Enter
About usin the Title and select the simple template under Template. Click Save. - You can now add any content you want to in the GRID-SIDE and GRID-MAIN boxes.
- Click the Preview button and notice that the breadcrumb bar now displays (it won’t appear on the home page). You can click the Home link to go back to the home page.
Congratulations you have completed this tutorial successfully! Let’s recap and look at what you have achieved and learned.
What you have learned
You have done a lot in this tutorial, you have learned how to:
- Understand what content objects, view, pages and templates are
- Install Jahia modules from the public Jahia App Store
- Create a template set Jahia module using the Jahia Studio
- Create a base template that is inherited by other page templates
- Create two page templates with different layouts
- Create a default home page that will be imported upon site creation
- Deploy a module in the Jahia Studio
- Create a site and add a page using the template set that was built previously
Where to go from here
- Content definition and view tutorial
In this tutorial, you will dive deeper and continue what you started in this tutorial. The tutorial explains how to define content definitions and views and how to build your own custom components.