Creating a workflow tutorial
This tutorial shows how to implement a new publication workflow from scratch. In the tutorial, you build a workflow that first locks the content that will be published. Then, the workflow evaluates that content using a Java class which can accept or reject the publication. If the publication is accepted, the node is published. If the publication is rejected, no publication occurs and the node is unlocked.
The tutorial requires an instance of Jahia and the Eclipse IDE with the BPMN Modeler (an Eclipse plugin). You perform most of the tutorial using the BPMN Modeler.
In the tutorial, you learn how to:
- Create a module that will contain your workflow assets in Jahia Studio
- Import the module into Eclipse
- Declare the data types and variables that you will use in the workflow
- Create workflow tasks in the BPMN Modeler graphic editor
- Configure input and output variables for the tasks using the data types and variables that you declared earlier
- Configure gateways that specify accept or reject publication conditions
- Create a WorkItemHandler to analyze the content that will be published
- Configure tasks
- Deploy and declare the workflow in Jahia
You can find the sample workflow for your reference on Github: https://github.com/Jahia/dx-examples/tree/master/example-workflow. The sample uses Eclipse version 4.6.0 and the BPMN Modeler version 1.3.0 Eclipse plugin.
Prerequisites
To complete the tutorial, you require a Jahia instance running in a test environment and an Eclipse IDE with the jBPM plugin. This section shows how to install Eclipse and the jBPM plugin.
Installing Eclipse and the jBPM plugin
First install the Eclipse IDE. Then, add the jBPM plugin from Eclipse.
To install Eclipse and the jBPM plugin:
- Download Eclipse here: eclipse.org/downloads/packages/release. Note that the tutorial uses the Eclipse 2019-12 version.
- In Eclipse, select Help>Install New Software.
- In the Available Software dialog, in Work with select All Available Sites.
- Then type
jBPMin the filter box. When filter results refresh, add the BPMN2 Modeler plugin. - Close the Available Software dialog.
Next, you create a module in Studio that you will use to store workflow assets.
Creating a module
Next you create the module and package that you will store your workflow assets. You create the module and package in Studio then later import the package into Eclipse. Finally, after creating the workflow in Eclipse, you redeploy the module in Jahia to make it available to users.
The package stores the mail templates, workflow files and the properties file that you will create later. Mail templates use the *.mail extension and workflow use *.bpmn2.
To create the module:
- In Studio, create a new module named
My Certification Workflow.

- Under the
src/main/resourcesfolder in your module, create theorg.jahia.modules.mycertificationworkflowpackage.

Initializing the workflow
Next, you import the My Certification Workflow that you created in Studio into Eclipse and create a basic workflow process diagram.
To initialize the workflow:
- In Eclipse, open the module in which you want to define a new workflow.
- Select File>Open Projects from File System.
- In the Import Projects from File System or Archive dialog, select Directory and navigate to the
/digital-factory-data/sources/mycertificationfolder. - Click Open and then Finish to import the project.
- In the Project Explorer, navigate to the
/src/main/resourcesfolder and create a new package with the same structure as your module, for example,org/jahia/modules/newCustomWorkflows. - In the
newCustomWorkflowsfolder, right-click and select New>Other. In the Select a wizard dialog, select BPMN2>Generic BPMN 2.0 Diagram and click Next.

- Select the Process diagram type and click Next.
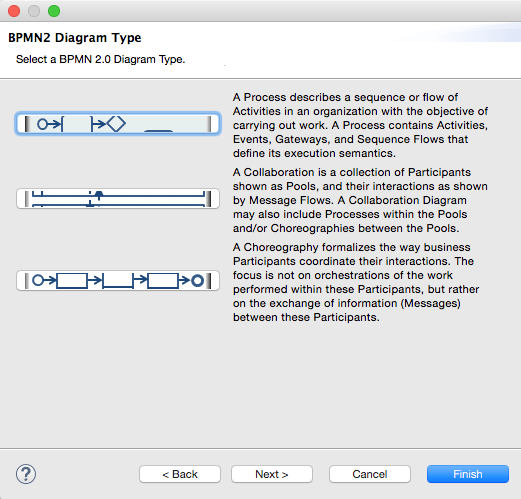
- Enter a name for the process diagram and ensure the extension is
.bpmn2. Click Finish.

The new workflow diagram opens in a new tab in Eclipse.

- Click on the diagram to enable the Properties tab at the bottom of the diagram. In Default Process>General>Attributes, change the name to match the file name that you provided earlier, for example,
new-custom-workflow.

- In Definitions, change the Target Namespace to
http://www.jboss.org/drools, Type Language toJava Types, and Expression Language toJava.

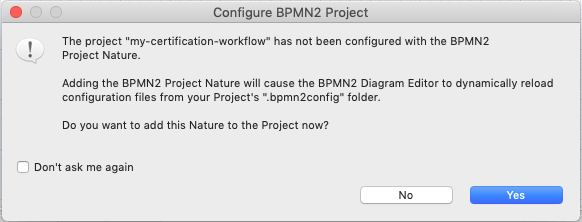
- Save your changes. In the Configure BPMN2 Project dialog, click Yes.
Declaring variables and data types
Next, you declare the variables required by your workflow. Through the workflow, data is passed from one element to another. In this step, you declare those data items in the JBPM plugin so that you can quickly map them to your tasks and events later.
To declare data types and variables:
- In Properties>Data Items expand Properties list for Process "new-custom-workflow".

- Click Add and then enter
nodeIdin the Name field and selectjava.lang.Stringin Data Type.

- Click Add and then enter
nodeIdsin the Name field. In Data Type, click Add. In the Create New Data Type dialog, enterjava.util.Listin the Structure field. Click OK.

- Next add the following variables:
Name Data Type workspace java.lang.String locale java.util.Locale workflow org.jahia.services.workflow.WorkflowDefinition user java.lang.String currentUser java.lang.String valid java.lang.Boolean
When you are finished, you should have something like the following.

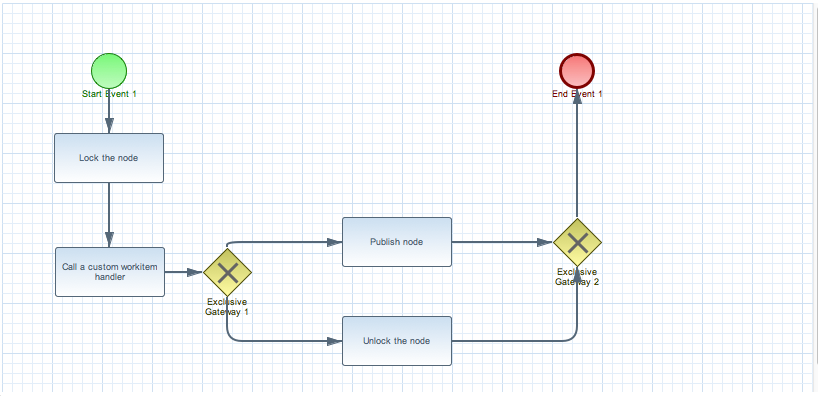
Creating the process diagram of the process
You create the workflow process in the BPMN graphic editor by adding tasks and exclusive gateways to the process diagram and connecting them with sequence flows. Tasks represent activities in the workflow. Exclusive gateways represent two possible paths in the workflow that exclude each other. Sequence flows link elements together.
You build the following process where the workflow:
- Starts
- Locks the node
- Evaluates the content using a Java class which can accept or reject the publication. If accepted, the node is published. If rejected, no publication occurs and the node is unlocked.
- Ends
The following diagram shows the workflow process
For each task, you define the input and output variables required by the task. For example, the Lock node task does not define output variables, but requires as input the workspace and nodeIds (=list of nodes on which the publication has been called) variables.
To create the Lock node task:
- In the pane at the right of the diagram select Tasks>Task. Click on the diagram to add the task.

- Double click on the task and change the name to
Lock the node.

- In I/O Parameters, expand Input Data Mapping and click Add and specify the following mappings:
As shown in the following example.From (Data Item) To (Data Type) workspace workspace (java.lang.String) nodeIds nodeIds (java.util.List)

To create the Custom work item handler task:
- Add a task named
Call a custom work item handler. - Specify the following input data mappings:
From (Data Item) To (Data Type) workspace workspace (java.lang.String) nodeIds nodeIds (java.util.List) - Specify the following output data mappings:
From (Data Item) To (Data Type) valid valid
To create the Publish task:
- Add a task named
Publish. - Specify the following input data mappings:
From (Data Item) To (Data Type) nodeIds nodeIds (java.util.List) workspace workspace (java.lang.String) user user currentUser currentUser workflow workflow
To create the Unlock task:
- Add a task named
Unlock. - Specify the following input data mappings:
From (Data Item) To (Data Type) nodeIds nodeIds (java.util.List) workspace workspace (java.lang.String)
Configuring the gateways
Next, you add two gateways to the diagram. Place the first gateway before the Publish and Unlock nodes.
To add the diverging gateway:
- To add a gateway, in the pane at the right of the diagram, select Gateway>Data-based Exclusive (XOR).
- Click on the diagram to add the gateway. Add the gateway to the left of the Publish and Unlock nodes.
- Use Sequence Flow connections to create connections between the tasks and gateway.
- Double-click the gateway and select Gateway in the Edit Exclusive Gateway dialog.
- In Attributes, set Gateway Direction to Diverging.
- In Sequence Flow List, specify settings for the true condition.
- Select Exclusive Gateway 1 ->Publish and click Edit.
- In Sequence Flow Details, in Name enter
valid==valid. - Click Add Condition and in Condition Expressions, select
Javain Condition Language. - In Condition, type
return valid;. Click OK.
- Specify settings for the false condition.
- Select Exclusive Gateway 1 ->Unlock and click Edit.
- In Sequence Flow Details, in Name enter
valid==false. - Click Add Condition and in Condition Expressions, select
Javain Condition Language. - In Condition, type
return false;. Click OK.
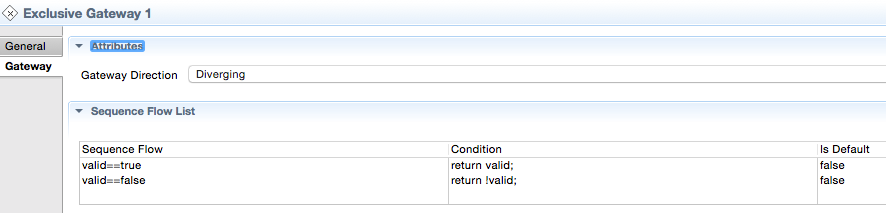
There have two possible conditions to define to automatically publish the content or reject the publication, depending on the output of your custom WorkItem Handler.
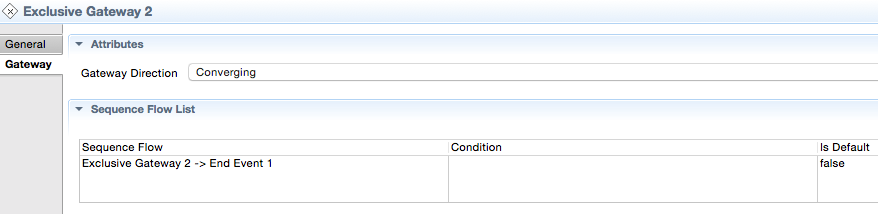
To add the diverging gateway:
- In the pane at the right of the diagram, select Gateway>Data-based Exclusive (XOR).
- Click on the diagram to add the gateway. Add the gateway to the right of the Publish and Unlock nodes.
- Use Sequence Flow connections to create connections between the tasks and gateway.
- Nothing has to be configured here. If you specified the correct sequence flow the gateway should already be converging.
Creating a custom WorkItemHandler
Next you define a custom task which will be able to analyze the content trying to be published in order to automatically accept or reject it, based on business rules (possibly a call to a WebService). To do so, you need to define a Java class extending AbstractWorkItemHandler and implementing WorkItemHandler.
Create the following Java package: org.jahia.modules.newCustomWorkflows
In this package, create the CustomWorkItemHandler class as following :
package org.jahia.modules.newCustomWorkflows;

import java.util.List;

import org.jahia.services.workflow.jbpm.custom.AbstractWorkItemHandler;
import org.kie.api.runtime.process.WorkItem;
import org.kie.api.runtime.process.WorkItemHandler;
import org.kie.api.runtime.process.WorkItemManager;
import org.slf4j.Logger;
import org.slf4j.LoggerFactory;

public class CustomWorkItemHandler extends AbstractWorkItemHandler implements WorkItemHandler {

 private transient static Logger logger = LoggerFactory.getLogger(CustomWorkItemHandler.class);

 @Override
 public void abortWorkItem(WorkItem workItem, WorkItemManager workItemManager) {
  logger.debug("CustomWorkItemHandler has been canceled");

  workItemManager.abortWorkItem(workItem.getId());
 }

 @Override
 public void executeWorkItem(WorkItem workItem, WorkItemManager workItemManager) {
  logger.debug("CustomWorkItemHandler has been called");

  // Retrieving input data
  List nodeIds = (List) workItem.getParameter("nodeIds");
  String workspace = (String) workItem.getParameter("workspace");

  Boolean result = false;

  /*
   * Write business code here and eventually modify the result
   * (call to webservices, checking data trying to be published, ...)
   */
  result = true;

  // Setting output data
  workItem.getResults().put("valid", result);
  workItemManager.completeWorkItem(workItem.getId(), null);
 }

}
You then need to declare the Spring bean related to your class. Edit your module Spring configuration file: src/main/resources/META-INF/spring/nameOfYourModule.xml
<?xml version="1.0" encoding="UTF-8"?>
<beans xmlns="http://www.springframework.org/schema/beans"
    xmlns:xsi="http://www.w3.org/2001/XMLSchema-instance"
    xsi:schemaLocation="http://www.springframework.org/schema/beans http://www.springframework.org/schema/beans/spring-beans-3.0.xsd">

    <bean id="customWH" parent="abstractWH" class="org.jahia.modules.newCustomWorkflows.CustomWorkItemHandler">
        <property name="name" value="Custom work item handler"/>
    </bean>
</beans>
Configuring tasks
The following section requires manually edit the .bpmn2 file. Be aware that any further modifications of this file using the BPMN Eclipse Modeler plugin could result in a rollback of your modifications.
Before configuring the task you set in your diagram, you need to specify some configurations related to Drools and to the schema location you are about to use.
Edit the <bpmn2:definitions...> element and add the two following attributes, if they are not already configured properly:
xmlns:drools="http://www.jboss.org/drools" xsi:schemaLocation="http://www.jboss.org/drools drools.xsd http://www.omg.org/spec/BPMN/20100524/MODEL BPMN20.xsd http://www.bpsim.org/schemas/1.0 bpsim.xsd http://www.omg.org/spec/BPMN/20100524/DI http://www.omg.org/spec/BPMN/20100524/DI-XMI http://www.omg.org/spec/DD/20100524/DC http://www.omg.org/spec/DD/20100524/DC-XMI http://www.omg.org/spec/DD/20100524/DI http://www.omg.org/spec/DD/20100524/DI-XMI"
Edit the <bpmn2:process...> element and add the two following attributes, if they are not already configured properly:
drools:version="1" drools:packageName="org.jahia.modules.newCustomWorkflows"
Then for each <bpmn2:task...> element you should add the attribute "drools:taskName" with one of the following case sensitive value:
| Task name | drools:taskName value |
|---|---|
| Lock the node | Lock node |
| Unlock the node | Unlock node |
| Call a custom workitem handler | Custom work item handler |
| Publish node | Publish node |
As you can see, the value to fill for your custom task corresponds to the value you specified for its name when declaring it as a bean.
Depending on the version of the BPMN Modeler you are using, you may have to also redefine the id attribute of your properties elements.
For each <bpmn2:property...> element, replace the value of the id element with the value of the name element. Also replace the previous use of these ID values with the new value
For example, the following code:
<bpmn2:property id="Property_6" itemSubjectRef="ItemDefinition_9" name="user"/>
Becomes:
<bpmn2:property id="user" itemSubjectRef="ItemDefinition_9" name="user"/>
And the following code:
      <bpmn2:dataInputAssociation id="DataInputAssociation_7">
        <bpmn2:sourceRef>Property_6</bpmn2:sourceRef>
        <bpmn2:targetRef>DataInput_7</bpmn2:targetRef>
      </bpmn2:dataInputAssociation>
Becomes:
      <bpmn2:dataInputAssociation id="DataInputAssociation_7">
        <bpmn2:sourceRef>user</bpmn2:sourceRef>
        <bpmn2:targetRef>DataInput_7</bpmn2:targetRef>
      </bpmn2:dataInputAssociation>
Declaring your workflow in Jahia
Workflow processes must be deployed into the process engine and declared in Jahia in order to be available to users. Once the workflow is available in the process engine, it has to be registered to the workflow service. This registration is done by declaring a Spring bean in the module's Spring configuration file. For your custom workflow, you need to add the following bean:
<bean name="new-custom-workflow" class="org.jahia.services.workflow.WorklowTypeRegistration">
    <property name="type" value="publish"/>
    <property name="definition" value="new-custom-workflow"/>
    <property name="forms">
        <map>
            <entry key="start" value="jnt:simpleWorkflow"/>
            <entry key="review" value="jnt:simpleWorkflow"/>
        </map>
    </property>
    <property name="permissions" >
        <map>
            <entry key="start" value="publication-start"/>
            <entry key="review" value="publication-review"/>
        </map>
    </property>
</bean>