Customizing content editing interfaces for users
GUI used by editors
ENGINES
In the Jahia lingo, an engine is a form generated by the application to edit a node, based on its definition. Engines are divided in multiple tabs giving access to different sets of features. The tabs displayed to a given user depends on his permissions, granted by it's role.

Example of an edit engine
MANAGERS
A manager is a UI, most of the time divided in three panels, allowing to browse the repository or a sub-set of the repository (filtered by nodeTypes or by root path)

The Files Manager
MODES
A mode is a distinct way of accessing Jahia, specified in the URL to which correspond a predefined behavior of the software and a workspace.
Edit mode allows to access the default workspace with full editing interfaces

Overview of Jahia GUI in Edit Mode
Contribute mode allows to access the default workspace with lightweight editing interfaces
Preview mode allows to render the content in the default workspace as if published
Live mode allows to access the live workspace with no editing interfaces at all (just browsing the published site). This is the mode visitors use when accessing your published site.
Input Selectors
Among the extensions to the JCR standard definitions, Jahia allows definitions to include « hints » to generate the input forms that are called "engines" the Jahia lingo.
Depending on the property type, a corresponding input field will be provided. It is possible to override the default input field by adding a specifier after the type definition.
USAGE :
- field-name (type)
- field-name (type,selector)
- field-name (type,selector[options])
where
- type is one of : string, long, double, decimal, path, uri, boolean, date, binary, weakreference
- selector is one of : text, richtext, textarea, choicelist, datetimepicker, datepicker, picker, color, category, checkbox
- options are relative to the selector, you can chain them using a coma as separator. Example : [option1, option2]
DEFAULT INPUT FIELD :
- for string, long, double, decimal, path, uri : will display an input text field on a single line
- for boolean : will display a checkbox
- for date : will display a date picker
- for weakreference : will display a selector
CUSTOM INPUT FIELD :
You can change the default display of a screen
text: will display a single line formrichtext: will display ckeditortextarea: will display a multiline areachoicelist: will display a drop down list with values define by the default value set or options. The choiceLists initializers defined by default are : resourceBundle, country, templates, templatesNode, users, nodetypes, subnodetypes, nodes, menus, script, flag, sortableFieldnames, moduleImage, linkerProps, workflow, workflowTypes, sort and componenttypes.- firstField (string, choicelist[sortableFieldnames]) < 'true', 'false' - play (string, choicelist[resourceBundle]) < 'true', 'false' - templateForLink (string, choicelist[templates,resourceBundle]) - nodeType (string, choicelist[subnodetypes = 'jnt:page,jnt:contentList,jnt:folder',resourceBundle])datetimepicker: will display a single line field and a calendar to select date and timedatepicker: will display a single line field and a calendar to select datepicker: will display a picker, depending of the option. The picker types defined by default are : file, image, folder, contentfolder, portlet, page, editorial, editoriallink, category, site, user and usergroup- source (weakreference, picker[type='file']) - image (weakreference, picker[type='image']) - j:node (weakreference, picker[type='contentfolder'])color: will display a color pickercategory: will display a category pickercheckbox: will display a checkbox
Tooltips
GENERALITIES
Tooltips are defined in the module resource bundles files. The key is based on the node type and property names.
The following examples show how to add tooltips to this definition and properties :
[jnt:tagCloud] > jnt:content, mix:title, jmix:tagsContent
- j:usageThreshold (long) = 1 indexed=no
- limit (long) = 50 indexed=no
- resultPage (weakreference) indexed=no < jnt:page
- relative (boolean) = false
COMPONENT TOOLTIPS
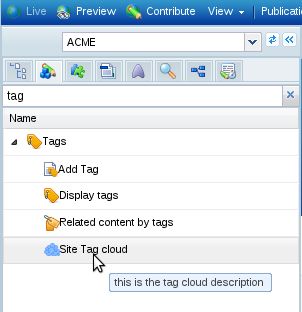
The tooltip appears on mouse over the component name in the create content panel of the side panel.
The resource name will be :
normalizedNodeName_description = component description
where normalizedNodeName in the definition name the : by _
Example :
jnt_tagCloud_description = Generate a tag cloud for all tags of the site.
PROPERTIES TOOLTIPS
A icon is displayed when a tooltip is set. The tooltip appears on mouse over.
The resource name will be :
normalizedNodeName.normalizedPropertyName.ui.tooltip
where normalizedPropertyName replaces in the property name the : by _
jnt_tagCloud.j_usageThreshold.ui.tooltip = number of items to start displaying a tag.

ChoiceList initializers
Jahia allows you to define in your definitions, that a property must use a choicelist (will be rendered by a dropdown list) to specify its value.
The simplest example is to use choicelist for the selector and to list the allowed values in the constraint of the definition :
- contract (string, choicelist) < contract1, contract2, contract3, contract4
This will give you a dropdown list like that :

This is nice but maybe our end users will want to have something more explanatory for choosing the right values.
We will now show you how to use resource bundle to modify the rendering of your dropdown list :
- contract (string, choicelist[resourceBundle]) < contract1, contract2, contract3, contract4
This will give you a dropdown list like that :

HOW CHOICELIST INITIALIZERS WORK ?
ChoiceList Initializers are implementations of the ChoiceListInitializer interface. All implementations are managed by the ChoiceListInitializerService. This service is defined in the applicationcontext-jcr.xml file.
<bean id="rbInitializer" class="org.jahia.services.content.nodetypes.initializers.ResourceBundleChoiceListInitializerImpl"/>
<bean id="choiceListInitializers" class="org.jahia.services.content.nodetypes.initializers.ChoiceListInitializerService" factory-method="getInstance">
    <property name="initializers">
        <map>
            <entry key="resourceBundle" value-ref="rbInitializer"/>
        </map>
    </property>
</bean>
When initializing the ChoiceListInitializerService we pass a map of initializers we want to use in the system. Each Initializer will be associated to a keyword. Here the ResourceBundleChoiceListInitializerImpl will be attached to the keyword resourceBundle. When writing your definition you can chain your Initializers to make complex stuff. Each initializer will receive the list of values from its predecessors. This way you can have one initializer that fill the values, and other in the pipe that change some of those values or add properties to them. Here an example for the Templates choicelist in the layout panel :
[jmix:renderable] > jmix:layout, jmix:contentMixin mixin
- j:view (string, choicelist[templates,resourceBundle,image])
This means that for displaying this dropdown list we first call the templates initializer that is responsible for filling the available values.
Then this list of values is passed to the resourceBundle initializer which will try to replace the label displayed in the dropdown list by one found in the resource bundles if available. Then all this updated values will go to the image initializer that will add an image to be associated with each value.
HOW TO DEVELOP YOUR OWN CHOICELIST INITIALIZERS?
You have also the possibility to develop your own initializers. Those custom initializers have to implement the ModuleChoiceListInitializer interface.
public class MyCustomInitializer implements ModuleChoiceListInitializer {
Then, in your module's spring configuration file, declare a bean for this initializer:
<bean id="dogChoiceList" class="com.mycompany.initializers.MyCustomInitializer" >
    <property name="key" value="customChoiceList"/>
</bean>
As a ModuleChoiceListInitializer, this initializer will be automatically detected by the system, and registered in the ChoiceListInitializerService, with the key specified in the spring file. You can then use this new initializer in your definitions.cnd file.
RENDERING OF CHOICELIST IN GWT
When a user creates or updates a content using the Jahia UI, each time he will see a popup with data to enter for each field of the current definition. If a field is associated with a choicelist selector, we will go through the pipe of initializers if defined. For the rendering we will use the displayName property of the ChoiceListValue object we will have received from the pipe. Each option value will be associated with the javax.jcr.Value of the same object. Then if in the properties of the ChoiceListValue we found a property called image we will use it to display an image if front of the option name.
Countries Initializer example
A full example for creating a complex initializer that will allow user to choose a country from a dropdown list and display a flag if available in front of the country name.
This example will use two classes, one for filling the countries in the list of values available for the dropdown list. And another class to add the flag if found for each country.
The code of the country initializer :
public class CountryChoiceListInitializerImpl implements ChoiceListInitializer {
    public List<ChoiceListValue> getChoiceListValues(ProcessingContext jParams, ExtendedPropertyDefinition declaringPropertyDefinition,
                                                     String param, String realNodeType, List<ChoiceListValue> values) {
        String[] iso = Locale.getISOCountries();
        List<ChoiceListValue> l = new ArrayList<ChoiceListValue>(iso.length);
        for (String anIso : iso) {
            l.add(new ChoiceListValue(new Locale("en", anIso).getDisplayCountry(jParams.getLocale()), null,
                    new ValueImpl(anIso, PropertyType.STRING, false)));
        }
        Collections.sort(l, new Comparator<ChoiceListValue>() {
            public int compare(ChoiceListValue o1, ChoiceListValue o2) {
                return o1.getDisplayName().compareTo(o2.getDisplayName());
            }
        });
        return l;
    }
}
You see that in this example when we create the ChoiceListValue we do not associated any properties, but only a display name in current locale of the user, and a value not sensitive to the locale the iso code of the country.
We sort the list based on the displayName (this could totally be done in another initializer in the pipe (for example a sort initializer at the end of the pipe)).
Now the code of the initializer for adding an image property to the ChoiceListValue objects of the list :
public class CountryFlagChoiceListInitializerImpl implements ChoiceListInitializer {
    public List<ChoiceListValue> getChoiceListValues(ProcessingContext context, ExtendedPropertyDefinition epd,
                                                     String param, String realNodeType, List<ChoiceListValue> values) {
        if (values != null) {
            for (ChoiceListValue value : values) {
                try {
                    String flagPath = "/css/images/flags/shadow/flag_" + new Locale("en",
                            value.getValue().getString()).getDisplayCountry(
                            Locale.ENGLISH).toLowerCase().replaceAll(" ", "_") + ".png";
                    File f = new File(JahiaContextLoaderListener.getServletContext().getRealPath(flagPath));
                    if (!f.exists()) {
                        flagPath = "/css/blank.gif";
                    }
                    value.addProperty("image", context.getContextPath() + flagPath);
                } catch (RepositoryException e) {
                    logger.error(e.getMessage(), e);
                }
            }
            return values;
        }
        return new ArrayList<ChoiceListValue>();
    }
}
This initializer if placed at the start of the pipe will be of no use as it will return an empty list.
Those initializers need to be declared in the ChoiceListInitializerService :
<bean id="rbInitializer" class="org.jahia.services.content.nodetypes.initializers.ResourceBundleChoiceListInitializerImpl"/>
<bean id="countryInitializerRenderer" class="org.jahia.services.content.nodetypes.initializers.CountryChoiceListInitializerImpl"/>
<bean id="countryFlagInitializer" class="org.jahia.services.content.nodetypes.initializers.CountryFlagChoiceListInitializerImpl"/>
<bean id="choiceListInitializers" class="org.jahia.services.content.nodetypes.initializers.ChoiceListInitializerService" factory-method="getInstance">
    <property name="initializers">
        <map>
            <entry key="resourceBundle" value-ref="rbInitializer"/>
            <entry key="country" value-ref="countryInitializerRenderer"/>
            <entry key="flag" value-ref="countryFlagInitializer"/>
        </map>
    </property>
</bean>
A definition example :
- country (string, choicelist[country,flag])
This will generate a dropdown list like that :

Other Initializers
You can define as many initializers as you want. By default Jahia provides to you two very flexible initializer :
- Node Initializer
- Script Initializer
NODE INITIALIZER
The node initializer allow you to bind a dropdown list to the content of a node in the JCR, by defining the root path of this dropdown list and the type of child nodes you want to list.
- firstLevelCategory (weakreference,choicelist[nodes='/sites/systemsite/categories;jnt:category'])
This will create a dropdown listing all the jnt:category elements from the folder /categories.
- j:theme (weakreference,choicelist[nodes='$currentSite/files/themes;jnt:folder'])
This will create a dropdown listing all the subfolders elements of the folder themes in the current site.
SCRIPT INITIALIZER
This is the most versatile initializer provided by Jahia as it allows you to use any script language JSR-223 compatible to write your initializer.
How to declare a scripted initializer ?
This is as simple as that :
- type (string,choicelist[script=type.groovy])
The initializer will look for the script in the module containing the definition in the scripts folder :
.
|-jnt_lastNews
|---html
|-jnt_news
|---html
|-resources
|-scripts
|-WEB-INF
The type of script is defined by the extension of the script, for example if your script has the name type.groovy, the script engine manager will try to find a declared script engine for the groovy extension .
What are the things my script must absolutely do ?
The script must return a List of ChoiceListValue.
Whaou, this is crazily powerful, but any suggestion to how to use that in the real world will be greatly appreciated. The first usage that came in mind is to define script that interacts with external system to fill the values, like XML files, databases, REST service etc.
Example of Groovy script parsing an XML file to fill the values :
class RecordsHandler extends DefaultHandler {
    def values

    RecordsHandler(List values) {
        this.values = values
    }

    void startElement(String ns, String localName, String qName, Attributes atts) {
        switch (qName) {
            case 'books':
                String labelName = atts.getValue("title")
                values.add(new ChoiceListValue(labelName,null,new ValueImpl(labelName,PropertyType.STRING,false))); break

        }
    }
}

def newValues = new ArrayList<ChoiceListValue>();
def handler = new RecordsHandler(values)
def reader = SAXParserFactory.newInstance().newSAXParser().getXMLReader()
reader.setContentHandler(handler)
reader.parse(new InputSource(new FileInputStream(file)))
return newValues
Each script can also access to the list of values from its predecessors as it is bound to the values variable.
Custom property rendering
We saw previously how to customize dropdown list in engines but how do you correctly display the data selected by the user. Keeping with the Country example, if you remember the code of the initializer, in the value we store only the ISO code of the selected country. But what we want to display to the end user is the country name in his language and maybe the flag also.
HOW ARE DECLARED THE BUILT IN RENDERERS?
Renderers are initialized in the same manner as the initializers, in the same Spring file applicationcontext-jcr.xml. Each renderer must extend the ChoiceListRenderer interface.
<bean id="countryInitializerRenderer" class="org.jahia.services.content.nodetypes.initializers.CountryChoiceListInitializerAndRendererImpl"/>
<bean id="countryFlagInitializer" class="org.jahia.services.content.nodetypes.initializers.CountryFlagChoiceListInitializerAndRendererImpl"/>
<bean id="choiceListRenderers" class="org.jahia.services.content.nodetypes.renderer.ChoiceListRendererService" factory-method="getInstance">
    <property name="renderers">
        <map>
            <entry key="country" value-ref="countryInitializerRenderer"/>
            <entry key="flagcountry" value-ref="countryFlagInitializer"/>
        </map>
    </property>
</bean>
HOW TO DECLARE SOME CUSTOM RENDERERS?
A custom renderer has to implement the ModuleChoiceListRenderer interface. Most of the time, it is also more convenient to extend the AbstractChoiceListRenderer abstract class. And you can even use the same java class to be both the initializer and the renderer implementations.
public class MyCustomInitializer extends AbstractChoiceListRenderer implements ModuleChoiceListInitializer, ModuleChoiceListRenderer {
In case you need to provide several renderers for the same initializer, the java class for the initializer would embed only the default renderer, and then you would need some additional java classes for the additional renderers.
public class MyCustomRenderer extends AbstractChoiceListRenderer implements ModuleChoiceListRenderer {
To declare a custom renderer, you need to set up a bean in your module's spring configuration file.
In case you have used the same java class for both the initializer and the renderer, it is no need to declare a second bean for the renderer, as the bean you have already defined for the initializer will be detected twice, one time as a custom initializer, and the other time as a custom renderer. It will be registered in the ChoiceListInitializerService and in the ChoiceListRendererService, each time with the same key, so that you will use the same keyword in the definitions.cnd file and in your jsp scripts.
<bean id="dogChoiceList" class="com.mycompany.initializers.MyCustomRenderer" >
    <property name="key" value="customRenderer"/>
</bean>
As a ModuleChoiceListRenderer, this renderer will be automatically detected by the system, and registered in the ChoiceListRendererService, with the key specified in the spring file. You can then use this new renderer in your jsp scripts.
HOW TO USE A RENDERER TO DISPLAY A PROPERTY VALUE IN A JSP?
Renderers are used through a tag in the templates, the tag can directly render the content of the property in its own manner, or can simply return a map of objects.
Example from the CountryFlagChoiceListInitializerAndRendererImpl :
blic class CountryFlagChoiceListInitializerAndRendererImpl implements ChoiceListInitializer, ChoiceListRenderer {
    public Map<String, Object> getObjectRendering(RenderContext context, JCRPropertyWrapper propertyWrapper)
            throws RepositoryException {
        Map<String, Object> map = new HashMap<String, Object>();
        final String displayName = new Locale("en", propertyWrapper.getValue().getString()).getDisplayCountry(
                context.getMainResource().getLocale());
        final String enDisplayName = new Locale("en", propertyWrapper.getValue().getString()).getDisplayCountry(
                Locale.ENGLISH);
        String flagPath = "/css/images/flags/shadow/flag_" + enDisplayName.toLowerCase().replaceAll(" ", "_") + ".png";
        File f = new File(JahiaContextLoaderListener.getServletContext().getRealPath(flagPath));
        if (!f.exists()) {
            flagPath = "/css/blank.gif";
        }
        map.put("displayName", displayName);
        map.put("flag", context.getRequest().getContextPath()+flagPath);
        return map;
    }

    public String getStringRendering(RenderContext context, JCRPropertyWrapper propertyWrapper)
            throws RepositoryException {
        final String displayName = new Locale("en", propertyWrapper.getValue().getString()).getDisplayCountry(
                context.getMainResource().getLocale());
        final String enDisplayName = new Locale("en", propertyWrapper.getValue().getString()).getDisplayCountry(
                Locale.ENGLISH);
        String flagPath = "/css/images/flags/shadow/flag_" + enDisplayName.toLowerCase().replaceAll(" ", "_") + ".png";
        File f = new File(JahiaContextLoaderListener.getServletContext().getRealPath(flagPath));
        if (!f.exists()) {
            flagPath = "/css/blank.gif";
        }
        return "<img src=\""+context.getRequest().getContextPath()+flagPath+"\"><span>"+displayName+"</span>";
    }
}
Example of usage in the templates :
<span class="jobtxt">${fn:escapeXml(values.town)}, <jcr:nodePropertyRenderer node="${currentNode}" name="country" renderer="flagcountry"/></span>
Or :
<jcr:nodePropertyRenderer node="${currentNode}" name="country" renderer="flagcountry" var="country"/>
<span class="jobtxt">${fn:escapeXml(values.town)}, <img src="${country.flag}"/> ${country.displayName}</span>
In order to be able to use the renderers to render single values out of the list and also to use the renderer in the backend, where the RenderContext - which is not available in backend code - is replaced by the Locale, you also need to implement methods passing a propertyValue, at minimum one like this example from the CountryChoiceListInitializerAndRendererImpl:
public String getStringRendering(Locale locale, ExtendedPropertyDefinition propDef, Object propertyValue) throws RepositoryException {
    return new Locale("en", propertyValue.toString()).getDisplayCountry(locale);
}
If a property renderer requires more attributes from the RenderContext - not just the Locale - then you have to throw an UnsupportedOperationException, like in this example from the CountryFlagChoiceListInitializerAndRendererImpl:
public Map<String, Object> getObjectRendering(Locale locale,ExtendedPropertyDefinition propDef,
        Object propertyValue) throws RepositoryException {
    throw new UnsupportedOperationException("This renderer does not work without RenderContext");
}

public String getStringRendering(Locale locale, propDef, Object propertyValue)
        throws RepositoryException {
    throw new UnsupportedOperationException("This renderer does not work without RenderContext");
}
CKEditor integration
This sections shows the ways to customize the CKEditor - a WYSIWYG rich text editor used for authoring content in DX 7.0.
Starting from DX 7.0 SP1 it is possible to provide custom configuration for the CKEditor, used in edit/contribute mode (add/update content engines and managers) for editing text fields (defined with richtext selector in the CND).
I. GLOBAL CONFIGURATION
It is possible to customize or override the CKEditor configuration globally, by providing it in a OSGi fragment bundle, whose host will be the "ckeditor" bundle.
For automating the bundle packaging and deployment process we've provided a "CKEditor configuration" utility, which can be found in the Tools Area (http://[digital-factory-server]:[port]/tools/ckeditorConfig.jsp):

The tool allows to build and download the configuration bundle or build and deploy the bundle into that Jahia instance to test the configuration immediately.
The format of the provided configuration is the same as the one in the CKEditor's config.js file: see Setting CKEditor Configuration - Using the config.js File.
For example, by building and deploying the following configuration:
CKEDITOR.editorConfig = function( config ) {
    config.extraPlugins='mathjax';
    config.toolbar_Full[8]=['Image','Flash','Table','HorizontalRule','Smiley','SpecialChar','PageBreak','Mathjax'];
}
we enable the Mathematical Formulas plugin and add the corresponding button into the 'Full' toolbar:

II. CUSTOM CONFIGURATION IN A TEMPLATE SET MODULE
By including a file /javascript/ckeditor_config.js into a template set bundle it is possible to extend or override the CKEditor configuration for for all richtext fields in the Web projects, using this template set. The format of that file is the same as CKEdotor's default config.js file (see above).
III. DEFINING CUSTOM CONFIGURATION FOR A PARTICULAR FIELD, USING THE CND SELECTOR OPTIONS
The configuration can be specified for a particular node type property, so that the edit/update content engine will use it when authoring content.
[jnt:myArticle] > jnt:bigText, jmix:basicContent, jmix:editorialContent
 - summary (string, richtext[ckeditor.toolbar='Mini']) i18n
The above definition for the field "summary" forces the usage of a smaller toolbar (toolbar ID is 'Small'):

It is possible to define the custom configuration file per field in a similar way, e.g.:
[jnt:bootstrapBigText] > jnt:bigText
  - text (string, richtext[ckeditor.customConfig='$context/modules/sample-bootstrap-templates/javascript/ckconfig.js']) internationalized
The above definition will force CKEditor to use the defined configuratin file when authoring content for that field.
IV. ADDING A CKEDITOR PLUGIN
CKEditor is a modular framework that can be extended with many plugins. Version compatibility between CKEditor and the plugins is something to monitor in order to ensure a smooth integration, please get in touch with the plugin editor if necessary.
Adding a plugin if straightforward and involves only a few steps:
- In the templateSet module, add the plugin.js under the folder:
/javascript/ckeditor/plugins/<nameOfThePlugin>/plugin.js - In the CKEditor configuration file, add the following line to load the plugin.js file:
CKEDITOR.plugins.addExternal('<nameOfThePlugin>', '/modules/nameOfYourTemplateSet/javascript/ckeditor/plugins/nameOfThePlugin/plugin.js'); - In the config function, add your plugin to the extraPlugins variable:
CKEDITOR.editorConfig = function( config ) { ... config.extraPlugins = '<nameOfThePlugin>'; ... }
That's it. The additional plugin should be available to all richtext editors inside Jahia.
V. EXAMPLE
In such a way it is possible to provide template-set specific CKEditor configuration:
- Toolbar set (see Toolbar Customization)
- CSS styles (see Styles)
- Templates (see Templates)
- etc.
There is an example of the config file in the sample-bootstrap-templates module (ckconfg.js) that provides a custom toolbar, defines custom styles and templates. That custom file is used in several fields from the sample-bootstrap-templates module:

Customize GWT UIs
ACTION ITEMS
The action items, defined in /WEB-INF/spring/uicomponents/applicationcontext-toolbar.xml , list all buttons that are available for the different content managers and edit mode configuration.
They are all beans of type org.jahia.services.uicomponents.bean.toolbar.Item, and can define the following properties :
actionItem: mandatory, this is the GWT class that handles the rendering of the button, and the operation that are done when it is clicked.titleortitleKey: Contains the title of the button, are the resource bundle key for that titleicon: the icon name, which should be found in the /icons folder.visibility: conditional visibility of the button, based on the context (global permission, running mode, ..)requiredPermission: the permission that is required on the current selection to be able to use this item. Note that it is different from the visibility settings, as the button will be visible but enable only the permission is verified on the current selection.properties: optional list of properties that can be used by the actionItem code.
MANAGERS
Managers are divided in four parts:
- toobars: panel that allows to trigger an action on the selected node as "Edit", "Delete", "Create folder", ..
- rigth panel: panel that is composed by several repository. Each repository is represent by a navigation tree.
- left panel: panel that displays sub-nodes of the selected node in a grid composed by several columns
- bottom panel: panel that is composed by several tab. Each tab displays useful informations about the selected node in the left panel
Within this spring configuration file, /WEB-INF/ect/spring/uicomponents/applicationcontext-contentmanager.xml,Jahia allows you to customize different aspects of the content manager as:
the actions that can be triggered in the toolbar
the displayed repositories in the rigth panel
the displayed columns in the left panel
the displayed tab in the bottom panel
...
As an example, here is how the configuration of the file manager has beean created:
create a bean that extends org.jahia.services.uicomponents.bean.contentmanager.ManagerConfiguration and with id "filemanager"
<bean id="filemanager" class="org.jahia.services.uicomponents.bean.contentmanager.ManagerConfiguration">
</bean>
set some simple properties
<bean id="filemanager" class="org.jahia.services.uicomponents.bean.contentmanager.ManagerConfiguration">
    <property name="nodeTypes" value="nt:file,nt:folder,jnt:mountPoint,jnt:portlet"/>
    <property name="folderTypes" value="nt:folder,jnt:mountPoint"/>
    <property name="toolbarSet" ref="document-manager"/>
    <property name="enableTextMenu" value="true"/>
    <property name="displayProvider" value="true"/>
    <property name="displaySearchInPage" value="false"/>
    <property name="displaySearchInContent" value="false"/>
    <property name="displaySearchInFile" value="false"/>
    <property name="displaySearchInTag" value="true"/>
</bean>
set the list of the displayed repositories of the rigth panel
<bean id="filemanager" class="org.jahia.services.uicomponents.bean.contentmanager.ManagerConfiguration">
    ...
    <!-- accordion panels-->
    <property name="tableColumns">
        <list>
            <ref bean="column.providerKey"/>
            <ref bean="column.ext"/>
            <ref bean="column.name"/>
            <ref bean="column.locked"/>
            <ref bean="column.path"/>
            <ref bean="column.size"/>
            <ref bean="column.lastModified"/>
        </list>
    </property>
    ...
</bean>
set the list of the displayed columns of the left panel
<bean id="filemanager" class="org.jahia.services.uicomponents.bean.contentmanager.ManagerConfiguration">
    ...
    <!-- tabs -->
    <property name="tabs">
        <list>
            <ref bean="tab.info"/>
            <ref bean="tab.authorizations"/>
            <ref bean="tab.usage"/>
            <ref bean="tab.versioning"/>
        </list>
    </property>
    ...
</bean>
set the list of the displayed tab info of the bottom panel
<bean id="filemanager" class="org.jahia.services.uicomponents.bean.contentmanager.ManagerConfiguration">
    ...
    <!-- tabs -->
    <property name="tabs">
        <list>
            <ref bean="tab.info"/>
            <ref bean="tab.authorizations"/>
            <ref bean="tab.usage"/>
            <ref bean="tab.versioning"/>
        </list>
    </property>
    ...
</bean>
set the visibility rule if nested
<bean id="filemanager" class="org.jahia.services.uicomponents.bean.contentmanager.ManagerConfiguration">
    ...
    <property name="visibility">
        <bean class="org.jahia.services.uicomponents.bean.Visibility">
            <property name="permission" value="contentmanager/filemanager"/>
        </bean>
    </property>
    ...
</bean>
set the toolbars (see applicationcontext-toolbar.xml for toolbar set beans)
<bean id="filemanager" class="org.jahia.services.uicomponents.bean.contentmanager.ManagerConfiguration">
    ...
    <property name="toolbarSet" ref="document-manager"/>
    ...
</bean>
At the end, the configuration of the file manager is:
<!-- file manager -->
<bean id="filemanager" class="org.jahia.services.uicomponents.bean.contentmanager.ManagerConfiguration">
    <property name="nodeTypes" value="nt:file,nt:folder,jnt:mountPoint,jnt:portlet"/>
    <property name="folderTypes" value="nt:folder,jnt:mountPoint"/>
    <property name="toolbarSet" ref="document-manager"/>
    <property name="enableTextMenu" value="true"/>
    <property name="displayProvider" value="true"/>
    <property name="displaySearchInPage" value="false"/>
    <property name="displaySearchInContent" value="false"/>
    <property name="displaySearchInFile" value="false"/>
    <property name="displaySearchInTag" value="true"/>
    <!-- accordion panels-->
    <property name="accordionPanels">
        <list>
            <ref bean="repository.website"/>
            <ref bean="repository.shared"/>
            <ref bean="repository.myexternal"/>
            <ref bean="repository.my"/>
            <ref bean="repository.users"/>
        </list>
    </property>
    <!-- tabs -->
    <property name="tabs">
        <list>
            <ref bean="tab.info"/>
            <ref bean="tab.authorizations"/>
            <ref bean="tab.usage"/>
            <ref bean="tab.versioning"/>
        </list>
    </property>
    <!-- table columns-->
    <property name="tableColumns">
        <list>
            <ref bean="column.providerKey"/>
            <ref bean="column.ext"/>
            <ref bean="column.name"/>
            <ref bean="column.locked"/>
            <ref bean="column.path"/>
            <ref bean="column.size"/>
            <ref bean="column.lastModified"/>
        </list>
    </property>
    <property name="visibility">
        <bean class="org.jahia.services.uicomponents.bean.Visibility">
            <property name="permission" value="contentmanager/filemanager"/>
        </bean>
    </property>
</bean>
EDIT MODE
The Edit mode is composed by several parts:
- toobar: a panel that is composed by a set of buttons. Each button allows to trigger an action on the selected node as "Edit", "Delete" , "Create Content" , "Create page" ...
- side panel, usually called the "Selector": a panel that is composed by several tabs from witch you can drag and drop content, view the site map, ....
- create engine: a wizard that allows to create new content from definition. Actually the is two different types: create page and create content
- edit engines: window that is composed by different part tab. Each tab displays a set of properties such as fields, acl, options, ....
Within this spring configuration file , /WEB-INF/ect/spring/uicomponents/applicationcontext-editmode.xml ,Jahia allows you to customize different aspects of the edit mode as:
the action that can be triggered in the toolbar
the displayed tabs in side panel
...
As an example, here is how the configuration of the default edit mode manager has been created:
create an edit mode configuration bean
<bean id="editmode" class="org.jahia.services.uicomponents.bean.editmode.EditConfiguration">
</bean>
set the toolbars
<bean id="editmode" class="org.jahia.services.uicomponents.bean.editmode.EditConfiguration">
    <property name="topToolbar" ref="editmode-topbar"/>
    <property name="contextMenu" ref="editmode-contextmenu"/>
</bean>
set the create engine for pages and contents
<bean id="editmode" class="org.jahia.services.uicomponents.bean.editmode.EditConfiguration">
    ...
    <!-- create engine-->
    <property name="createEngines">
        <list>
            <ref bean="engine.edit.createpage"/>
            <ref bean="engine.edit.createcontent"/>
        </list>
    </property>
    ...
</bean>
set the edit engine for pages and contents (in this case it's the same)
<bean id="editmode" class="org.jahia.services.uicomponents.bean.editmode.EditConfiguration">
    ...
    <!-- edit engine -->
    <property name="editEngines">
        <list>
            <ref bean="engine.edit.editcontent"/>
        </list>
    </property>
    ...
</bean>
set the tabs on the side panel
<bean id="editmode" class="org.jahia.services.uicomponents.bean.editmode.EditConfiguration">
    ...
    <!-- tabs -->
    <property name="tabs">
        <list>
            <ref bean="sidePanelTab.pages"/>
            <ref bean="sidePanelTab.createContent"/>
            <ref bean="sidePanelTab.content"/>
            <ref bean="sidePanelTab.images"/>
            <ref bean="sidePanelTab.files"/>
            <ref bean="sidePanelTab.portlets"/>
            <ref bean="sidePanelTab.search"/>
            <ref bean="sidePanelTab.workflow"/>
        </list>
    </property>
    ...
</bean>
Finally, the configuration bean for the edit mode is:
<bean id="editmode" class="org.jahia.services.uicomponents.bean.editmode.EditConfiguration">
    <property name="topToolbar" ref="editmode-topbar"/>
    <property name="contextMenu" ref="editmode-contextmenu"/>

    <!-- edit engine -->
    <property name="editEngines">
        <list>
            <ref bean="engine.edit.editcontent"/>
        </list>
    </property>

    <!-- create engine-->
    <property name="createEngines">
        <list>
            <ref bean="engine.edit.createpage"/>
            <ref bean="engine.edit.createcontent"/>
        </list>
    </property>

    <!-- tabs -->
    <property name="tabs">
        <list>
            <ref bean="sidePanelTab.pages"/>
            <ref bean="sidePanelTab.createContent"/>
            <ref bean="sidePanelTab.content"/>
            <ref bean="sidePanelTab.images"/>
            <ref bean="sidePanelTab.files"/>
            <ref bean="sidePanelTab.portlets"/>
            <ref bean="sidePanelTab.search"/>
            <ref bean="sidePanelTab.workflow"/>
        </list>
    </property>
</bean>
HOW TO SET VISIBILITY RULES SUCH AS "NESTED PERMISSIONS" ON A SPECIFIC PART OF THE CONTENT MANAGER AND THE EDIT MODE?
Each part of the content managers and edit mode has a optional properties called "visibility". Basically, it allows you to define the conditions under witch element is visible for the current user.
Example 1:
<bean id="filemanager" class="org.jahia.services.uicomponents.bean.contentmanager.ManagerConfiguration">
    ...
    <property name="visibility">
        <bean class="org.jahia.services.uicomponents.bean.Visibility">
            <property name="permission" value="contentmanager/filemanager"/>
        </bean>
    </property>
    ...
</bean>
means that the filemanager is visible only for users who have the site permission "filemanagers" of the group "contentmanager".
Example 2:
<bean id="repository.website" class="org.jahia.services.uicomponents.bean.contentmanager.Item">
    <property name="key" value="websiteRepository"/>
    <property name="visibility">
        <bean class="org.jahia.services.uicomponents.bean.Visibility">
            <property name="permission" value="contentmanager/website"/>
        </bean>
    </property>
</bean>
means that the repository "website" is visible only for users who have the site permission "website" of the group "contentmanager"
The bean "visibility" is defined by the following properties: - permission: allows to define the site permissions that the user must have - serverActionPermission: allows to define the server permissions that the user must have - needAuthentication: allows to define if the user must be authenticated or not - userAgent: allows to define the userAgent (ie, mozilla, ....) - value: allows to define the value (true false)
Thanks to this mechanism, you can customise the visibility of any part of the content managers and the edit mode.
Customize default "guest" labels
As every organization has naming preferences, Jahia give you the opportunity to change the labels for the embedded guest group and guest user on your platform. Those names are found in resource bundles files.
To override the default value you should define in your own jahia.properties file in which module Jahia should lookup the specified keys.
There is one key for user and one for group, you can also specify which key to use if you do not like the default name.
######################################################################
### System users resources ###########################################
######################################################################
# Set this to associate the users to a resource bundle,
# Set the module name that contains the resource for guest
guestUserResourceModuleName = Default Jahia Templates
# Set the key for guest
guestUserResourceKey =label.user.guest

######################################################################
### System group resources ###########################################
######################################################################
# Set this to associate the groups to a resource bundle,
# Set the module name that contains the resource for guest
guestGroupResourceModuleName = Default Jahia Templates
# Set the key for guest
guestGroupResourceKey =label.group.guest
here the extract from the DefaultJahiaTemplates.properties file
label.group.guest=Guest users
label.user.guest=Guest user