Creating navigation menus
Overview
Basicaly a menu is a list of nodes typed as jmix:navMenuItem. Adding a menu item, an entry, is creating a node with the type jmix:navMenuItem. Displaying a menu is rendering all the wanted jmix:navMenuItem, depending of specified criterias.
As any other content, it is possible and easy to customize the way the node are filtered, added, and displayed. The node type for menu is jnt:navMenu. Its definition (in modules/default/META-INF/definitions-nav-menu.cnd) is :
  [jnt:navMenu] > jnt:content, mix:title, jmix:siteComponent
   orderable
   - j:baselineNode (string,choicelist) < 'home', 'currentPage'
   - j:maxDepth (long) = 2
   - j:startLevel (long) = 0
   - j:menuItemView (string,choicelist[templates='jmix:navMenuItem,menuItem',resourceBundle,image]) = menuElement
   - j:styleName (string) nofulltext
   - j:layoutID (string) nofulltext
The default associated JSP file is : jnt_navMenu/html/navMenu.jsp in the default module.
An entry is a mixin jmix:navMenuItem set on any type.
[jmix:navMenuItem] mixin
The default associated JSP file is : jmix_navMenuItem/html/navMenuItem.menuElement.jsp in the default module. We must specify a view as we want to display the mixin, not the default rendering of the node. If not specified, the menuElement view is used. It will search for jmix:navMenuItem under the baseNode, and display items that match the set restrictions (like level or specified menu).
All these menus use the <ul><li> structure
We provide several examples of views for menus :
- oneLevel : one level menu without any style other than those set by the webmaster
- simple : recursive menu without any styles (inpath, selected, etc)
- default : complete menu with styles
Common use cases
Here are the two steps to follow:
In the templateSet - From the studio, set a menu in a template.
Add entries in the menu from the side panel - From edit mode, fill the menu.
Set a menu in a template from the studio
In any area, simply drag and drop the navigation menu component in your template

Edit the component properties

Baseline node: allows you to set if the menu is absolute (home) or relative (current page)Max depth: sets how deep the menu will display itemsStart level: sets the level the menu have to start display itemsview of the menu items: defines the view used to display menu items (menuElement is the default)style that surround the menu. This style must be declared in your css file: defines the class around the menuunique <div> ID define in the page to reference this menu: defines the id around the menu
That's it. your menu will be displayed in the pages that will use this template.
Add entries in edit mode
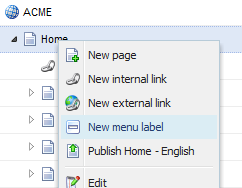
In edit mode, on the first tab of the side panel there is the page/links structure of the web site. With a right click on any item, you can create contents that automatically generate an entry in the menus. you can create one of these : - Pages - External links - Internal links - Menu labels
When created, the entry will appear in all menus of the page that matches the menu levels set in the studio. If you want the item to be displayed only in specific menus, you need to check “Select this option if you want to specify the menu where this item should appear”, then select the menu you want.

Custom menu items
Customization can be done at two different levels: the menu structure itself (navMenu.jsp), and the rendering of items (navMenuItem.menuElement.jsp).
Menu structure
You can add a view for your menu (jnt:navMenu) to change its structure or add javascript. The view will be automatically available in the Layout tab’s view selector of the menu. You just have to create a new file under the jnt_navMenu/html folder or create this folder tree in your module directory, named navMenu.<yourView>.jsp where <yourView> is your view name. In a file named navMenu.yourView.properties you have to set two properties for this view, as they are needed to manage cache dependency:
cache.mainResource = true
cache.mainResource.flushParent = true
The best practice is to copy one of the predefined menus, which is close to your needs and customize it.
The beginning of the file sets the properties to display the menus. The display part is between the <ul> tags.
Rendering items
The default view for items in a menu is defined as the menuElement view. The rendering is applied on jmix:navMenuItem, it means the default JSP file used for rendering items will be :
jahia/modules/default/jmix_navMenuItem/html/navMenuItem.menuElement.jsp
If you want a custom display, you have to create a new view menuElement for your type definition. For example Jahia uses a custom view for jnt:page items. This choice will let you add properties such as icon (reference to a file) or alternate text for a menu item.
[jnt:navMenuText] > jnt:content, mix:title, jmix:navMenuItem
+ * (jmix:navMenuItem)
or
[jnt:page] > nt:base, jmix:nodenameInfo, jmix:observable, jmix:basemetadata, mix:title, jmix:publication, jmix:tagged, jmix:navMenuItem, jmix:hasTemplateNode
orderable
- jcr:title (string) i18n mandatory
- j:templateNode (weakreference,choicelist[templatesNode]) mandatory < jnt:template
+ * (nt:base) = nt:base version
+ * (jmix:navMenuItem)
+ * (jmix:navMenuItem) let you add sub menu items under your current menu.
You can also define your own view for items. You must define a default view for it. This view will be available to be set in the jnt:navMenu from the studio.
To define an available view, you have to define it in the property file of the view : The view property of jnt:navMenu is define as
- j:menuItemView (string,choicelist[templates='jmix:navMenuItem,menuItem',resourceBundle,image]) = menuElement
meaning that the type must me set as "menuElement". To do that, near the view, create a .properties file with the same name as the view and put in it :
type = menuItem
All items in the menu will use the same view.
Define a new action item
You can add you own action item in edit mode, on the contextual menu for the first tab of the side panel (like page, external node link, etc ...). The action is org.jahia.ajax.gwt.client.widget.toolbar.action.NewContentActionItem. The definition must have the mixin jmix:navMenuItem. In order to make it appear in the context menu, you have to define a new bean that describes your action.
This is the structure of the bean you have to set :
  <bean class="org.jahia.services.uicomponents.bean.toolbar.Item">
          <property name="actionItem">
              <bean class="org.jahia.ajax.gwt.client.widget.toolbar.action.NewContentActionItem">
                  <property name="nodeTypes" value="my:nodeType"/>
                  <property name="parentTypes" value="jnt:page"/>
              </bean>
          </property>
          <property name="titleKey" value="title"/>
          <property name="icon" value="image.png"/>
          <property name="parent" value="editmode.tabs[0].treeContextMenu"/>
         <property name="positionBefore" value="Toolbar.Item.Publish"/>
          <property name="visibility">
     <bean class="org.jahia.services.uicomponents.bean.Visibility">
      <property name="permission" value="permissionName"/>
     </bean>
    </property>
  </bean>
where
nodeTypes: is your nodetype with the mixin jmix:navMenuItemparentTypes: is the node on witch the edit menu entry will appeartitleKey: is the bundled resource key to be displayedicon: icon use for the menu entryparent: is the bean on witch this one will be injected (see applicationcontext-editmode.xml file for this structure)positionBefore: is the name of the bean before witch this menu entry will be positioned (positionAfter, position are available too)visibility: is the Visibility Bean that displays or not the entry
Inject a custom action Item into an existing menu
you can create a custom action item into a module, and inject this one into Jahia menu. for example, you've created your custom manager and you want to open it through the Jahia menu, you need to create a Spring bean into the configuration xml file :
<bean id="Toolbar.Item.ContentManager" class="org.jahia.services.uicomponents.bean.toolbar.Item">
<property name="parent" ref="menus"/>
<property name="actionItem">
<bean class="org.jahia.ajax.gwt.client.widget.toolbar.action.ActionOpenCustomManager"> <!-- custom or existing action, for example : redirection-->
<!-- properties of your custom action -->
</bean>
</property>
<property name="titleKey" value="label.custommanager"/> <!-- label of your item -->
<property name="icon" value="manager-icon"/> <!-- icon of your item -->
</bean>
the example is very simple, you can add whatever property you need : permission, url, ...
parent property needs a list so we have to build a list with references to Jahia menu, in the same configuration file :
   <util:list id="menus">
        <ref bean="bluemenu"/> <!-- id for Jahia menu in Anthracite theme -->
        <ref bean="editmode.managers.menu"/> <!-- id for managers edit menu on default theme-->
    </util:list>
now, you can deploy your module, and see your new Item menu with other Jahia items.