Specifying advanced options in Content Editor
This topic shows you how to use settings in the Advanced options tab in Content Editor.
Advanced options for content authors
Content Editor provides additional options for managing your content from the Advanced options tab in Content Editor. You can:
- View technical information about your content
- Define vanity URLs for content
- See where the content is referenced by other content types
- View previous versions of content and restore a specific version
- View actions that have been performed on content
- Schedule when content is visible and hidden
Viewing details and technical information
By default, when you open the Advanced options tab, you see information about the content that you are editing in Details and Technical information.
- In Details, you can view when content was last published, last modified, and initially created. You can also see which user performed each action.
- In Technical information, you can view information that is most relevant to developers:
- Main content type
The displayable name of the content type, for example,Highlights. - Full content type
The technical name of the content type and all mixins applied to it. For example,jdnt:highlight,jdmix:hasLink,jdmix:imgView, andjmix:renderable - Path
The location of the content inside the Jahia platform. For instance,/sites/digitall/home/area-main/area-1/area-1-side/global-presence-rich-text - UUID
The unique identifier of the content. For instance,454826a2-ecef-40c1-a27b-998117d3d3bc. This identifier doesn't change if the content is renamed or moved. However, the UUID will change if you export the content from one platform and import it in an other.
- Main content type
SEO
You can define vanity URLs for pages and content and specify the default URL to use when the content or page is called. Vanity URLs must be unique on your site meaning that you cannot add a vanity URL if it is already defined for other content, whether the content is published or not.
For more information on vanity URLs, see Using vanity URLs.
Viewing content references
If content such as text or an image is referenced and reused on another page, you can view a list of those references. The same content can be integrated into multiple pages within a site or several sites. You can use this information to find the location of occurrences and to determine how changing content on one page will impact multiple pages.
You can also break the content references. Before you do so, note that this action cannot be undone and can affect other pages on your sites.
To view content references:
- In Page Composer or jContent, navigate to your content and open it for editing.
- In the top toolbar in Content Editor, click Advanced Options and then select Usages.
A list of content references displays. The first column contains a link to the page that contains the referenced content. The second column shows the path of the reference object. - To break the link between the content and its references, click Clean references.
Warning: Before breaking content references, ensure that you are aware of the content and pages that will be affected by the doing so. Also note that this action cannot be undone.
Viewing content history
You can view a list of actions that have been performed on a content object. For example, you can see the date and type of action performed, the user who performed the action, and the property on which the action was performed.
To view content history:
- In Page Composer or jContent, navigate to your content and open it for editing.
- In the top toolbar in Content Editor, click Advanced Options and then select History.
A list of actions performed on the content object displays.
You have viewed history of actions performed on a content object.
Managing versions of your content
Jahia stores published versions of your content. You can view of list of published versions, compare a previous version with the current version, and restore a previous version.
Note: The restore operation is only performed in the workspace. You must republish content to make the restored version available online.
Comparing a published version with the current content
You can compare a previous version of content with the current version. The current version is either the last published version of your content or the current staging version.
To compare a published version of your content with the current content:
- In Page Composer or jContent, navigate to your content and open it for editing.
- In the top toolbar in Content Editor, click Advanced Options and then select Versioning.
- In the Compare versions list, select the published version that you want to compare against the current version and click the Compare with staging version button.
- In the content comparison page, the previously published content displays in the left pane and the current content displays on the right.
- To show changes in the current content, in the right pane click Highlighting. Content that has been deleted in the newer version shows in with a red background and with strike through text. New content displays a green background.
You have compared your current version with a published version of your content.
Restoring a previously published version of your content
You can restore content from a previously published page. Note that the existing staging content will be lost.
- In Page Composer or jContent, navigate to your content and open it for editing.
- In the top toolbar in Content Editor, click Advanced Options and then select Versioning.
- In the Compare versions list, select the published version that you want to compare against the current version and click the Compare with staging version button.
- To restore the previous version of your content, click Restore in the left panel. The content from the older published version is copied from the live workspace to the default workspace.
You have restored a previously published file.
Setting visibility settings for content
You can schedule when published content is visible online. This feature is used for time based publishing. Visibility conditions do not override permissions. For example, a user or group without read permissions will not see content or a page, regardless of visibility conditions. A user or group with read permissions will see content or a page only if the specific visibility conditions are met.
You can specify three types of conditions:
- Start and end date
Sets the time interval for when the page or content is available online. If no start date is set, the page or content is visible once published and until the end date occurs. If no end date is set, the page or content is visible once the start date is reached. For example,Visible from 11/15/2019 08:00 until 11/25/2019 08:00makes content visible for the specified range in November. - Time of the day
Set the daily time interval for when the page or content is visible. For example,Visible from 07:00 until 09:00makes the page or content visible from 7:00 am until 9:00 am daily. - Day of the week
Sets the days of the week when the page or content is visible. For example,Visible on [Saturday, Sunday]makes the page or content visible on Saturdays and Sundays.
Note: You can add multiple visibility conditions of the same type. For example, you can add one conditions specifying that content is Visible on [Wednesday] and another that content is Visible on [Friday].
To specify that the page and content is visible only if all the visibility conditions are met, select the All conditions should match box.
Advanced options for site administrators
Site Administrators can use Advanced options to specify settings such as live and edit roles, workflows and channels.
Live roles
This tab is used to define the roles (which are associated to permissions) for users and groups for the live version of the content. Live roles define what a user can do on a published content. A specific interface allows you to search for the users and groups to add to a role. Note that you can select several users and groups by holding the Ctrl key while clicking on the users and groups.
Roles are inherited. This mean that by default a content has the same role configuration as its parent content. For example, when you set roles on a site, these roles are used by the pages in the site, by the subpages, areas of a page and the page contents. At any level you can add or remove a user and group from a role. This is replicated on the subcontent.
Edit roles
This tab is used to define the roles (which are associated to permissions) for users and groups for the workspace version of the content. Edit roles define what a user can do on a content when editing content, for example, creating, publishing, and translating.
Break all inheritance
As with live roles, edit roles are inherited. You can break role inheritance from the Edit Roles tab. If you do, you will have to reset all the roles (edit and live) for the content. Modifications of the roles in a parent content will not affect the roles set for this content, as the inheritance has been broken. It is possible to restore the inheritance afterwards.
Workflow
This tab allows you to select the type of workflow to use when publishing or unpublishing the content. By default, the type of workflow used is inherited from the “parent”, meaning the parent page or parent content (page/area/list/etc.), but it can be changed by unchecking the box “Same workflow as parent” and by selecting the desired workflow in the drop-down.
This tab is rarely available to individual content creators. Its use is typically restricted to advanced webmasters and reviewers.
Channels
This tab allows you to control for which channels, set of devices or specific devices, the content should appear or not.
The most useful channels are:
- Generic Phone
This applies to any smartphone (including Android and iPhones) - Phone: Android
This applies to every Android smartphones - Phone: iPhone
This applies to every generation of iPhones - Tablet: Android
This applies to every Android tablets - Tablet: iPad
This applies to every generation of iPad
Note: Several other older specific devices are available for compatibility reasons with previous versions of Jahia. These devices are most likely to be unavailable in a future version of Jahia.
Once the channels are selected, you can choose either:
- Exclude for these channels
Meaning that the content will not be visible from the selected channels - Include only for these channels
In this case the content will be only visible from the selected channels
Accessing legacy functionality
If necessary, you can access legacy functionality in Advanced options, including the legacy content editing UI, layout and view settings, metadata, categories, and options.
Content
The Content tab allows you to change the value of the different fields that compose the content item.
All content or pages share the same System name property. This property is used to identify a content/page among the contents created in the same area/content list, or pages created under the same parent page. It is advised to use a meaningful name during the content creation. If your content has a title property, then it is possible that a system name will automatically be suggested based on the title of the content. Uncheck “Automatically synchronize name with title” in order to manually edit this property.
Every property of the content is associated to a specific input field: text field, rich text field, checkbox, drop down list, dual list, date picker, reference picker and color picker.
Special case when the site is available in several languages
If your site is available in several languages, then the Content tab displays some fields differently as if the site was available in only one language. Your content can be composed of properties that are unique for all the languages, and “internationalized” properties with a different value per language. Such “internationalized” properties are identified by one icon and a button. In order to fill these properties for every language, you will have to switch to the corresponding language in the language switcher, located above the tabs.

Copy to All Languages: This button copies the value of the field for all the other languages, overriding the other values. This button should be used with care, especially when updating a content.
The following section allows you to select for which languages the content will be displayed online:
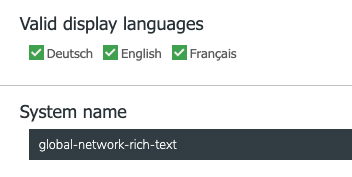
By default all the languages are selected, which means that the content will be displayed online in all the languages. When unselecting a language, you will prevent the content to be visible online for that language.
For more information on making your webproject available in several languages, see Managing languages for your site.
Rich text field
A rich text field allows you to edit yourself the way the text of your will be displayed in the page, as compared to other properties. Depending on the type of content and on your role, the options available in the rich text editor (Jahia embeds CKEditor) may differ. Most of the time the basic text edition operations are available: changing the style (title, text, etc.), the font, the color, the alignment, lists, etc.
Layout
The Layout tab allows you to select how your content should be displayed in your page. The easiest way is by selecting an alternative view.
Note: The Layout tab is not available for pages.
View
A view is a way of displaying the content in your page and every content has a default view, the one used when the content is created. A view is specific to a type of content. Depending on your site, it is possible that other views are available, so you can choose the best way the content should appear in your page.
In order to select a view, you must activate (if not already done) the "View" box and then select from the drop-down list the desired view. A preview of the selected view is available, however this may differ from the final rendering in the page.
Reference view
If you are editing a content reference, then the “Reference view” box is displayed and allows you to select a view for your reference among the views available for the type of content being referenced.
Metadata
All content contains metadata that provides information about the content object. Metadata is also used to perform advanced searches, such as filtering. Most metadata fields are captured by Jahia and are not manually editable, like creation date or the author name. You can update some additional fields, like tags, keywords or description.
- Description
Simple field that provides a description of the content. In multilingual websites, this property is per language. - Tags
Tags can contain one or more words. You can add several tags at a same time by using commas as separators. The tag field is enhanced with assisted typing. When you type two letters in the Tag field, Jahia will suggest a list of existing tags from your site. - Keywords
Single words that describe your content. Follow your company recommendations regarding the usage of keywords.
Site administrators have access to a panel dedicated to the tag management.
Categories
This tab displays the tree of available categories you can use to classify and enrich contents with meaningful concepts. The categories are managed by administrators. Authors can not create new categories here, but just use them.
Options
The Options tab has some additional options usually added to meet the specific needs of your site. As these are customizations, it is not possible here to detail the specific options available for your site.