Installing Elasticsearch, Unomi, and Marketing Factory
The Apache Unomi official and nightly builds are distributed as packages (ZIP or TAR/GZ), which contain the Apache Karaf server with all the Apache Unomi services bundled and pre-configured. A second distributable is the Marketing Factory Package itself (JAR file), which includes modules to be deployed on the Digital Experience Manager instance. Next sections describe the installation of both parts.
3.1 Elasticsearch server
Marketing Factory 1.9 works with Apache Unomi 1.3.0-Jahia that requires ElasticSearch 5.6.3. Therefore you will need to install a standalone ElasticSearch using the following steps:
- Download an ElasticSearch 5.x version (5.6.3 or a more recent 5.6.x version, but not 5.7.x) from the following site: https://www.elastic.co/downloads/past-releases/elasticsearch-5-6-3
- Uncompress the downloaded package into a directory (we will refer to it in the documentation as the
<elasticsearch-install-dir>) - In the file
<elasticsearch-install-dir>/config/elasticsearch.ymlreplace the cluster.name parameter here by your own cluster name.# ---------------------------------- Cluster ----------------------------------- # # Use a descriptive name for your cluster: # cluster.name: YourOwnClusterName #You can note this cluster name in order to configure your Unomi instance to point on it later.
- launch the server using
bin/elasticsearch(Mac, Linux)bin\elasticsearch.bat(Windows) - Check that the ElasticSearch is up and running by accessing the following URL: http://<your-server-hostname>:9200
3.1.1 Starting and stopping ElasticSearch
Change to the <elasticsearch-install-dir>/bin and launch ElasticSearch simply by using the command:
./elasticsearch
You can then stop the server simply by issuing a CTRL+C inside the console where you launch the ElasticSearch server. Leave it running for now as we will need it running before starting Apache Unomi. If you want to install ElasticSearch as a background service on a specific operating system, you may use other packages. You can find documentation on how to do this here: https://www.elastic.co/guide/en/elasticsearch/reference/current/install-elasticsearch.html
3.2 Apache Unomi
3.2.1 Compatibility
Depending on the Marketing Factory version that you are deploying on your DX Instance, you must get the compatible corresponding Apache Unomi. This information should be on the Marketing Factory download page. Do not download Apache Unomi directly from the public Apache website as these versions are not supported. Marketing Factory will not work if it used with a non-compatible version of Apache Unomi
3.2.2 Installation
As a reminder, you can find the Jahia supported version of Unomi on jahia.com website. The installation of Apache Unomi consists of one unique step, which requires uncompressing the content of the context-server-package-X.X.X.tar.gz (Linux / Solaris / Mac OSX) or context-server-package-X.X.X.zip into your target installation folder. It will create the folder context-server-package-X.X.X, which we will reference later in this document as <cxs-install-dir>. Whether you’re installing Unomi and ElasticSearch locally, remotely, in cluster or not, you need to specify an ElasticSearch cluster name, it is recommended to do this before you start the server for the first time, or you will lose all the data you have stored previously. You can also change the host and port if they need to be modified from the default values.
To change these settings, you will need to modify for each cluster node a file called <cxs-install-dir>/etc/org.apache.unomi.persistence.elasticsearch.cfg with the following contents:
cluster.name=YourOwnClusterName
# The elasticSearchAddresses may be a comma separated list of host names and ports such as
# hostA:9300,hostB:9300
# Note: the port number must be repeated for each host
elasticSearchAddresses=localhost:9300
index.name=context
3.2.3 Directory layout
The directory layout of an installed Apache Unomi (after first startup) is as follows:
/bin: control scripts to start, stop, login etc./data: working directory/cache: OSGi framework bundle cache/generated-bundles: temporary folder used by the deployers/log: log files
/deploy: hot deploy directory/etc: configuration files/instances: directory containing instances/lib: contains the bootstrap libraries/ext: directory for JRE extensions/endorsed: directory for endorsed libraries
/system: OSGi bundles repository, laid out as a Maven 2 repository The data folder contains all the working and temporary files for Apache Unomi. If you want to restart from a clean state, you can wipe out this directory, which has the same effect as using the clean option (see next section). You will also want to clear the<elasticsearch-install-dir>/datadirectory if you want to purge the stored data.
3.2.4 Starting and stopping Apache Unomi
The first time you start Apache Unomi is "special". By default the Apache Karaf (OSGi) server will start, but Apache Unomi's packages will not start automatically (previous versions started automatically, but we have since then introduced a new migration tool and this is why the first start is a little different). To start Apache Unomi, you must first start the Apache Karaf server in any mode (see below), and then start the packages using a shell command.
Apache Unomi supports different start mode:
- the "regular" mode starts Apache Karaf in foreground, including the shell console.
- the "server" mode starts Apache Karaf in foreground, without the shell console.
- the "background" mode starts Apache Karaf in background. You can also manage Apache Karaf as a system service (see "Integration in the operating system: the Service Wrapper" section of the Apache Karaf documentation located here: https://karaf.apache.org/manual/latest/wrapper). Various run modes are described in details on the "Start, stop, restart, connect" page (https://karaf.apache.org/manual/latest/#_start_stop_restart_connect) of the Apache Karaf documentation. For development, demo and quick test purposes the "regular" mode is appropriate, whereas for a production run the "background" mode is suited best.
3.2.4.1 Regular mode
For Linux / Solaris / Mac OSX:
./bin/karaf
For Windows:
bin\karaf.bat
This starts Apache Karaf as a foreground process, and displays the shell console. Note, please, closing the console or shell window will cause Apache Unomi and Apache Karaf to terminate. In regular mode you could type 'system:shutdown' or 'logout' in the console to shutdown Apache Karaf.
3.2.4.2 Starting an Apache Karaf server in a background mode
For Linux / Solaris / Mac OSX:
./bin/start
For Windows:
bin\start.bat
You can connect to the shell console using SSH or client (see the next section).
3.2.4.3 Connecting using a client
Even if you start Apache Karaf without the console (using server or background modes), you can connect to the console. This connection can be local or remote. It means that you can access the Apache Unomi console remotely. To connect to the console, you can use the bin/client Unix script (bin\client.bat on Windows). In order to connect to a local process you should use for Linux / Solaris / Mac OSX:
./bin/client –h localhost –u karaf
For Windows:
bin\client.bat –h localhost –u karaf
3.2.4.4 First-time Apache Unomi start
The first time you start Apache Karaf, the Apache Unomi packages will not automatically start, you must start them using the following Apache Karaf shell command:
unomi:start
This step is only required once, the next time Apache Karaf starts it will automatically start the Apache Unomi packages.
Note that it is possible to start Apache Unomi without this command, to do so you will need to modify the setenv.sh and add the following line:
export KARAF_OPTS="-Dunomi.autoStart=true"
3.2.4.5 Stopping Apache Unomi
When you start Apache Unomi in regular mode, the logout command or CTRL-D key binding helps you logout from the console and shutdown the Apache Unomi instance. When you start Apache Unomi in background mode, you can use the bin/stop Unix script (bin\stop.bat on Windows). More generally, you can use the shutdown command (on the CXS console) that works in any case.
karaf@root()> shutdown -h
Confirm: halt instance root (yes/no):
The shutdown command asks for a confirmation. If you want to bypass the confirmation step, you can use the -f (--force) option:
karaf@root()> shutdown -f
You can also use directly halt which is an alias to shutdown -f -h.
3.2.5 Unomi key and event security
Apache Unomi uses a mechanism to prevent unauthorized servers and clients to send some specific events. Events such as logins, or properties updates should only be allowed from whitelisted servers. In order to do that Apache Unomi uses a combination of a unique key and an IP address to check if a server may send restriced events to Unomi. This is configured in the etc/org.apache.unomi.thirdparty.cfg file that is created after the initial start of Unomi (Unomi must be restarted for the settings from this file to take effect).
Edit the org.apache.unomi.thirdparty.cfg file to add a Unomi key. This key may be any unique string (there is a default one, but it should only be used for testing, never for production !). We recommend using something obscure such as a UUID (generate one here) or a SHA checksum (generate one here).
You will also need to configure the IP addresses that will be allowed to send some secure events. Warning: if these requests will go through proxies, you MUST use the IP address of the last proxy in the chain. For example if your deployment is setup this way : DX -> Public Unomi IP -> Apache HTTP server -> Unomi, the IP address must be the last IP that is used to connect to Unomi, in this case the IP adress of the HTTP server. Here we call the various IP addresses of the DX nodes DX_NODE_1, DX_NODE_2. Of course if you have more than two nodes you will also need to add them here.
thirdparty.provider1.key=<generated-unomi-key>
thirdparty.provider1.ipAddresses=127.0.0.1,::1,DX_NODE_1,DX_NODE_2
thirdparty.provider1.allowedEvents=login,updateProperties
The Unomi key will then be required in the Marketing Factory connection setup. Note that the allowedEvents must contain the updateProperties event, as it is now required by Marketing Factory to perform any updates on profile or persona properties. Make sure this value is present especially if you are migrating from previous versions of Apache Unomi.
3.3 Marketing Factory Package
3.3.1 Deploy modules
The Marketing Factory Package is delivered as a JAR named EnterpriseDistribution-MarketingFactory-1.9.0.jar, which must be deployed on your Digital Experience Manager server. While your Digital Factory server is running, go into the Server Administration UI _ System components _ Modules and use the "Upload action" choosing the EnterpriseDistribution-MarketingFactory-1.9.0.jar file to install the package.
The package installs two modules:
- marketing-factory-core
- marketing-factory-components
NOTE: prior installation you might want to add a property to your jahia.properties file:
- wemPoolMaxTotal, this parameter is available for 1.9.1 and superior, by default the value is 200 and it will change the max number of concurrent connections, more information here
3.3.2 Enable the modules on your site
You should enable those two modules on a site, where you would like the Marketing Factory feature to be enabled:
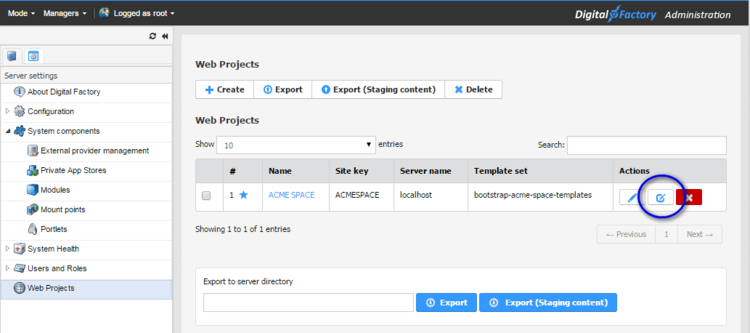
- Use the Server Administration UI _ Web Projects
- Choose your Web project and click on "Edit site" icon (second in the actions)
- 3. Click on "Choose modules to be deployed" button
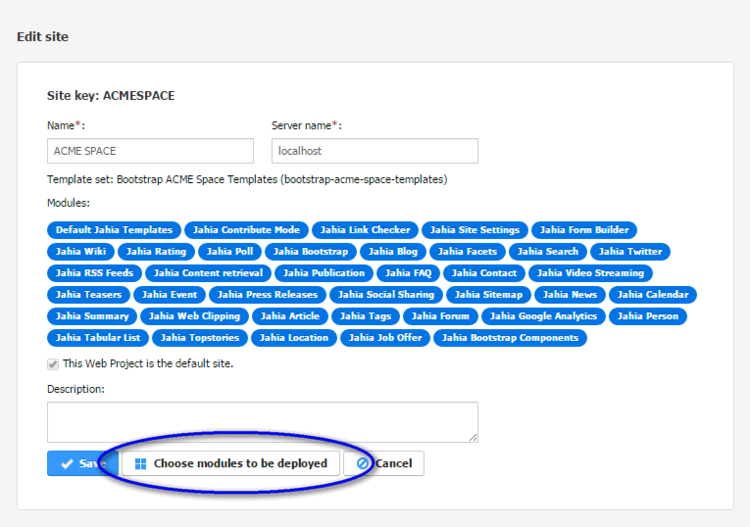
- 4. On the next screen select Marketing Factory Core (marketing-factory-core) module and click "Next" to save the changes.
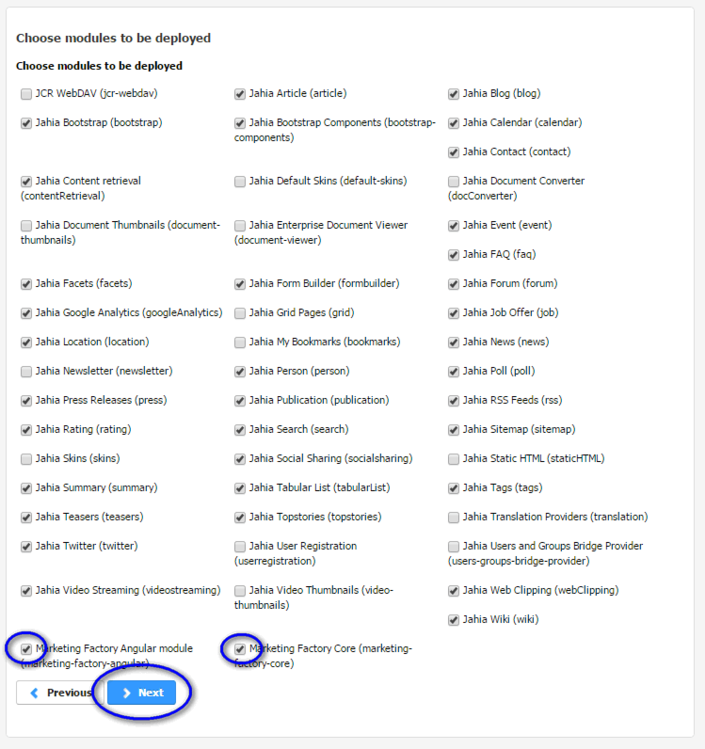
- Now you could switch into Edit mode for the site and go to the Site Settings tab (left side panel in edit module). A new section will be available there, which contains Marketing Factory related management pages:
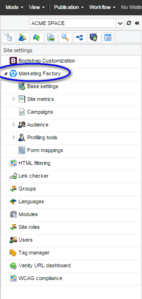
Please, refer to the next section for the description of how to setup Marketing Factory.
3.3.3 Setup
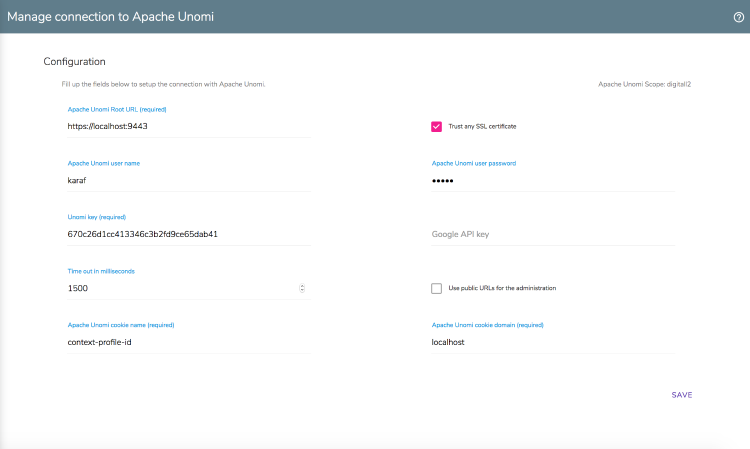
Once the Marketing Factory modules are installed and enabled on your site, the next step is to connect the Marketing Factory modules to the Apache Unomi instance, which should be also up and running at that point. In the Edit mode navigate to the Site settings tab (left-side panel) of your site and open the Marketing Factory Settings screen. Here you should provide the following information:
- Apache Unomi Root URL: this should be the base administration URL of Apache Unomi. This address must use https protocol, for instance: https://localhost:9443 . See section 4 for more information about Unomi addresses configuration.
- Trust any ssl certificate: activate this checkbox if you are using SSL connection and if you are using self-signed (provided by default) or certificates that are not by a trusted certificate authority (not recommended). This is useful for test installations but should not be used for production installations. For your tests though you must know that the Apache Unomi package is configured with a default SSL certificate.
- Apache Unomi user name: Apache Unomi requires a login to access the administration REST API. By default it is accessible with the "karaf" user.
- Apache Unomi password: the default password for the "karaf" user is "karaf".
- Apache Unomi key : The Unomi key is required and should be set to the same value as configured in Unomi's
etc/org.apache.unomi.thirdparty.cfgfile (see section 3.2.5 for details on how to set it up). - Google API Key: this key is used by the preview feature and by the geolocation by point feature. The rest of Marketing Factory can work without this key to be filled. Please refer to google documentation for more information: https://developers.google.com/maps/documentation/javascript/get-api-key
- Time out in milliseconds: this value defines the default Javascript timeout for request going from the Marketing Factory modules to Apache Unomi. If Apache Unomi doesn’t answer to requests fast enough, and the timeout value is reached, the modules will fallback to default variants and behave "cleanly" under the circumstances. This helps protect the system against network issues or potential Apache Unomi slowdowns or failures. The value of the timeout is a balance to find between your organization expectations on the response time of the content and the infrastructure.
- The default value is 1500ms which is adapted to local environments where Unomi typically respond in this delay. For production installations, we recommend to set this value so that it doesn't downgrade the customer experience while still being reasonable in your environment. Our tests show that 300ms is a good balance.
- Use public URLs for the administration: By default, Unomi has two endpoints (private and public). If you need to use the same endpoint for business users (marketers) and visitors, check this option.
- Apache Unomi cookie name: this value defines the name of the cookie used by Unomi. By default, use "context-profile-id" . If you changed the value of the property "contextserver.profileIdCookieName" in Unomi configuration file etc/org.apache.unomi.web.cfg , the values should be the same.
- Apache Unomi cookie domain: Use the same value as the "contextserver.domain" defined in Unomi configuration in etc/org.apache.unomi.web.cfg
And click on a "Save" button.
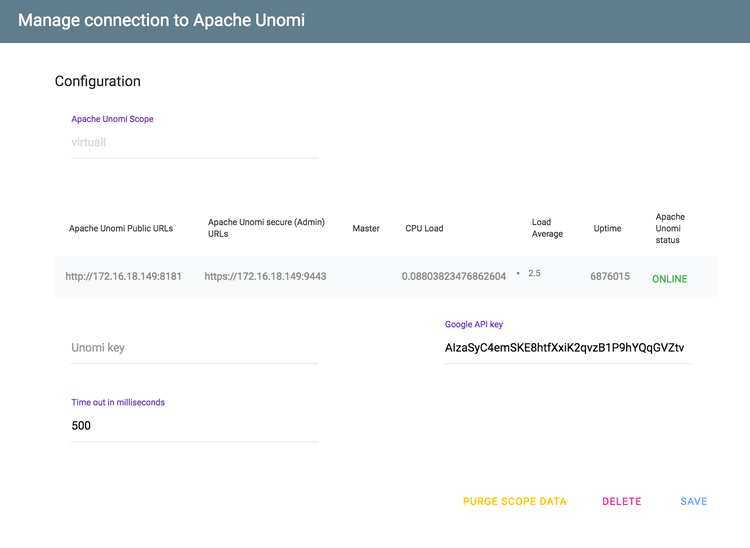
After the settings are successfully saved, the screen shows the configured Apache Unomi instance:
On this step the setup of the Marketing Factory is finished and you could start managing the Web experience using various entry points in the Marketing Factory administration menu.
3.3.4 Roles and permissions
When deploying Marketing Factory modules, 3 permissions are added on the Editor in chief role.
if you have created your own role, you will have to add theses 3 permissions to access the Marketing Factory administration interface.
