Marketing Factory quick install
Introduction
You'll find the necessary steps to have a Marketing Factory 1.9 running on a local instance.
1. Java
- Install JDK 8 (see http://www.oracle.com/technetwork/java/javase/downloads/index.html) and make sure you set the
JAVA_HOMEvariable (https://docs.oracle.com/cd/E19182-01/820-7851/inst_cli_jdk_javahome_t/)
2. ElasticSearch
The ElasticSearch prerequisite can be found at this link: https://www.elastic.co/guide/en/elasticsearch/reference/current/setup.html
- Download ElasticSearch 5.6.3
- Unzip to any folder
- Edit the file
conf/elasticSearch.ymland modify propertycluster.namein the to<defineYourClusterName>(i.e. cluster.name: myCluster) - Start Elastic Search :
./bin/elasticsearch
3. Apache Unomi
- Download the latest Jahia distribution of Apache Unomi
- Unzip to any folder
- Edit the file
/etc/org.apache.unomi.persistence.elasticsearch.cfgand set the propertycluster.nameto<defineYourClusterName>(i.e cluster.name=myCluster) - (Optional) Apache Unomi requires an IP database in order to resolve IP addresses to the user location. The GeoLite2 database can be downloaded from MaxMind here: http://dev.maxmind.com/geoip/geoip2/geolite2/
Simply download the GeoLite2-City.mmdb file into the “etc” directory. - (Optional) Apache Unomi includes a geocoding service based on the Geonames database that is used to create conditions on countries or cities.
Get the “allCountries.zip” database from here: allCountries.zip Download it and put it in the “etc” directory, without unzipping it. Import can take about 15 minutes but will run in the background. - Start Unomi using :
./bin/karaf - On the first start, you'll need to execute the following command :
and wait for startup to complete. This step won't be necessary on the next server startups, the Unomi bundles (packages) will start automatically.unomi:start - Try accessing https://localhost:9443/cxs/cluster with username karaf and password karaf . You might get a certificate warning in your browser, just accept it despite the warning it is safe.
- You can try accessing https://localhost:9443/cxs to check the available Unomi services.
4. Marketing Factory modules
If your server doesn't have access to internet, please download the modules from the following address: https://store.jahia.com/contents/modules-repository/packages/MarketingFactory.html
Follow the steps below if the server on which your Digital Experience Manager - Enterprise Distribution ONLY - is running can access the Internet :
- Prior to start the installation in itself, please change your license: License.xml (XML file) 30 days trial license, copy the license in <Java-Installation>/digital-factory-config/jahia/ folder and restart Digital Experience Manager
- Go to the Module Management interface of a running Jahia Digital Experience Manager (Enterprise Distribution) instance
- Click on "Available modules" and type "Marketing" in the search box
- Enable Marketing Factory core on your website
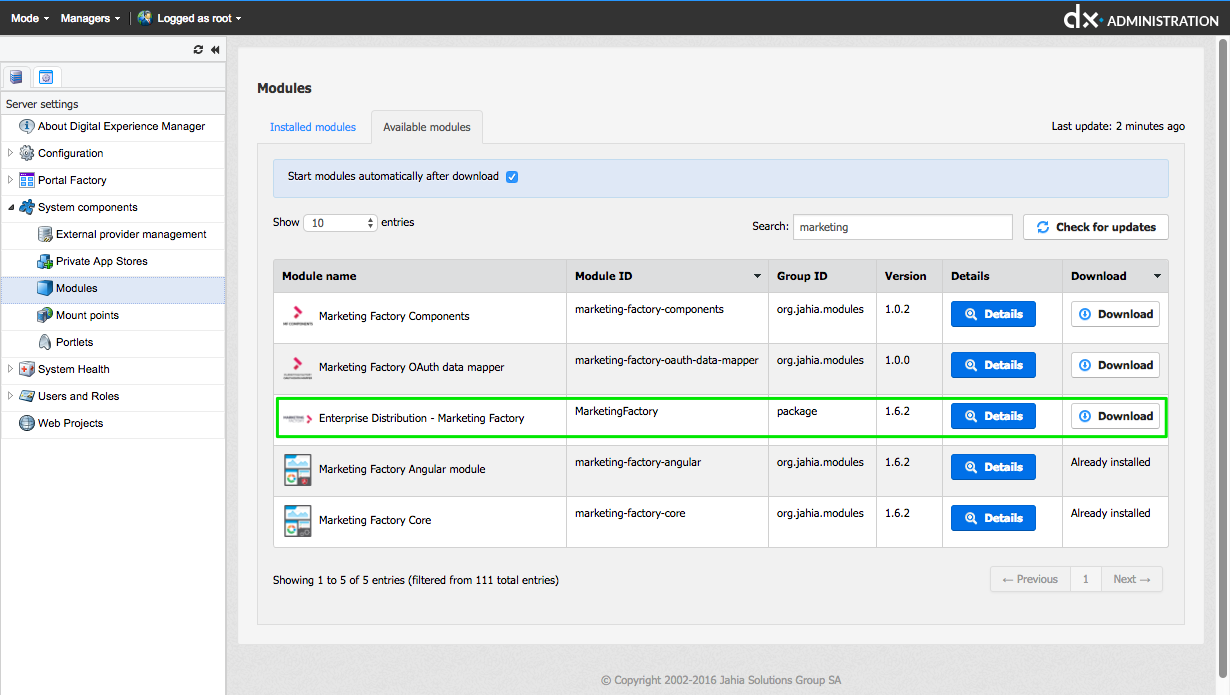
Select the "Enterprise Marketing Factory" Package and click on "Download"
5. Marketing Factory settings
| Parameter | Value |
|---|---|
| Secure address | https://localhost:9443 |
| login | karaf |
| password | karaf |
| Trust any SSL certificate | checked |
| Google map key (The key not required) |
<setyourownkey-or-get-one-here-https://developers.google.com/maps/documentation/javascript/get-api-key> |
| Unomi key required |
The Unomi key that is stored in Unomi's etc/org.apache.unomi.thirdparty.cfg file. You can use the default key for testing purposes, but in production please refer to the complete installation guide for information on how to generate your own custom key. |
| Apache Unomi cookie name required |
By default, set it to "context-profile-id" |
| Apache Unomi cookie domain required |
Use the same value as the "contextserver.domain" that is defined in Unomi configuration in etc/org.apache.unomi.web.cfg |
- In DX edit mode, go to Site Settings, Marketing Factory menu and hit "save" using the default values. As an alternative, you can use the following parameters