Managing pages in Page Composer
Organizing your sitemap
This section shows how to organize your sitemap in Page Composer, create pages and group them using a menu labels, and add internal and external links to your top navigation bar.
About pages
Your site consists of a home page and subpages. Each page can contain predefined editable or noneditable content-items and areas (areas are placeholders defined at the template level to host content, for instance a menu, or paragraphs of text). Each area can contain one or more content items.
A page-template applies to every page. Page templates define the structure of a page, including the position of different areas and noneditable elements, for example a navigation menu.
Creating a page in Page Composer
In Page Composer, you create a new page in the left panel.
To enable Page Composer on your platform, please contact your administrator and follow the steps described on Enabling or disabling Page Composer & Page Builder.
To create a page in Page Composer:
- In Page Composer, click on Pages in the left pane.
- Navigate to the parent page below which you want to create a new page.
- Click the ellipsis button (...) beside the parent page. In the context menu, select New page.

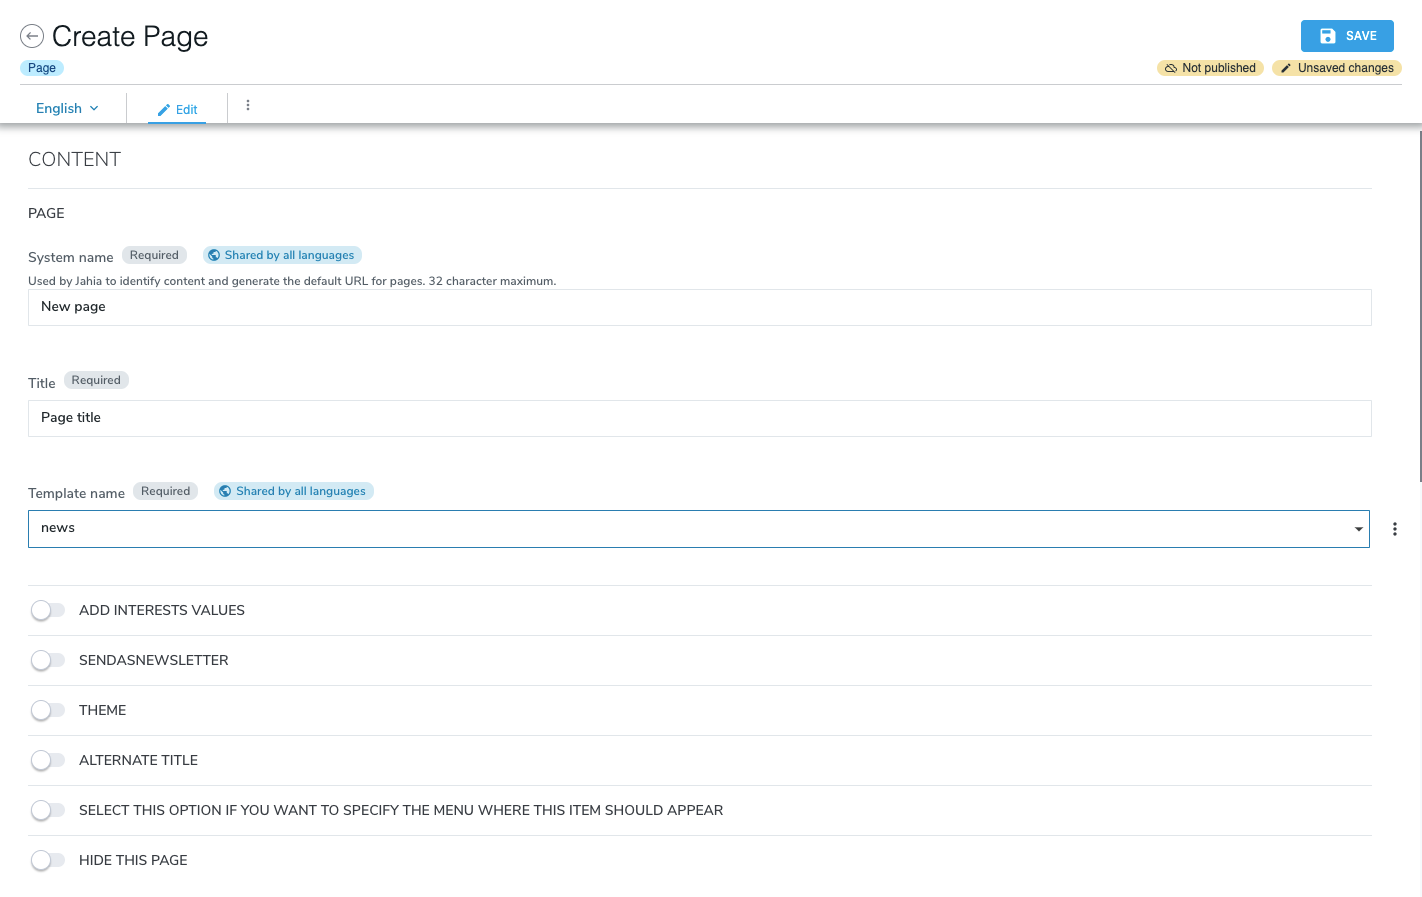
- In the Create Page page, the options that are available depend on the site you are working on. At a minimum, provide a system name, page title, and select a page template.
- System Name
System name of the page. The system name is used to build the page URL. You can also define a custom URL in the SEO tab. By default, the system name is created from the page title. - Title
Title of the page. - Template name
The page template that defines the structure of the page, areas on the page, types of content that each zone can content, and more. The list of available page templates is specific to each site.
Note: The list of available templates can also contain Page Models. For more information, see Creating page models.
- System Name
- For more information entering information in Content Editor, see Using Content Editor.
- Click Save.
The new page displays in the page tree.
Using a menu label to group pages
A menu label enables you to group pages under a single navigation menu. The label is only for organizational purposes as site users cannot click a menu label. After you create a menu label, you can create or move pages under the label.
To create a menu label:
- In Page Composer, click on Pages in the left pane.
- Navigate to the parent page below which you want to create a menu label.
- Click the ellipsis button (...) beside the parent page. In the context menu, select Add>New menu label.

- In the Create Navigation Menu page, enter a title.
- Click Save.
The menu label displays in the page tree. You can now group pages under the menu label.
Specifying navigation menus for a page or menu label
You can choose to display a page or menu label only in one or more specific navigation menus. For example, if your site uses multiple navigation menus, you might want to exclude a page from one or more of the menus.
To specify navigation menus for a page:
- In Page Composer, open the page for editing.
- In Content, enable Select this option if you want to specify the menu where this item should appear.
- Select the menus in which to include the page or menu label.
- Save your changes.
Creating navigation links
The section shows you how to add links to the navigation bar that displays at the top of your page. You can add links to pages within your site and to external websites.
Creating an internal link
An internal link enables you to display a link to another page in your Jahia web project. The link displays in the top navigation menu for site users.
To create an internal link:
- In Page Composer, click on Pages in the left pane. Navigate to the page in which you want to create the link.
- Right-click and select Add>New internal link.
- In the Create Internal link page, enter a link title. The title is the text that displays in the navigation menu.
- To select destination page:
- Click on the Target field under Internal Link. The site tree for the current site opens.
- Navigate the site tree in the left pane and select the page to link to.
- In the main window, select the page or content corresponding to the link that you are creating. Then click Save.
- To specify how the links opens for users, in the Target field under Link, choose one of the following:
- New Window (_blank)
Links opens in a new window - Parent Window (_parent)
Link opens in the same frame and site visitor leaves the current page. - Same window (_self)
Link opens in a new tab - Topmost window (_top)
- New Window (_blank)
- Click Save.
Creating an external link
An external link enables you to display a link to an external web page. The link displays in the top navigation menu for site users.
To create an external link:
- In Page Composer, click on Pages in the left pane. Navigate to the page in which you want to create the link.
- Right-click and select Add>New external link in the context menu.
- In the Create Link (External) page, enter a link title. The title is the text that displays in the navigation menu.
- In the URL field under Link (external) enter the URL of the external page.
- To specify how the links opens for users, in the Target field under Link, choose one of the following:
- New Window (_blank)
Links opens in a new window - Parent Window (_parent)
Link opens in the same frame and site visitor leaves the current page. - Same window (_self)
Link opens in a new tab - Topmost window (_top)
- New Window (_blank)
- Click Save.
Copying pages
To copy a page:
- Right-click a page and select Copy or click on the ellipsis (...) button.
- Open the context menu of the parent page under which you want to paste the page. Select one of the following:
- Paste
Copies the page and its subpages. Content is duplicated and can be modified without affecting the source page. - Paste one page
This copies only the page and not the subpages
- Paste
Moving a page
You can move and reorder pages by drag-and-drop or cut and paste.
When using the cut and past method:
- Right-click a page and select Cut or click on the ellipsis (...) button
- Select Paste to move the page and its subpages.
When using the drag-and-drop method:
- Hold the click on the page
- Drag it where you want to move the page:
- a blue line represents where the page will be moved when dropping, useful for re-ordering pages
- or drop it on a page in order to move it as a subpage
Editing the properties of a page
When you edit the properties of a page, you open it for editing in Content Editor. For more information on Content Editor, see Using Content Editor.
To open page for editing:
- In the left navigation pane, select Page Composer then select your site.
- At the right of the page name in the tree, click the ellipsis button (...) and select Edit.

- Content Editor opens. See Creating a page in Page Composer for more information about the fields that you can edit.
Publishing pages
You can publish and unpublish a page from the publication menu at the top-right of the page. You publish in the current language.
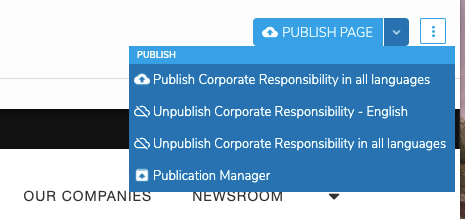
The publication menu has the following options.
- Publish the page or selected items in the current language
- Publish the page or selected items in all the site languages
- Unpublish the page or selected items in the current language
- Open the Publication Manager, which is a tool to manually select multiple items and launch a publication process
For more information on publishing, and publishing a specific piece of content in your page, see Publishing content.
Deleting a page
The way that you delete pages depends on whether the page has already been published or not. In both cases it is a two-step process. First you mark the page for deletion and secondly you delete it.
Deleting a page will also delete its subpages. Remember, you can unpublish a page or content so that it is no longer visible online for a selected language.
Marking page for deletion
The first step is to mark content for deletion.
To mark a page for deletion:
- Right-click on the page and select Delete.
- In the confirmation window, click Yes. The page is dimmed in Page Composer with Deleted text indicating that the page is ready to be deleted.
Pages marked for deletion no longer displays in Preview mode, but still displays online if it was previously published. - To cancel the deletion, right-click on the page and select Undelete and click Yes.
Deleting pages that have never been published
To delete pages marked for deletion that have never been published:
- Right-click and choose Delete (permanently).
- In the confirmation window, click Yes.
Deleting published pages
Pages marked for deletion are permanently deleted in their working and live versions when being published. In other words, you must start the publication of pages marked for deletion to permanently delete them online.
Exporting and importing pages
You can export a page as a .zip file and import it under another page. For information in exporting and importing content within a page, see Managing content in Page.
Exporting a page
You can export a page to your local machine so that you can import it on a different site or server. Exporting a page also exports its subpages.
To export a page:
- Right-click on the page and select Export.
- In the Export dialog, choose from one of the following export options:
- Export Zip
Export the content from the workspace in a zip file - Export Zip with live content
Export in a zip file the content as it is in the workspace and the content as it is online (“live content”).
The page or pages export to a .zip file on your local machine.
Importing a page
After exporting a page, you can reimport it. You typically uses page import when you want to:
- Export a page and import under another page in the same site
To import pages:
- Right click on the parent page where you want to import and click Import.
- In the Import dialog, click Choose File.
- Navigate the exported file and click OK. The import is performed in the background.
- Refresh the page to see the imported page.
Note that the import time depends on the size of the imported file.