Collecting form data from site visitors
Form mapping lets you capture data submitted by visitors through forms and silently stores that data inside submitter profiles (anonymous or not), regardless of the initial purpose of the form. Correctly used, in conjunction with personalization, form mapping enables you to employ a strategy of progressive profile nurturing by collecting reliable, meaningful, relevant and reusable data.
Accessing the Manage Form Mapping page
To access the Manage Form Mapping page:
- Navigate to jExperience>Projects>Form mappings.

Form mapping definition
A form mapping is defined by a name, path to the page which contains the form, the form identifier (name or ID), and instructions on how to treat each field of the form when the form is submitted.
Form mapping overview
Form mapping is a process by which a marketer defines that some fields in a form should be captured by jExperience and inserted into the visitor profile. Of course, the visitor is the one who submits the form.
Form mapping has been developed to work with most forms as soon as they are included in a Jahia page, whether this is a HTML static form, a form built with Forms, and even if the form has been developed on a third-party platform. Only two constraints need to be fulfilled for your form to be compatible with the form mapping the:
- Submit event has to be propagated and no JS code blocking this propagation should be executed
- Form must be displayed on the page load or in the next seconds following the page load.
Creating a form mapping
The creation of the form mapping is a multi-step process that starts by identifying the form that must be mapped, then by declaring the mapping between the form fields and the profile fields. To avoid mistakes, and because each operation is based on previously provided information, each step appears in the page once the previous step is completed.
- Click on the Form mappings entry (left menu).
- Click on the upper right menu.
- Choose New form mapping.
Step 1: a form appears

- Give your mapping a meaningful name.
- Give your mapping a meaningful description (optional).
Step 2: A new section appears

- Copy and paste the URL of the page that contains the form or click on Show the page picker link. This will pop-up an overlay with your site map.
- Open the tree with the arrows until you find the desired page (the one that contains your form), then click on the page name.

Once you have clicked on the page name, the overlay presenting the sitemap disappears and the field Base page path is filled with the correct URL.
Step 3: a new field appears
Then a new field appears in the page: form name. This field allows jExperience to define which form to capture in the page, which can contain several (at least two if, like most websites, you have a search form present on all your pages).

To select the correct form:
- Click on Show Visual Picker. This opens the target page in an overlay.

- Scroll in the page to find where the form is, then click in any field to select the form.
- Once a form is selected, the OK button (bottom-left) becomes clickable. Click OK.
- The page disappears. The form name is inserted in the field. Two new sections appear in your form mapping builder: Additional pages and Mappings.
Step 4
A new section Additional pages appears to allow you to select other pages that include the same form (it needs to have the same Form name or Form ID) so you do not have to create one mapping per form instance.

- Click on the page picker and choose another page containing your form.
- Repeat that process as often as needed.
Step 5
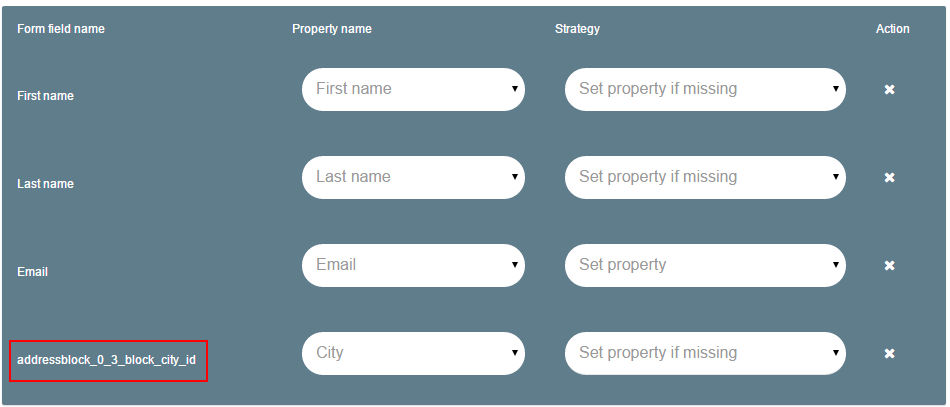
The Mappings section is where you are going to map the form fields to the visitor profile fields.

As soon as you have selected a form, jExperience has analyzed the form to extract each field (even the hidden fields). Those fields are available in the drop-down list labeled Please select a form field.
- Select a field.

- Choose one field from the list: the field appears instantly on a gray / green background.
- Select which profile property the value of this field should be stored to when the form data is captured by jExperience. The list of properties displays all available properties currently declared in your visitors profile.

- Choose a strategy for this field capture. The strategy tells jExperience how to react if the property is already filled inside the visitor profile.
Set property means that the value from the form submitted will be inserted in the visitor profile in all cases. If the property already had a value, the new value will replace it. This capability is very powerful but also dangerous. On critical properties, you should use this option only if you think that the form result is worthwhile to the visitor and s/he will definitely input a trustable value.
Set property if missing means that the value from the submitted field will be stored in the visitor profile only if the property is currently empty (or if the property does not exist yet).

- Repeat the process for each field you want to map.
Note that as soon as a field has been mapped to a profile field, it disappears from the list of available fields. This avoids accidently mapping the same field twice with inconsistent directives and also shows users what fields remain to be mapped.

Note also that you are not obliged to map all fields from the initial form, obviously.
Finally, notice - at the bottom of the screenshot - the name of the city field is taken from the form. In this example this field name is understandable (city id) although it appears to be a little cryptic. This example illustrates how important it is to enforce your developer team or content contributors to choose meaningful names for the form. Form field names like field1, field2, etc. will make it close to impossible for marketers to properly map them to profile properties.
Finally, the form mapping builder allows you to assign visitors, who submit this form, to one or more static lists, which can be very convenient and flexible.

Adding new properties with the form mapping
It can happen that a form contains fields that do not correspond to any existing property inside your jExperience visitor profile, but that marketers would still like to capture anyway. Well, it is possible and, in fact, it is easy to achieve as well.
- Click on the properties dropdown list.
- Scroll till the end.
- Choose Other.

- In the field that appeared at the bottom, enter a meaningful property name for this new property. The identifier can only contain letters. No numbers, accentuated characters, punctuation marks or spaces are allowed.
- Choose the strategy.

Now that the property has been prepared, as soon as a first-time visitor submits a form with this field filled, the property will be created and the value will be stored in his or her profile. To make the property appear in the profiles page (which is not mandatory in order to reuse it), please refer to the Profiles chapter.