MailChimp Integration
Before you start
Jahia MailChimp Integration Module (JMCIM) is the powerful tool to publish Your Jaha content into MailChimp campaigns. It has some powerful features to improve Your MailCimp workflow, such as mapping site users to MailChimp lists, creating sets of MailChimp campaigns a with the same settings and automate them, subscribing and unsubscribing to MailCimp lists with on-site components, etc.
You need MailChimp account to work with this module. If You don`t have one, please visit http://mailchimp.com/ to register.
You also need MailChimp API key to link JMCIM with your Jahia site. To obtain MailChimp API key, please follow the instructions at http://kb.mailchimp.com/integrations/api-integrations/about-api-keys
To learn more about MailCimp features, options and settings, see MailChimp Knowledge Base - http://kb.mailchimp.com/
Getting and installing JMCIM into your system
If you are familiar with installing Jahia modules you may skip this paragraph and continue reading at JMCIM CONFIGURATION chapter.
You have two options to install JMCIM into your Jaya.
- Install directly from the Jahia CMS (recommended)
- Download from The JahiaPublick Appstore (store.jahia.com) and then install into your system.
Installing from CMS
- Switch to Administration mode.
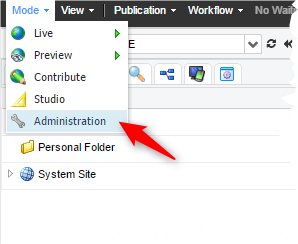
- Choose Server settings (A) tab and select System components(B)/Modules (C) to see the list of installed and available Jahia modules
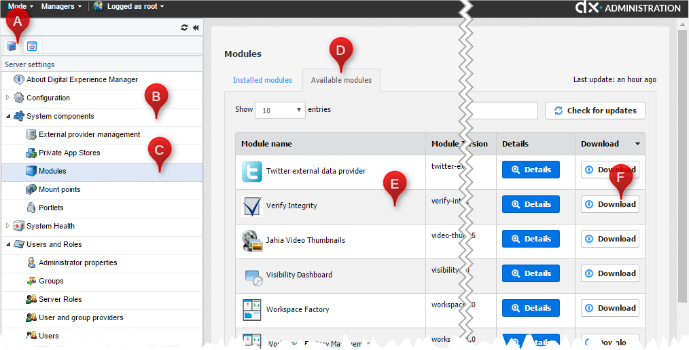
- In Available module tab (D) choose Jahia Mailchimp Integration Module (E) and then press "Download".
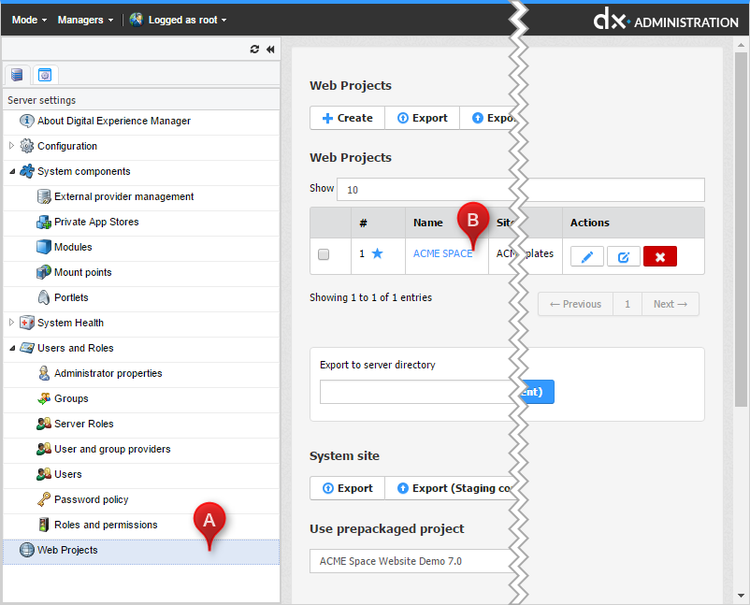
- Once installed, JMCIM should be deployed on the site. Go to Web projects (A) on the Server Configuration tab in the Administration mode. Then select a site (B) to deploy the JMCHIM module
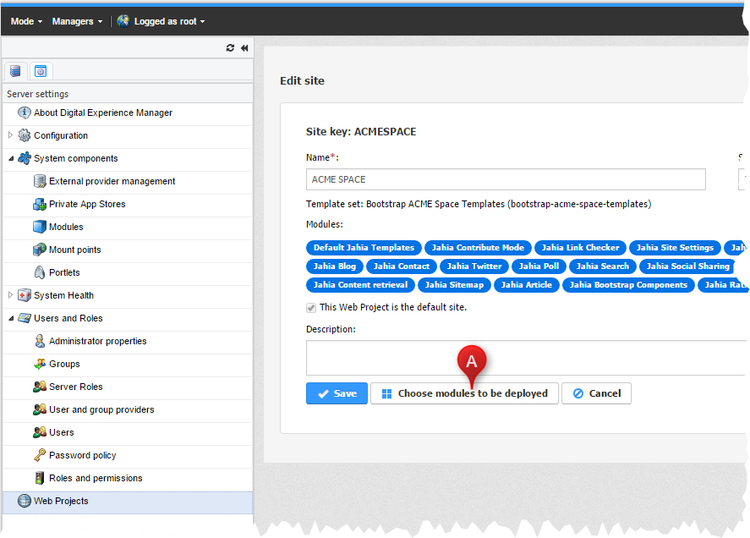
- On the next screen (Site Edit Screen) preess Choose modules to be deployed button (A)
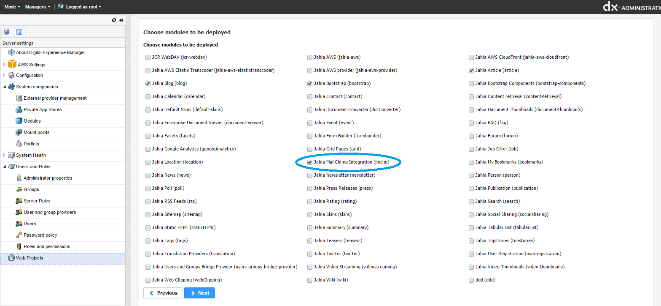
-
Select Jahia Mailcimp Integration Module.
Now The module is deployed to your site
Installing from Jahia Public Appstore
- Visit Jahia Publick Appstore to download module.
- In Edit mode choose Server Settings (A) tab and select System components(B)/Modules (C).
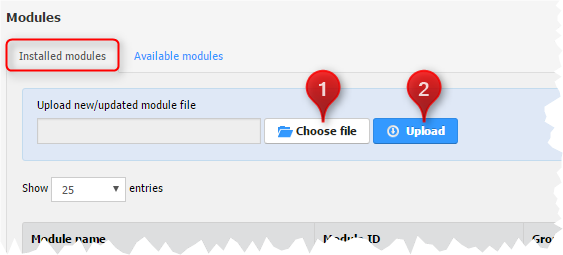
- In Installed modules tab press Choose file button and when file is chosen press Upload
- Next steps will be similar to steps 4-6 of the previous section.
JMCIM configuration
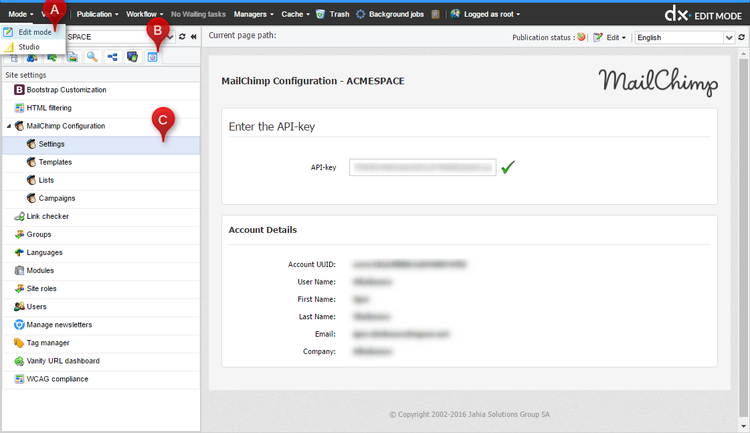
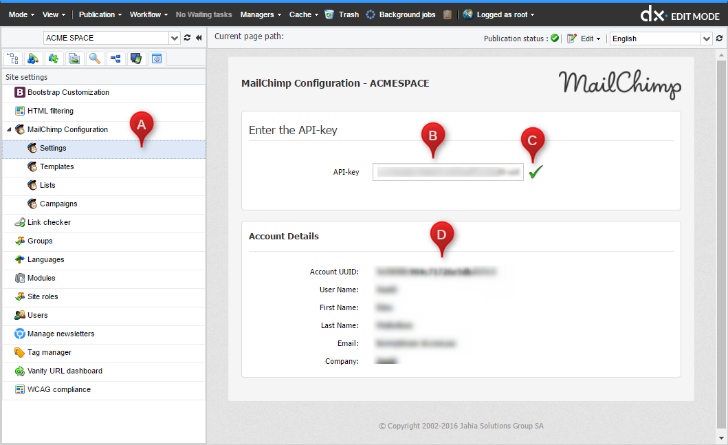
To configure JMCIM switch to the Edit mode and Then select Mailchimp Configuration node (C) from the Site Settings tab.
Adding and replacing API key for MailChimp Module
You need to have a valid MailChimp account and MailCimp API Key to use all module features. To create MailChimp account, please visit mailchimp.com and to obtain API Key follow the instructions at http://kb.mailchimp.com/integrations/api-integrations/about-api-keys.
To add or replace your API-Key to JMCIM paste it into the input field (B) on a Mailchimp Configuration/Settings (A) node. The key will be validated automatically and in a case of successful validation check mark will appear (C). Otherwise, you should check and re-enter your MailChimp API-key.
MailChimp account details will be shown after validation. Note, that You can`t edit them from this module.
You can`t use more than one API Key at once. If You want to use another API Key, You`ll need to replace it.
You can`t delete old API key from the system without replacing it.
Template configuration
Template – is a MailCimp term for the layout that you build your campaign on. To find out more about MailCimp templates, please visit MailCimp Knowledge base (http://kb.mailchimp.com/campaigns/ways-to-build/templates-vs-campaigns?_ga=1.184451046.1576595803.1473242553)
It is possible to send any site content via MailChimp. But to get best results we suggest using specially designed pages on Your site.
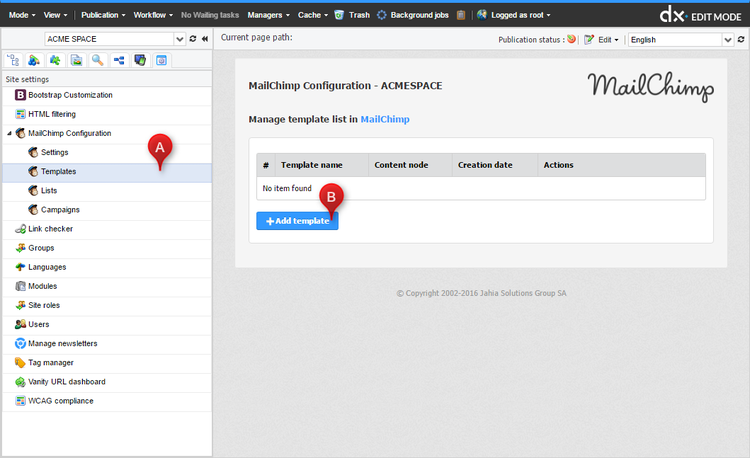
- To add a node as a template, visit MailCimp ConFiguration/ Templates (A) and press Add template (B) button.
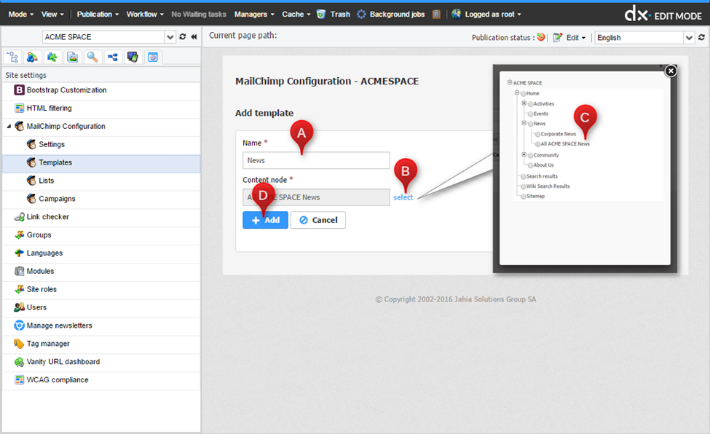
- Then enter a name for a template (A) and click select to select the desired node from a popup window (C)
- You have full control on templates created in JMCIM.
- Edit name and node (B)
- Edit template in Mailchimp (C)
- Update template content if it was changed on site (D)
- Delete template (E) from the system and the MailChimp account.
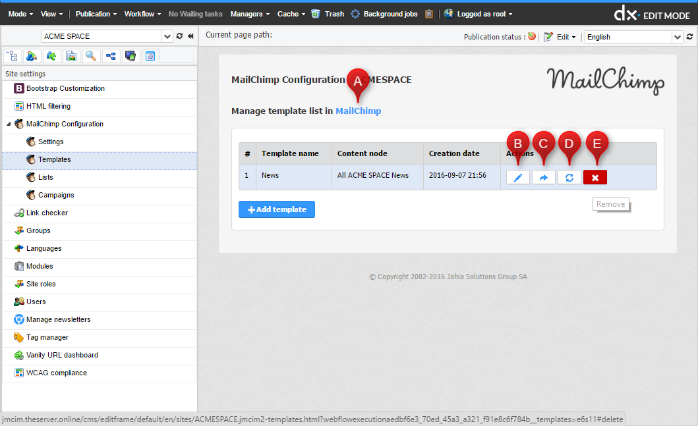
You can view and edit templates that were created in JMCIM only. To access and manage all your MailCimp templates press the link (A) on a form to be redirected to MailChimp site.NOTE!
MailChimp lists configuration
According MailChimp Knowledge base, LIST is a collection of subscribers who have opted-in to receive correspondence from you or your organization.
You can use lists previously created in MialChimp or create new either using MailCimp subscribe Component on your site or using MailChimp.
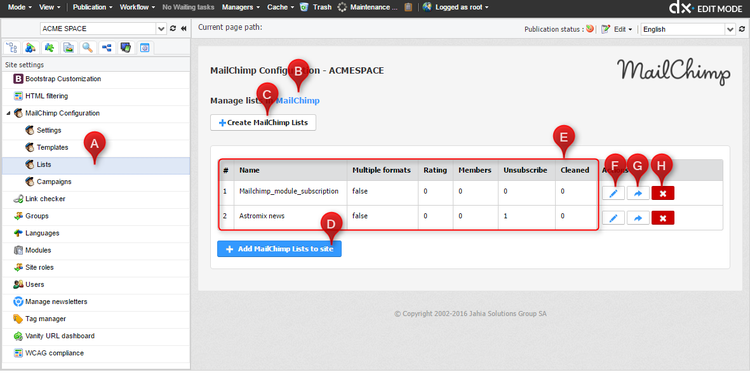
All list Configuration options are located on MailCimp Configuration/ Templates (A) screen.
According to MailChimp Knowledge base, list is a collection of subscribers who have opted-in to receive correspondence from you or your organisation.
You can use lists previously created in MialChimp or create new either via MailCimp subscribe Component on your site or MailChimp site forms.
All list Configuration options are located on MailCimp Configuration/ Templates (A) screen.
This screen allows you to:
- To Add (map) MailChimp lists to site (D), edit their settings (G) and delete lists from site (H);
- To view mapped to site Mailchimp lists statistics (E);
- To access special pages on MailChimp Site to create (C), manage(B) and edit lists(F).
By pressing "delete" button you only delete MailCimp list from site. To delete list from MailChimp visit list managing page on MailChimp web-site.
Mapping Mailchimp Lists into JMCIM
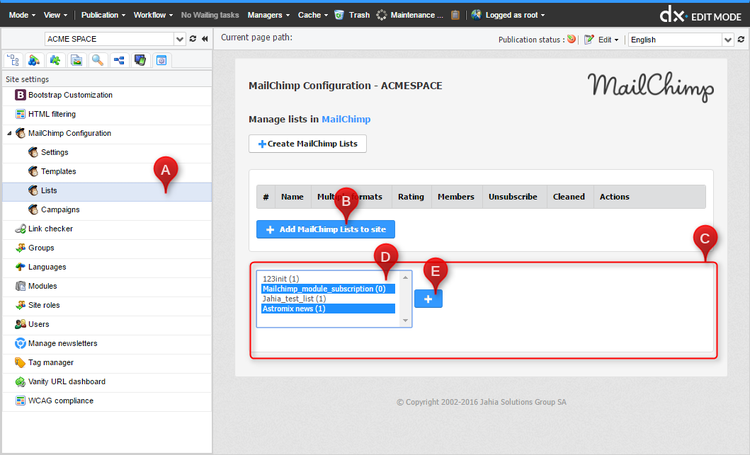
After That MailCimp list selector area (C) with list of all MailChimp lists from your account will appear. Choose one or more lists from list selector (D) and press Add button (E). Now list(s) are added so you may configure it.
Mapped list settings
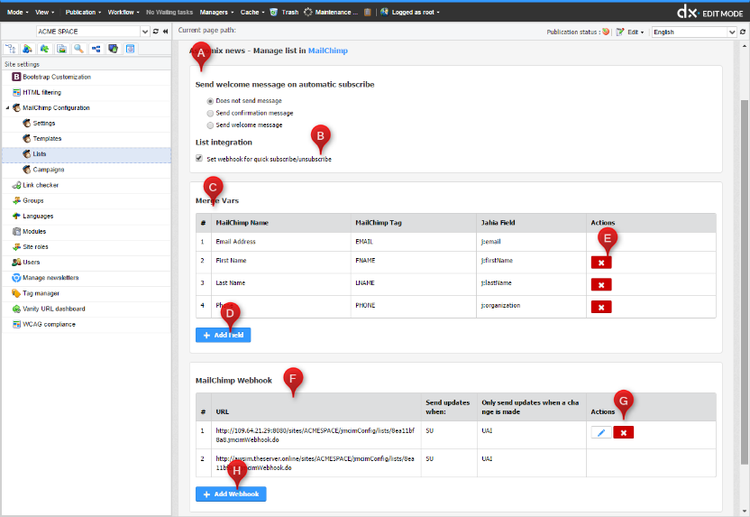
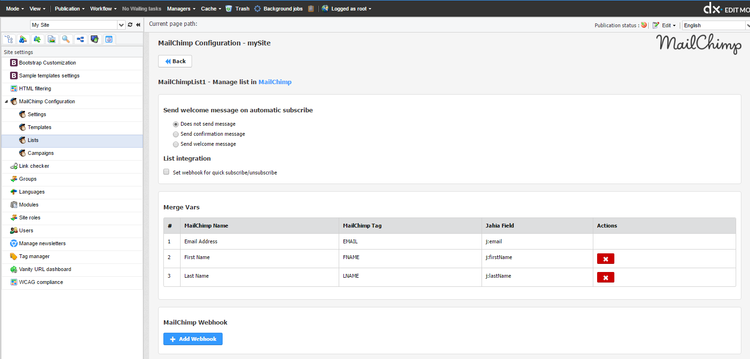
- Choose Welcome message options on automatic subscribe (A);
- Rview mapped list merjed fields (C);
- Add(A) and delite(E) merged fields
- Rewew(F), add(H) and delete(H) webhooks.
Mergin Jahia fields with MailCimp Lists
While adding MailCimp list to JMCIM some fields will be automatically merged. They are:
- E-mail (this field is mandatory and cannot be deleted from this list);
- First name;
- Last name.
Any other fields that are present in your MailCimp list options can be added manually.
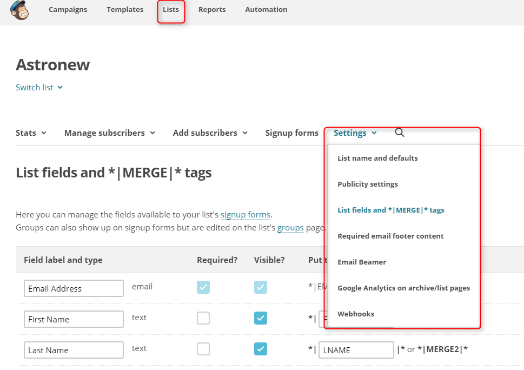
You can find MailCimp fields tags in MailCimp list settings.
Some fields cannot be merged without prior consulting with you site developer and administrator.
Setting and managing webhooks
You can setup sending confirmation or welcome message to subscriber after subscription. Also you can set webhook on subscribe and unsubscribe. To add webhook uri – click "Add Webhook"
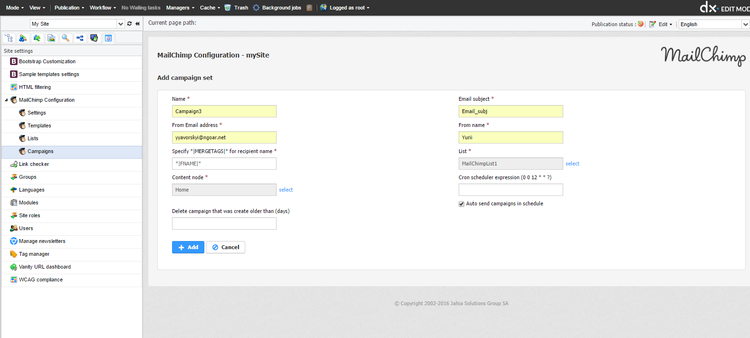
Setting Up campaigns and creating campaign sets
MailChimp subscription component
You may add your site users and subscribers in mailchimp list directly from you site by using MailCiimp Subscription Component.
It Can be added to any page (B) of your site in Pages tab (A) of an Edit mode. As adding any other component to page jucs click "add Component" button (C) and than select MailcimpSubscription Component (E) from the Site components (D).
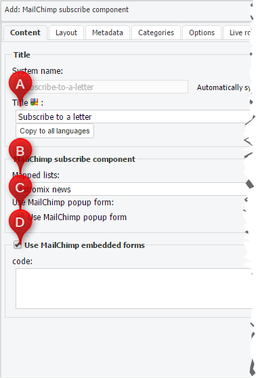
You will be taken to the component configuration screen where name of the component (A) and Mapped list (B).
There are also two advanced options:
- Use MailChimp Popup form (C).
- MailCimp embedded form where you can insert custom HTML-code for subscription form generated by Mailchimp (D). This allows you to create your custom forms and collect all additional user data that are in your MailChimp list.
Please ensure that your jahia user has E-mail set.
After adding component to the page publish it to the LIVE, so users can subscribe to you MailCimp mailing lists.
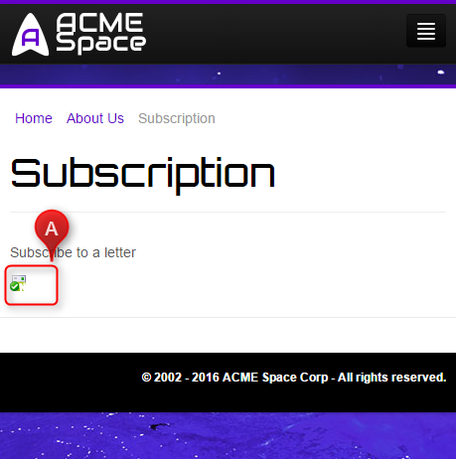
On a screenshot you can see default design of MailCiimp Subscription Component in "Unsubscribed" mode. After user subscription conformation it will be changed.
Click on a MailCiimp Subscription Component in "Subscribed" mode will unsubscribe current user.
