Configuring main Digital Experience Manager features
1 Configuration files
Digital Experience Manager features can be configured in various files. Nevertheless, the main configuration options are gathered in the jahia.properties and jahia.node.properties files. The latter one is responsible only for clustering settings. Since Digital Experience Manager 7.0.0.2 the runtime data and configuration files are located outside the Web application for better maintainability and customization.
1.1 Main configuration files
The content of the digital-factory-config folder (or the one, which you’ve chosen as a target for configuration location during Digital Experience Manager installation) is as follows:
digital-factory-config
`-- jahia
    |-- applicationcontext-custom.xml
    |-- jahia.properties
    |-- jahia.node.properties
    `-- license.xml
Where:
applicationcontext-custom.xml- is a Spring bean definition file (empty by default), where custom bean definitions could be placed or the Digital Experience Manager once can be overridden (a bean definition is overridden by its bean ID).jahia.properties– main configuration file, which allows customization of most of Digital Experience Manager features and services.jahia.node.properties– configuration file for the clustering optionslicense.xml– is a file with your current Digital Experience Manager license
1.2 Technical details
Technically, the digital-factory-config folder is made available to the Digital Experience Manager via class path, either by adding the path location to some application server specific files or by creating a JAR file with the content of the digital-factory-config folder and deploying it to your application server. In effect the content is available for the application using the classpath lookup like:
getClass().getResource("/jahia/jahia.properties")
or in a Spring framework resource lookup format as:
classpath*:jahia/jahia.properties
2 Personalizing URLs
2.1 URL Rewriting
Please refer to the URL rewriting section in the Developers TechWiki for more information: http://www.jahia.com/get-started/for-developers/developers-techwiki/urls-management/url-rewriting
2.2 Removing jsessionid from URLs
Digital Experience Manager requires that the user’s session is correctly handled. Usually, applications use cookies to track the session. If cookies are not available on the client or the client connects for the first time, the application server adds a parameter in all links to handle session tracking. This parameter can create issues when indexing links by search engines. Digital Experience Manager can automatically remove it from all links. This feature can be enabled in the jahia.properties file:
# Disable the jsessionid parameter added by application server to track session when no cookie is present
disableJsessionIdParameter = true
By default, the session ID parameter removal is enabled, and it won’t appear in links. If you need to support browsers which do not handle cookies, you can disable this feature.
2.3 Changing context and port number
2.3.1 During the installation
Changing the Digital Experience Manager Web application context path (the default one is ROOT) as well as default Apache Tomcat port numbers – in case Tomcat pack is selected – is possible during the installation via Installer UI, by choosing and completing the “Custom install” option at the beginning. See the “3.2.3.3.1 Apache Tomcat configuration” and “3.2.3.3.2 Web application settings” sections for more details.
2.3.2 After the installation
Once you have installed Digital Experience Manager, you will still be able to change those values if required. To change the port, you just need to configure it at application server level. Please refer to your application server documentation. If you need to change the context path, you will need to redeploy your Jahia application using this new context path. Refer to your application server documentation if you need some additional information about how to do this.
2.3.3 Permanent move for vanity URLs
In Digital Experience Manager, you can define SEO friendly vanity URLs. There can be more than one URL for the same resource, whereas only one can be set as the default one. With the permanentMoveForVanityURL setting in the jahia.properties configuration file you can control access with a non-default vanity URL. Digital Experience Manager should inform the client that the resource has permanently moved (HTTP status code 301). This is the default behavior. If you set the parameter to false, then Digital Experience Manager will serve the request without changing the URL to the new default one.
3 Caching
3.1 Introduction
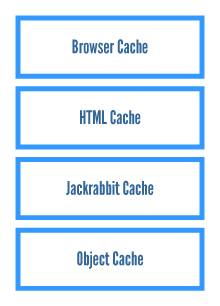
Caches are essential to high-performing web systems such as Digital Experience Manager to be able to avoid recreating dynamic content under large system loads. In the graph above, we can see the basic architecture of the cache sub-system. The main focus in Digital Experience Manager v7.2.0 lies on the Module Cache (HTML content output cache) which is using the Ehcache implementation. Digital Experience Manager uses multiple cache layers to optimize the performance of page delivery:
- the browser cache
- front-end HTML caches (skeleton/module cache)
- object caches
- content repository/database caches
Each of these cache layers plays a different role in making sure values are only computed once.
3.2 The browser cache layer
While not integrated in Digital Experience Manager, but in the browser, the browser cache plays a critical role in guaranteeing good performance for the end-user. For example, Digital Experience Manager’s usage of the GWT framework makes it possible for AJAX source code to be aggressively cached in the browser cache; therefore making sure we don’t reload script code that has not changed. Digital Experience Manager also properly manages the browser cache to make sure it does not cache page content that has changed. It also controls expiration times for cached content, so that the browser does not request content that is rarely changed.
3.3 The front-end HTML cache layer
Historically, Jahia has had many front-end HTML cache layer implementations. The first was the full-page HTML cache. While very efficient when a page was already available in the cache, it did not degrade very well for pages that had a fragment of the HTML that changed from page to page, or from user to user (for example, displaying the user name on the page). Digital Experience Manager v6.5 changed that and it combines the sheer efficiency of the embedded full-page cache with the fragment handling of a page. This new cache implementation is called the “Module Cache” (previously Container Cache) and integrates fragment caching at a module level, making the interaction with templates very natural. Template developers usually do not have to add any markup in order to have their fragments correctly cached. Even when they need to control the fragment generation, this is much easier to do than in previous versions of Digital Experience Manager.
The HTML code of each module is aggregated on runtime to render the page for the end user. For each module, we try to maximize its sharing by building complex keys, considering several parameters like roles/templates/etc. That way we can share this rendering with a maximum number of other users that have the same rights.
We also detect cases where more than one parallel request tries to obtain the same fragment, which is not yet cached. In such cases, to not waste resources we let just one request do the work and make the other request(s) wait for it. If rendering the module takes too long, the waiting request gets cancelled with an exception saying “Module generation takes too long due to module not generated fast enough (>10000 ms)”. As such errors should be taken seriously see chapter “7.3 How to handle module generation timeouts?” for hints how to solve such issues.
3.4 Object caches
The next layer below the front-end HTML cache sub-systems are the object caches. This layer handles all Digital Experience Manager objects that represent sites, users, groups, etc. It serves as a layer on top of the content repository/database caches to avoid reconstructing objects for each model request. This is all handled internally by Digital Experience Manager and it is only important to interact with these caches if integrators are directly calling Digital Experience Manager’s API to perform object changes that do not automatically update the caches scheduling / batching.
3.5 Content repository caches
As we moved all content objects to the Java content repository, the object and database caches are used less than in previous Digital Experience Manager versions. Retrieving content objects from the JCR does not require as many additional caches as before. The content repository optimizes the performance with some internal caches. See section “5.10 Increasing bundleCacheSize” for how to tune the content repository bundle caches for optimized performance.
3.6 Ehcache configuration
A new section “5.3 Cache configuration” has been added.
4 Clustering
4.1 Introduction
Deploying Digital Experience Manager in a cluster is a very powerful way of distributing CPU and memory load to handle larger traffic sites.
A typical Digital Experience Manager cluster installation is illustrated in the graph below.
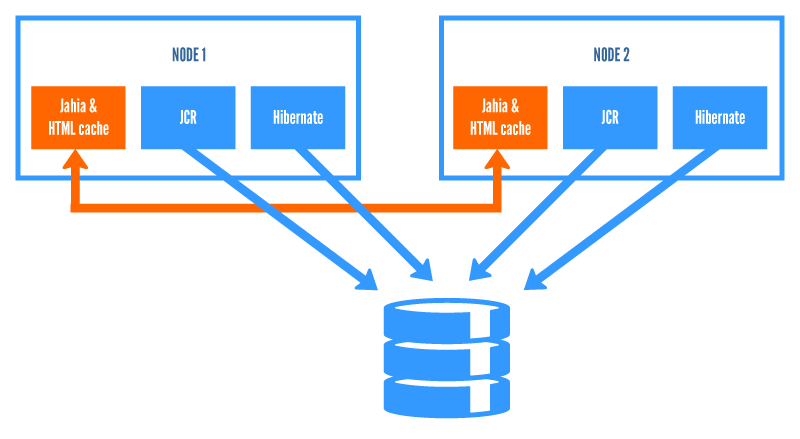
All Digital Experience Manager nodes, belonging to the same cluster, share the same database schema to have a common data storage.
Digital Experience Manager v7.2.0 is largely based on Apache Jackrabbit and thus relies on its clustering capabilities and configuration. See http://wiki.apache.org/jackrabbit/Clustering for more details. In Digital Experience Manager uses Jackrabbit’s DataStore (see http://wiki.apache.org/jackrabbit/DataStore for more details of how it works). This way it is now possible and recommended to store large files on a shared file-system, while storing everything in the database is still an option.
Indexes in Jackrabbit have to be local to each cluster node and cannot be shared.
For Jackrabbit, every change made by one cluster node is reported in a journal (database table). Cluster nodes read the journal and update their state at a configurable synchronization interval.
Ehcache is another component, which needs communication between nodes. We are using JGroups as a communication channel, by default.
Since DX 7.2, there is one more cluster communication channel (using Hazelcast) which is part of the clustered module deployment feature.
4.1.1 BROWSING nodes
“Browsing” nodes are specialized Digital Experience Manager nodes that only serve as content publishing nodes. They also interact with portlets to render pages. Using this node specialization allows to separate the browsing load from authoring and background processing loads.
4.1.2 AUTHORING nodes
Digital Experience Manager “authoring” nodes are cluster nodes that can be used to either browse or edit Digital Experience Manager content. This is the most common usage of Digital Experience Manager nodes, and therefore it is interesting to have multiple instances of these nodes to distribute the load.
4.1.3 PROCESSING node
In Digital Experience Manager, long-running tasks such as workflow validation operations, copy and pasting, content import and indexing are executed as background tasks, which can be resource intensive. This way, while these long operations are executed, other nodes are still able to process content browsing and editing requests.
There can be only one processing node in Digital Experience Manager cluster.
4.2 Configuration
It is essential that when binary data is stored on a file system (the default and preferred option), all cluster nodes should point to the same shared directory to store binary data in a common file data store. During installation of a cluster node you will be asked to enter the “Path to Data Store files” (on the step for configuring database: see section “3.2.3.2 Database”).
To install your Digital Experience Manager cluster, you will have to install your cluster nodes one after the other.
- For the first one, proceed as if you were installing a standalone Digital Experience Manager, excepted that you need to specify that you are installing a cluster at the “Operating mode” step. If you have chosen to use the bundled Tomcat as application server, do not start it at the end of the wizard.
- For the other nodes, execute the wizard again, connecting to same database. This time just specify that the schema does not have to be created (uncheck “Create required database tables” checkbox). On the screen where you configure your cluster, take care to define a new server ID or keep <auto> for an auto-generated value. If you have already set a node to be the processing server, uncheck the option as only one node can have this role in your cluster.
The cluster configuration is by default located in the digital-factory-config/jahia/jahia.node.properties file under:
######################################################################
### Cluster settings ################################################
######################################################################
Note, please, that with the Digital Experience Manager v7.2.0 there is no longer needed to configure a fixed list of IP addresses of all cluster nodes. We switched to a DB-based member discovery mechanism (all Digital Experience Manager cluster nodes share the same DB schema) to make the configuration much simpler.
4.3 Sharing webapps
Web applications need to support clustering on their own to be able to fully work in a clustered Digital Experience Manager environment.
You have to deploy the webapp on each node of the Digital Experience Manager cluster. If this webapp stores some data, you will have to ensure that each instance of your webapp shares the same data, and do not duplicate it, otherwise you may encounter some functional issues. Refer to your webapp documentation to perform this.
4.4 Sticky sessions
If you are using a hardware or software load balancer in front of Digital Experience Manager to handle the distribution of load among all Digital Experience Manager nodes in the cluster, you will need to activate "sticky sessions" on your application server and the load balancer. This is required to force an open session to make all requests on the same server for the time of the session.
On Tomcat, this is done by adding a unique jvmRoute attribute in the server.xml file:
<Engine name="Catalina" defaultHost="localhost" jvmRoute="jvm1">
where jvm1 is the name of the worker as declared in the load-balancer. The jvmRoute attribute value can be specified during the installation of Digital Experience Manager instance on the screen with cluster configuration settings (="Server ID of this node"). You can also see the reference guide for the configuration of the load balancer on the Apache web site: http://tomcat.apache.org/connectors-doc/reference/workers.html.
4.5 Starting up
The first time the cluster is started, the processing server must be started first and standalone. Once the initialization process is completely finished, you can start the other cluster nodes.
4.6 Distributed sessions and failover support
For authenticated users, the Digital Experience Manager stores data in the HTTP session. By default, this data is stored in memory of the server, where requests of a session are routed to. When the server is shut down, all this session data disappears and the user will have to login again and eventually re-do steps. For higher availability and up-time we recommend storing the session data in an external system, so that sessions survive a stopped server and that other servers can continue working on user requests, which were previously served from the stopped server. This way the user will not even perceive that there was a problem and will not get unsatisfied. From Digital Experience Manager v7.1.2 onwards you can deploy the distributed-sessions module, which in its first version offers the ability to store session data in Redis. As the module’s session manager is based on Spring Session more technologies may get added in future. So, for now you first need to install and run Redis 2.8+ (http://redis.io/download). Then download and install the distributed-sessions module from our AppStore. You need to make the following configuration changes on all Digital Experience Manager cluster nodes. In WEB-INF/web.xml of the DX web-application add the following two filter definitions:
<filter>
    <filter-name>springSessionRepositoryFilter</filter-name>
    <filter-class>org.jahia.bin.filters.ModuleDelegatingFilterProxy</filter-class>
    <async-supported>true</async-supported>
</filter>
<filter>
    <filter-name>httpSessionSynchronizerFilter</filter-name>
    <filter-class>org.jahia.bin.filters.ModuleDelegatingFilterProxy</filter-class>
    <async-supported>true</async-supported>
</filter>
Lower in the same file you need to add filter-mapping elements, which must be placed rightafter the first filter-mapping element for CharacterEncodingFilter:
<filter-mapping>
    <filter-name>springSessionRepositoryFilter</filter-name>
    <url-pattern>/*</url-pattern>
</filter-mapping>
<filter-mapping>
    <filter-name>httpSessionSynchronizerFilter</filter-name>
    <url-pattern>/*</url-pattern>
</filter-mapping>
It is also important that in digital-factory-config/jahia/jahia.properties the setting for jahiaGeneratedResourcesDiskPath needs to be uncommented and should point to a shared network folder, which is accessed by all cluster nodes:
jahiaGeneratedResourcesDiskPath=${jahia.data.dir}/generated-resources/
To configure the session manager with the connection to Redis, the cookie and jvmRoute settings (the settings from Tomcat’s server.xml are not detected) you need to add the following parameters to digital-factory-config/jahia/jahia.node.properties (adapt them to your environment):
jahia.session.redis.host = localhost
jahia.session.redis.port = 6379
jahia.session.redis.database = 0
jahia.session.redis.timeout = 2000
jahia.session.cookieName = JSESSIONID
jahia.session.cookiePath = /
jahia.session.cookieMaxAge = -1
jahia.session.useHttpOnlyCookie = true
jahia.session.jvmRoute = node1
You do not need to set the jvmRoute (which will be appended to the session cookie name) if your load balancer does not use that cookie to ensure sticky sessions, but sets an own routing cookie. Like mentioned in section 4.4 Sticky sessions it is required in Digital Experience Manager to have sticky sessions configured. Only for live mode, when the content is just read-only, sticky sessions are not mandatory. The reason is that writes to the content repository can take up to around 5 seconds to get synchronized to other cluster nodes. So to make an immediate subsequent read request see the current update, the read request needs to be served by the same server as the write request, which is ensured with sticky sessions. For some actions in administration or our tools section, we recommend bypassing the load balancer, especially for
- module or portlet deployment/activation
- site import (for site import in Digital Experience Manager we do not provide failover support)
- obtaining the status of certain cluster nodes.
Another limitation is that Atmosphere websockets cannot be used together with our module based on Spring Session. Notice that for now we have tested and support the distributed-sessions module just with Tomcat. Also, before you start using the feature you need to first thoroughly test it with your application in a test environment. You need to make sure that all the custom objects you write to the HTTP session are serializable. The objects should also not be too huge in size, because the HTTPSession object now is created and deserialized on each single request (so there no longer is a HTTPSession object, which exists for the whole session lifetime). Therefore, you should also not store references to HTTPSession objects, because these just show the parameters at the time, when the session object instance was created to serve that specific request. This instance will afterwards not see changes whenever session objects are added or removed. You should also not update a mutable object held in session from some custom background thread, which does not pass through the servlet filter to write back session object changes to the external store. You should also check that your custom processing does not rely on storing or reading data on a resource, which is just available from one cluster node, because after failover to a different server node this resource will not be available.
4.7 Adding new node to the cluster
Adding a new node to an existing cluster is done by copying an existing node (usually a browsing one) and adjusting the configuration appropriately.
Follow the steps below to perform this procedure:
- Stop the DX cluster node which you will copied.
- Copy the complete DX installation folder (including the Apache Tomcat, if you use it), configuration (digital-factory-config) and data (digital-factory-data) folders (including repository indexes) to the new location.
- Adjust the node clustering configuration in the file
digital-factory-config/jahia/jahia.node.properties:cluster.node.serverId- each cluster node should have a unique ID- bind address (if not empty) and port numbers for clustered communication
- verify the value of
processingServerflag (there can be only one node in the cluster, where this flag is set to true)
- Adjust any absolute paths, if needed, in
digital-factory-config/jahia/jahia.propertiesas well as in your own configuration files. - If the copied node is located on the same server, you will need to adjust the port numbers (
jahia.node.properties,jahia.propertiesand Tomcat, if used) in a way, that they do not conflict. - Start your new DX node and verify the log file of the server for correct startup.
- Verify (using Jahia Tools / Cluster view page) that the new node has correctly joined the cluster. The discovery can take up to some minutes.
You are done with adding a new DX cluster node.
5 LDAP
LDAP is an application protocol for querying and modifying directory services running over TCP/IP. Digital Experience Manager has default connectors to retrieve users/groups from an LDAP server. Digital Experience Manager supports most LDAP servers right out of the box, including OpenLDAP and ActiveDirectory. It is most commonly used with SSO technologies to provide a seamless experience to end-users. The LDAP configuration is deployed as an OSGi configuration, bound to the “Jahia LDAP connection (ldap)” module bundle, available in the Digital Experience Manager 7.2.0 Enterprise Distribution. The LDAP user and group providers can be configured during the Installation Wizard by activating “Configure an LDAP user/group provider” option and providing your LDAP server specific parameters. After the installation, an LDAP user/group provider can be configured using the administration UI under Server settings / Users and Roles / User and group providers. Please visit the following documentation for more details: https://www.jahia.com/community/extend/developers-techwiki/users-and-groups/ldap-connector-71
6 Authentication
6.1 Single Sign-On: CAS
The Central Authentication Service (CAS) is a single sign-on protocol for the web. Its purpose is to permit a user to access multiple applications while providing their credentials (such as user id and password) only once.
When the client visits Digital Experience Manager and wants to authenticate, Digital Experience Manager redirects the user to the CAS server. CAS validates the client's authenticity, usually by checking a username and password against a database (such as LDAP or Active Directory).
If the authentication succeeds, CAS returns the client to Digital Experience Manager, passing along a security ticket. Digital Experience Manager then validates the ticket by contacting CAS over a secure connection and providing its own service identifier and the ticket. CAS then gives the application trusted information about whether a specific user has successfully authenticated.
Digital Experience Manager uses Jasig CAS 3.1 Java client, which adds support for CAS 2.0 specification features (http://www.jasig.org/cas/protocol), like multi-tier proxy authentication etc.
The following section gives an overview of configuration options.
6.1.1 Digital Experience Manager side
Step 1 - The first file to configure is:
<digital-factory-config>\jahia\jahia.properties
Here the values that you would want to change are:
######################################################################
### CAS Authentication config ########################################
######################################################################
# Enable CAS authentication valve
auth.cas.enabled = false
# URL prefix of the CAS server
auth.cas.serverUrlPrefix = https://localhost:8443/cas
# Redirect URL to the CAS server for login
auth.cas.loginUrl = ${auth.cas.serverUrlPrefix}/login
# Logout URL to invalidate the user session on the CAS server
auth.cas.logoutUrl = ${auth.cas.serverUrlPrefix}/logout
Please note, the CAS server should be accessed using HTTPS protocol. See “4.6.1.2 Configuring ticket validator” section for advanced configuration. Step 2 - Add the login link in a Digital Experience Manager view: In the Studio mode, you can use the “Login” component to place a link for the login page into your template. Alternatively, in your template code you can use the following expression to have a proper link (considering CAS server login page):
<%@ taglib prefix="c" uri="http://java.sun.com/jsp/jstl/core" %>
<a href="<c:url value='${url.login}'/>">Log in</a>
To add only a logout URL, you can use:
<%@ taglib prefix="c" uri="http://java.sun.com/jsp/jstl/core" %>
<a href="<c:url value='${url.logout}'/>">Log out</a>
The page https://wiki.jasig.org/ contains some information to configure your CAS server. The following “How-To” can be also helpful: http://jira.jahia.org/browse/JKB-22. A good architecture would separate the CAS server from the other application servers.
6.1.2 Configuring ticket validator
By default, Digital Experience Manager uses the org.jasig.cas.client.validation.Cas20ServiceTicketValidator implementation for ticket validation, which validates Service Tickets in compliance with the CAS 2 (using /serviceValidate service endpoint). The validator implementation is pluggable and can be replaced with e.g. the org.jasig.cas.client.validation.Cas20ProxyTicketValidator one (/proxyValidate endpoint), which also supports ticket validation using configured list of proxies. To override the default implementation the following configuration option should be added into jahia.properties file with the ID of the Spring bean, representing the validator (implementation of the org.jasig.cas.client.validation.TicketValidator interface), for example:
auth.cas.ticketValidator=Cas20ProxyTicketValidator
And the corresponding bean can be defined in a Spring file, e.g. <digital-factory-config>\jahia\applicationcontext-custom.xml as follows:
<bean id="Cas20ProxyTicketValidator" class="org.jasig.cas.client.validation.Cas20ProxyTicketValidator" scope="prototype">
    <constructor-arg index="0" value="${auth.cas.serverUrlPrefix}" />
    <property name="acceptAnyProxy" value="true"/>
    <property name="allowedProxyChains">
        <value>
            http://proxy1 http://proxy2
            http://proxy3 http://proxy4
        </value>
    </property>
</bean>
The bean defines a list of proxy chains and can accept other supported parameters, like renew, encoding, proxyCallbackUrl, proxyGrantingTicketStorage, etc.
6.1.3 Troubleshooting
If you have errors of the form:
org.jahia.exceptions.JahiaException: User message=Cannot validate CAS credentials, System message=Cannot validate CAS credentials, root
It is most probably due to your SSL certificate, and that the JVM that runs the Jahia does not recognize it. Refer to https://wiki.jasig.org/display/CAS/Solving+SSL+issues for more details.
6.2 SSO with Kerberos
Digital Experience Manager is able to plug-in different authentication policies via HTTP filters and a pipeline of authentication valves. Some filters and valves are provided and can be activated by configuration, like NTLM or the integration of a CAS (Central Authentication Service) server. We also provide a filter and valve for integration with SPNEGO (Simple and Protected GSSAPI Negotiation Mechanism) to negotiate with the client and use either Kerberos or NTLM as a fallback. This way a non-interactive login is possible, which takes the user logged in to the operating system running the browser. Such a secure solution is especially interesting for intranets running with Windows servers. This document describes how to configure such an environment.
6.2.1 Prerequisites
If using Windows Server 2008, then at least Service Pack 2 needs to be installed (otherwise only simple Kerberos user logons, e.g. via CAS, work, but checks against a Service Principle Name, SPN, will not work, as this one contains slashes, see Microsoft KB article: 951191). For this guide, we assume that you are using the Windows Active Directory server. If you want to use Kerberos, then all clients and servers need to be joined in the same AD domain. If this requirement is not met, then SPNEGO will fall back to NTLM. It should also be possible to use other directory servers supporting Kerberos and you can take this guide to get some useful information also relevant for alternative environments. In the guide, all terms in angle brackets <> should be replaced by terms fitting your environment or your choice. Notice also that realm names are case-sensitive and recommended to be used in UPPER CASE. Also with Kerberos you will not be able to use IP addresses or localhost but rather you will have to use the server name (DNS must be properly set up).
6.2.2 Set up the Active Directory
A Service Principal Name (SPN) account needs to be created for the Jahia server. Note that this account can't be used to log in. 1. Start the Active Directory User and Computers from the Administration Tools menu. 2. Right click on the Users repository and select New > User. 3. Enter the user information (by example <your-spn-account> for user login), press Next. 4. Enter the <password> and select Password never expires, click on Next and then on Finish. Now in Windows server 2008 there is an extra step, which is not required in Windows server 2003: In a console enter the command:
setspn -a http/<your.jahia.server.name><your-spn-account>
6.2.3 Create the Keytab file
The Keytab file enables a trust link between the Digital Experience Manager server and the Key Distribution Center (KDC). This file contains a cryptographic key. The ktpass tool, which comes from the Windows Resource Kit (http://go.microsoft.com/fwlink/?LinkId=62270), is used to generate this file (in Windows Server 2008 the tool is already part of the product). In a console, enter the command:
ktpass.exe /out <your-spn-account>.keytab /princ host/<your.jahia.server.name>@<YOUR.AD.REALM> /pass * /mapuser <your-spn-account> /ptype {krb5_nt_principal} /crypto {rc4-hmac-nt}
This command will generate the <your-spn-account>.keytab file, which has to be copied to a secret place on the Jahia server, which only the Jahia server application can read.
6.2.4 Create Kerberos configuration file (krb5.conf)
On the Digital Experience Manager server create the Kerberos configuration file (krb5.conf) and place it somewhere on the Digital Experience Manager server. In the startup script of the Digital Experience Manager server you need to add the following parameter to pick up this file:
set JAVA_OPTS=%JAVA_OPTS% -Djava.security.krb5.conf=<path>\krb5.conf
Here is an example: <YOUR.REALM> is the same as the domain in caps. With evolving versions, you may, for instance, have to change the enctypes settings.
[libdefaults]
ticket_lifetime = 24000
default_realm = <YOUR.REALM>
default_tkt_enctypes = rc4-hmac des3-cbc-sha1 des-cbc-md5 des-cbc-crc
default_tgs_enctypes = rc4-hmac des3-cbc-sha1 des-cbc-md5 des-cbc-crc
permitted_enctypes = rc4-hmac des3-cbc-sha1 des-cbc-md5 des-cbc-crc
[realms]
<YOUR.REALM> = {
kdc = <hostname.of.your.kdc>.<your.domain>
}
[domain_realm]
.<your.domain> = <YOUR.REALM>
<your.domain> = <YOUR.REALM>
[logging]
kdc = FILE:/var/log/krb5kdc.log
admin_server = FILE:/var/log/kadmin.log
default = FILE:/var/log/krb5lib.log
6.2.5 Create JAAS login configuration file (jaas-login.conf)
On the Digital Experience Manager server create the JAAS login configuration file (jaas-login.conf) and place it in a secret place accessible for the Digital Experience Manager server only. In the startup script of the Digital Experience Manager server you need to add the following parameter to pick up this file:
set JAVA_OPTS=%JAVA_OPTS% -Djava.security.auth.login.config=<path>\jaas-login.conf
set JAVA_OPTS=%JAVA_OPTS% -Djavax.security.auth.useSubjectCredsOnly=false
Here is an example of the content:
com.sun.security.jgss.accept {
    com.sun.security.auth.module.Krb5LoginModule
    required
    storeKey=true
    keyTab="<path>/<your-spn-account>.keytab"
    doNotPrompt=true
    useKeyTab=true
    principal="HTTP/<your.jahia.server.name>@<YOUR.REALM>"
    isInitiator=false
    debug=false;
};
6.2.6 Test the SPN account
As it is quite easy to make mistakes in the Kerberos configuration, you should test your configuration with the tools provided by Java, before starting Digital Experience Manager. In order to have those tests work, you have to copy your krb5.conf file in your windows system directory and rename it krb5.ini (most often c:\windows\krb5.ini) Verify that you are able to read the keytab file:
%JAVA_HOME%/bin/klist -k FILE:<path>/<your-spn-account>.keytab
and
%JAVA_HOME%/bin/kinit -k -t FILE:<path>/<your-spn-account>.keytab HTTP/<your.jahia.server.name>@<YOUR.REALM>
%JAVA_HOME%/bin/klist
6.2.7 Set up the browser
6.2.7.1 Internet Explorer (min 5.0.1)
1. In Internet Explorer, click Internet Options on the Tools menu. 2. Click on the Advanced tab, click to select the Enable Integrated Windows Authentication (requires restart) check box in the Security section, and then click OK. 3. Click on the Security tab, click to select Local Intranet, then click on Sites, lastly click on Advanced. 4. Enter https://<your.jahia.server.name> and validate it by clicking on Add and OK. 5. Restart Internet Explorer.
6.2.7.2 Firefox (min 0.9)
1. In Firefox, enter about:config as the URL and click on Go. 2. On the line network.negotiate-auth.trusted-uris, right-click on Modify and enter https://<your.jahia.server.name>
6.2.8 Activate the SPNEGO HTTP filter and authentication valve in Digital Experience Manager
Kerberos authentication in Digital Experience Manager 7.2.0 is only supported with Enterprise Distribution. To activate it, you need to set the auth.spnego.enabled property in jahia.properties to true and restart the server.
6.2.9 Activate the SPNEGO filter for specific subnets only
This feature is supported since DX version 7.1.2.0. To activate SPNEGO filter for specific subnets only, you need to specify these subnets via the auth.spnego.onlyForSubnets property in jahia.properties. Please note that the desired subnets have to be declared using the CIDR notation. Activating the SPNEGO filter only for some subnets still allows guest users from other IPs to access the website. CIDR notation is a compact representation of an IP address and its associated routing prefix. The notation is constructed from an IP address, a slash ('/') character, and a decimal number. The number is the count of leading 1 bits in the routing mask, traditionally called the network mask. The IP address is expressed according to the standards of IPv4 or IPv6. As example: 192.168.100.14/24 represents the IPv4 address 192.168.100.14 and its associated routing prefix 192.168.100.0, or equivalently, its subnet mask 255.255.255.0, which has 24 leading 1-bits.
| CIDR | Host bits | Subnet mask | Addresses in subnet | Typical usage |
|---|---|---|---|---|
| /8 | 24 | 255.0.0.0 | 16777216 = 224 | |
| /9 | 23 | 255.128.0.0 | 8388608 = 223 | |
| /10 | 22 | 255.192.0.0 | 4194304 = 222 | |
| /11 | 21 | 255.224.0.0 | 2097152 = 221 | |
| /12 | 20 | 255.240.0.0 | 1048576 = 220 | |
| /13 | 19 | 255.248.0.0 | 524288 = 219 | |
| /14 | 18 | 255.252.0.0 | 262144 = 218 | |
| /15 | 17 | 255.254.0.0 | 131072 = 217 | |
| /16 | 16 | 255.255.0.0 | 65536 = 216 | |
| /17 | 15 | 255.255.128.0 | 32768 = 215 | ISP / large business |
| /18 | 14 | 255.255.192.0 | 16384 = 214 | ISP / large business |
| /19 | 13 | 255.255.224.0 | 8192 = 213 | ISP / large business |
| /20 | 12 | 255.255.240.0 | 4096 = 212 | Small ISP / large business |
| /21 | 11 | 255.255.248.0 | 2048 = 211 | Small ISP / large business |
| /22 | 10 | 255.255.252.0 | 1024 = 210 | |
| /23 | 9 | 255.255.254.0 | 512 = 29 | |
| /24 | 8 | 255.255.255.0 | 256 = 28 | Large LAN |
| /25 | 7 | 255.255.255.128 | 128 = 27 | Large LAN |
| /26 | 6 | 255.255.255.192 | 64 = 26 | Small LAN |
| /27 | 5 | 255.255.255.224 | 32 = 25 | Small LAN |
| /28 | 4 | 255.255.255.240 | 16 = 24 | Small LAN |
| /29 | 3 | 255.255.255.248 | 8 = 23 | Smallest multi-host network |
| /30 | 2 | 255.255.255.252 | 4 = 22 | "Glue network" (point to point links) |
| /31 | 1 | 255.255.255.254 | 2 = 21 | Point to point links (RFC 3021) |
| /32 | 0 | 255.255.255.255 | 1 = 20 | Host route |
6.2.10 Related links
Here are some links for further reading and troubleshooting:
| Title | URL |
| Kerberos with Java Troubleshooting | http://java.sun.com/j2se/1.5.0/docs/guide/security/jgss/tutorials/Troubleshooting.html |
| Advanced Security Programming in Java SE ... Single Sign-On | http://java.sun.com/javase/6/docs/technotes/guides/security/jgss/lab/ |
| Kerberos Authentication problems – Service Principal Name (SPN) issues | http://blogs.technet.com/b/askds/archive/2008/05/29/kerberos-authentication-problems-service-principal-name-spn-issues-part-1.aspx |
| Setting up CAS with SPNEGO Authentication Handler | https://wiki.jasig.org/display/CASUM/SPNEGO |
6.2.11 Tips and Tricks
First of all, we recommend you to take a look at http://blogs.technet.com/b/askds/archive/2008/03/06/kerberos-for-the-busy-admin.aspx for information about how Kerberos works.
This Article shows how to resolve common errors
6.2.11.1 ERROR [ErrorLoggingFilter] - Unexpected exception occurred
ERROR [SpnegoParser] - Failed to parse: 32
INFO [SpnegoParser] - [0,APPLICATION_CONSTRUCTED_OBJECT,0x4e] Expected type identifier
INFO [SpnegoParser] - Expected length 84 mismatch against actual 30
INFO [SpnegoParser] - [2,OID,0x4c] Expected oid identifier
ERROR [ErrorLoggingFilter] - Unexpected exception occurred
java.lang.NullPointerException
This error means that the Kerberos authentication is not done on the client browser.
Resolution: Check your Kerberos configuration with klist and kinit tools. Look at http://support.microsoft.com/default.aspx?scid=kb;EN-US;262177 to activate Kerberos event logging.
6.2.11.2 KrbException: Clock skew too great (37)
This error occurs when there is more than 5 minutes between the Kerberos’ domain controller and the Digital Experience Manager server times.
Resolution: Check time and time zone.
7 Document converter
Digital Experience Manager Document Converter Service delegates conversion tasks to an OpenOffice/LibreOffice instance, either to a local one or a remote service. To use the converter service, you need OpenOffice/LibreOffice v3 or higher installed (the latest stable 4.x version is recommended). Further in this document, we refer to OpenOffice or LibreOffice as “OpenOffice” for the sake of simplicity.
In order to enable the service the following setting should be set to true in the jahia.properties file:
######################################################################
### Document Converter Service #######################################
######################################################################
# Set this to true to enable the document conversion service
documentConverter.enabled = true
7.1 LocalOpenOffice instance
The converter service is capable of creating an OpenOffice process and using it, in case Digital Experience Manager and OpenOffice are located on the same machine. In such case, the converter service starts a local instance of the OpenOffice service for processing conversion tasks. The configuration in this case is pretty simple: a service needs to be enabled (see above) and a path to the OpenOffice folder has to be provided in the jahia.properties file:
######################################################################
### Document Converter Service #######################################
######################################################################
# Set this to true to enable the document conversion service
documentConverter.enabled = false
# The filesystem path to the OpenOffice
# Usually for Linux it is: /usr/lib/openoffice
# for Windows: c:/Program Files (x86)/OpenOffice 4
# and for Mac OS X: /Applications/OpenOffice.org.app/Contents
documentConverter.officeHome = /usr/lib/openoffice
7.2 RemoteOpenOffice service
The converter service is capable of using an OpenOffice process started as a service on a local or remote machine. This connection is configured as given below in the snapshot of the applicationcontext-doc-converter.xml file:
<bean id="DocumentConverterService"
      class="org.jahia.services.transform.DocumentConverterService"
      init-method="start" destroy-method="stop">
    <property name="enabled" value="true"/>
    <property name="officeManagerBeanName" value="remoteOfficeManagerFactory"/>
</bean>
<bean name="remoteOfficeManagerFactory"
      class="org.jahia.services.transform.RemoteOfficeManagerFactory"
      lazy-init="true">
    <property name="host" value="192.168.1.101"/>
    <property name="portNumber" value="19001"/>
</bean>
OpenOffice in this case should be started as a service on the 192.168.1.101 machine. A sample command for starting OpenOffice as a service looks like:
soffice -headless -accept="socket,host=192.168.1.101,port=19001;urp;" -nofirststartwizard
More details can be found on the JODConverter Web Site (http://artofsolving.com/node/10), including the HowTo for:
- Creating an OpenOffice.org Service on Windows (http://artofsolving.com/node/11)
- Creating an OpenOffice.org Service on Unix-like systems (http://artofsolving.com/node/12).
8 Document viewer
Digital Experience Manager offers a built-in support for previewing various types of documents (PDF, Office, etc.) as a SWF flash using a player in a Web page. The direct conversion to flash is available for PDF documents only. To have a preview for non-PDF files (Microsoft Office, OpenOffice etc.) the document converter service (see section “4.7 Document converter” above) should be enabled to perform an intermediate conversion of documents to PDF files. The viewer service requires the pdf2swf utility (from SWFTools: http://www.swftools.org/) to be installed. The installation guidelines are available on the corresponding Wiki pages: http://wiki.swftools.org/wiki/Installation. The following two configuration parameters in digital-factory-config/jahia/jahia.properties file are responsible for enabling and configuring the document viewer service:
######################################################################
### Document Viewer Service ##########################################
######################################################################
# Viewer service enables previewing of documents of various formats
# (PDF, Office, etc.) as a SWF flash.
# The direct conversion to flash is available for PDF files only.
# In order for this service to work with non-PDF files a document
# converter service (see section above) should be enabled to perform
# an intermediate conversion of documents to PDF files.
# Set this to true to enable the document viewer service
jahia.dm.viewer.enabled = false
# Viewer service requires the pdf2swf utility (from SWFTools) to be installed
# The following specifies the path to the pdf2swf executable file
# Usually for Linux it is: /usr/bin/pdf2swf
# for Windows: C:/Program Files (x86)/SWFTools/pdf2swf.exe
# If the SWFTools installation folder is present in your PATH, you can
# specify only the executable name here
jahia.dm.viewer.pdf2swf = pdf2swf
The jahia.dm.viewer.pdf2swf parameter should contain an absolute path to the pdf2swf executable file or, in case the corresponding folder is included into the PATH environment variable, just the executable name, i.e. pdf2swf.
9 Document thumbnails
In Digital Experience Manager we are pleased to offer an out-of-the-box support for automatic creation of image thumbnails for uploaded documents that significantly improves the usability and user experience when working with Jahia Document Manager or document-related components.
The service is enabled by default for all PDF documents. A thumbnail is automatically created for the first page of an uploaded document.
To have thumbnails for non-PDF files (Microsoft Office, OpenOffice etc.) the document converter service (see section “4.7 Document converter” above) should be enabled to perform an intermediate conversion of documents to PDF files.
The following entry in the digital-factory-config/jahia/jahia.properties file is responsible for enabling/disabling the document thumbnails service:
######################################################################
### Document Thumbnails Service ######################################
######################################################################
# Document thumbnails service enables automatic creation of thumbnail
# images for uploaded documents.
# The direct creation of a thumbnail is available for PDF files only.
# In order for this service to work with non-PDF files a document
# converter service (see section above) should be enabled to perform
# an intermediate conversion of documents to PDF files.
# The following enables/disables the document thumbnails service
jahia.dm.thumbnails.enabled = true
10 Video thumbnails
For an improved media experience, Digital Experience Manager offers a possibility of automatic thumbnail generation for uploaded video files. The video thumbnails service requires the ffmpeg utility (http://ffmpeg.org/) to be installed. The following two configuration parameters in digital-factory-config/jahia/jahia.properties file control the service:
######################################################################
### Video Thumbnails Service ##########################################
######################################################################
# Video thumbnails service enables automatic creation of thumbnail images
# for uploaded video files.
# Set this to true to enable the video thumbnails service
jahia.dm.thumbnails.video.enabled = false
# Video thumbnails service requires the ffmpeg utility to be installed
# The following specifies the path to the ffmpeg executable file
# Usually for Linux it is: /usr/bin/ffmpeg
# for Windows, for example: C:/Program Files (x86)/ffmpeg-20120503-git-c1fe2db-win64-static/bin/ffmpeg.exe
# If the ffmpeg/bin folder is present in your PATH, you can
# specify only the executable name here
jahia.dm.thumbnails.video.ffmpeg = ffmpeg
The jahia.dm.thumbnails.video.ffmpeg parameter should contain an absolute path to the ffmpeg executable file or, in case the corresponding folder is included into the PATH environment variable, just the executable name, i.e. ffmpeg.
11 Image service
The Digital Experience Manager Image Service is here to manipulate images from Digital Experience Manager itself. For licensing reasons, the service is by default using a Java native API named ImageJ, but this is not a really powerful API nor really efficient. So, if you want to boost the quality of your thumbnails or the result of your other image manipulation operations, Digital Experience Manager allows you to define the path to your ImageMagick installation so that we can use it instead of the ImageJ API.
11.1 How-to Install ImageMagick?
Follow the instructions for your system on the Image Magick Binary Releases page: http://www.imagemagick.org/script/download.php Once ImageMagick is installed, modify your jahia.properties file to activate ImageMagick instead of the ImageJ API.
######################################################################
### Image conversion Service #########################################
######################################################################
# The image service to use
# Native java service : "ImageJImageService"
# Set to "ImageMagickImageService" to use ImageMagick. You'll then have to set
# theimageMagick path
imageService = ImageMagickImageService
# The path to image magick and exiftools
# For windows : C:\\Programs\\ImageMagick;C:\\Programs\\exiftool
imageMagickPath = /usr/bin:/usr/local/bin:/opt/local/bin
12 Error and thread dump directories
12.1 Error file dumper server
Digital Experience Manager’s error file dumper service is used to automatically create reports when an error occurs. The location of those files is by default: ${jahia.log.dir}/jahia-errors. In case the jahia.log.dir system property is not set explicitly or detected automatically by Digital Experience Manager (for Apache Tomcat and JBoss EAP / AS servers) the following location is used: ${java.io.tmpdir}/jahia-errors. Effectively, for Apache Tomcat this is by default under: <tomcat-home>/logs/jahia-errors. And for the JBoss EAP / AS: <jboss-home>/standalone/log/jahia-errors. It is possible to override the error folder location with a system property named jahia.error.dir, e.g. by adding -Djahia.error.dir=/var/logs/jahia/errors to the JVM options (CATALINA_OPTS for Apache Tomcat).
12.2 Thread dumps
Via a “System Health -> Memory and thread dumps” panel in Server settings or via Jahia Tools Area it is possible to perform single thread dumps as well as a series of thread dumps into a file. The location of those files is by default: ${jahia.log.dir}/jahia-threads. In case the jahia.log.dir system property is not set explicitly or detected automatically by Digital Experience Manager (for Apache Tomcat and JBoss EAP / AS servers) the following location is used: ${java.io.tmpdir}/jahia-threads. Effectively, for Apache Tomcat this is by default under: <tomcat-home>/logs/jahia-threads.
And for the JBoss EAP / AS: <jboss-home>/standalone/log/jahia-threads.
It is possible to override the error folder location with a system property named jahia.thread.dir, e.g. by adding -Djahia.thread.dir=/var/logs/jahia/threads to the JVM options (CATALINA_OPTS for Apache Tomcat).
13 OSGi SSH Console
In DX 7.2 we’ve dropped the Felix gogo shell (Telnet-based) and replaced it with more powerful, flexible and secure Apache Karaf SSH shell.
The SSH shell is enabled by default and listens, for the sake of security, by default only on host 127.0.0.1, i.e. on connections from localhost. The default port number is 8101.
The configuration of port number and host can be found in the digital-factory-config/jahia/jahia.properties:
######################################################################
### OSGi settings ####################################################
######################################################################
# The following setting is used to change the port which the
# Apache Karaf OSGi command line shell will listen to for SSH
# connections. Set it to a negative value to disable this feature
# entirely.
karaf.remoteShell.port = 8101
# The bind address for the SSH shell. '127.0.0.1' means the SSH shell
# will only allow local connections to be established. You may want to
# define here an dedicated IP address, the console will bind to, or
# a '0.0.0.0' which will mean it will be bound to all available
# network interfaces.
karaf.remoteShell.host = 127.0.0.1
The port number for the SSH console can also be configured during the DX installation wizard (in Advanced install mode). The SSH console requires a login and password, which are the same as the ones, configured for the DX administration tools (/tools).
14 UI configuration
14.1 Default theme selection
DX 7.2.2.0 comes with a new theme for its interface, called “jahia-anthracite”. This new theme is used on the new installations, but is deactivated when migrating from a previous DX version. In any case, the theme to be used can be configured in digital-factory-config/jahia/jahia.properties
######################################################################
### GWT THEME ACTIVATION #############################################
######################################################################
# Enable or disable new theme for GWT UI
#jahia.ui.theme = jahia-anthracite
In order to keep the “default” theme, used in the versions prior to DX 7.2.2.0, use jahia.ui.theme = default
The selected theme will be used by default for every users, but note that users can select the theme they want to use in their profile.
14.2 Drag and drop strategy
Starting from DX 7.2.2.0, it is possible to select a drag and drop strategy in the edit mode between 4 options:
######################################################################
### DRAG AND DROP CUSTOMIZATION #############################################
######################################################################
# this parameter change the drag behavior in edit mode
# - ENABLED (default): the entire content is draggable
# - NO_DRAG_IN_EDIT_AREA: dragging in the main panel is disabled, content can still be dropped from the side panel
# - DRAG_ZONE_IN_EDIT_AREA: a drag zone is displayed at the top left of the module. Only clicking in this drag zone
#   allows to drag the content
# - DISABLED: all the drag and drop is disabled
#jahia.ui.dragAndDrop = ENABLED
The “ENABLED” option is the default one, and is the strategy used in the previous DX versions.
14.3 Automatic refresh of the left panel
Consecutive publications can lead to a “constant” refresh of the left panel in the edit mode, which can make it unusable. It is possible to deactivate this automatic refresh by adding the property jahia.ui.refreshOnExternalModification in digital-factory-config/jahia/jahia.properties and by setting it to false. In such case, when a publication occurs, a notification in the bottom of the screen is displayed and the refresh icon of the left panel changes color. This setting is advised for environments with lots of publication.
By default jahia.ui.refreshOnExternalModification is set to true, so there is an automatic refresh after every publication.
14.4 Automatically mark new content as "Work in progress"
It is possible to automatically mark a content as "Work in progress" when it is being created by using the following property:
wip.checkbox.checked = true
The behavior depends if the site is available in one or several languages:
- One language: the checkbox "Save as work in progress" is automatically selected when creating the new content
- Several languages: the option "All content" is automatically selected when creating the new content
14.5 Hide "Unpublish" option when node is not published in current language
Property introduced with DX 7.2.3.2:
By default, if a node does not have a translation node (meaning it has never been translated) in a given language, then the "Unpublish" option is never displayed.
However, if a content item which contains non-internationalized properties has been published in one language, then this content node and its non-internatinalized properties are still live for all the languages. In such case, the default behavior is to show the "Unpublish" option in all the languages, even if the content item as never been published in that language. This default behavior can be changed, in order to hide the "Unpublish" option in that case, by setting the property useFullPublicationInfoInMainAreaModules to true.
15 jQuery version
Starting with DX 7.2.3.1, it is possible to choose the jQuery version to use between 1.12.4 and 3.3.1 . The version 3.3.1 is used by default on new installations. It is possible to switch to the version 1.x in digital-factory-config/jahia/jahia.properties:
######################################################################
### JQUERY CONFIGURATION #############################################
######################################################################
# JQuery version
# The version number will be used when using jquery in a page. The system will look for jquery-[version].min.js.
# JQuery module provides 1.12.4 and 3.3.1 , but other versions can be added in a separate module.
#jahia.jquery.version = 3.3.1
# JQuery mapping plugins
# This parameter can be used to include one or more JS files everytime jquery is called in a page
# JQuery-migrate can be added here : jahia.jquery.plugins = jquery-migrate-3.0.1.min.js
#jahia.jquery.plugins =
Please note that the following modules require jQuery 1.x to work:
- Jahia Private App Store
- Jahia Wiki
- Jahia Blog
- Jahia Job Offer
- Jahia Form Builder
- Portal