Adding and editing content
The edit engine is the name of the window used by the authors to create or edit their content items and set their behavior like permissions, taxonomy or SEO.
The edit engine is nearly the same whatever the type of content authors are editing. Some small differences can occur in one tab or another to match specifics of a given content type but the structure of the interface and main features remains the same. The tabs displayed depend on the type of content and on the role of the author.
The edit engine is displayed when creating a new content/page or when editing a content (right-click on the content/page then “Edit” or by double clicking on the content)

It is separated in three distincts parts.In the left side, you can find the name of the content being edited, the language switcher (if your site is available in several languages) and a list of available tabs. Each tab is described further in this document and achieve a specific goal. On the right side, you can find the form associated to the tab, in which you can fill the different fields of your content, or specify the different options/properties. The bottom bar allows you to choose to save the content as work in progress (so it can’t be part of a publication, more info here), to cancel your modifications or to save them.
When an author open the edit engine in order to modify a content, a lock is set on the content preventing other authors from contributing the content at the same time. The lock is released once the first author closes the edit engine.
The description of the different tabs is provided below.
1 Content
The edit engine always opens on this tab. It allows to change the value of the different fields that compose the content item, you could say the “actual content” of the item.
Every content or page share the same property “system name”: this property is used to identify a content/page among the contents created in the same area/content list, or pages created under the same parent page. It is advised to use a meaningful name during the content creation. If your content has a title property, then it is possible that a system name will automatically be suggested based on the title of the content. Uncheck “Automatically synchronize name with title” in order to manually edit this property.
Often, there will be no need to switch to a different tab.
Every property of the content is associated to a specific input field: text field, rich text field, checkbox, drop down list, dual list, date picker, reference picker and color picker.
Simply enter the desired values into the fields at your disposal. Once the entry is made, you can confirm by clicking the "Save" button at the bottom of the engine, or continue your editing in one of the other tabs available.
Unless you click on the “Save” button, changes are not taken into account by the system. You can switch from one tab to another without losing your changes, but if you close your browser, of if your session expires (usually after 30 mins of inactivity) or if you click "Cancel" no changes will be taken into account by Digital Experience Manager.
1.1 Special case when the site available in several languages
If your site is available in several languages, then the Content tab display some fields differently as if the site was available in only one language.
Your content can be composed of properties that are unique for all the languages, and “internationalized” properties with a different value per language. Such “internationalized” properties are identified by one icon and a button.
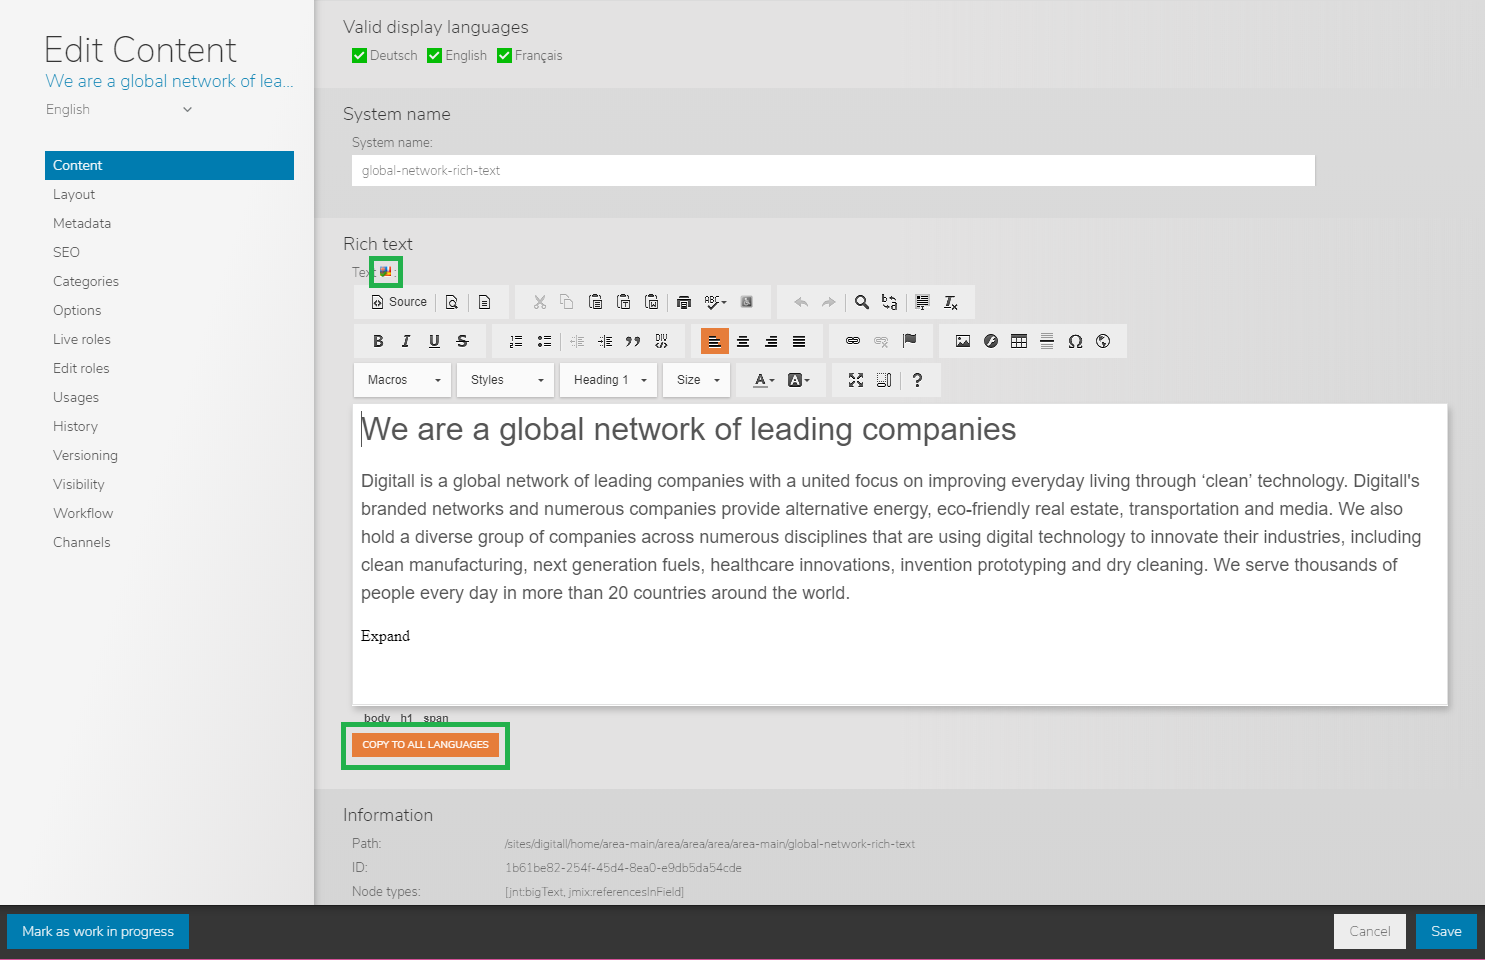
In order to fill these properties for every language, you will have to switch to the corresponding language in the language switcher, located above the tabs.
Copy to All Languages: This button copies the value of the field for all the other languages, overriding the other values. This button should be used with care, especially when updating a content.
The following section allows you to select for which languages the content will be displayed online:

By default all the languages are selected, which means that the content will be displayed online in all the languages. When unselecting a language, you will prevent the content to be visible online for that language.
Please consult the dedicated documentation regarding webprojects available in several languages.
1.2 Rich text field
A rich text field allows you to edit yourself the way the text of your will be displayed in the page, as compared to other properties. Depending on the type of content and on your role, the options available in the rich text editor (Digital Experience Manager embeds CKEditor) may differ. Most of the time the basic text edition operations are available: changing the style (title, text, etc.), the font, the color, the alignment, lists, etc.
- Add links
It is possible to easily add link when using the rich text editor by clicking on the “link” button.

A pop-up is then displayed to help you add your link:
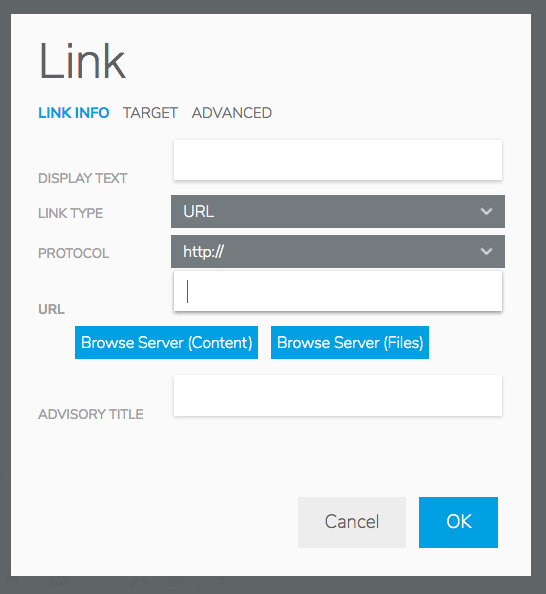
In the “Display text” field, just type the text of your link.
If you want to add a link to a page or content of your site, it is strongly advised to click on either “Browse Server (Content)” or “Browse Server (Files)” which will open a picker. This way, if the page or file is moved in the future, you will not have to manually update the link in your text.
For external links, just used the “http” field.
Other options are available in the “Target” and “Advanced” tabs.
- Add image
You may be able to add images in your text. To do so, click on the image button, which will display a popup:
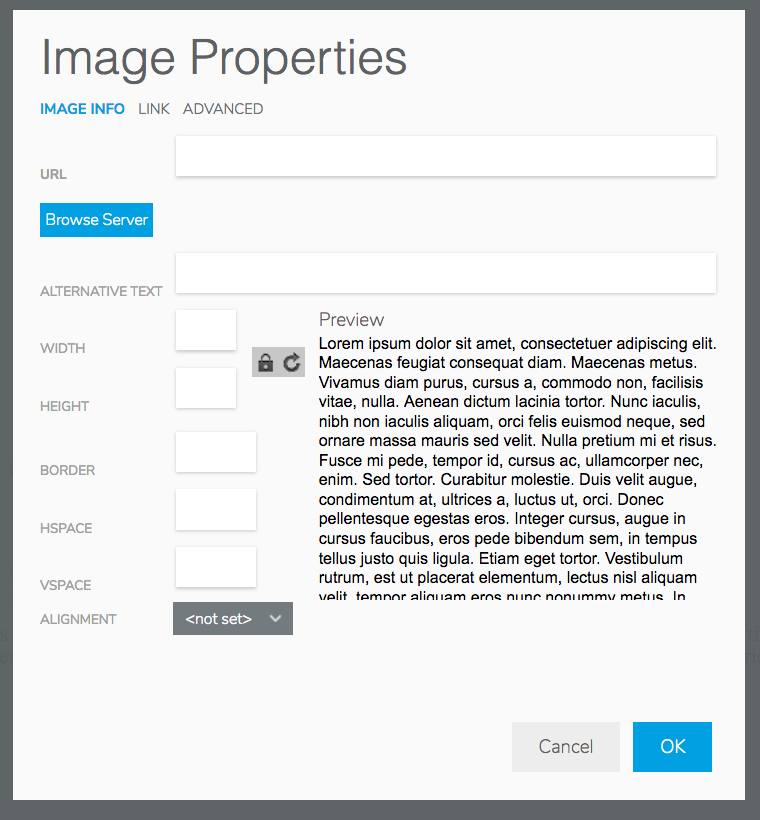
Clicking on “Browse Server” will open the image picker, in which you will be able to select an existing image, or from which you will be able to upload an image. Once the image is selected, you will be able to resize it by editing its height and/or width (not that image edition tools are available from the image picker). Click on “Ok” to add the image.
2 Layout
The layout tab allows you to select how your content should be displayed in your page. The easiest way is by selecting an alternative view.
The Layout tab is not available for pages.
2.1 View
A view is a way of displaying the content in your page and every content has a default view, the one used when the content is created. A view is specific to a type of content. Depending on your site, it is possible that other views are available, so you can choose the best way the content should appear in your page.
In order to select a view, you must activate (if not already done) the "View" box and then select from the drop-down list the desired view. A preview of the selected view is available, however this may differ from the final rendering in the page.
2.2 Reference view
If you are editing a content reference, then the “Reference view” box is displayed and allows you to select a view for your reference among the views available for the type of content being referenced.
3 Metadata
Each contents has metadata used to describe the details contained within the content object. Metadata is also used to perform advanced searches, such as filtering. Most fields are captured automatically by Digital Experience Manager and are not manually editable, like creation date or the author name. Some additional fields, like tags, keywords or description, can be manually updated.
3.1 Description
Simple field to allow a description of the content. In multilingual websites, this property is per language.
3.2 Keywords
Use single words to describe your content. Follow your company recommendations regarding the usage of keywords.
3.3 Tags
Tags can contain one or several words, and several can be added at a same time by using commas as separators between each of them. You will then be able to remove each of them individually if desired.
The tag field is enhanced with assisted typing, as soon as you start typing 2 letters in the tag field, Digital Experience Manager will suggest a list of existing tags in the site that start with those letters.
Site administrators have access to a panel dedicated to the tag management.
4 SEO
This tab allows you to define additional URLs (called vanity URLs) for pages and contents, and even to choose the default URL to use when the content or page is called. This is an important SEO factor.
The vanity URLs set here has to be unique on your site (including both unpublished and published contents): you will not be able to add an additional URL if it is already in use by another content (published or not).
You can activate or deactivate such URLs from this tab.
Site administrators have access to a panel dedicated to the management of vanity URLs.
5 Categories
This tab displays the tree of available categories you can use to classify and enrich contents with meaningful concepts. The categories are managed by administrators, authors can not create new categories here, but just use them.
Categories can be used to easily retrieve contents in the edit mode, using the category panel.
6 Options
The Options tab has some additional options usually added to meet the specific needs of your site. As these are customizations, it is not possible here to detail the specific options available for your site.
7 Live roles
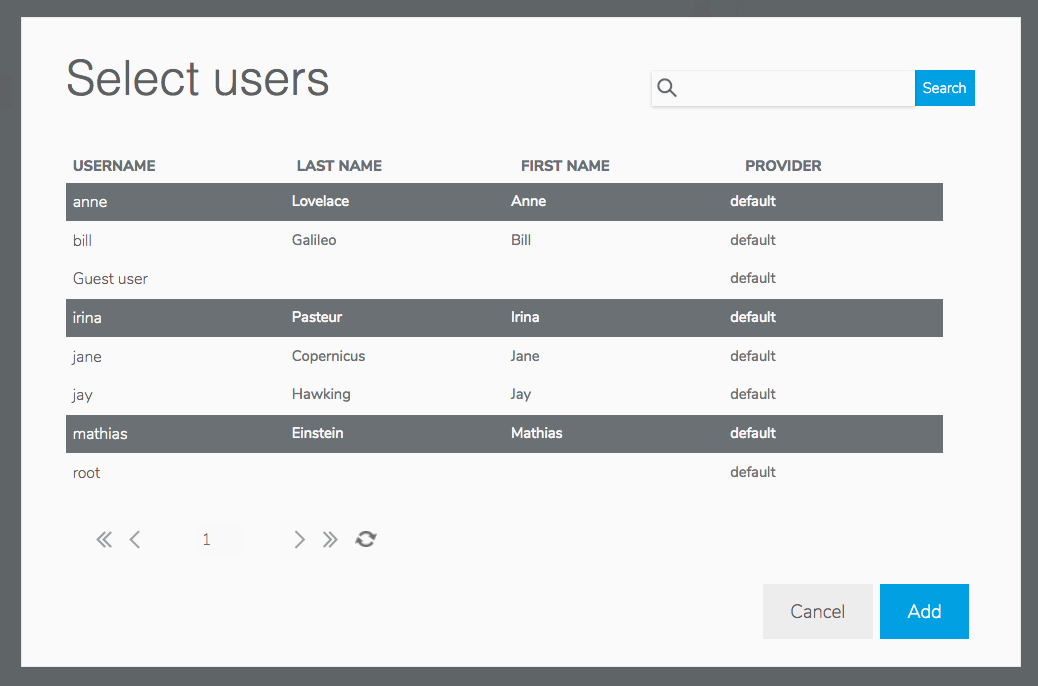
This tab is used to define the roles (which are associated to permissions) for users and groups for the live version of the content. The live roles define what a user can do on a published content.
A specific interface allows you to search for the users and groups to add to a role. Note that you can select several users/groups by holding the Ctrl key while clicking on the users/groups, and then clicking on “Ok”.
Roles are inherited. This mean that by default a content has the same role configuration as its parent content: for instance, when you set roles on a site, these roles are used by the pages underneath the site, by the subpages, areas of a page until it reaches the contents themselves. At any level you can remove or add a user/group to/of a role. This will be replicated on the sub-contents.
8 Edit roles
This tab is used to define the roles (which are associated to permissions) for users and groups for the workspace version of the content. The edit roles define what a user can do on a content in the edit or contribute mode: e.g. creation, publication, translation, etc.
Break all inheritance
Same as for the live roles, edit roles are inherited. It is possible to break this role inheritance from the Edit roles panel. In such case, you will have to re-set all the roles (edit and live) for the content. Modifications of the roles in a parent content will not affect the roles set for this content, as the inheritance has been broken. It is possible to restore the inheritance afterwards.
9 Usages
This tab is purely informative and provides a detailed summary of where content is used. As the same content can be integrated into multiple pages within a site or several sites, this tab is useful for determining where all occurrences are located, allowing an editor to know how changing content on one page will impact multiple pages. The first column lists the URL of the page and a link to it, the second column shows the path of the reference object.
The “Clean references” button will break the link between the content and its references, use with caution and only if you know what you are doing!
10 History
The history tab provides information regarding operations performed on the content. Click on the ‘i’ button of the selected line to see more details.
11 Versioning
Everytime a content is published, a new version is created. In the versioning tab, you can access the list of versions, meaning the state of the content when it was published. You can compare a previous version with the current one, and you can also restore a previous version. The restore operation is only done in the workspace, so you will have to re-publish the content in order to have the restored version available online.
12 Visibility
This tab allows you to schedule when the content should be visible online once published, using “visibility conditions”. This is used for time based publishing.
3 types of conditions are available:
- Start and end date: set a time interval when the page/content should be available online. If no start date is set, then the page/content will be visible once published, until the end date is reached. If no end date is set, the page/content will be visible once the start date is reached. For instance: From 01/01/2018 08:00 until 10/10/2018 08:00
- Time of the day: set a time interval in the day when the content should be visible. E.g. Everyday from 07:00 am until 09:00am.
- Day of the week: select the days of the week when the content should be visible. E.g. Every Saturdays and Sundays.
You can add several visibility conditions, from any type.
By checking the box “All conditions should match”, the page/content will be visible only if all the visibility conditions are met.
Example:

The following content will be visible only the weekends between 7am and 9am from January 1st 2018 8am until October 10th 2018 8am.
The current status in live shows you if the content/page is currently visible online, and the “Current conditions result” shows the status of the conditions currently shown in the edit engine.
These visibility conditions do not conflict or bypass permissions. A user or group with no read permission will never see the content or page, but a user or group with read permission will see the content or page only if the specific condition(s) defined in this tab is(are) successfully resolved.
13 Workflow
This tab allows you to select the type of workflow to use when publishing or unpublishing the content. By default, the type of workflow used is inherited from the “parent”, meaning the parent page or parent content (page/area/list/etc.), but it can be changed by unchecking the box “Same workflow as parent” and by selecting the desired workflow in the drop-down.
This tab is rarely available to individual content creators. Its use is typically restricted to advanced webmasters and reviewers.
14 Channels
This tab allows you to control for which channels, set of devices or specific devices, the content should appear or not.
The most useful channels are:
- “Generic Phone”: this applies to any smartphone (including Android and iPhones)
- “Phone: Android”: this applies to every Android smartphones
- “Phone: iPhone”: this applies to every generation of iPhones
- “Tablet: Android”: this applies to every Android tablets
- “Tablet: iPad”: this applies to every generation of iPad
Once the channels are selected, you can choose to either:
- “Exclude for these channels”: meaning that the content will not be visible from the selected channels
Or
- “Include only for these channels”: in this case the content will be only visible from the selected channels
15 List ordering
This tab is only available when editing a list or an area. It allows you to choose the way the contents are ordered inside the list/area, it can be either automatic or manual.
15.1 Automatic list ordering
When this option is selected, it is not possible to manually move a content inside the list in the edit or contribute mode using drag and drop.
15.2 Manual list ordering
This option leaves you the possibility to manually move a content up or down inside the list. This can be achieved by drag and drop, or by using the control buttons “Move up”, “Move first”, “Move down” and “Move last”.
You can also delete contents from the list. Be careful as this operation cannot be undone once you have clicked on the “Save” button in the bottom right corner of the edit engine. However, if you have deleted a content from the “List ordering” tab, it does not appear in the table anymore but clicking on “Cancel”, or using the “Previous” button from your browser, will cancel this operation and your content will still be available.
When this option is selected, it is not possible to manually move a content inside the list in the edit or contribute mode using drag and drop.
16 Contribute mode settings
This tab is only displayed in edit mode when editing a list or an area. It allows a webmaster to allow or not contributors to edit and create contents in this list/area from the Contribute mode.
The webmaster can select the types of contents that can be created in the area in contribute mode by selecting them in the list. If no type of content is selected, it means that any content can be created.