Installation of Digital Experience Manager on various platforms
Digital Experience Manager's official and nightly builds are distributed as installation packages, which contain the entire software suite (Digital Experience Manager, Jahia Core Content Platform, Studio) as well as the Digitall Website demo, several template sets and dozens of composite modules.
1 Main installation steps:
- Download the latest stable Digital Experience Manager 7.2.0 build from http://www.jahia.com by choosing the right downloadable package for your operating system
- Double-click on the downloaded installation package, which will start the installation wizard.
- On Unix servers with graphical environment, you can start the installation wizard running
java -jar <your-downloaded-digital-experience-manager-jar> - On Unix servers where you have no graphical environment, you can start the installation also in the Console Mode:
java -jar <your-downloaded-digital-experience-manager-jar> -console - In case you would require running the wizard in Console Mode on Windows, you will need to open your command prompt with administrator privileges.
- Follow the installation wizard. See next sections for a detailed description of the settings.
- At the end, you can let the wizard launch Digital Experience Manager (if the bundled Apache Tomcat server was selected as an option). Otherwise, you can launch Digital Experience Manager using the generated shortcut or within the created installation folder using a console window launch the command
./start.sh(on Linux/MacOSX) orstart.bat(on Windows). Important:the first start of your Digital Experience Manager may take up to 3 minutes, depending on your hardware (initial templates publication and modules deployment). The next starts will be much faster.
2 Settings during installation
2.1 Installation path
There shouldn’t be any spaces in your folder naming. For example, C:\DigitalExperienceManager-7.2\ is OK while C:\Digital Experience Manager 7.2\ is not.
2.2 Installation type – Discovery install
This option allows to discover Digital Experience Manager without specific configuration thanks to the installation of an Apache Tomcat 8 server & Sun Java DB / Apache Derby DBMS bundle. This installation also provides and deploys all interesting and available modules, applications and templates.
2.2.1 Default application server
The default Digital Experience Manager v7.2.0 is distributed with an Apache Tomcat 8.0.39 application server. No manual configuration of the server is required, as it will be directly setup during the Digital Experience Manager installation. By default, Tomcat will use standard ports (8080, 8009 and 8005). Please ensure that you do not have any other servers/services running and using those ports. Optionally, you can change Tomcat ports during the "Custom install" installation type (see "3.2.3 Installation type – Custom install").
2.2.2 Default database
Digital Experience Manager v7.2.0 is installed with the embedded Sun Java DB / Apache Derby database engine with the “Discovery install” option. If you wish to get started rapidly, you can use the provided database as is. With the “Custom Install” option you can choose to install Digital Experience Manager to another more robust standalone database during the configuration wizard of Digital Experience Manager. Please note that you cannot simply switch the database at a later stage on the same installation. You will have to export the content and import it into a new Digital Experience Manager installation configured with the different database.
2.3 Installation type – Custom install
If you want to install Digital Experience Manager on a custom environment (application server, database, mail server configuration, different port numbers), choose a particular operating mode (development, production, distant publication server), configure clustering or LDAP providers, you need to choose the “Custom Install” option.
2.3.1 Application server
Digital Experience Manager v7.2.0 Enterprise Distribution can be installed with an Apache Tomcat 8.0.39 application server. If you want to install into your own server, you need to deselect the “Apache Tomcat” checkbox on Step 5 of the installation wizard and click Next. On the next page, you will be able to choose whether the installation is targeted into one of these application servers:
- Apache Tomcat 8.0.x (in case you want to deploy Digital Experience Manager yourself into an existing Tomcat server other than the one bundled by default)
- IBM WebSphere 8.5.5
- Red Hat JBoss EAP 6.x
The installed Digital Experience Manager will then include some specific configurations, which are needed to make it run smoothly in the targeted application server. See the next chapter “Application server specific installations” for further information.
2.3.2 Database
The embedded Sun Java DB / Apache Derby database engine, which is used with “Discovery install” option is not suited for production. During installation, you can choose between:
- Microsoft SQL Server
- MySQL 5.x
- Oracle 11g
- PostgreSQL 9.x
- Sun Java DB / Apache Derby (standalone)
Please note, that you cannot simply switch the database at a later stage on the same installation. You will have to export the content and import it into a new Digital Experience Manager installation configured with the different database.
During installation, you will be asked to provide the connection URL (see chapter "Database" for details) and the user/password for accessing the database.
Furthermore, you also will be able to set whether binary data should be stored in the database or directly on a file system (for clustered Digital Experience Manager setup the file system need to be shared by all cluster nodes). By default, the binary files are stored on the file system, which in most cases results in a better performance as the file content can be directly streamed from the file system (utilizing low level OS mechanism) and a higher level of concurrency can be achieved. There is also an option present to define if the Digital Experience Manager DB structure (tables, indexes, sequences) has to be created first (this option needs to be unchecked e.g. when running the installation wizard for installing second, third, etc. cluster nodes).
2.3.3 Apache Tomcat configuration
This section is available only if you have chosen to use the bundled Tomcat application server.
Here you have the possibility to configure the different ports used by Tomcat.
2.3.4 Web application settings
Here you have the possibility to specify the context path for Digital Experience Manager Web application. If you want to deploy it into the root context (“/”), just leave the field blank.
You also need to specify a login and password that will be required to access the Tools Area: monitoring and debugging tools embedded in Digital Experience Manager.
2.3.5 Operating mode
Here you have to choose in which mode you want to install Digital Experience Manager.
Development– enables development mode for Digital Experience Manager including access to Studio.Development + Modules/JahiApps/Demos– same as "Development" mode. Additionally, includes the set of all optional modules, template sets and pre-packaged demo sites.Production– includes the "core" set of Digital Experience Manager modules. Disables development mode for template deployment. Studio mode access is also disabled.Distant publication server– Same as "Production". Additionally, content editing activities are limited to the Live content only.
Just take care that even if you can switch later between the modes (you can reconfigure it in jahia.properties), some modules will be packaged only when you perform the installation in “Development + Modules/JahiApps/Demos” Mode. Installing in Production Mode, and then switching to Development Mode will activate the development dedicated features (like the Studio), but will not deploy the additional modules. You will have to deploy them using Module Management Panel in Digital Server Administration. Please refer to the “3.8 Modules” section for more information.
2.3.6 Differences between Development and Production modes
Here we will list the differences in terms of available features and Digital Experience Manager behavior between the Development and Productions modes. From the packaged modules point of view, there are no differences between plain Development (not the second option, which is “Development + Modules/JahiApps/Demos”) and Production mode.
| Development mode | Production mode | |
|---|---|---|
| Studio | Yes | Not accessible |
| Cache | Display extra information directly in the rendered page by passing request parameter “cacheinfo=true” in the page URL | n/a |
| Rendering | Display extra view/area rendering information by passing request parameter “moduleinfo=true” in the page URL | n/a |
| Error handling | Exception stacktraces are rendered in the error page. Additional (more verbose) error reporting using ErrorFileDumper in the rendering of views. | n/a |
| Rules | Watch for changes in rule files under <digital-experience-manager-web-app-dir>/WEB-INF/etc/repository/rules and automatically rebuild the rule base | n/a |
| Job scheduling
(from Spring) |
If a background job is scheduled from a Spring definition file, the job is recreated (all the job data is deleted) and rescheduled on each Digital Experience Manager restart. | Spring-based configured jobs are never deleted. If the change is detected in the trigger configuration the job is re-scheduled on Digital Experience Manager startup. |
| URL rewriting rules | Scanned for changes each 5 seconds. The rule base is reloaded if changes are detected. | No implicit scanning for changes. |
| Groovy patcher | Scans for new patches each 5 seconds and executes them. | Scan interval is configurable at is set to 5 minutes by default. Scanning can be disabled completely. |
2.3.7 LDAP configuration
In case you will use LDAP directory as a provider for application users or/and groups, you can choose to configure LDAP provider settings during installation. If you check this option, you will then access an additional screen, where you can setup your configuration for user and group providers.
If you do not configure them during the installation process, you will still be able to do it later from the configuration files. Please refer to the “4.5 LDAP ” section for more information.
2.3.8 Cluster configuration
You can also configure Digital Experience Manager to be run in cluster mode. If you check this option, you will then access an additional screen where you can setup your cluster configuration.
Here, you will have to specify if the node you are installing is the processing server. Remember that only one node of this type is allowed in the same cluster. Please refer to the “4.4 Clustering” section for more information.
You will also have to specify a unique server identifier (or leave the <auto> value for it to be auto-generated) and declare the IP and listening port.
2.3.9 System administrator settings
You need to at least provide the password for the root user, who, like a super-user, always has all of the privileges in Digital Experience Manager. So, you should choose a strong password and keep it secret.
2.3.10 Mail server
Mail server: this field contains the SMTP host name, with advanced options.
Digital Experience Manager uses the Apache Camel framework for messaging, and the format of the mail endpoint should conform to the one, required by the Camel Mail Component (http://camel.apache.org/mail.html), i.e.:
[smtp|smtps]://[username@]host[:port][?options]
All parts except the host are optional. See use cases below. Mail administrator: the field contains a single e-mail address or multiple addresses (separated by a comma) of users who will receive system-level notifications (e.g. about errors, if this option is enabled).
Mail from: the default sender e-mail address for an e-mail message.
Here are several use cases for "Mail server" field values:
- SMTP server does not require authentication and uses the standard port 25:
smtp.acme.com - SMTP server requires authentication and uses non-standard port 11019:
smtp.acme.com:11019?username=myuser&password=secretpassword - GMail example: SMTP server requires authentication and SSL enabled (or TLS):
smtps://smtp.gmail.com?username=acme@gmail.com&password=mypasswordor
smtp.gmail.com:587?username=acme@gmail.com&password=mypassword&mail.smtp.starttls.enable=true - Enable the mail server debugging option to see the details of e-mail server communication:
smtp.acme.com?mail.debug=true
3 Folder structure after installation with bundled Tomcat
Note, please, that since Digital Experience Manager 7.0.0.2, the runtime data and main configuration files are by default located outside of the Digital Experience Manager Web application (the feature, known previously as “externalization”). This allows for more clear separation of artifacts, better customization, production deployment and maintainability throughout the project lifecycle, including hotfixes and upgrades. We will reference further in this document the runtime data folder as digital-factory-data and the configuration folder as digital-factory-config. Here is a brief overview of the folders structure in Digital Experience Manager along with the important files that will be used throughout this guide. The files and folders in the Web application (here under tomcat/webapps/ROOT) should be the same as what is on the other application servers. Note, please that some folders under digital-factory-data are created on demand (upon DX is started for the first time).
<INSTALL_PATH>
|-- digital-factory-config
| |-- jahia
| | |-- applicationcontext-custom.xml
| | |-- jahia.properties
| | |-- jahia.node.properties
| | `-- license.xml
|-- digital-factory-data
| |-- bundles-deployed
| |-- compiledRules
| |-- db
| | `-- sql
| | `-- schema
| |-- dbdata
| |-- generated-resources
| |-- imports
| |-- karaf
| | |-- data
| | |-- deploy
| | |-- etc
| | |-- instances
| |-- modules
| |-- patches
| | |-- groovy
| | |-- sql
| |-- prepackagedSites
| |-- repository
| | |-- datastore
| | |-- workspaces
| | |-- indexing_configuration.xml
| | |-- indexing_configuration_version.xml
| |-- scripts
| | `-- groovy
|-- docs
|-- icons
|-- licences
|-- logs
|-- tomcat
| |-- bin
| | |-- catalina.bat
| | |-- catalina.sh
| | |-- setenv.bat
| | |-- setenv.sh
| | |-- shutdown.bat
| | |-- shutdown.sh
| | |-- startup.bat
| | `-- startup.sh
| |-- conf
| | |-- catalina.properties
| | |-- server.xml
| | `-- web.xml
| |-- lib
| |-- logs
| | |-- jahia-errors
| | |-- jahia-threads
| | |-- jahia.log
| | |-- jahia_access.log
| | `-- jahia_profiler.log
| |-- temp
| | |-- jahia-caches
| | `-- jahia-jsps
| |-- webapps
| | `-- ROOT
| | |-- css
| | |-- engines
| | |-- errors
| | |-- gwt
| | |-- icons
| | |-- iphone
| | |-- META-INF
| | | `-- context.xml
| | |-- tools
| | `-- WEB-INF
| | |-- classes
| | |-- etc
| | | |-- config
| | | | |-- log4j.xml
| | | | `-- urlrewrite.xml
| | | |-- repository
| | | | |-- export
| | | | |-- jackrabbit
| | | | | |-- repository.xml
| | | | |-- nodetypes
| | | | |-- rules
| | | | |-- root.xml
| | | | |-- root-mail-server.xml
| | | | |-- root-permissions.xml
| | | | |-- root-roles.xml
| | | | |-- root-user.xml
| | | | |-- site.xml
| | | | |-- template-root-mail-server.xml
| | | | |-- template-root-user.xml
| | | | `-- user.xml
| | | `-- spring
| | |-- lib
| | |-- notifications
| | `-- web.xml
| |-- work
|-- tools
|-- uninstaller
|-- OpenAdministration.URL
|-- OpenHome.URL
|-- start.bat
|-- start.sh
|-- stop.bat
`-- stop.sh
Here is a brief overview of the important folders:
digital-factory-config/: Contains Digital Experience Manager configuration and license file under jahia sub-folderdigital-factory-data/: Runtime Digital Experience Manager data, including database creation scripts, modules and prepackaged sites to be deployed, JCR repository folder etcdigital-factory-data/bundles-deployed: Contains all the bundles, corresponding to the deployed modules. Note: when restarting the server after flushing the contents of this folder, the modules present in the digital-factory-data/modules will be redeployed, but the other modules (uploaded via UI, RESR API, downloaded from store) will NOT be redeployed, and will require to be manually deployed again.digital-factory-data/compiledRules: folder with the pre-compiled business rules, which are generated on module deployment and “cached” here.digital-factory-data/db: The database scripts to create the DB schema of Jahia and to connect to the corresponding database can be found here.digital-factory-data/generated-resources: contains aggregated and minified CSS and JavaScript assets which are generated during rendering of live pages.digital-factory-data/karaf: The configuration and runtime data of the OSGi container (Apache Karaf).digital-factory-data/karaf/etc: Configuration files for the Apache Karaf OSGi container.digital-factory-data/modules: Modules and template-sets located in that directory will be deployed to the server on startup or whenever a file changes during runtime. Template-sets will be available in the drop-down list when you create a new virtual site, and modules will be seen in the left panel of the Studio or in the Edit mode.digital-factory-data/patches/groovy: Includes Groovy-based patch scripts. The folder is also “watched” for the new scripts during runtime on the processing server to allow execution of patches during runtime.digital-factory-data/patches/sql: Contains SQL scripts which are executed against database schema on DX startup.digital-factory-data/repository: The Jackrabbit repository home, where the workspace configuration, and version storage is located as well as search indexes.digital-factory-data/repository/datastore: The Jackrabbit datastore folder where the binary resources will be stored.digital-factory-data/repository/index- and
digital-factory-data/repository/workspaces/*/index: The search indexes will be stored in these directories. tomcat/: Contains pre-configured Apache Tomcat servertomcat/logs/jahia-errors: Folder where Digital Experience Manager error dumper service writes error reports into.tomcat/logs/jahia-threads: Folder where Digital Experience Manager thread dumper service writes thread dump files into.tomcat/temp/jahia-jsps: This directory will contain complied JSPs of the Digital Experience Manager modules. It will include both compiled class and Java file for each JSP. This can prove helpful in case you have an error in a template showing in the Tomcat logs, for instance: sitemap_jsp.java:984: illegal start of expression. If you want to make sure that all JSP files of the templates are recompiled after a change, you may want to delete the jahia-jsps directory and also the Standalone directory in work. Next time you access a page, Tomcat will recompile all JSP files used by the page.tomcat/webapps/ROOT/engines: This directory contains all the JSP, images and JavaScript files of Digital Experience Manager engines (Content Manager, Content Picker, Live Content Picker etc.).tomcat/webapps/ROOT/META-INF/context.xml: Database connection information. This configuration is applicable only for Apache Tomcat server.tomcat/webapps/ROOT/WEB-INF/classes: Besides some configuration files, here you will find mainly resource bundle files used to translate the Digital Experience Manager interface in other languages. There are normally at least 2 files for each language: JahiaInternalResources.properties and JahiaTypesResources.properties.tomcat/webapps/ROOT/WEB-INF/etc: The etc directory contains most of the configuration files of Jahia. The config sub-directory contains several configuration files (log4j.xml, seo-urlrewrite.xml, etc.). The repository directory contains the configuration files for Jackrabbit repository. The spring directory may contain custom Spring bean definition files, but is empty by default. The internal Spring files are located inside jahia-impl-*.jar file.start.*/stop.*: The Digital Experience Manager start and stop scripts.
4 Discovering Digital Experience Manager - first usage
This applies only if you want to discover Digital Experience Manager 7.2, using the prepackaged demonstration site. It assumes that you have installed Digital Experience Manager using “Discovery install” or selecting “Development + Modules/JahiApps/Demos” Mode, so that the example templates and the modules they require have been automatically deployed.
- Open a browser and go to http://localhost:8080/start.Use the root user credentials set up during the installation process. You will discover the new Digital Experience Manager landing page. Click on the “Create new Web-Projects” button and you're ready to create your first site.
- Import the new “Digitall Prepackaged Demo Website” package. After successful import, click on the “Go to Edit Mode” button to see the Edit Mode for this Digitall Web site.
- Switch to the Live or Contribute Mode and enjoy!
5 Installing a production server – additional steps
This applies when you install your production server, and assumes that you have installed Digital Experience Manager in Production Mode.
Before being able to create your first website, you will have to deploy your custom set of templates and modules. But during the development process, you may have used some Digital Experience Manager standard modules, automatically available on your installation. Notice that most of those modules were available because you installed your development server using the development mode. As your production server uses the production mode, only the core modules will be available. So, you also need to deploy yourself the standard modules you want to use.
- Prepare all the JAR files for your custom templates and modules, and the one for each standard module you want to use. For the standard modules, you can either download them from the Jahia Private App Store (http://store.jahia.com/), or retrieve them from your development server (they are available in digital-factory-data/modules/). In case you download the modules from the Jahia Private App Store, take care to download the same version of the module as the one you have tested during your validation process.
- In order to deploy additional modules, you could use a dedicated screen in the Digital Experience Manager installer, where you are offered to provider a folder to additional modules, which have to be deployed to the Digital Experience Manager instance, you are installing. Alternatively, after the installation you could use Module management screen in Digital Experience Manager Administration or manually copy the required modules to digital-factory-data/modules folder.
- The modules will be automatically deployed
- Now you can either import your site data from an export of your integration/development platform, or create a new empty site.
- Now let your users enter content on their site.
6 Different types of environment
During the life-cycle of a project you will need different types of environments:
- Development environment - each of your developers will have their own environment. Those developer environments are normally much lighter than the one needed for production. Your developers can either use the integrated DBMS (Apache Derby) or use another DBMS (MySQL, Microsoft SQL Server, PostgreSQL or Oracle).
- Integration environment - this environment will help you integrate the work of all your developers on the same platform and prepare the site(s) you are going to deploy in production.
- Production environment - this one is the last step in the development life-cycle of your project.
7 Application server specific installations
7.1 Apache Tomcat 8.0.x
To deploy Digital Experience Manager into an existing Apache Tomcat 8.0.x installation a number of required steps has to be completed.
Next subsections describe all those steps, which are all mandatory.
7.1.1 Installation
The installation procedure for an existing Apache Tomcat 8 is as follows:
- Launch the Installer.
- Choose the
Custom Install (advanced)installation type. - Select only
Digital Experience Manager + Jahia Core Content Platformpack, unselecting theAdd Apache Tomcatone - On the next screen choose the
Apache Tomcat 8.0.xas the target application server - Follow the next steps of the Installer.
Once the Installer is finished in your installation directory you should find among others the tomcat folder and, if the locations of runtime data and configuration folders were not changed during the installation, the digital-factory-config and digital-factory-data folders.
7.1.2 Deployment
Further, it is assumed that your target Apache Tomcat server is installed in the <tomcat> folder and <install-dir> will reference the folder, where you’ve installed Digital Experience Manager into using the installer.
- Copy the content of the
<install-dir>/tomcat/libfolder into your<tomcat>/libdirectory. - In case
ROOTwas configured as the Web application context name, please, remove or rename the default Tomcat’sROOTWeb application at<tomcat>/webapps/ROOT, if it exists, to e.g. tomcat-root or similar. - Copy the content of the
<install-dir>/tomcat/webappsfolder into your<tomcat>/webappsdirectory. - The configuration folder path (
digital-factory-config) has to be added into the class path to make it available to Digital Experience Manager. The easiest way is to modify the common.loader variable value in the<tomcat>/conf/catalina.properties file to point to thedigital-factory-configfolder path. For example, if the Digital Experience Manager configuration folder has a path/opt/DigitalExperienceManager-7/digital-factory-configthan the value of common.loader should look like:common.loader="${catalina.base}/lib","${catalina.base}/lib/*.jar","${catalina.home}/lib","${catalina.home}/lib/*.jar","/opt/DigitalExperienceManager-7/digital-factory-config"If your
digital-factory-configfolder is inside the installation folder, you could use the path, relative to catalina.home, i.e.:common.loader="${catalina.base}/lib","${catalina.base}/lib/*.jar","${catalina.home}/lib","${catalina.home}/lib/*.jar","${catalina.home}/../digital-factory-config" - Please, note, if you decide to move the
digital-factory-datafolder to other location, thejahiaVarDiskPathvalue in thedigital-factory-config/jahia/jahia.propertiesfile should be adjusted to reflect its new path. 6. Adjust the JVM and connector options appropriately (see next sections).
7.1.3 JVM tuning options
The default JVM options of the Apache Tomcat must be adjusted to reflect the Digital Experience Manager requirements. We recommend creating a setenv.bat (Windows) or setenv.sh (non-Windows OS) script in the <tomcat>/bin folder to put those options. An example of the <tomcat>/bin/setenv.bat for Windows OS could be:
rem ------------------------------------------------------------------
rem Digital Experience Manager settings
rem ------------------------------------------------------------------
set CATALINA_OPTS=%CATALINA_OPTS% -server -Dsun.io.useCanonCaches=false -verbose:gc -XX:+HeapDumpOnOutOfMemoryError -XX:+PrintConcurrentLocks -Djava.net.preferIPv4Stack=true -Xms2048m -Xmx2048m -XX:MaxPermSize=384m
set CATALINA_OPTS=%CATALINA_OPTS% -Dderby.system.home="%CATALINA_HOME%\..\digital-factory-data\dbdata"
In a similar way, the <tomcat>/bin/setenv.sh script for a non-Windows OS can look like:
#!/bin/sh
# --------------------------------------------------------------------
# Digital Experience Manager settings
# --------------------------------------------------------------------
CATALINA_OPTS="$CATALINA_OPTS -server -Djava.awt.headless=true -verbose:gc -XX:+HeapDumpOnOutOfMemoryError -XX:+PrintConcurrentLocks -Djava.net.preferIPv4Stack=true -Xms2048m -Xmx2048m -XX:MaxPermSize=384m"
CATALINA_OPTS="$CATALINA_OPTS -Dderby.system.home=$CATALINA_HOME/../digital-factory-data/dbdata"
export CATALINA_OPTS
export CATALINA_PID=$CATALINA_HOME/temp/tomcat.pid
Note, please, the -XX:MaxPermSize is not supported starting from JDK 8. If you are running DX on JDK 8, please, omit this option.
The JVM heap sizes (-Xms and -Xmx) as well as the permanent generation space size (-XX:MaxPermSize) should be adjusted according to your needs. Note that the minimal value of the -Xmx value, required by Digital Experience Manager is 2048m. If you have chosen Apache Derby as the target DBMS server during the installation, the value of the -Dderby.system.home in the setenv.bat/setenv.sh script should point to your digital-factory-data/dbdata folder.
7.1.4 HTTP/AJP connector tuning options
The following configuration for the HTTP and AJP connectors (configured in the <tomcat>/conf/server.xml file) is recommended[1], which includes maximum threads and accept count configuration, compression of the response content etc.:
<Connector port="8080"
protocol="HTTP/1.1"
redirectPort="8443"
maxThreads="300" acceptCount="100"
compression="on"
compressableMimeType="text/plain,text/html,text/xml,text/css,text/javascript,application/x-javascript,application/javascript" />
<Connector port="8009" protocol="AJP/1.3" redirectPort="8443"
connectionTimeout="20000" keepAliveTimeout="300000" maxThreads="300" />
7.2 IBM WebSphere 8.5.5
The installation and configuration steps for IBM WebSphere are covered on a dedicated page WebSphere V8.5.5 Installation guide.
7.3 Red Hat JBoss EAP 6.x
To deploy Digital Experience Manager into an existing Red Hat JBoss EAP 6.x installation several required steps have to be completed. Note, please, here we assume the deployment into a JBoss EAP instance, running in a standalone mode with a default configuration profile.
Next subsections describe all those steps, which are all mandatory.
7.3.1 Installation
The installation procedure for an existing JBoss server is as follows: ul>
- Launch the Installer.
- Choose the
Custom Install (advanced)installation type. - Select only
Digital Experience Manager + Jahia Core Content Platformpack, unselecting theAdd Apache Tomcatone - On the next screen choose the
Red Hat JBoss EAP 6.xas the target application server - Follow the next steps of the Installer. Once the Installer is finished in your installation directory you should find among others the jboss folder and, if the location of runtime data folder was not changed during the installation, the
digital-factory-datafolder.
7.3.2 Deployment preparation
Further, it is assumed that your target Red Hat JBoss server is installed in the <jboss> folder and <install-dir> will reference the folder, where you’ve installed Digital Experience Manager into using the installer.
- Copy the content of the
<install-dir>/jbossfolder into your<jboss>directory. - Continue with the steps, described in the next sections.
7.3.3 JVM tuning options
The default JVM options in the JBoss’ startup script (<jboss>/bin/standalone.conf.bat or <jboss>/bin/standalone.conf) should be adjusted to use server JVM ("-server" option), have at least 1280 MB[2] heap size (-Xms1280m) and at least 256 MB2 as a limit for the permanent generation heap size (-XX:MaxPermSize=256M), if applicable, also adding other tuning options.
Note, please, the -XX:MaxPermSize is not supported starting from JDK 8. If you are running DX on JDK 8, please, omit this option.
This can be done by adjusting the corresponding line in your <jboss>/bin/standalone.conf.bat file (Windows OS):
set "JAVA_OPTS=-server -Xms2G -Xmx2G -XX:MaxPermSize=384M"
or in the <jboss>/bin/standalone.conf file (non-Windows OS) – here we use larger values as an example:
JAVA_OPTS="-server –Xms4G –Xmx4G -XX:MaxPermSize=512M"
The following lines needs to be added to: On Windows OS:
set "JAVA_OPTS=%JAVA_OPTS% -Djava.io.tmpdir=%JBOSS_HOME%\standalone\tmp"
set "JAVA_OPTS=%JAVA_OPTS% -Dderby.system.home=c:\DigitalExperienceManager-7\digital-factory-data\dbdata"
set "JAVA_OPTS=%JAVA_OPTS% -verbose:gc -XX:+HeapDumpOnOutOfMemoryError -XX:+PrintConcurrentLocks"
And for non-Windows OS:
JAVA_OPTS="$JAVA_OPTS -Djava.io.tmpdir=$JBOSS_HOME/standalone/tmp"
JAVA_OPTS="$JAVA_OPTS -Dderby.system.home=/opt/DigitalExperienceManager-7/digital-factory-data/dbdata"
JAVA_OPTS="$JAVA_OPTS -verbose:gc -XX:+HeapDumpOnOutOfMemoryError -XX:+PrintConcurrentLocks"
Server configuration (JBoss should be running)
The next steps have to be performed on a started JBoss server instance. Please, start your JBoss server instance from <jboss>/bin folder by using: On Windows OS:
standalone.bat -b 0.0.0.0
On non-Windows OS:
./standalone.sh -b 0.0.0.0
The 0.0.0.0 value after -b switch means that JBoss will be bound to all available network interfaces. You could use particular one instead, e.g. 192.168.1.101. When omitted the JBoss will bind to the loopback address (127.0.0.1) only. After the JBoss instance is started continue with the next steps.
7.3.4 Create management user
When JBoss is running, you could create a server management user (for accessing JBoss Management UI) by using <jboss>\bin\add-user.bat (Windows platform) or <jboss>/bin/add-user.sh (non-Windows platform). Provide the required information to add the user. Alternatively, you could add a user in a non-interactive mode: On Windows OS:
add-user.bat -u manager -p manager_123
On non-Windows OS:
./add-user.sh -u manager -p manager_123
7.3.5 Apply Digital Experience Manager specific configuration
For configuring JDBC driver, DB datasource and also deactivating default JBoss ROOT application (in case Digital Experience Manager will use ROOT Web application context), the following script has to be executed against running JBoss server instance from <jboss>/bin folder: Windows OS:
jboss-cli.bat --file=jahia-config.cli
Non-Windows OS:
./jboss-cli.sh --file=jahia-config.cli
7.2.6 Deploy and start Digital Experience Manager
The configuration is ready now and we can deploy and start the Digital Experience Manager. To trigger the deployment, you need to delete the marker file:
<jboss>/standalone/deployments/digitalexperiencemanager.ear.skipdeploy
This will trigger the deployment and startup of the Digital Experience Manager Web application.
8 Modules
This chapter applies to the module deployment in DX 7.2.0.0+. For earlier versions of DX, please, refer to the corresponding versions of this document.
8.1 Module deployment
Modules are extensions to Digital Experience Manager, which are packaged as JAR files and can be deployed on a server. A module can contain different kinds of resources: JSPs, definitions in CND files, CSS and images, resource bundles, XML or ZIP import files, rules definitions, libraries, Spring files etc. Modules are deployed by using the built-in module management screen in Server Settings, using REST API (with supplied command line scripts) or by dropping them into the digital-factory-data/modules folder. When deploying several new versions of modules, it is advised to use the REST API (see chapter 8.1.4 "Installing multiple modules") as it comes with an optimization regarding dependency resolutions: a single bundle refresh is performed internally at the end.
8.1.1 Module management UI
The module management UI contains an explicit checkbox for starting or not a module, uploaded via that UI, as well as a similar checkbox for the modules, downloaded from private app store.
More information about the module management UI here.
8.1.2 REST API and command line scripts
A new REST API was introduced for module management in DX 7.2 and corresponding command line scripts are provided in the DX distribution (in a default installation they are located in the <dx-install-dir>/tools folder). Examples of usage of such scripts are listed below.
Note that all the scripts are available for Windows (.bat), Linux and MacOS (.sh) operating systems.
In order to perform these operations with a different user from root (which is the user by default), you can change the value of DX_USERNAME in the setupBundleApi.sh/.bat file with the selected username who must have the administration permission "Admin templates".
8.1.3 Installing a module
./installBundle.sh article-2.0.2.jar true
Installs the specified file as a module and starts it after the installation. if last parameter (true) is omitted, the module is just installed, but not started automatically.
8.1.4 Installing multiple modules (since 7.2.1.0)
./installBundles.sh article-2.0.2.jar faq-2.0.2.jar --start
Installs the specified files as modules and starts them after the installation. if last parameter (--start) is omitted, the modules are just installed, but not started automatically.
8.1.5 Starting a module
./startBundle.sh org.jahia.modules/article/2.0.2
Starts the article module version 2.0.2. The org.jahia.modules/article/2.0.2 is a full module key in this case, which is composed like <groupId>/<artifactId>/<version> string. The start/stop/ uninstall commands can operate on a full module key as well as on a short one, like article/2.0.2 or event article, if the corresponding bundle can be resolved by that key unambiguously, e.g. if there is only one bundle with symbolic name article installed on your DX instance. The shorter form will be:
./startBundle.sh article
8.1.6 Stopping a module
./stopBundle.sh org.jahia.modules/article/2.0.2
Or in a shorter form:
./stopBundle.sh article
This command stops the target article module.
8.1.7 Uninstalling a module
./uninstallBundle.sh org.jahia.modules/article/2.0.2
And the shorter form:
./uninstallBundle.sh article
Uninstalls the target article module from your DX instance.
8.1.8 Get local bundle info (since 7.2.0.2)
./getLocalBundleInfo.sh article/2.0.2
Get current local info about a single bundle.
./getLocalBundleInfo.sh article/2.0.2 jline/2.14.2
Get current local info about multiples bundles.
./getLocalBundleInfo.sh article/*
Get current info about all versions of a bundle (since 7.2.3.3).
./getLocalBundleInfo.sh org.jahia.modules/*/*
Get current info about all modules and their versions, having group ID org.jahia.modules (since 7.2.3.3).
./getLocalBundleInfo.sh *
Get current info about all bundles (since 7.2.3.3).
8.1.9 Get cluster wide bundle info (since 7.2.0.2)
./getBundleInfo.sh article/2.0.2
Get current info about a single bundle.
./getBundleInfo.sh article/2.0.2 jline/2.14.2
Get current info about multiples bundles.
./getBundleInfo.sh article/*
Get current info about all versions of a bundle (since 7.2.3.3).
./getBundleInfo.sh org.jahia.modules/*/*
Get current info about all modules and their versions, having group ID org.jahia.modules (since 7.2.3.3).
./getBundleInfo.sh *
Get current info about all bundles (since 7.2.3.3).
8.1.10 Notes about deployment into /modules folder
The deployment of modules can also be done by dropping them into the digital-factory-data/modules folder. This folder is “watched” for changes (new modules are dropped, existing modified or deleted) and actions are performed by DX to react on those changes. The folder supports module operations in “hot” (online, while DX is running) as well as in “cold” (offline, when DX is shut down) mode. If a new module is dropped into that folder, it is by default automatically started if DX is running in development operating mode (“operatingMode” flag value in jahia.properties file) or just installed without auto-starting it in case of other operating modes (say, “production”). If needed, the behavior can be explicitly controlled by adding the following flag into jahia.properties (or your own jahia.custom.properties) file:
jahia.modules.fileinstall.bundles.new.start=true
Supported values are true or false.
Notes about module dependencies
We rely on OSGI capability mechanism to define the dependencies between modules.
An OSGI bundle, so a DX module, can be started if all its dependencies (OSGI bundles that provides the required capabilities) are resolved.
The import and definition registering is done at resolve state.
At startup, a DX module, if necessary:
- stops any previous version of the module
- register the bundle into TemplatePackageRegistry (where it computes the dependencies using TemplatePackageRegistry.computeDependencies)
- fire deploy event to DX (mostly to flush caches)
- registers script resolvers
- registers the Drools rules
- registers http resources
- starts spring context
We provide several mechanisms to make the module start whatever the order the modules are deployed.
- We compute all the dependencies each time a module, or one of its dependencies, is started
- If a dependency is not fulfilled, or not available at startup, the module startup is postponed. At the end of the process, all the modules should be started correctly.
- The
jahia-dependsdefines the required modules to be resolved. It also defines, in case of multiple modules deployed at once, the order to start them. Copying several modules at once in the /modules directory work as each module deployed one by one, so we cannot compute the order of deployment, this can lead to inconsistencies while the modules are starting, but should be solved automatically at the end.
8.2 Cluster deployment
DX 7.2 comes with a built-in clustered module management support. All module operations, performed via Module management UI (in Server Settings) or via new REST API / command-line scripts on any node and also including module deployments/undeployments via the /modules folder, are automatically replayed on other nodes in the cluster, so the state of bundles should be consistent across all nodes in the cluster. When a cluster node is joining the cluster it “pulls” the bundle state from the cluster and “applies” it locally. So, the module operations, listed in chapter “3.8.1 Module deployment”, are cluster-wide (e.g. a module deployed on any node of the cluster will be automatically deployed on the other nodes). Be aware, please, that direct bundle operations, performed via Java code (on BundleContext or Bundle instances), any custom scripts, OSGi Web Console or SSH Console (except clustered commands under cluster:* group), are only effective locally (until the next cluster-wide operation is performed which synchronizes the cluster state in any case). Note, please, when a module is deployed in cluster, it becomes “available” only after its deployment has been successfully completed by a DX processing node. For information and troubleshooting you could refer to a SSH console and “cluster:*” group of commands. The following command:
cluster:bundle-list default
shows the clustered state of bundles in the default group – the global cluster group, which includes all nodes. This command has a shortcut alias:
clb
which does the same. Here is the sample snapshot of the output of this command: 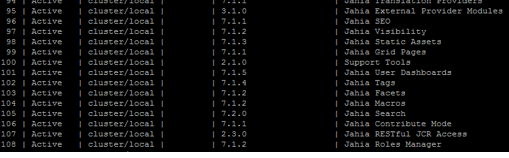
In case of bundle state desynchronization in cluster, e.g. due to a cluster split (network partition) or other issues, it could be required to force synchronization of cluster state for bundles:
cluster:sync –bundle
or for all resources (bundles, config, features):
cluster:sync
Module version update with limited downtime
Starting a new version of a module can take some time (from several seconds to few minutes), depending on its complexity, which will make the module unavailable during this operation, as well as the modules depending on it. This can be even more problematic when it involves a template set module: the consequence will be the unavailability of the sites using this template set during the start operation. The steps explaining how to perform a module deployment in a cluster with limited downtime are described in the "Module version update with limited downtime" procedure.
8.3 Module undeployment
You can undeploy your modules using REST API (or corresponding uninstallBundle.sh command-line script). Alternatively, you can undeploy the modules from the Administration > Server settings > System components > Modules screen. The advantage of doing so using the UI approach is that Digital Experience Manager will inform you of any modules that might depend on the one you're trying to undeploy and will first ask you to disable the module from all the sites that might be using it. In any case, the module undeployment in both cases is a cluster-wide operation as described in the section “3.8.2 Cluster deployment”.
8.4 Deployment on sites
Once the JAR file has been deployed, modules become available. They can then be deployed to Web projects via module management screen in Server Settings or via Studio. If a new version of the module is uploaded on the server, it will be automatically deployed on all sites that are currently using it. All updates will be immediately available in the site.
- have temporary data (Digital Experience Manager caches, errors, thread and heap dumps) inside JBoss’ directory structure
- in case the embedded Apache Derby DBMS is used, a Derby home must be set properly, pointing to the digital-factory-data/dbdata folder
- further GC, thread and heap dump options, which we recommend