Managing server settings
1 Introduction
Digital Experience Manager features a back-office panel designed to manage sites and the overall platform. This interface is called the "Administration Mode" or "Administration".
If you have administrative privileges, you can access the Administration Mode:
- by typing the address of your Digital Experience Manager server directly in your browser, followed by "/administration"
- from the DX menu > Adminsitration
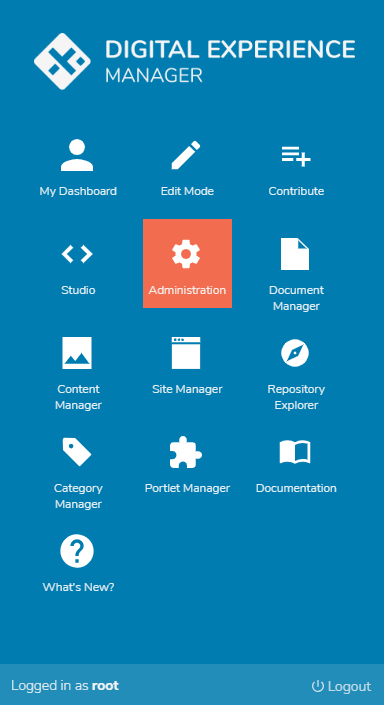
- from the toolbars that appear in some of the modes (e.g. the Studio) by clicking on "Modes" > "Administration".

By default, after install and once a site has been created, Digital Experience Manager comes with:
- A "root" user: this is the system’s "super user". It is granted all permissions on the entire platform and can access all of its functionalities for all hosted sites. It is a system user whose rights cannot be altered, even though it is not directly listed in content object permissions. The "root" user is obviously not subject to system permissions control, it has all rights and they cannot be revoked.
- A "Site Administrators" group (site-administrators) for the users in charge of the site, who will have "complete control" over it (writing, workflows etc.) as well as a group of privileged users (site-privileged) for those who need access to the default workspace, used mainly in the Edit and Contribute Modes. This makes it possible to secure accesses. Please note that when a user is given a role that requires access to the default workspace (e.g., an editor role), then the user will be automatically added to this group.
- Finally, site or server administrators can delegate tasks to other users. For instance, the site administrator can grant other users access to user and group management. Of course, these users will be able to access the features defined by the site administrator, and only these features.
Access to the "Server Settings" tab is normally allowed to the Super Administrator only, since the actions and operations available in this section will affect all the sites hosted on the Digital Experience Manager server (or cluster).
This section is where you can create users, add portlets or edit the roles available on the platform. This is also where you can list, manage, create or delete virtual sites.

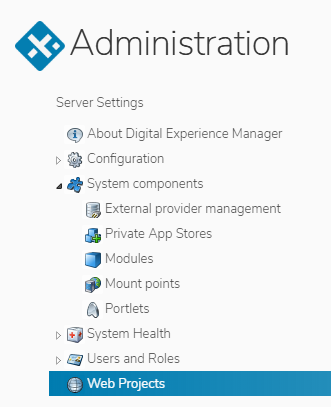
2 "Web Projects"
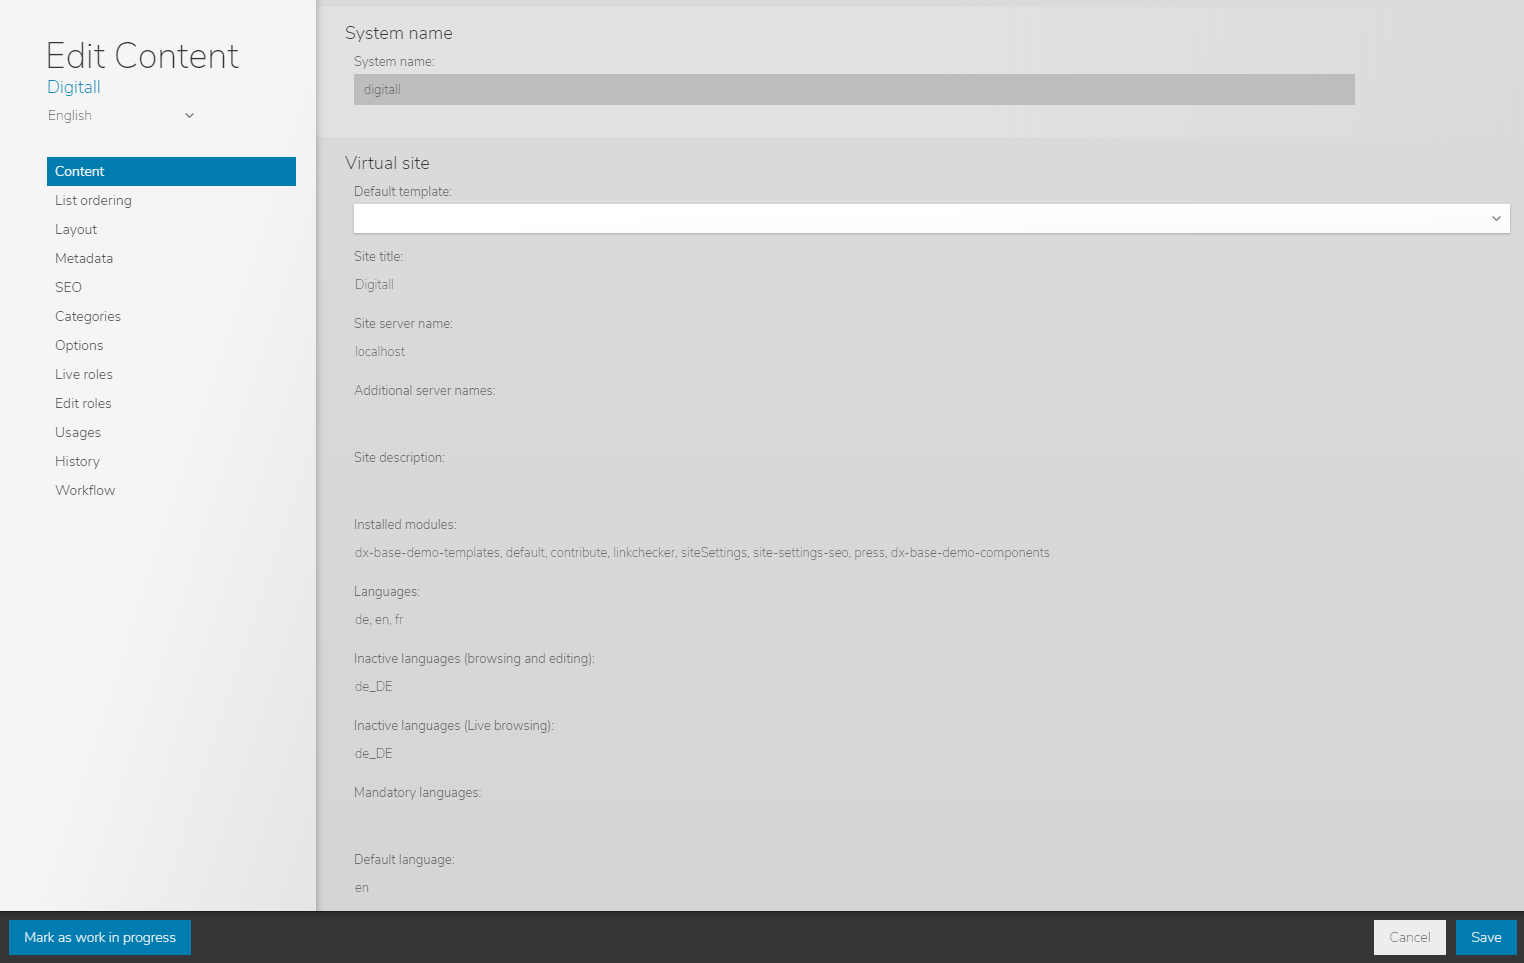
You can create multiple Web projects (or "virtual sites") within a single Digital Experience Manager server. Each site will have its own set of pages, contents, files etc.
However, the notion of "virtual site" in Digital Experience Manager does not refer to straightforward physical sharing of the platform but rather to the possibility of creating separate "virtual spaces".
Each site can have:
- its own domain (i.e., you can choose to manage one site on www.domain-a.com and another site on www.domain-b.com, while hosting both on the same Digital Experience Manager server),
- its own site map along with its own structure,
- its own groups (i.e., you can have two separate "Authors" groups with different members for site A and site B)
- its own settings (please see the features described in section two)
However, each site shares the following with the other sites:
- the same database and API: this makes it possible to access content objects available in other virtual sites. This means that identical contents can be easily re-used across multiple sites (e.g., news items that are the same for several departments with separate sites), although security issues may arise with shared platforms (e.g., the sites of two separate companies are hosted on the same server).
- the same sets of templates (for the sites that share the same set of templates).
- the same modules
- the same category tree
- the same users (LDAP or Digital Experience Manager users: it is not possible for two separate users (e.g., John) to have the same ID between two sites. LDAP groups, like LDAP users, are also common to all sites.)
Creating a new virtual site is useful when a company needs to manage multiple Web projects (e.g., a public Website, one or more Extranets and several department Intranets). The concept of virtual sites allows for better role assignment and makes it possible to use different views (sitemap, themes, search results…) or URLs/domains for different sites, while keeping the ability to share contents, users or mashups.
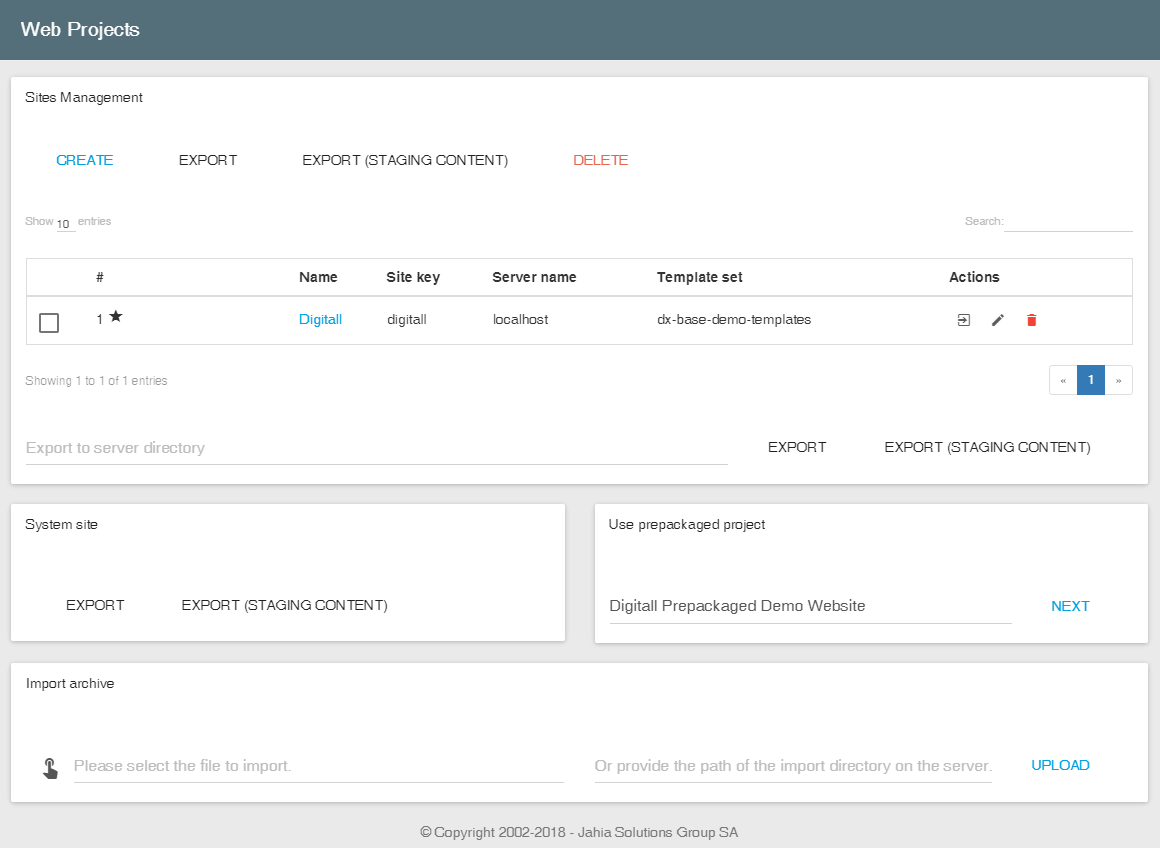
You can access the list of all existing Web projects from this interface.
The default Web project is the one with a star next to it. Action icons to edit, delete or export a site are displayed at the end of each line.
2.1 Creating a Web Project
If the platform does not contain any site yet (which is unlikely on a production server, since development teams usually deliver a readily usable environment), Digital Experience Manager has a dedicated settings screen to create a new Web project.
If there are already sites on the platform, a slightly different interface is displayed, although with the same options.
There are three different ways to create a site. This documentation will only cover the first one in detail, since the second method is mostly used for training purposes and the third one to restore a site backup or to transfer a site from one server to another.
2.1.1 Creating a Web Project From Scratch
Step 1

Name: the value entered in this field will be used in various parts of the Digital Experience Manager interface to designate the site. This value can be changed later on.
Site key: the name of the root node of the site. This name will appear in the default URLs, since all pages and site contents will be stored under it. Therefore, it is recommended to enter a short and descriptive title. You will not be able to change this value later on, so make sure to choose it wisely.
Server name: the name of the default domain where this site will be located. If the site you are creating is not going directly into production but is rather used as a test or development site, then leave localhost in the field, as this value can be properly configured on the production server later on. If in doubt, always leave the localhost value and ask an administrator or a hosting specialist. This value can be changed later on.
Additional server names: the names of additional domains from which this site can be accessed. It is possible to set several additional server names for a site by listing them, separated by a comma, for instance: en.myservername.com, fr.myservername.com . This value can be changed later on.
Description: this informative field is used to add details about the site. This value can be changed later on.
Set as the default Web project: if this box is checked and the platform hosts several sites, visitors will be redirected to this site when they access the server without indicating the desired site. This value can be changed later on.
Create an administrator for the new Web Project: using this option will create a user account with all permissions on the current site. This option is relevant if the site is going to have a specific Webmaster. If the Webmaster uses the "root" account or if a dedicated user account already exists (in Digital Experience Manager or an enterprise directory), then it is not necessary to create a new account.
Once these fields have been filled, click on the "Next" button to select the site’s template and default language.
Step 2
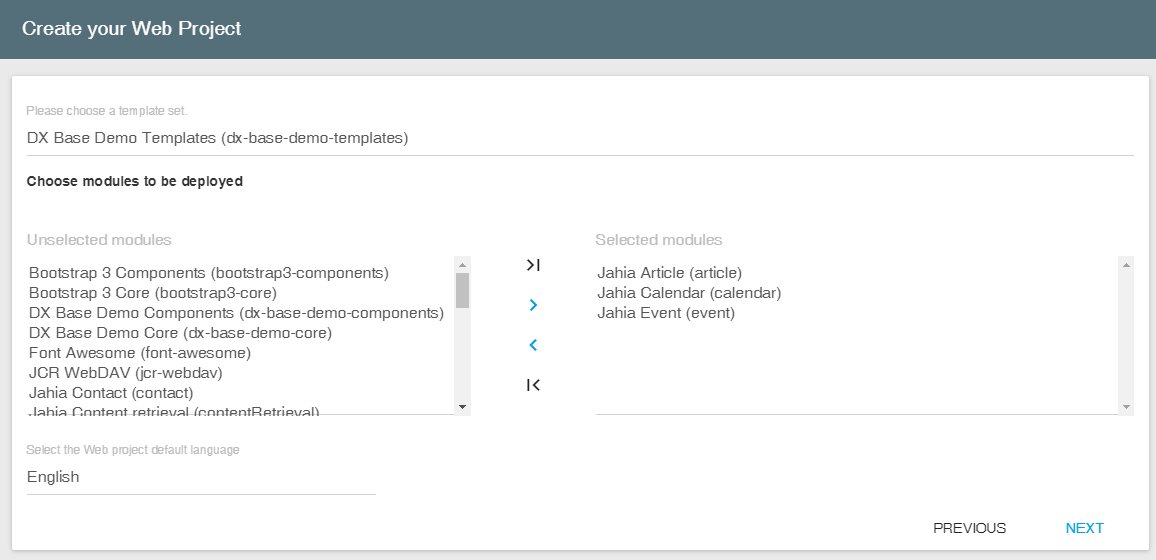
Please choose a template set: select the desired template set in this drop-down menu. If the template set has a preview image, it will be displayed in the area below the menu to facilitate its visual identification.
Choose modules: by default all web projects benefits from components/features that are part of the core software (default module). Modules listed in this screen are the ones deployed on the Digital Experience Manager platform (the war files has been deployed) that can be optionally activated on the project you are creating. Each module listed here can provide new content types or new features usable by editors.
Note: when administrator create a new site, developers or the project responsible is supposed to have given them previously the list of modules to be activated. If this is not the case, modules may be deployed later through the Studio (development or staging platforms) or through the "Manage Modules" panel in the Server Settings section of the Administration if it is a Production platform (when Production Mode is activated the Studio is not available).
Select the Web project default language: this drop-down list contains languages and their local variants. In the case of a multilingual site, select the language considered as the most important. Visitors will be redirected to this language if they try accessing the site without specifying the desired language.
Click on the "Next" button.
Step 3
The next screen displays a summary of all previously entered information in order to perform a last check before creating the Web project. If an error is detected, it is possible to return to the beginning of the creation process to modify the erroneous value. The information submitted on each screen is kept in memory until the user session expires, so there will be no need to re-type everything.

If all the information is correct, click on the "Next" button. A rotating wheel will appear while the server is working and disappear once the site has been created successfully.
Once the site has been created, you are redirected to the main menu of the "Web Project Management" panel, where the new site should now be listed.
For direct access to the newly-created site, use the "Mode" menu in the top bar and select "Edit Mode" or click the "Edit" 
2.1.2 Using a Prepackaged Demo Project
This option can be used to create a new site containing ready-made pages and contents (typically, examples provided by Digital Experience Manager as a demo under the name ACME Space Website Demo): in the drop-down list, select the desired Web project and click on the "Proceed" button.
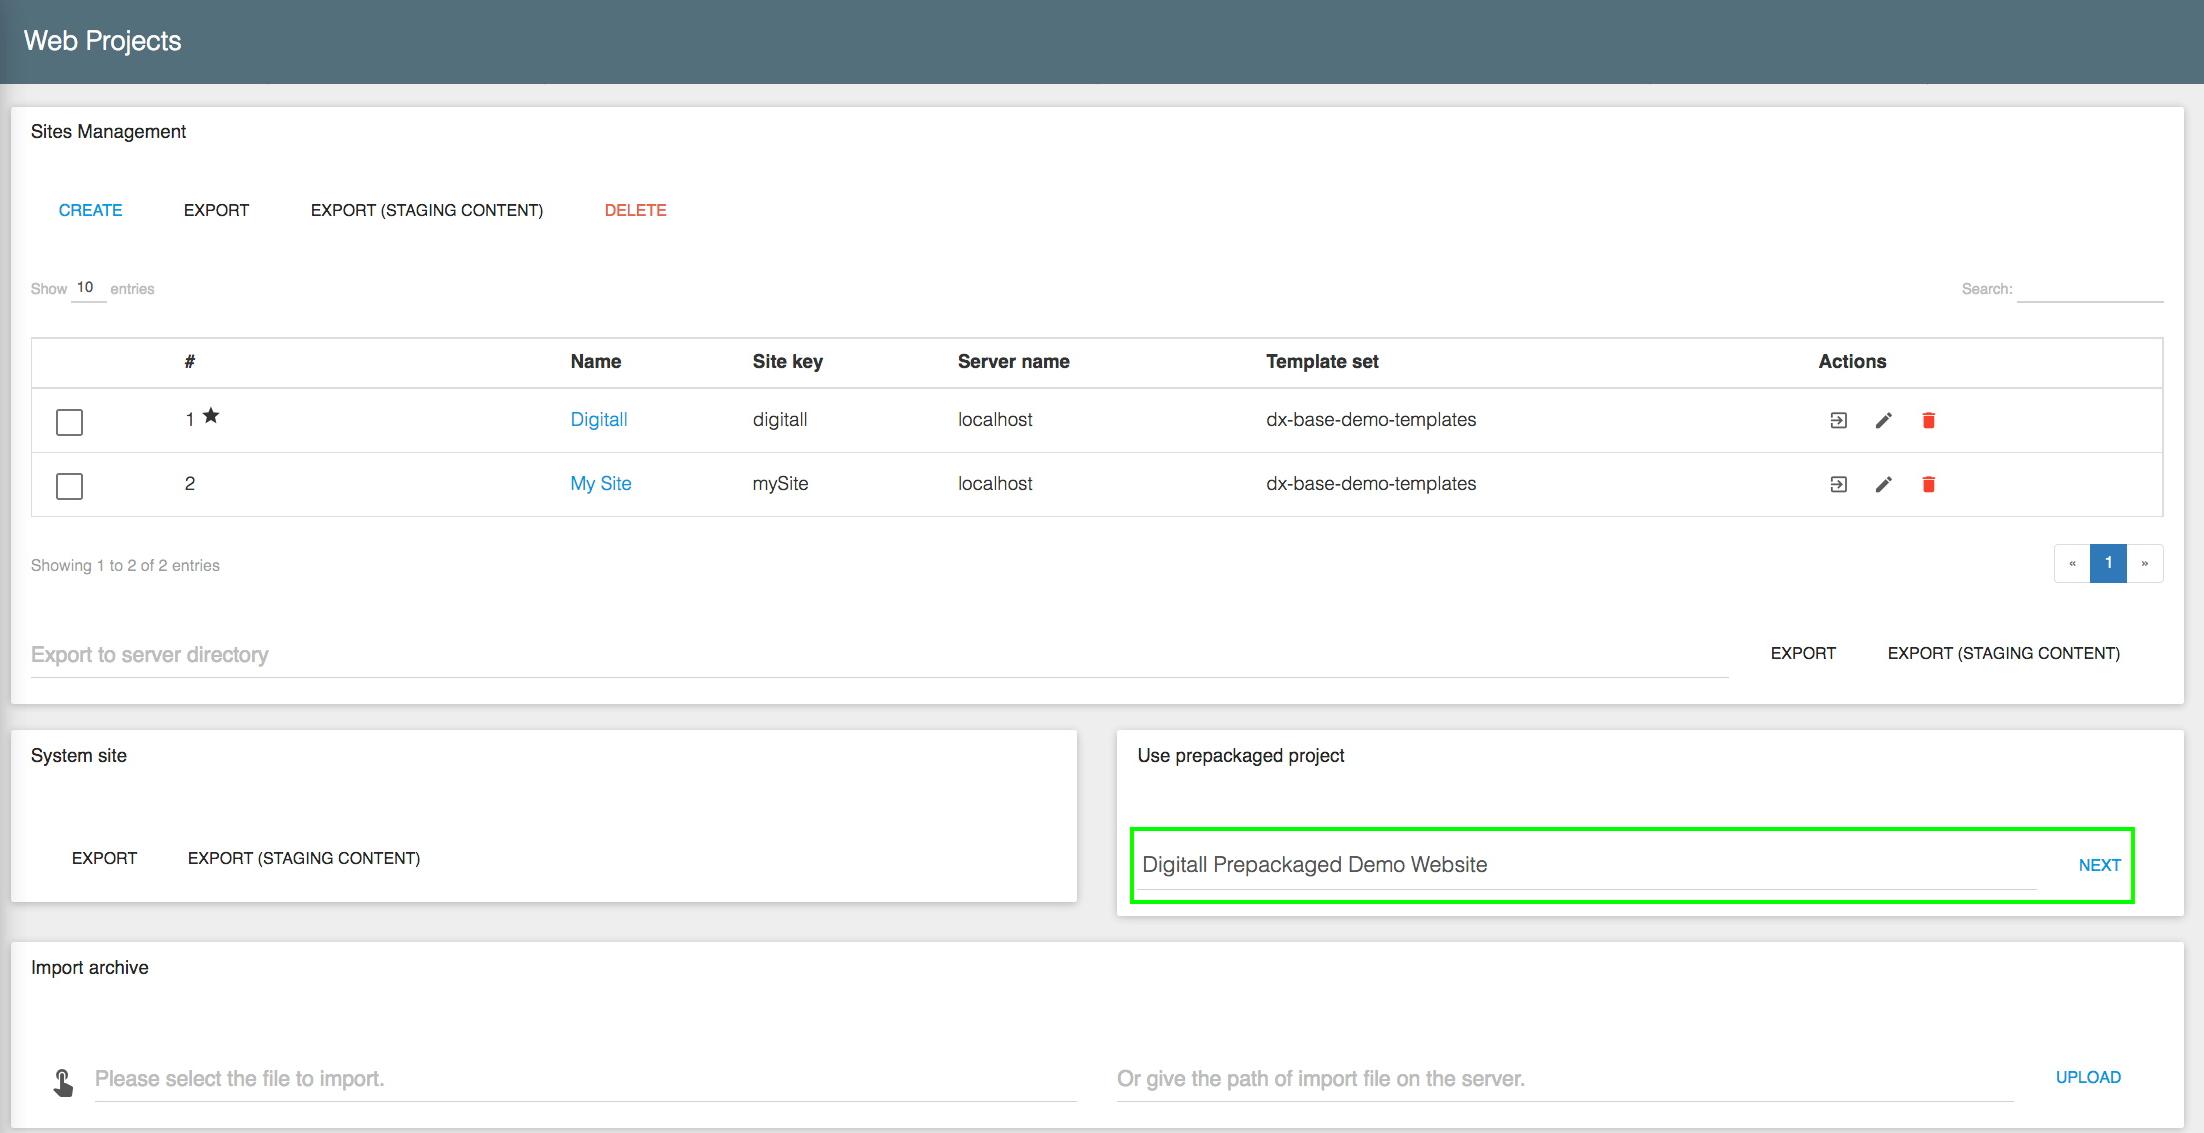
In the next screen, provide the Web project’s title, domain name and unique identifier for default URLs, then click on the "Next" button.
The newly imported site then appears in the list of your Web Projects.
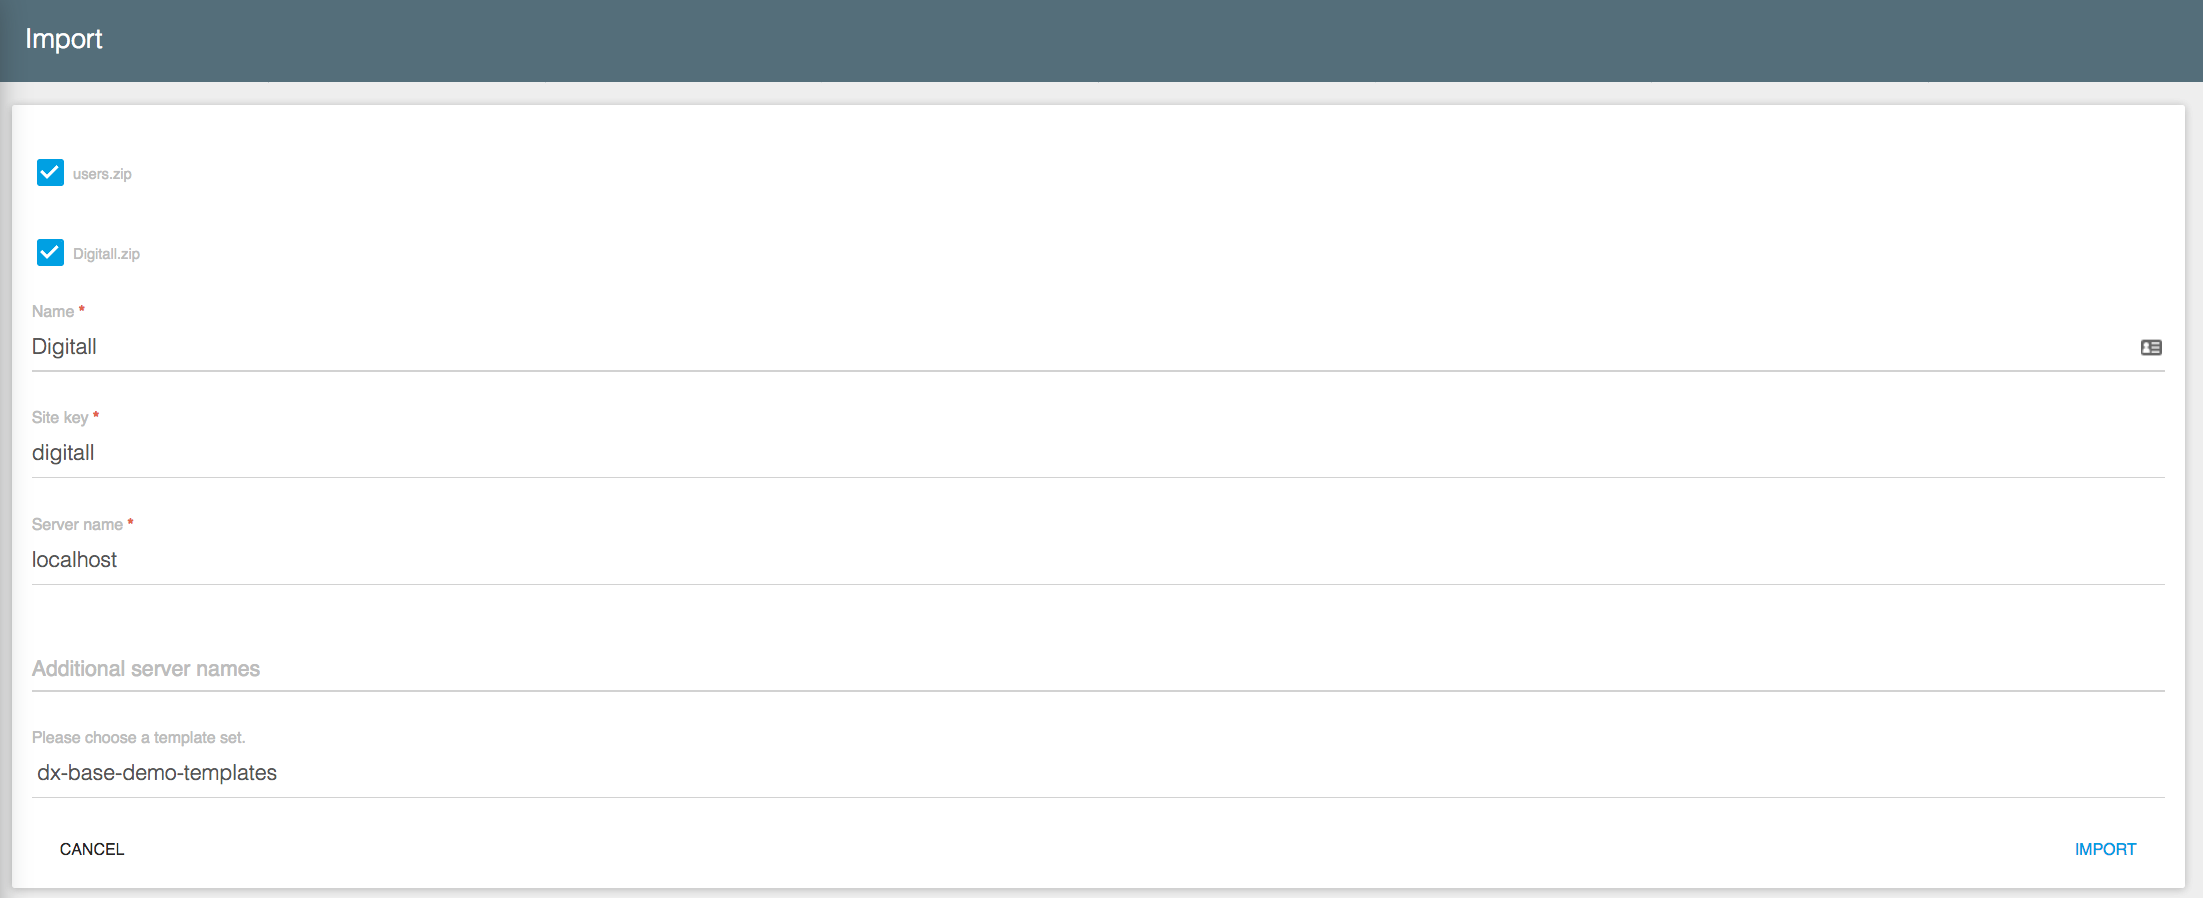
2.1.3 Importing a Previously Exported Web Project
This option makes it possible to select a .zip file from a previous exportation on a local hard drive. The exportation will have been carried out via the dedicated Digital Experience Manager interface (see further down). A new Web project will be created, with the exact same settings and contents as the exported site.
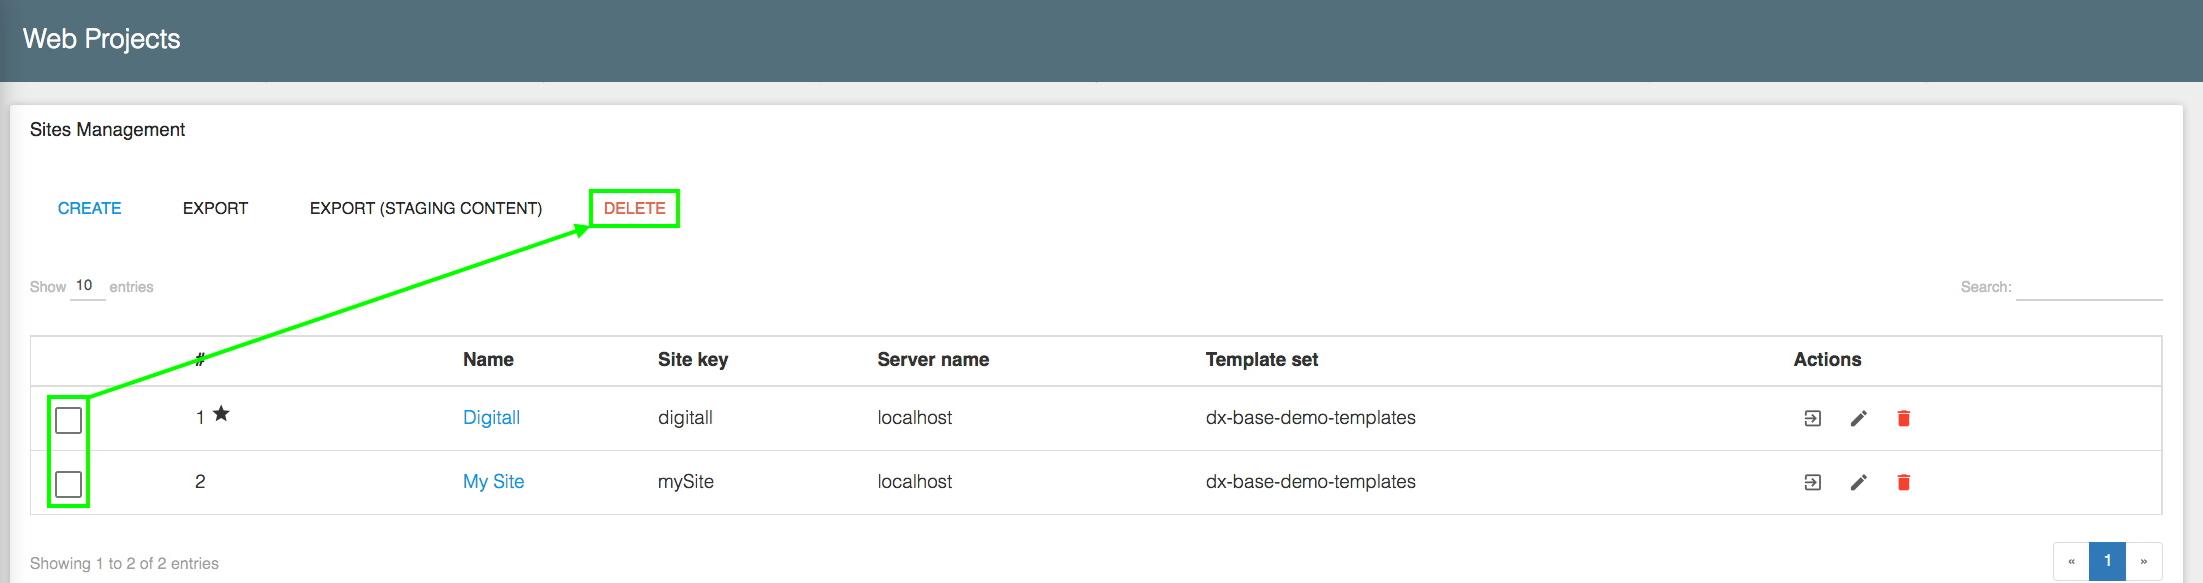
2.2 Deleting a Web Project
To delete a single Web project, click on the corresponding deletion icon. Be aware that this action cannot be undone: it is highly recommended to export the site before deleting it.
To delete multiple Web projects, check the corresponding boxes, then click on the "Delete" button in the action menu at the top.
2.3 Exporting a Web Project
Several situations can require exporting a Web project:
- Backup: an exported site can be imported back in the exact same state as it was. However, this solution requires a manual intervention by an administrator and in no case should be considered a reliable backup method.
- Transfer to another server: can be used to duplicate a site at specific times to work on another server, to run tests, to use as a basis to start new projects etc.
- Transfer from a development server to a production server: it can be convenient to export a project that was completed and pre-filled with content in a development environment and then import it on its future production server.
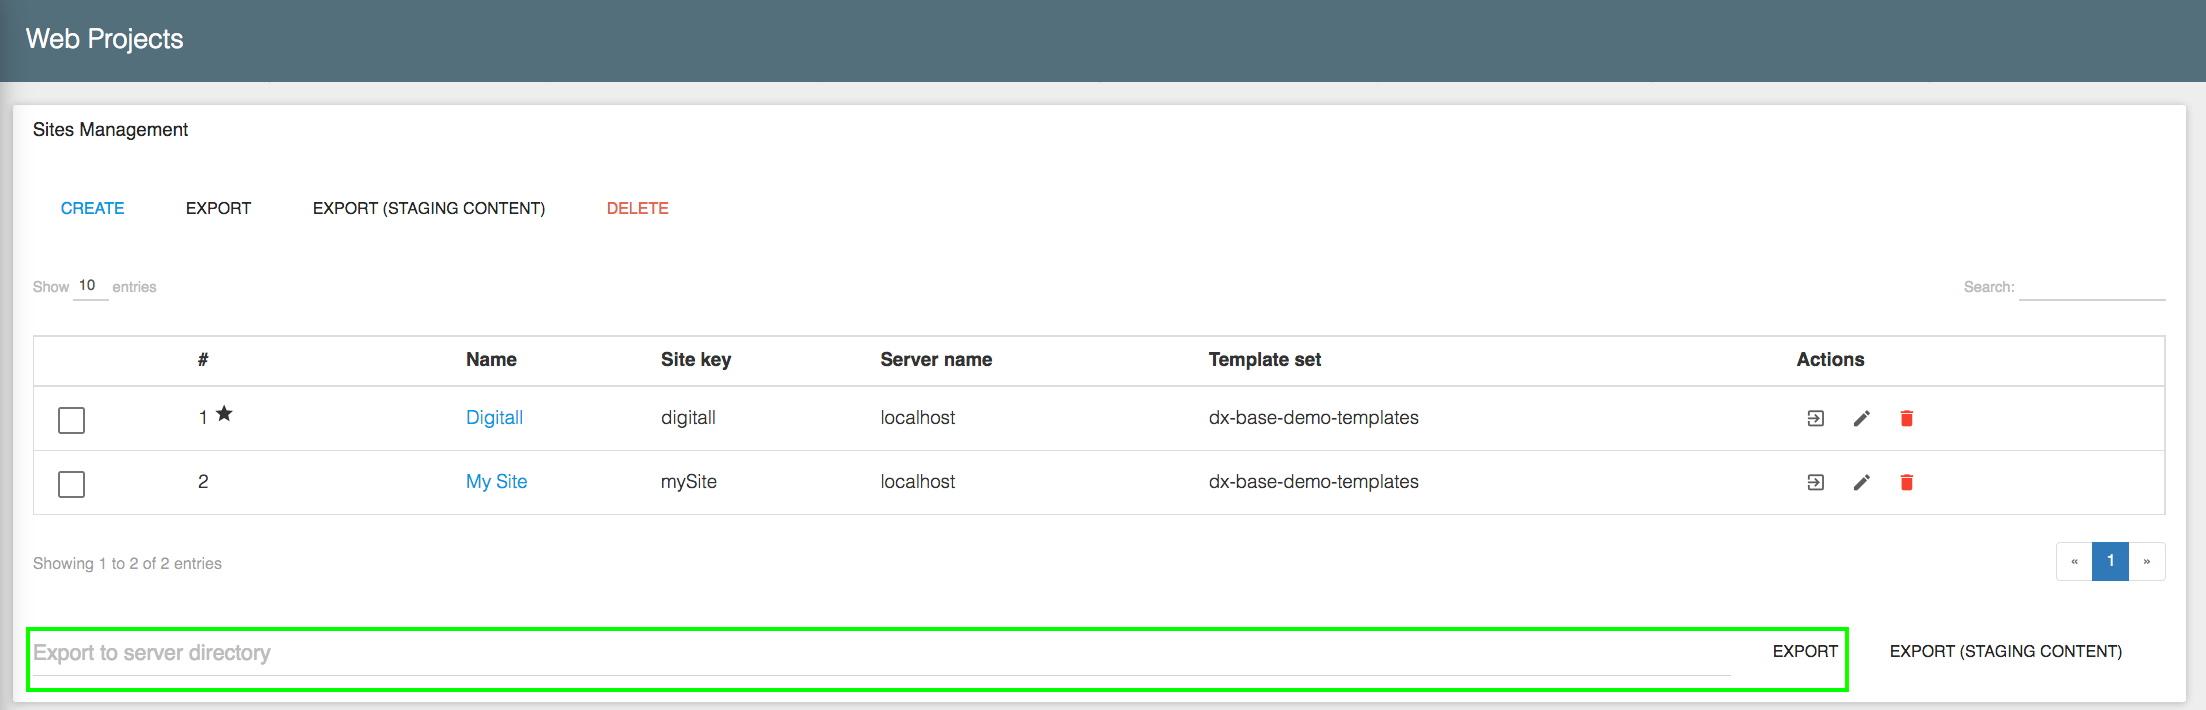
You have the choice to export the staging version (default workspace) or both the staging and published version (live workspace).
To export staging version of a single web project web site only, use the checkbox in front of its name.
Check the selected project(s) you wish to export and click the "Export (staging content)" button.

To export both the staging and published versions of a single Web project or multiple Web projects, check the corresponding box(es) on the left and choose "Export" in the action menu.

The system site can also be exported (but not deleted, renamed or modified). This option is useful if, for instance, shared content has been stored here to make it usable from all sites.
2.4 Editing Web Project Properties
To edit a Web project’s properties, click on its title. In the next screen, you can edit the following fields:
- Web project title
- Web project name
- Web project description
2.5 Other Site-Related Settings
Other settings are available directly in Edit Mode. In the Selector, you can use the contextual menu (click on the three-dots icon) to edit the node for a Website and access additional information and settings.

More details can be found in the Webmaster’s guide.
3 Manage Users
Unlike groups, users are common to the entire system, in order to ensure their uniqueness. Therefore, their configuration can be found in the server settings.
3.1 Creating a User
Go to the "Manage users" panel and click on the "Create new user" button.
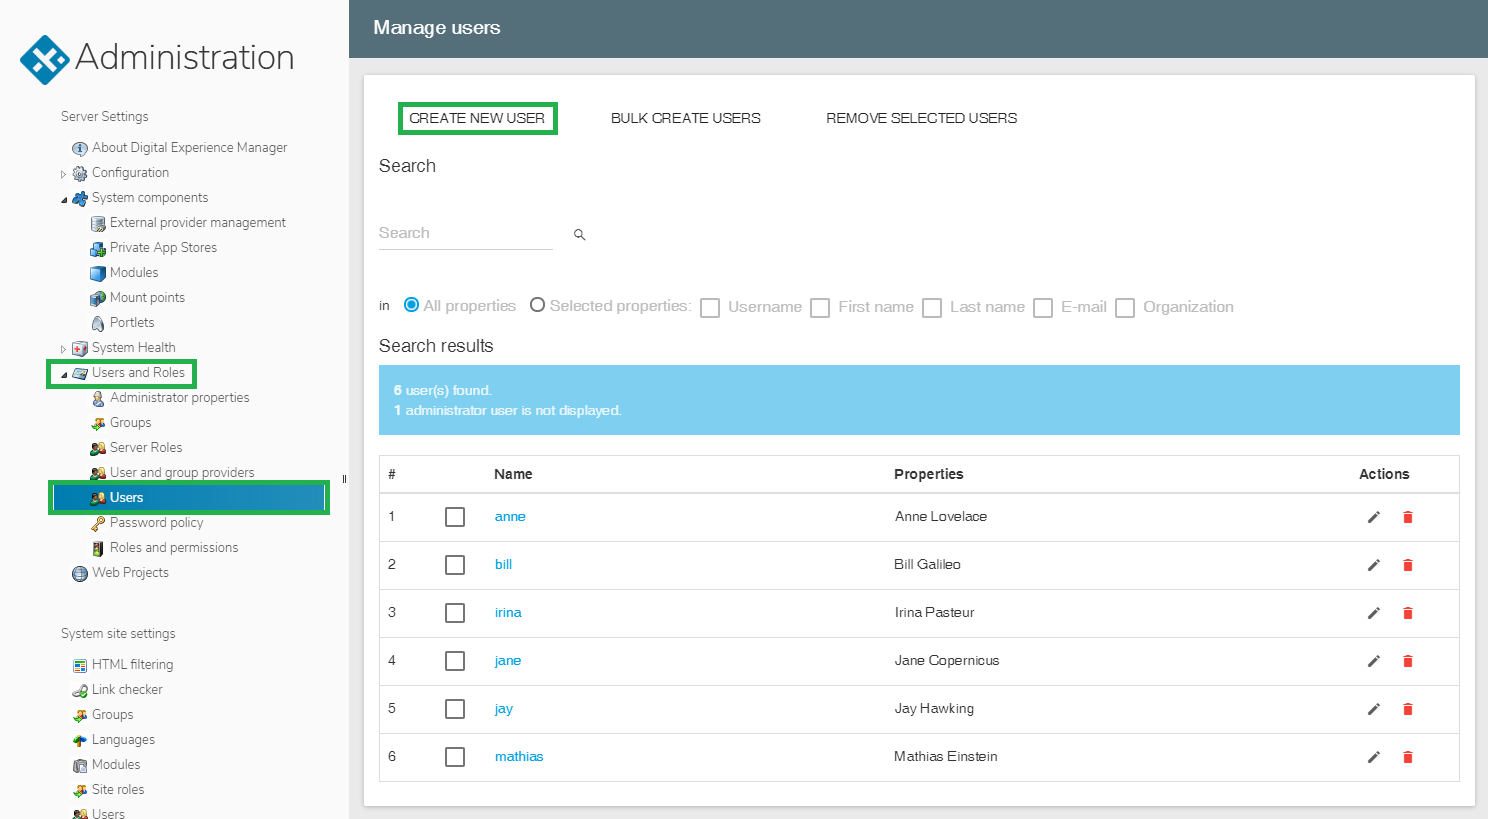
The user creation screen will be displayed, where you can enter the properties for the new user:

3.2 Editing User Properties
To bring modifications to a user’s properties, just select the username and click the "Edit/View selected user properties" button. You will be redirected to a screen similar to the user creation screen, where you will be able to edit all the properties except for the user’s name.

3.3 Removing a User
In the users’ list, click on the one you want to delete to select it, then click on the "Remove selected user" button.

3.4 Locking a User
It is possible to lock a user account, i.e., to disable their account, which will prevent them from logging in.
Locking an account can be convenient because it blocks the user without destroying their account, i.e., without deleting all the information, documents and contents in their personal directory.
To lock a user, you need to open their properties by double-clicking on their name in the users’ list (or by selecting it and clicking on the "Edit/View selected user properties" button). Once the properties are displayed, check the "Account locked" box, then click on the "OK" button.
With Digital Experience Manager, as soon as an account is blocked, the session is immediately terminated.

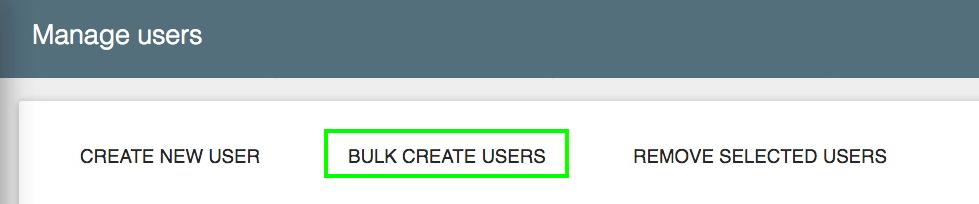
3.5 Batch-Importing Users
Users can be imported into Digital Experience Manager in batches, using a CSV file.
It must contain at least a username and a password, but it may contain all properties for a user. The CSV fields must imperatively be specified via a header such as this one:
j:nodename,j:password,j:firstName,j:lastName
steven,steven1234,Steven,ACME
robert, robert1234, Robert, ABME
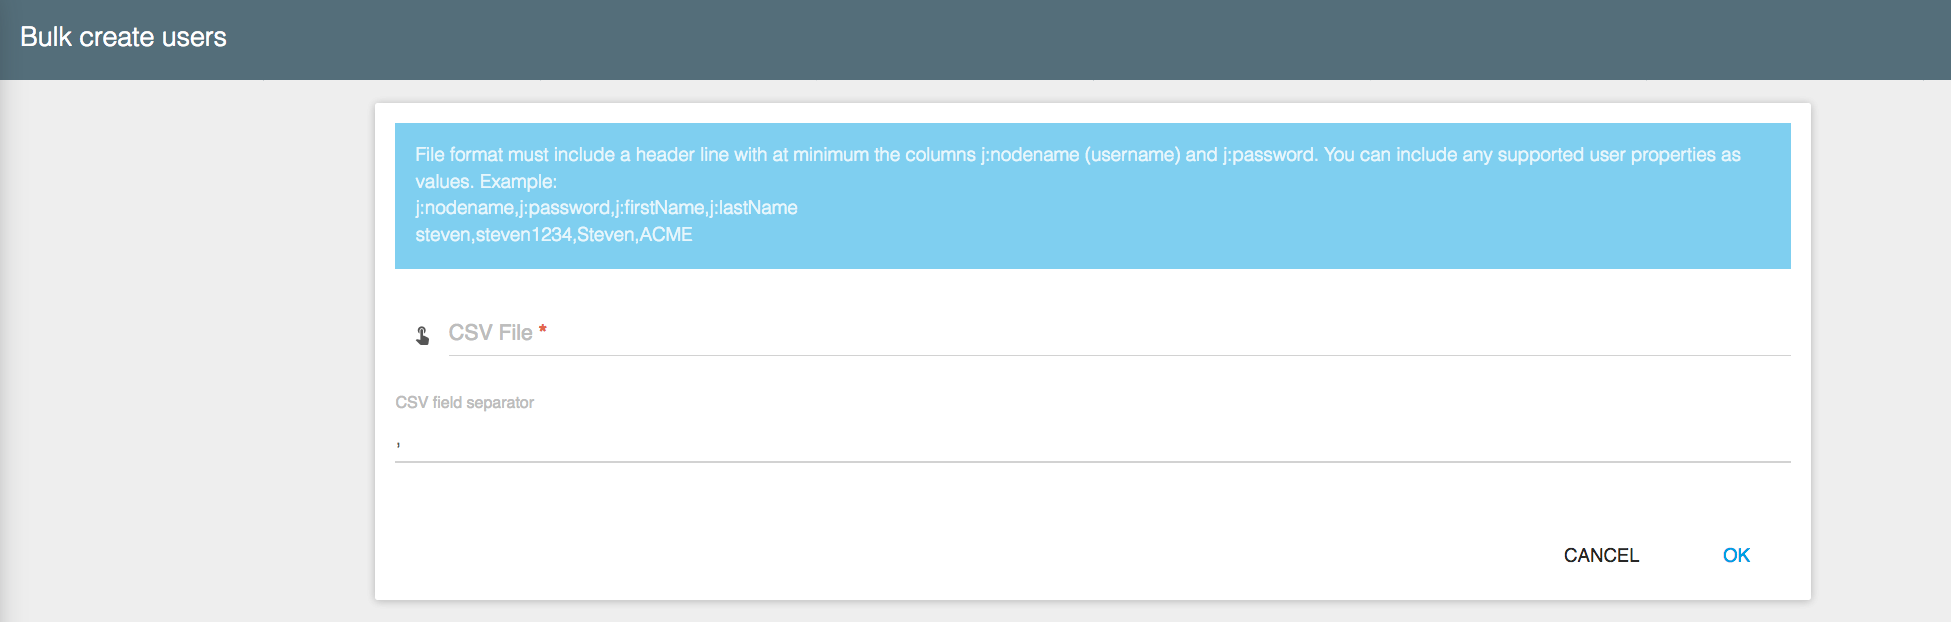
Finally, do not forget to specify the separator before importing, here the "," character.
3.6 External Users and groups provider
Digital Experience Manager can also have access to an external source of users and groups. Go to users and Roles and select User and group providers tab.
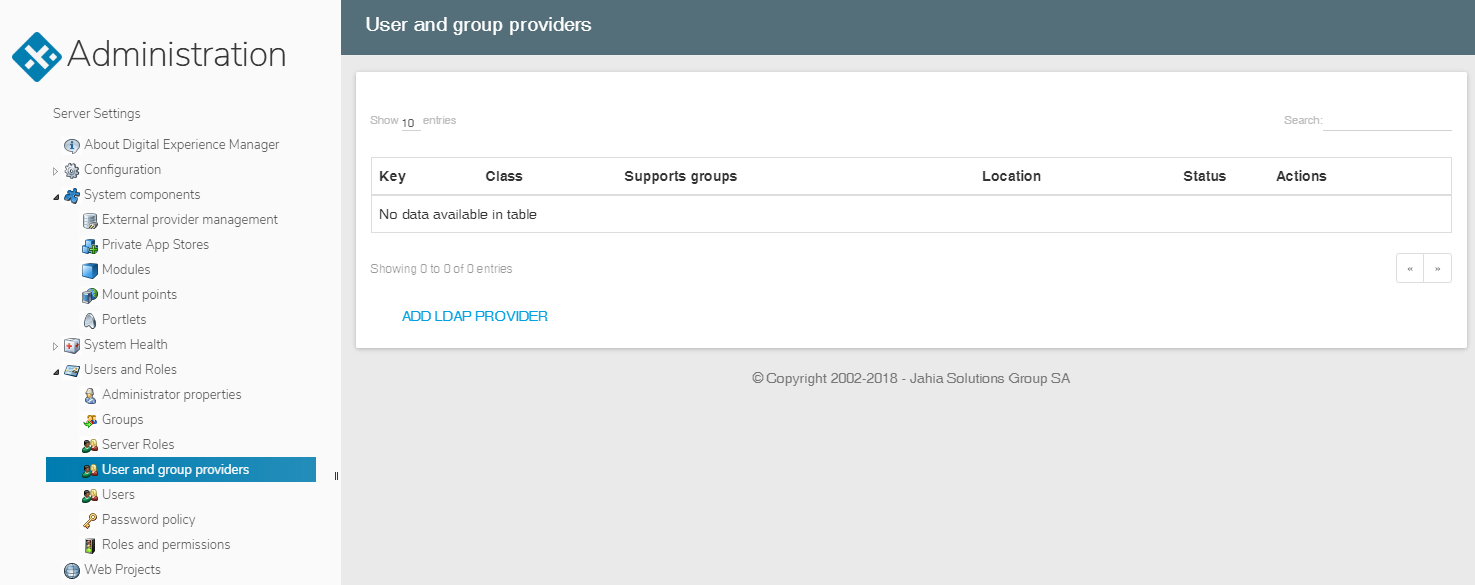
Digital Experience Manager is able to connect with an external LDAP source. Click on the "Add LDAP provider" button and provide all needed data to create this connection.
If your LDAP external provider evolves, it is possible to edit it in order to update its connection information. You can also suspend its connection or delete it if this provider is no longer available.
4 E-mail Settings
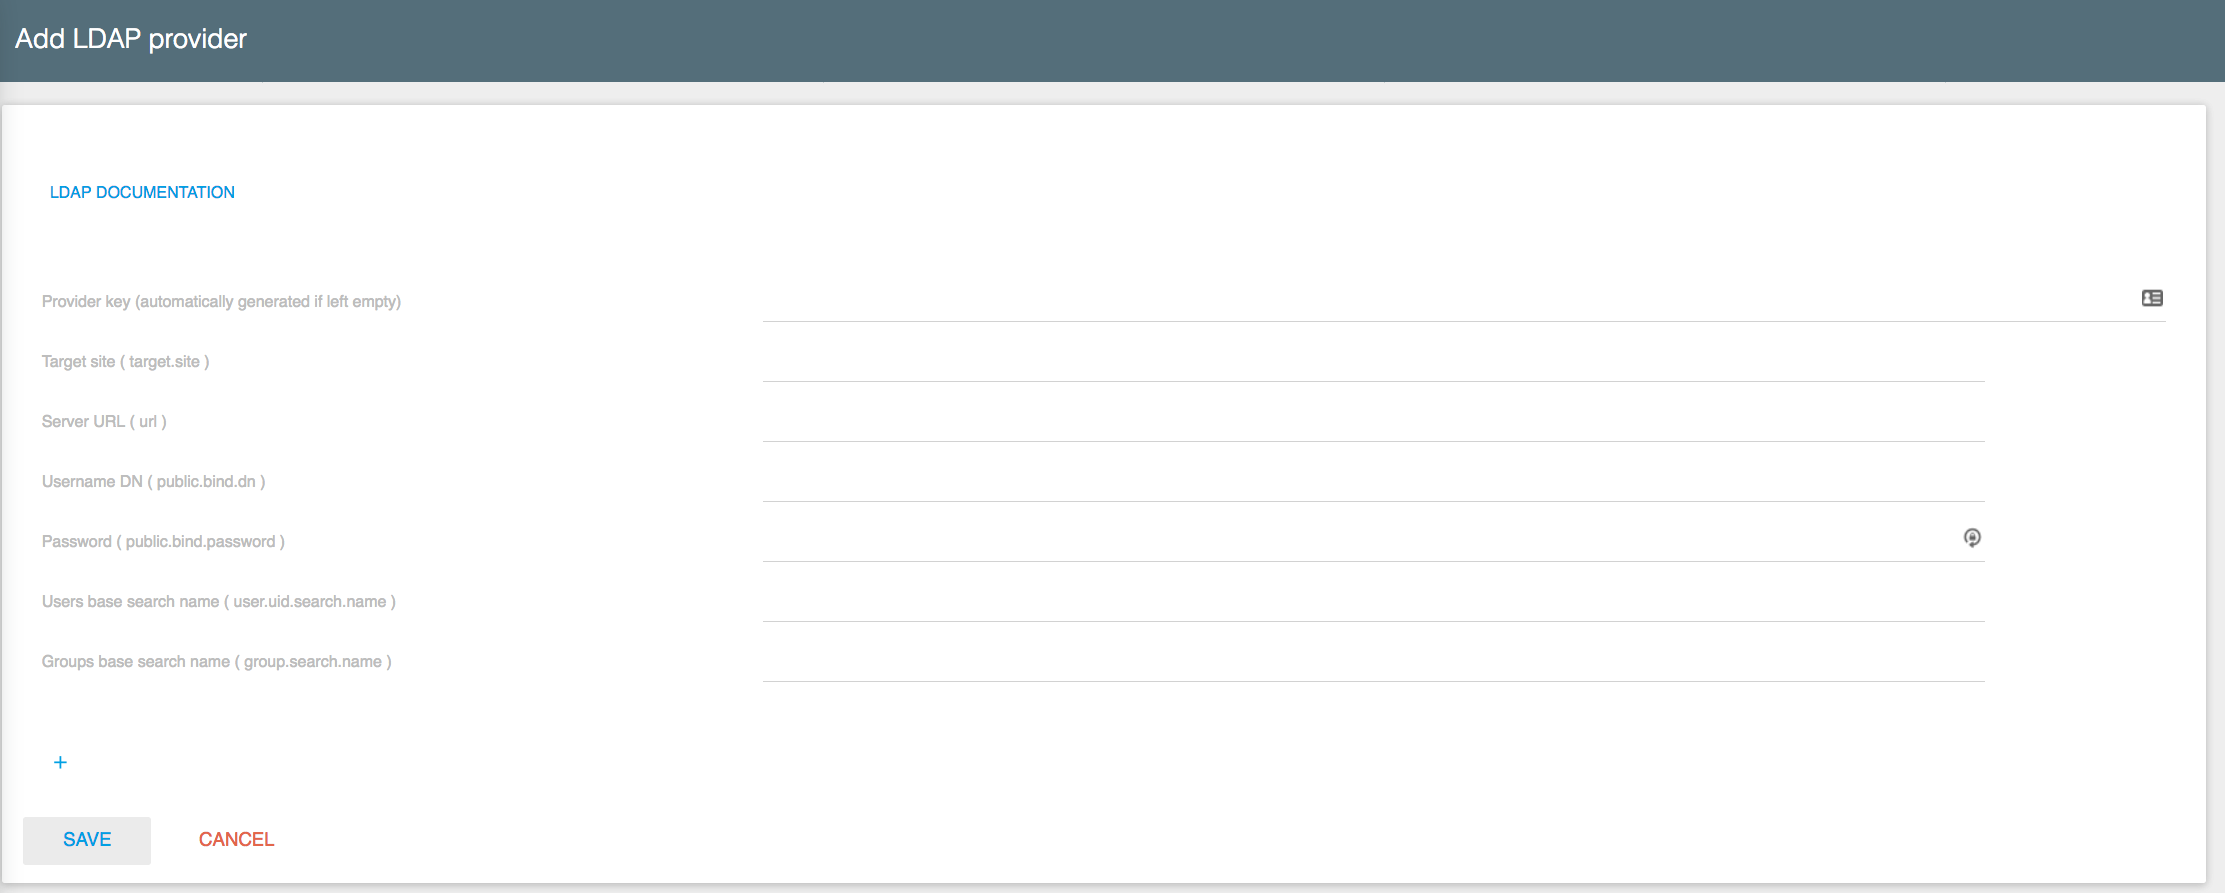
In this panel, you can edit the settings for the mail server used to send e-mail notifications. These parameters should have been entered previously when installing the Digital Experience Manager server.
To configure your mail server correctly, start by entering your SMTP server address. Then you can enter the system administrator’s e-mail address. They will receive e-mail notifications if system errors occur. You can also define the e-mail address from which the automatic system-level notifications will originate. Of course, this e-mail address must be recognized and accepted by the SMTP server.
Here is additional information about these settings:
- Mail server: this field contains the e-mail server’s SMTP address. It may contain some advanced properties like:
- port number: if not using the standard SMTP port (25)
- username and password: if the SMTP server requires authentication
- additional properties: in order to enable TLS, for instance.
The value in this field should be formatted as follows:
<username>:<password>@<smtp-host>:<smtp-port>[Parameter1=Value1,Parameter2=Value2,...]All arguments are optional, except <smtp-host>. Should you need more details, you will find examples of use further down.
- The Mail administrator field contains one or more e-mail addresses separated by commas. Each of these users will receive system-level notifications (if enabled).
- Finally, the Mail from field will be used as the sender address for the e-mail notifications.
- Disable workflow task notifications prevent workflows from sending emails.
In order to illustrate various possible configurations, here are a few examples of use:
- The SMTP server does not require authentication and uses standard port 25:
smtp.acme.com - The SMTP server requires authentication and uses non-standard port 11019:
username:secret-password@smtp.acme.com:11019 - Example for a Gmail account: the SMTP server requires authentication and TLS is enabled:
acme@gmail.com: secret-password@smtp.gmail.com:587[mail.smtp.starttls.enable=true] - If necessary, this enables advanced e-mail debugging options in order to see the details of communication with the SMTP server:
smtp.acme.com:25[mail.debug=true]
Finally, the event notification level option is only used to send notification e-mails about system errors. Only system administrators of the platform are affected by this option (see further up for the list of recipients).
On the other hand, the e-mail server configuration affects all e-mail notifications in Digital Experience Manager (including workflow notifications for instance) and not only system-level notifications.
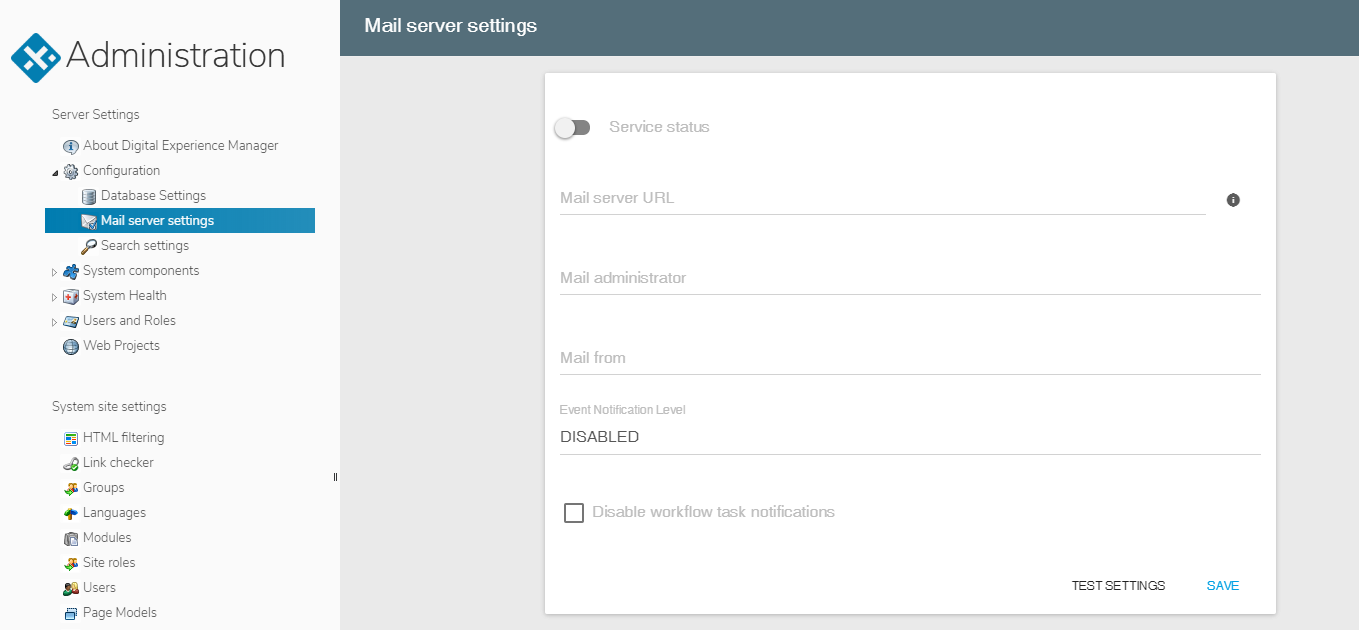
5 Manage Portlets
Digital Experience Manager supports the JSR168 (Portlet 1.0) and JSR286 (Portlet 2.0) standards natively. Generic portlets can be easily deployed and used within Digital Experience Manager, which can act as an additional portal server.
A portlet is generally a small Web application that can manage several instances. For example, an administrator can deploy a generic portlet such as an "RSS Portlet", used to read and display an RSS feed. This generic portlet can then be used in several pages or even sites to display totally different RSS feeds. Digital Experience Manager will process each feed as an instance of the portlet. Each instance is saved and considered as a "mashup" available in the application.
The generic portlet is deployed and managed directly from this section of the administration center. The Super Administrator can then define which users are allowed to create new instances from this portlet (e.g., new RSS feeds). Each of these instances can then be assigned different user-specific rights. This method allows the administrator to define who can add feeds and who can place them inside a page in a specific site. This system only makes sense if the administrator wishes to keep control over the "mashup instances" that are generated. If not, just add the "users" group (all identified users) to each portlet and then each user will be free to create as many instances of the portlet as they want.
To learn how to develop new portlets or how to deploy an existing portlet in your Digital Experience Manager environment, please refer to the online documentation available on www.jahia.com.
Like in the "Web Project Management" panel, you will find in the "Manage Portlets" panel a list of all deployed portlets in the upper part of the main menu. You can click on the available operations and actions next to each portlet to display more details, edit their access rights or display their usage list.
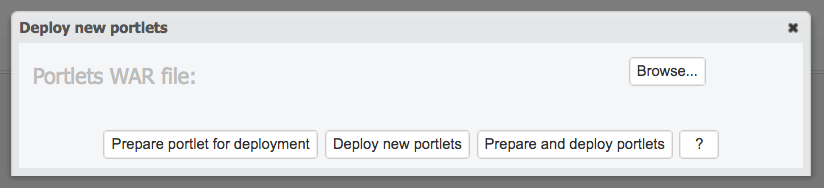
To deploy a portlet in Digital Experience Manager’s default Tomcat application server, a developer will need to edit a configuration file provided with the portlet. Click on the "?" button to display a description of this operation. It can also be done automatically by clicking on the "Prepare portlet for deployment" or "Prepare and deploy portlets" button.
Once the portlet is deployed, you may need to refresh the portlets list.
If you use an application server other than Tomcat, you must perform this operation manually and deploy the portlets as specified in the documentation of your application server.
6 Edit Super Administrator Properties
As the Super Administrator, you can edit your own root user properties (name, password, e-mail…) at any time.

Once you have updated the desired information, click on the Save button.
7 Server and Cache Status
In this panel, the Super Administrator can find information about the various system parameters available from their Digital Experience Manager server and they can monitor (and flush) the various cache levels managed by the application.
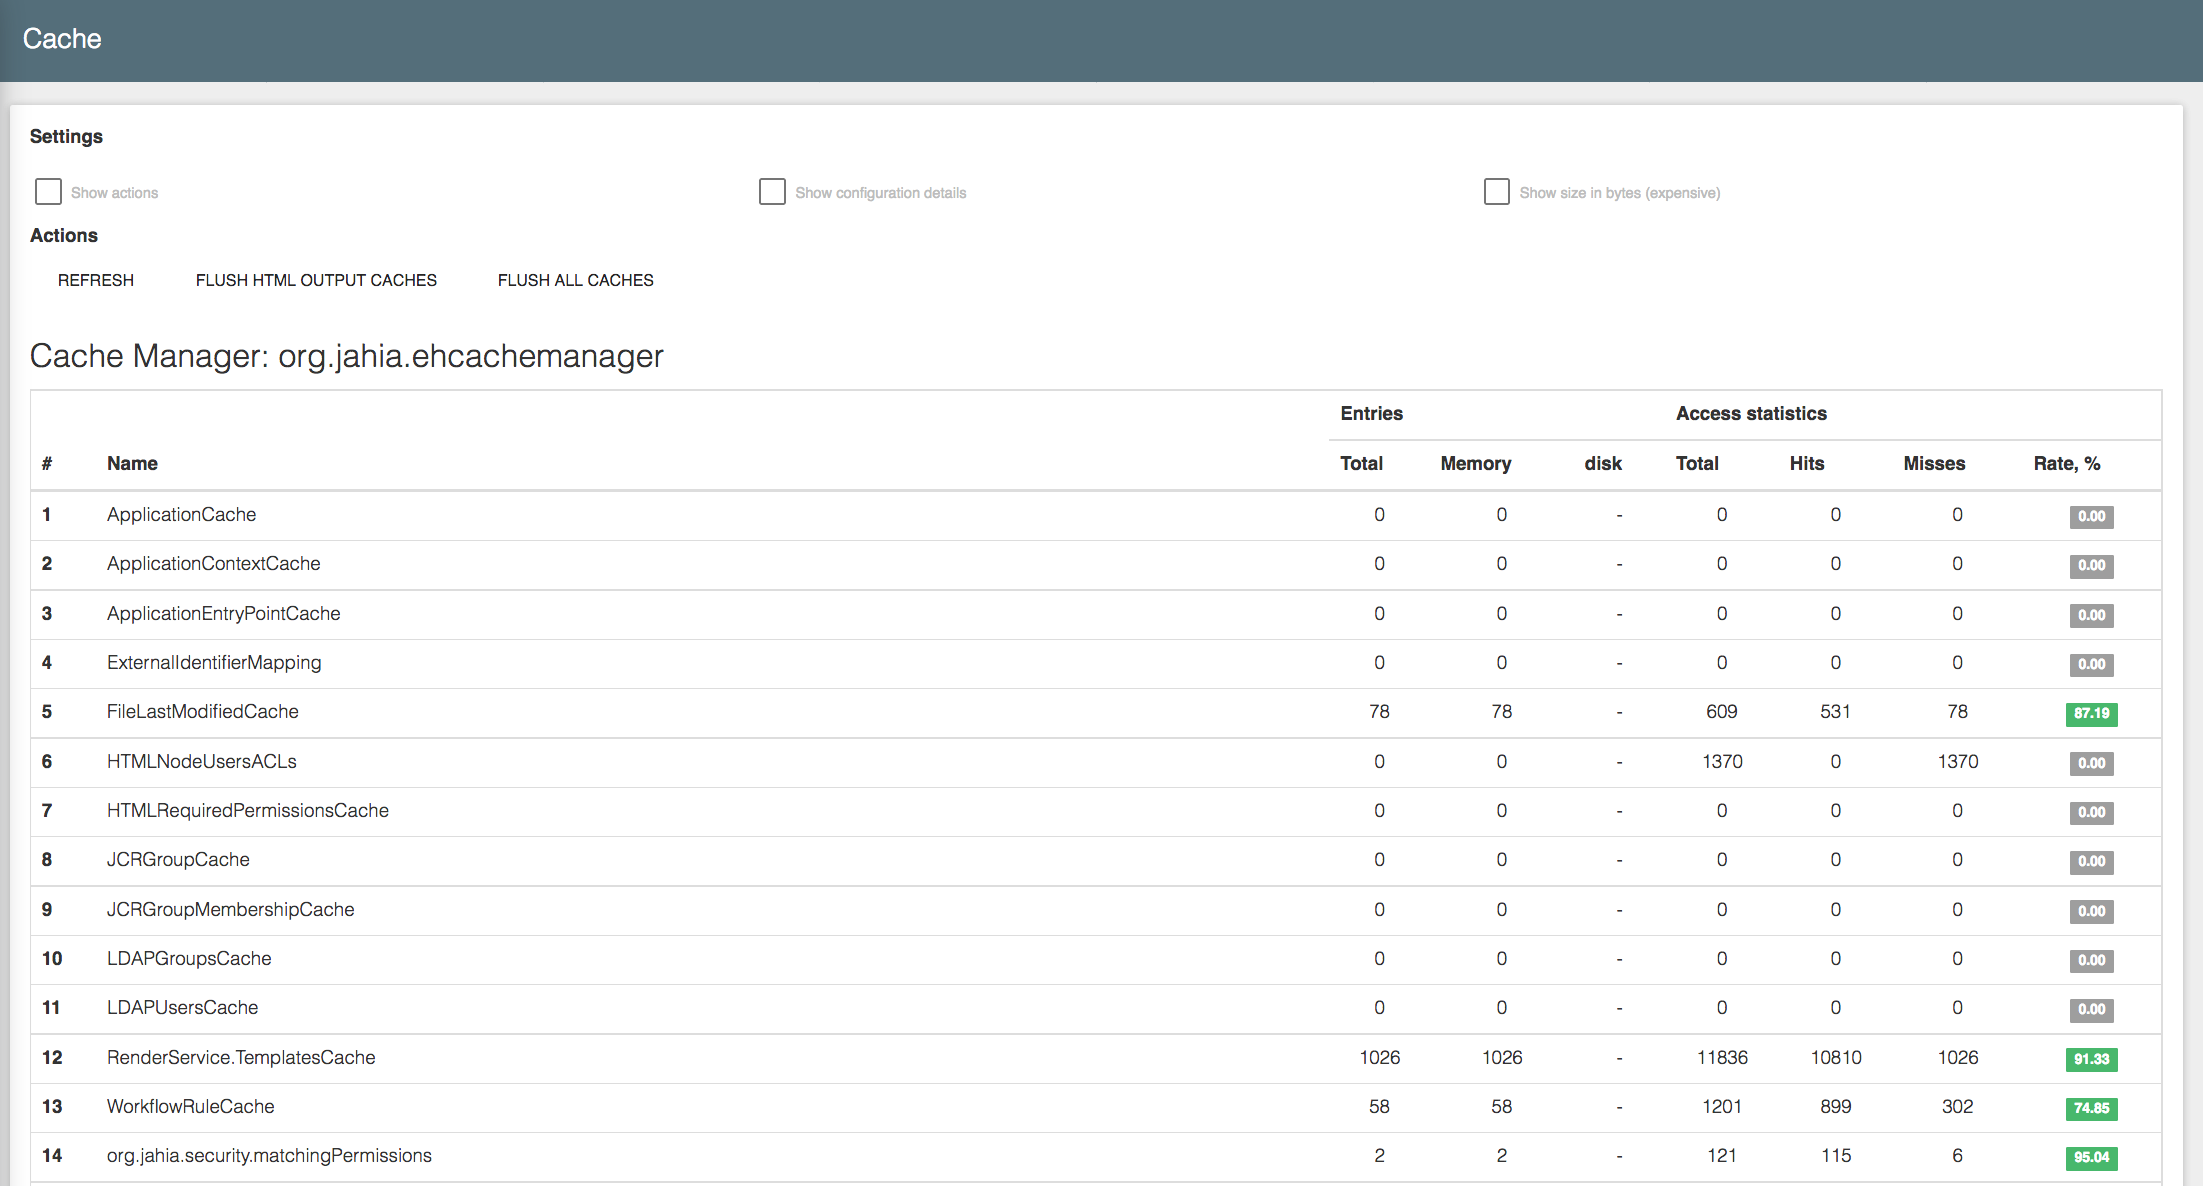
8 Cache Management
This panel allows to visualize the current state of all cache layers, front-end and back-end and to verify their level of efficiency.
The buttons at the top of the panel launch a purge of the following caches :
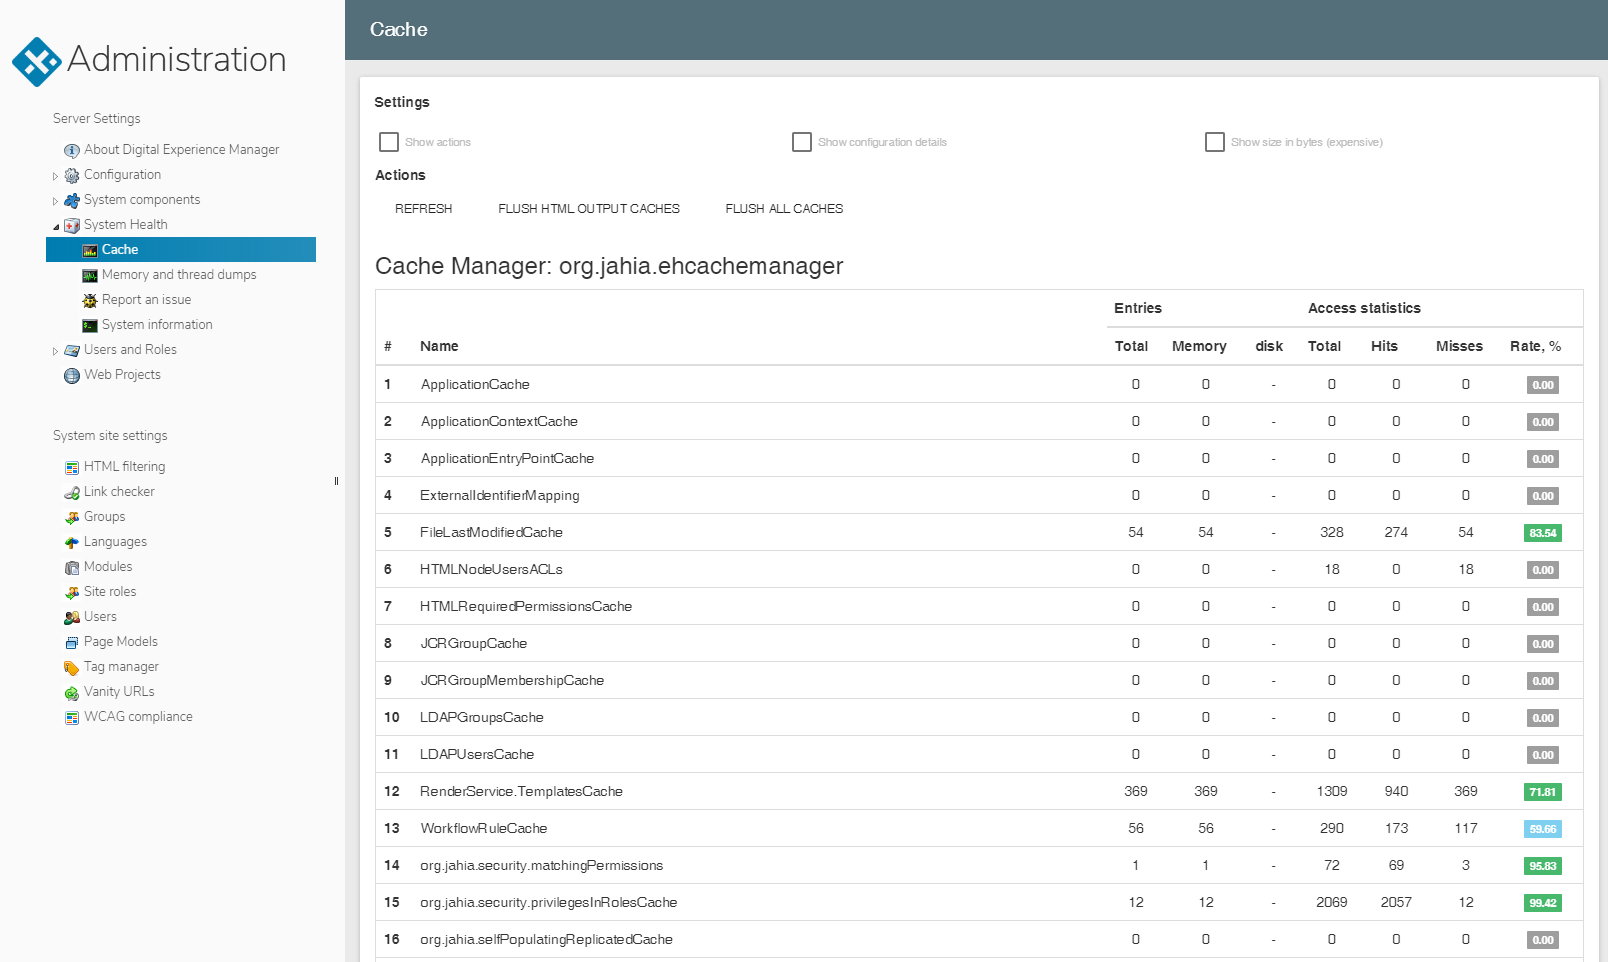
- HTML output caches : all the HTML cache fragments (front-end)
- All caches : all front-end and back-end caches
To purge more selectively the back-end caches, check the "Show actions" checkbox. The end of the panel displays a Flush button next to each item in the list.
Be careful: a cache purge is not a trivial action in term of data coherence, stability and performances. Flushing front caches (HTML fragments) will oblige the platform to regenerate each fragment as soon as a content item is requested by a user and may imply a heavy CPU overload. Such flushing should never be done on a production platform unless you perfectly master the consequences and how the software will react, especially if your server is already facing a heavy charge.
Statistics can be activated for EHCache or Hibernate if necessary by clicking the corresponding "Enable statistics" button. The panels will expand accordingly.
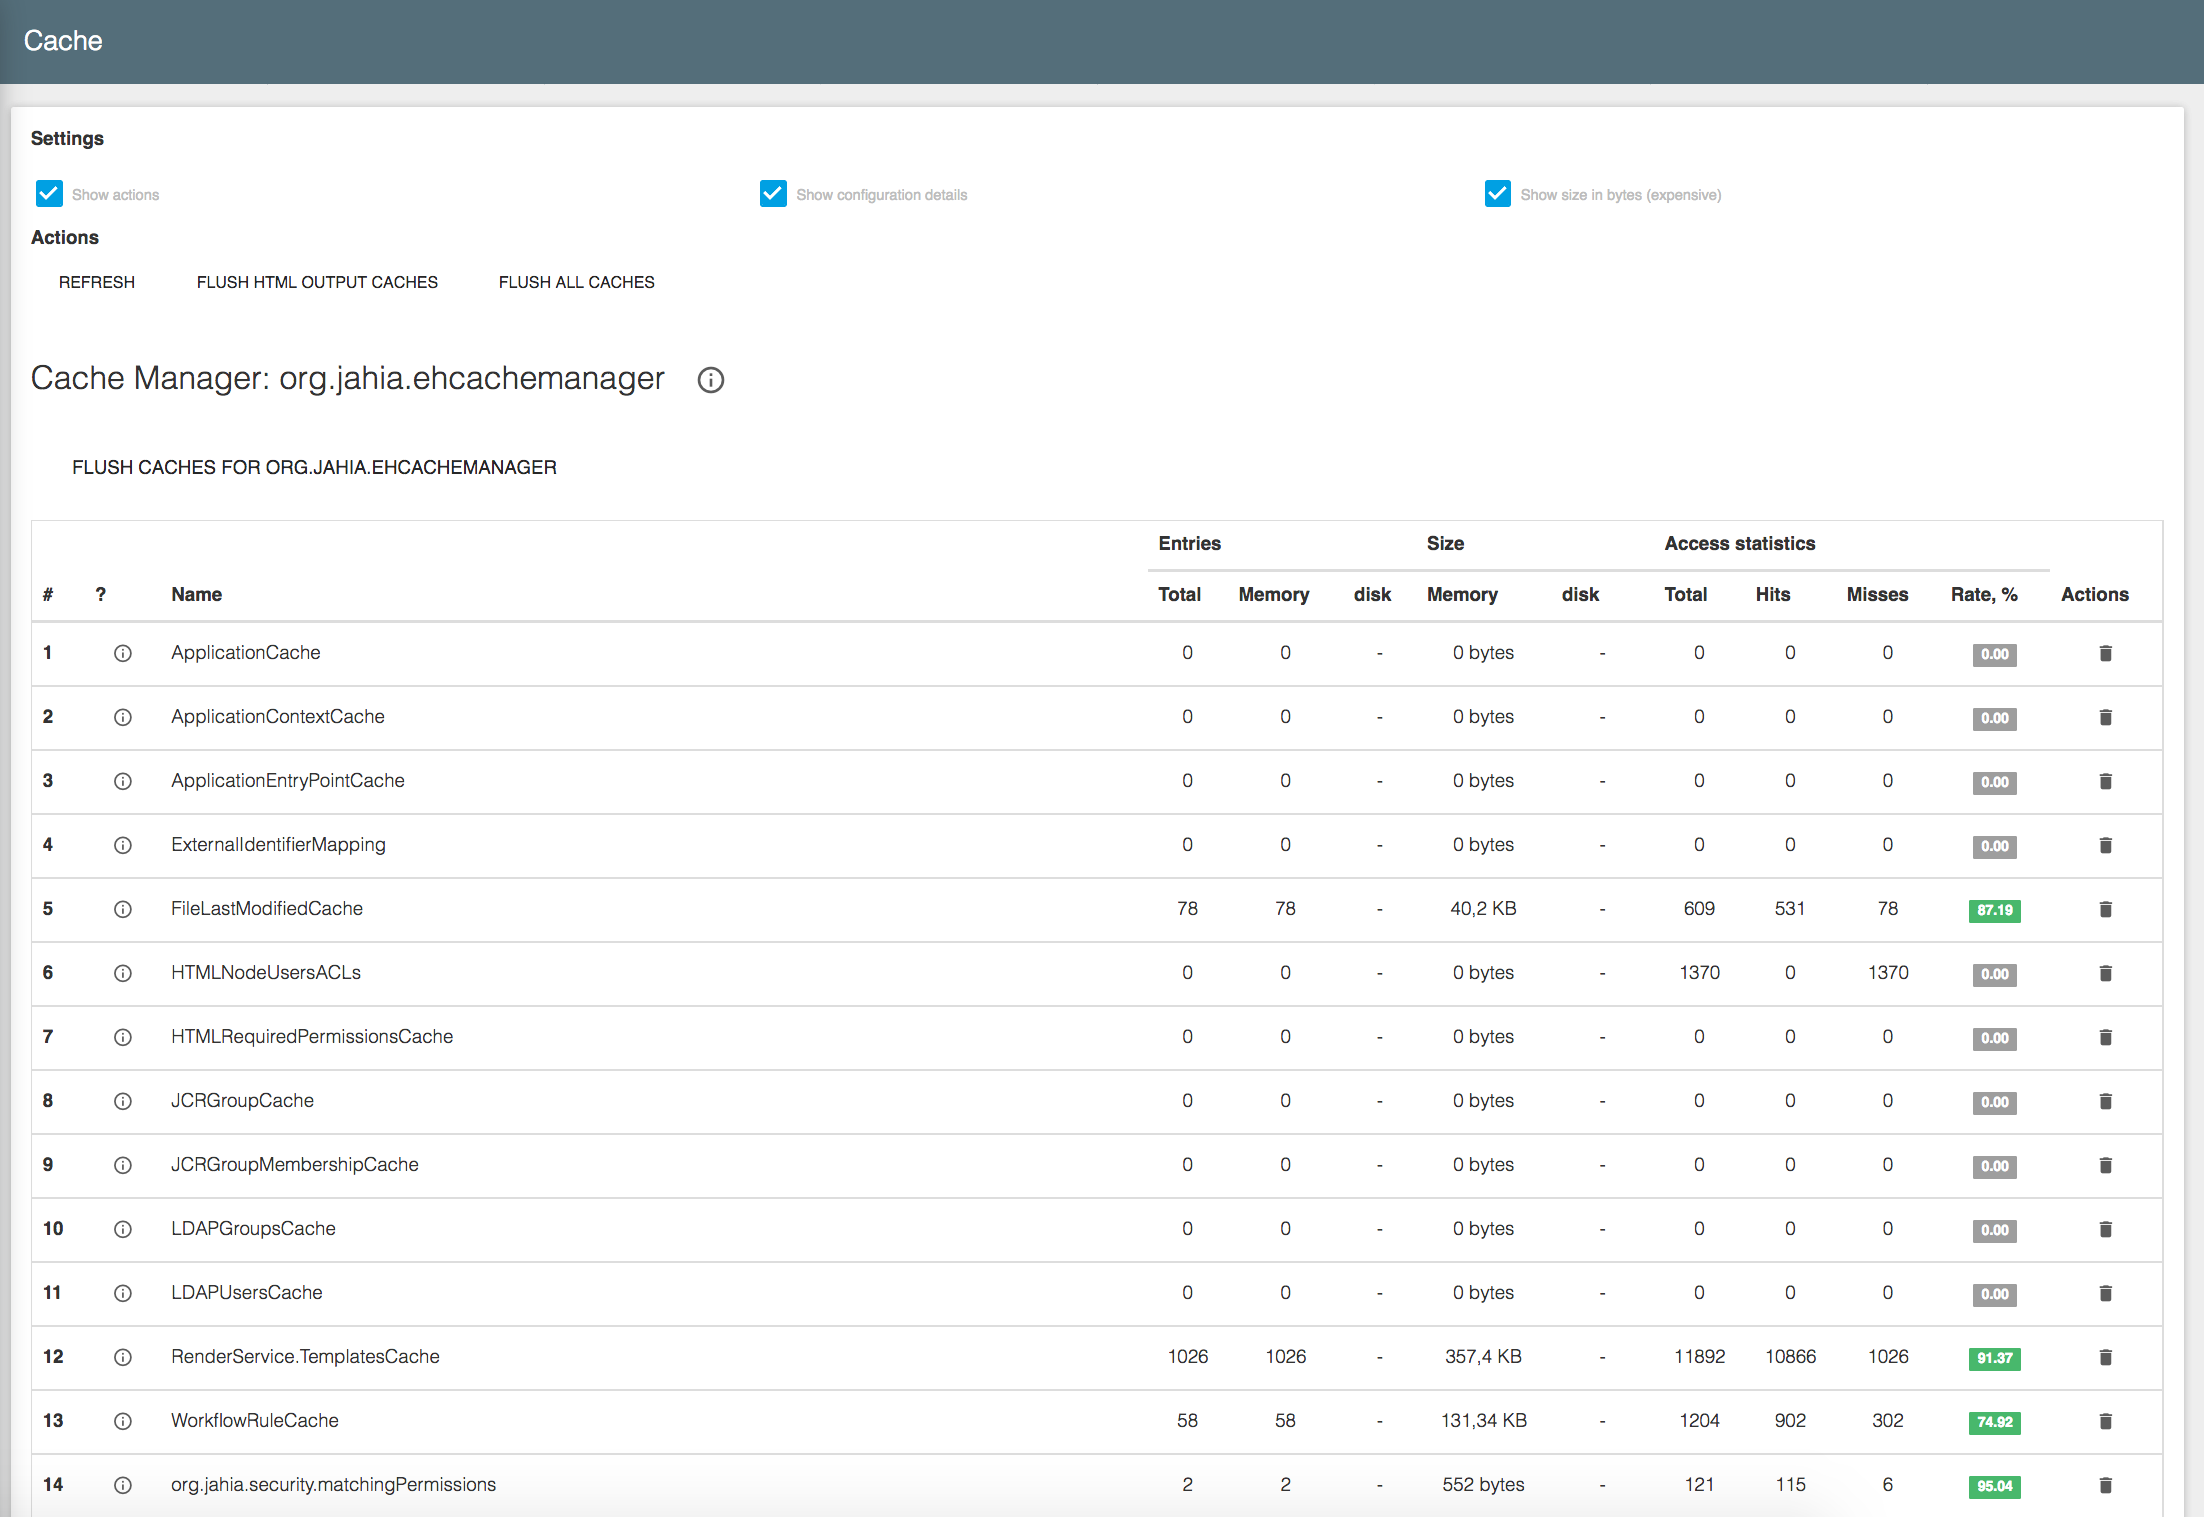
That statistical information can be useful on punctual basis in order to audit the system. They shouldn’t be activated all the time on a production server.
8.1 Memory and Thread Dumps
Memory
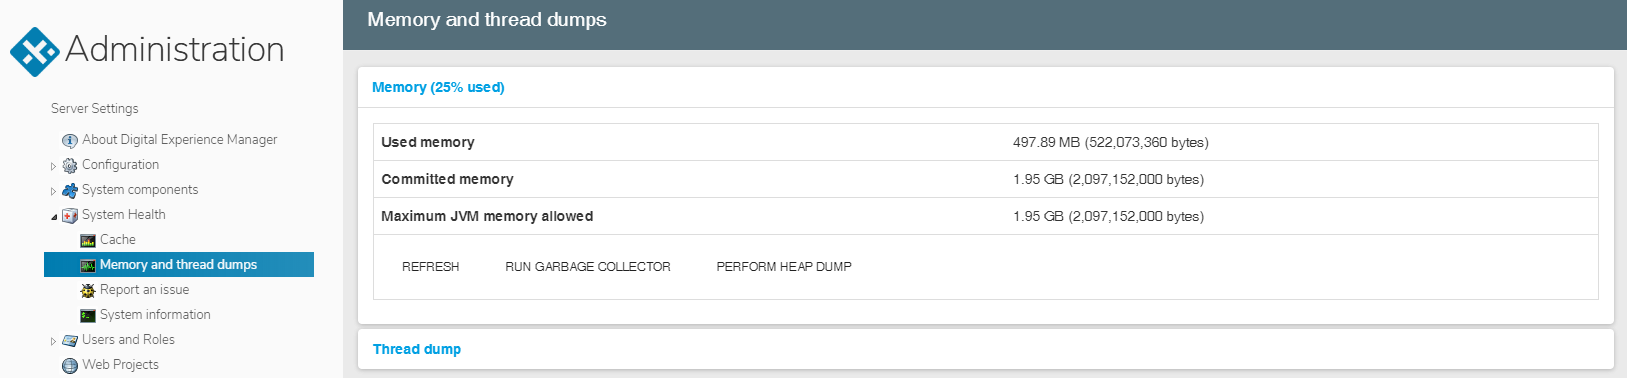
This panel provides information about allocated memory, used memory and free memory.
It is possible to run the garbage collector to flush the memory in use (warning: the consequences of a forced memory flush on a production site can severely alter performance and only administrators with a thorough knowledge of application servers and JVM operation should use this option)
Thread Dump

Click the "Thread dump" link to display the options.
This panel offers various options to run a thread dump and get the results
- In a new window of the browser
- In a downloadable file - In the Java console
- In a file automatically stored on disk [Digital Experience Manager install directory]/temp/Jahia-threads
- Perform a thread dump to analyze the currently running threads. A Thread Dump Analyzer is also available in this sub-section.
- Several dumps at a regular interval stored on disk
It is possible to stop Thread Dump Monitor and Error File Dumper. Those two features run in the background and dump as much information as possible when an error occurs. While very useful for support, those options should be deactivated on platforms submitted to heavy load, as those features themselves are resource-intensive when they are called. If your platform encounters errors due to overload, those options will make things worse by adding load to the load.
The last line of that section refers to the launch of a thread analyzer tool.
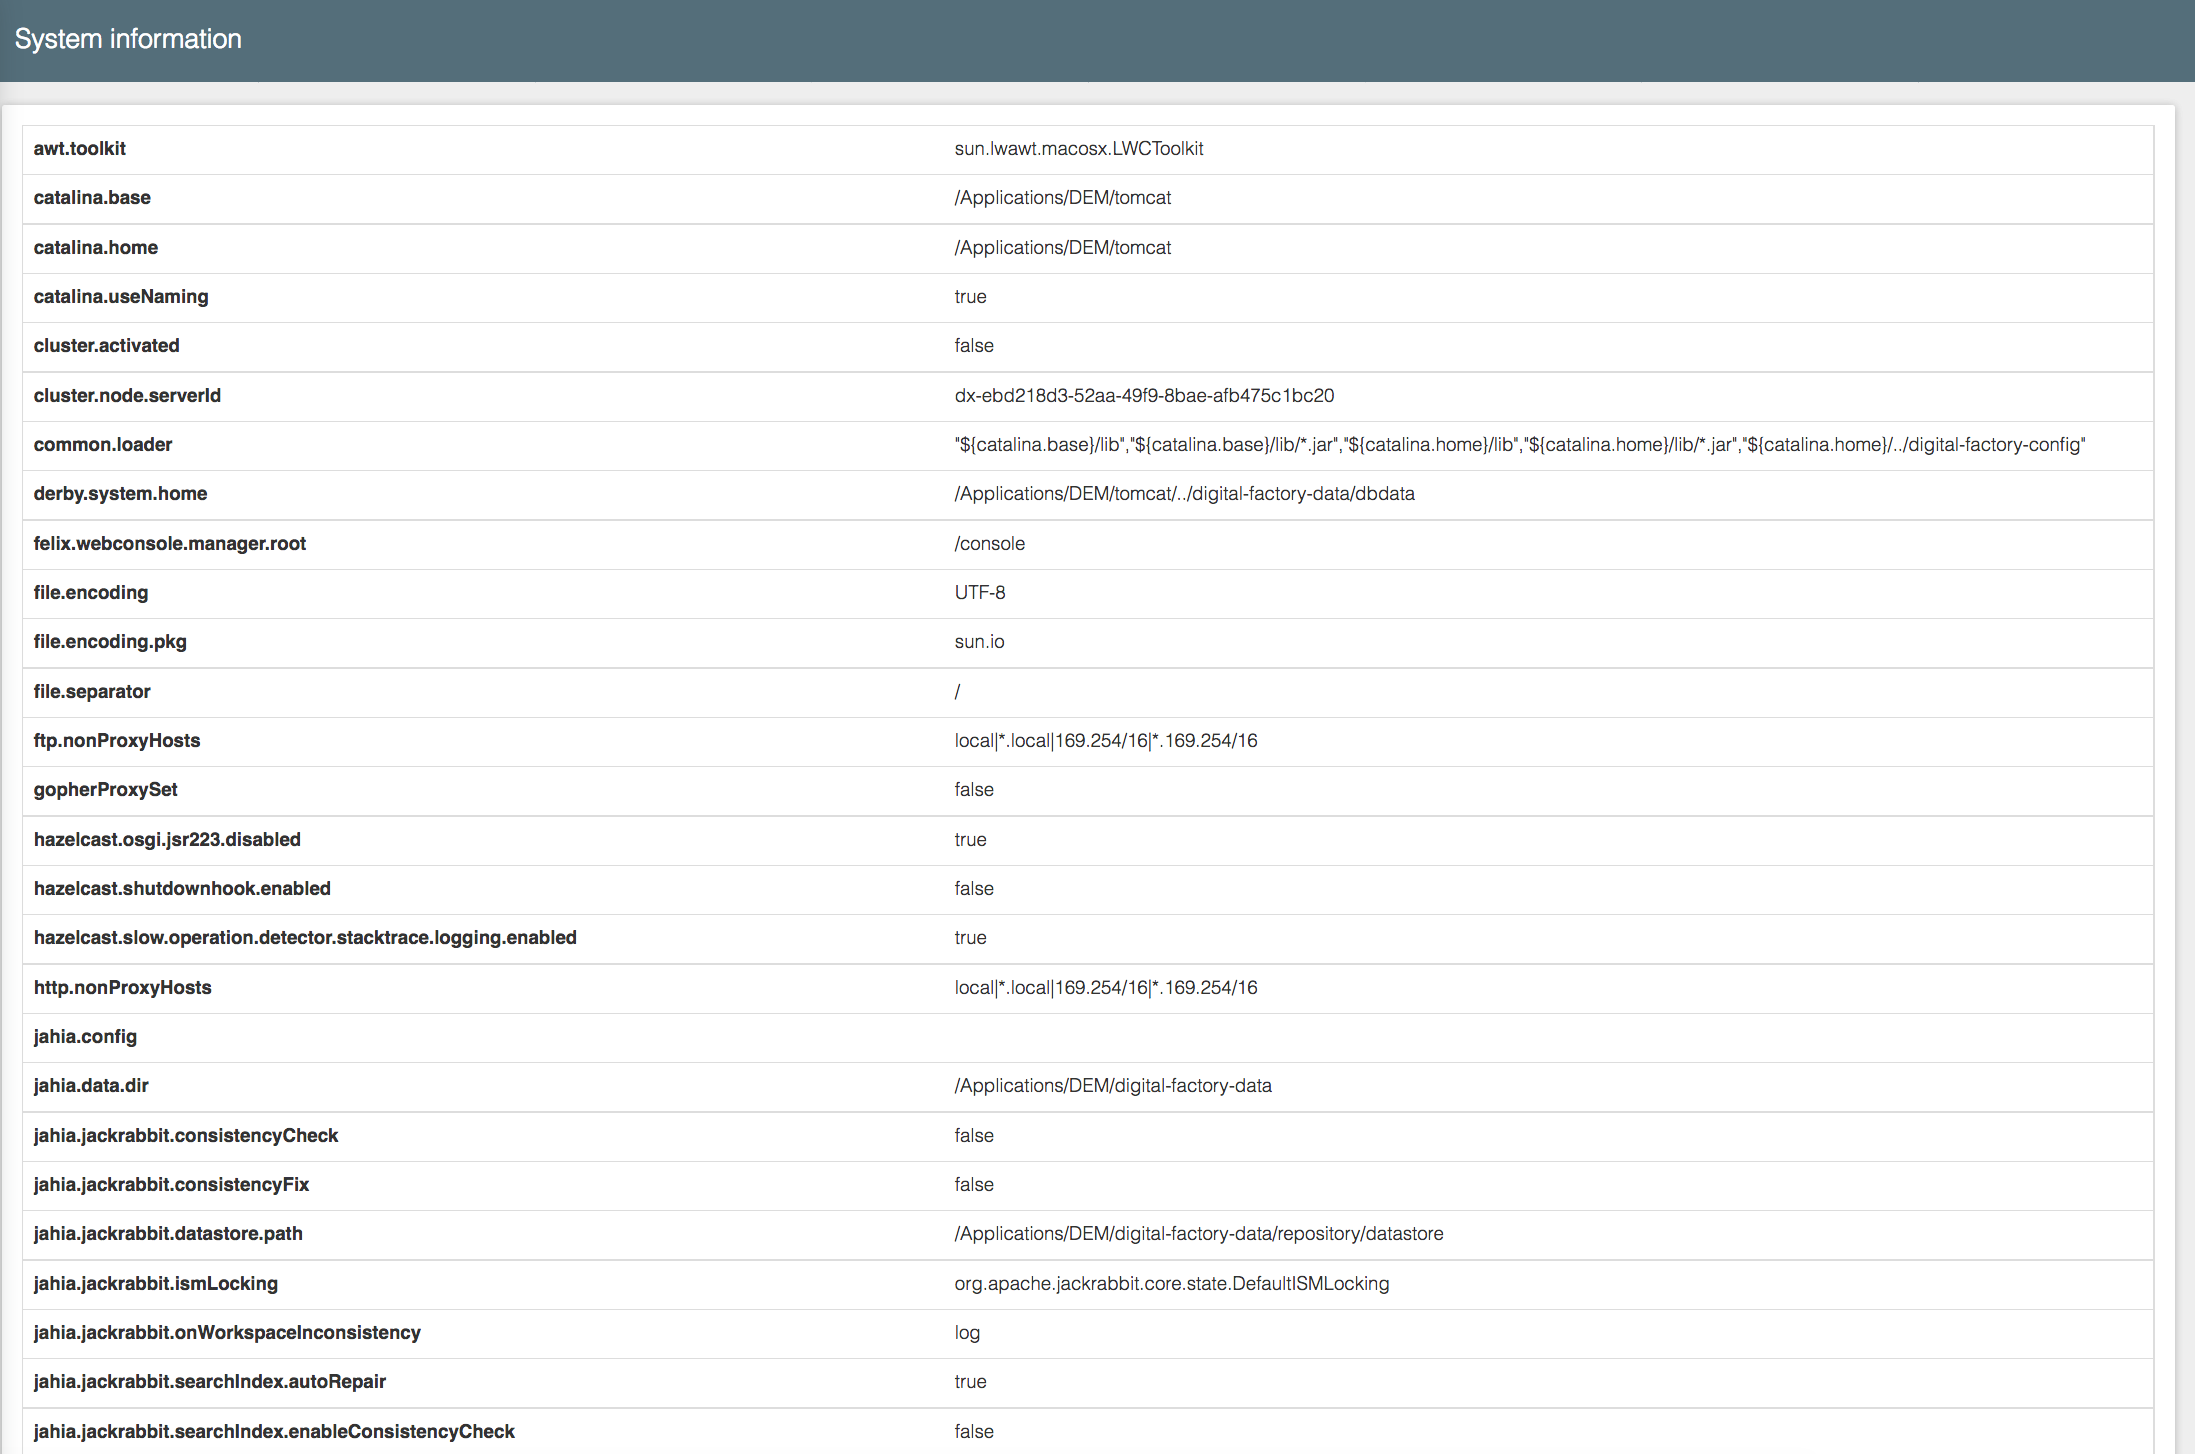
8.2 System information
The last sub-section contains information about the system and environment where Digital Experience Manager is running (OS, JVM, install path, database...).
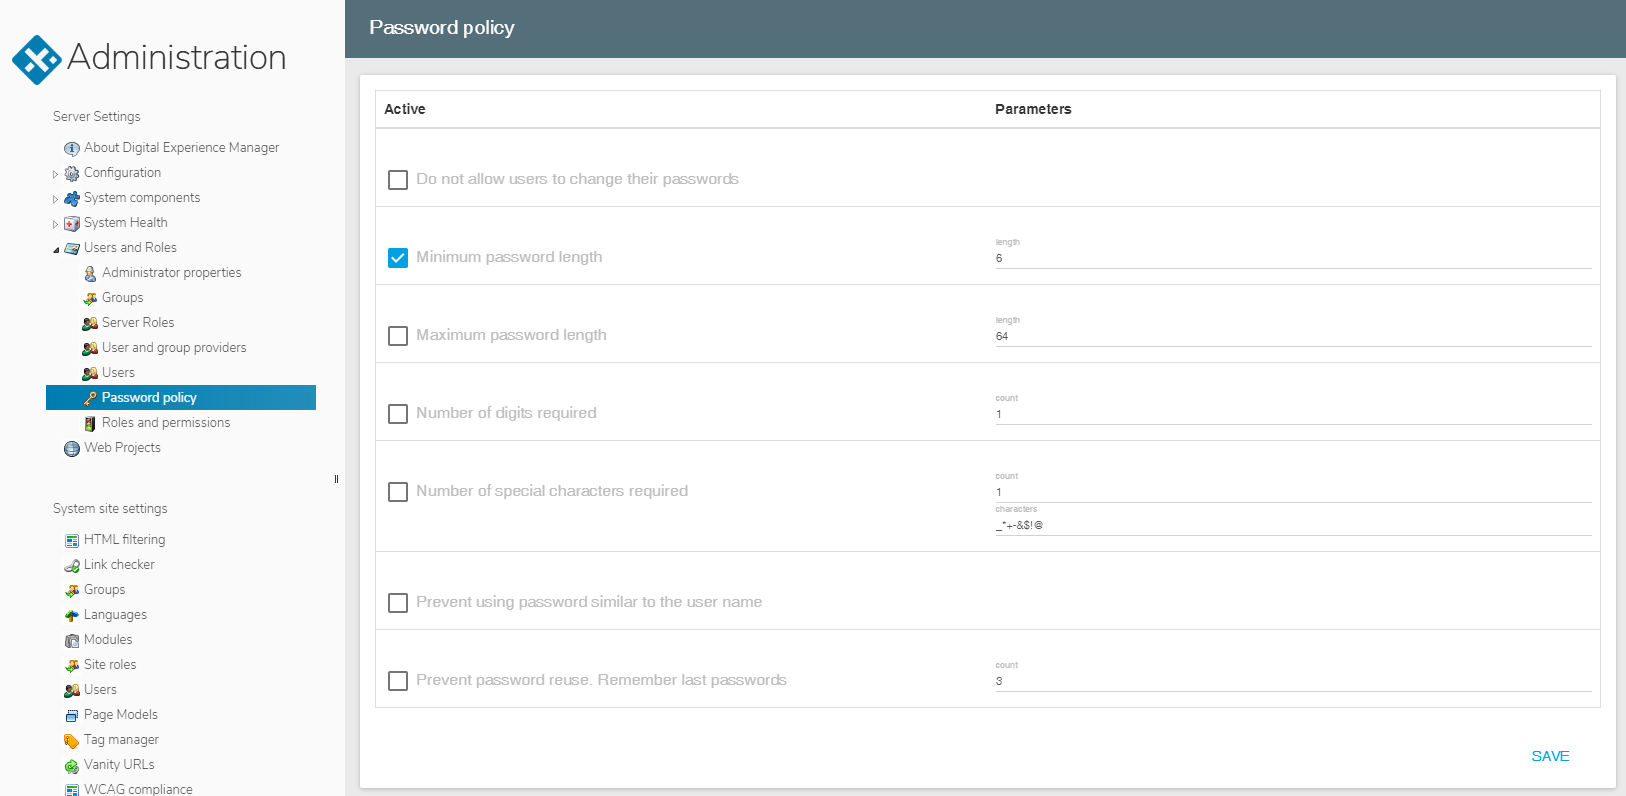
9 Password Policy
The "Password Policy" panel is designed to manage the rules that will secure the users’ authentication data. Settings such as the minimum password length, the requirement for special characters, the obligation to change password after a certain time etc. can be adjusted from this menu.
10 Roles and Permissions
The permissions management system (the ability to access certain pages, to write, to use certain tools etc.) relies on combinations of permissions that define a role.

By default, Digital Experience Manager comes with permissions for repositories, i.e. read/write permissions to the live or default (Edit) workspaces, permissions to restrict access to management sections or permissions to manage access to the Contribute, Edit and Studio Modes. However, every panel deployed in Digital Experience Manager can add its own permissions to implement its own access control. For example, this is the case for the blog platform or for comments, which define permissions allowing the creation of comments or blog entries directly in Live Mode. Finally, some operations in Digital Experience Manager will generate permissions automatically, such as the deployment of portlets or templates, making it possible to manage the way these elements are used in the system.
The combination of several permissions defines a role. For instance, a translator role will need the permissions to access the Edit Mode and to edit contents in Edit Mode in a specific language, but not the permission to create any! An editor role, in charge of validating contents, will have the publish permission and the read permission to the Edit Mode, but not the write permission because they are only here to validate! And so on... You are free to create your own roles to meet your particular needs, e.g., a "blogger" role.
These roles can then be assigned to user groups or users for all or part of a site, even for a single content item, directly via the Edit Mode.
Roles Types
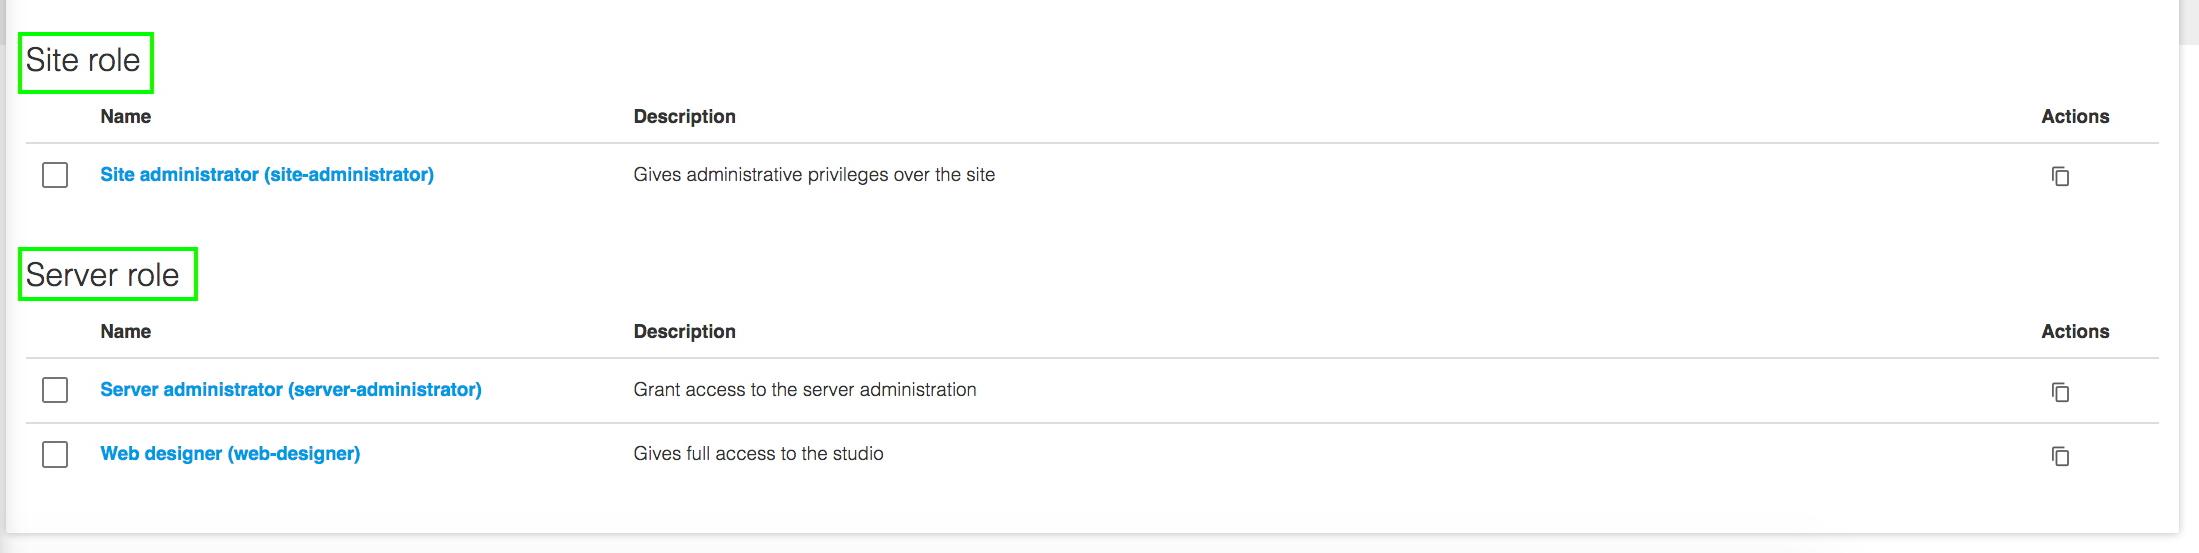
Roles are divided into four types: "Live Roles", "Edit Roles", "Site Roles" and "Server Roles".
When a role has permissions on the "Live" workspace only, it is recommended to choose the type "Live Role".
If the role defines mixed permissions (Live workspace and Default) or edit permissions only (Default workspace), it is recommended to choose the type "Edit Roles". By default, the publishers do not see simple editing interfaces in the first tab (Live Role) which allows them to control their content once published, only users with greater rights have access to the "Edit Roles" tab in the Edit mode.
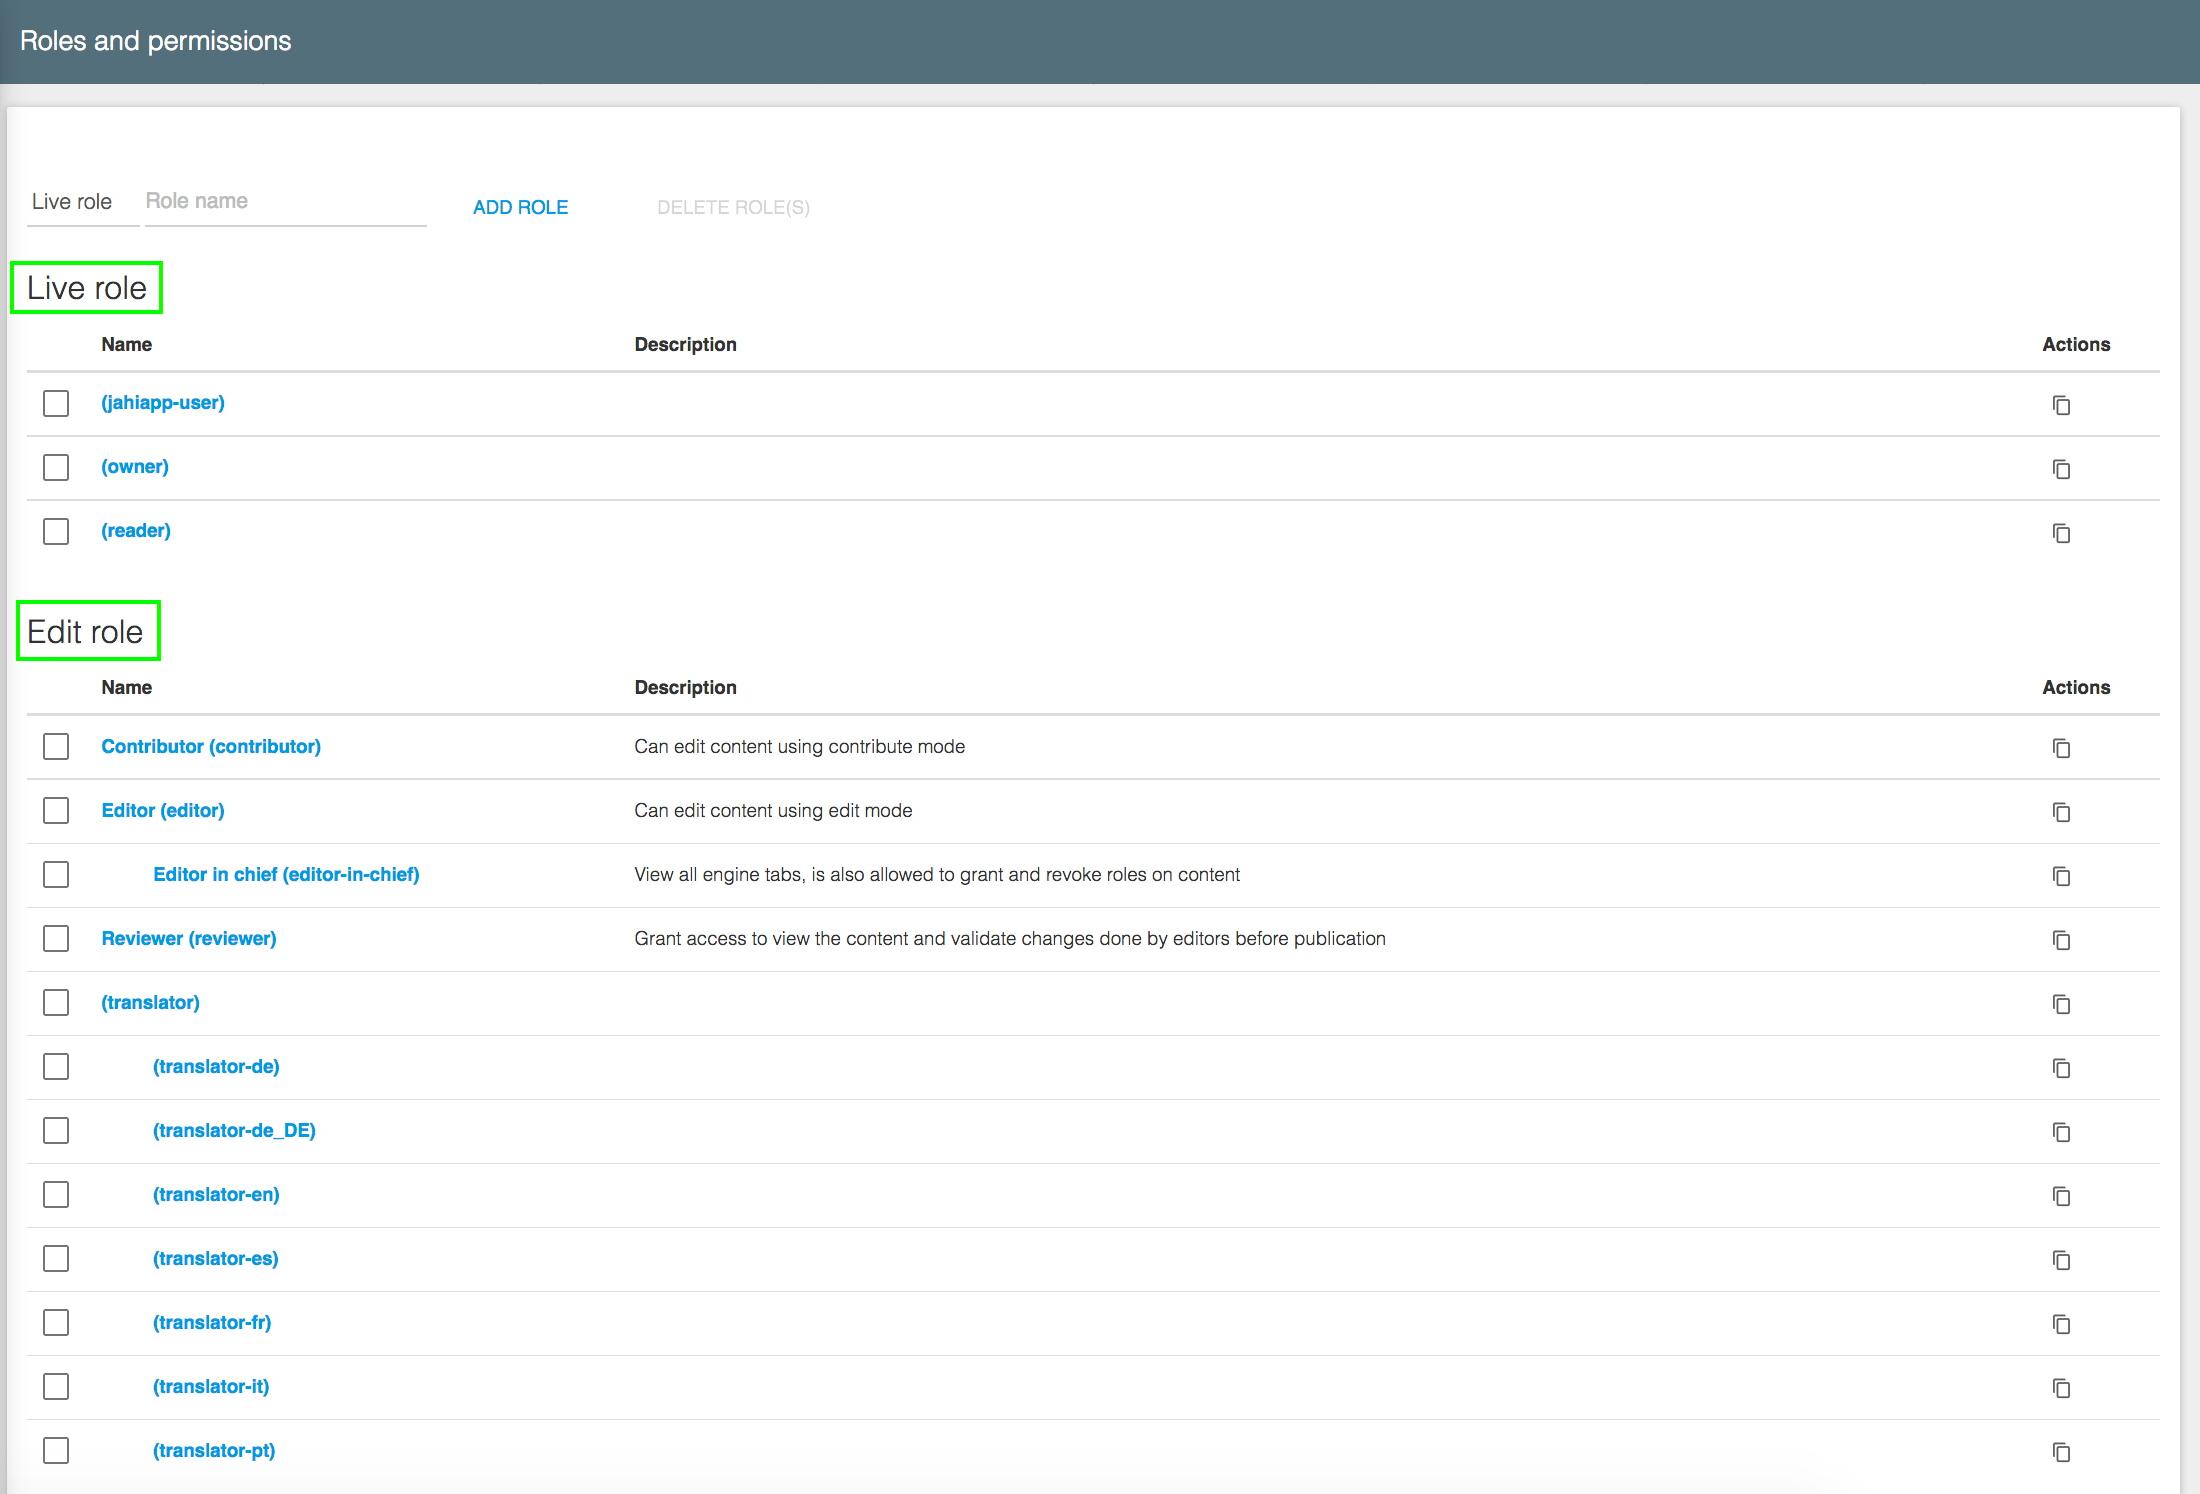
Site Roles have site-wide permission settings, like for instance access to the Site Settings panel.
Server Roles have permission settings on the server itself, including access to the Server Administration panel.
See Permissions section further down for more information about permissions specific to each Role type.
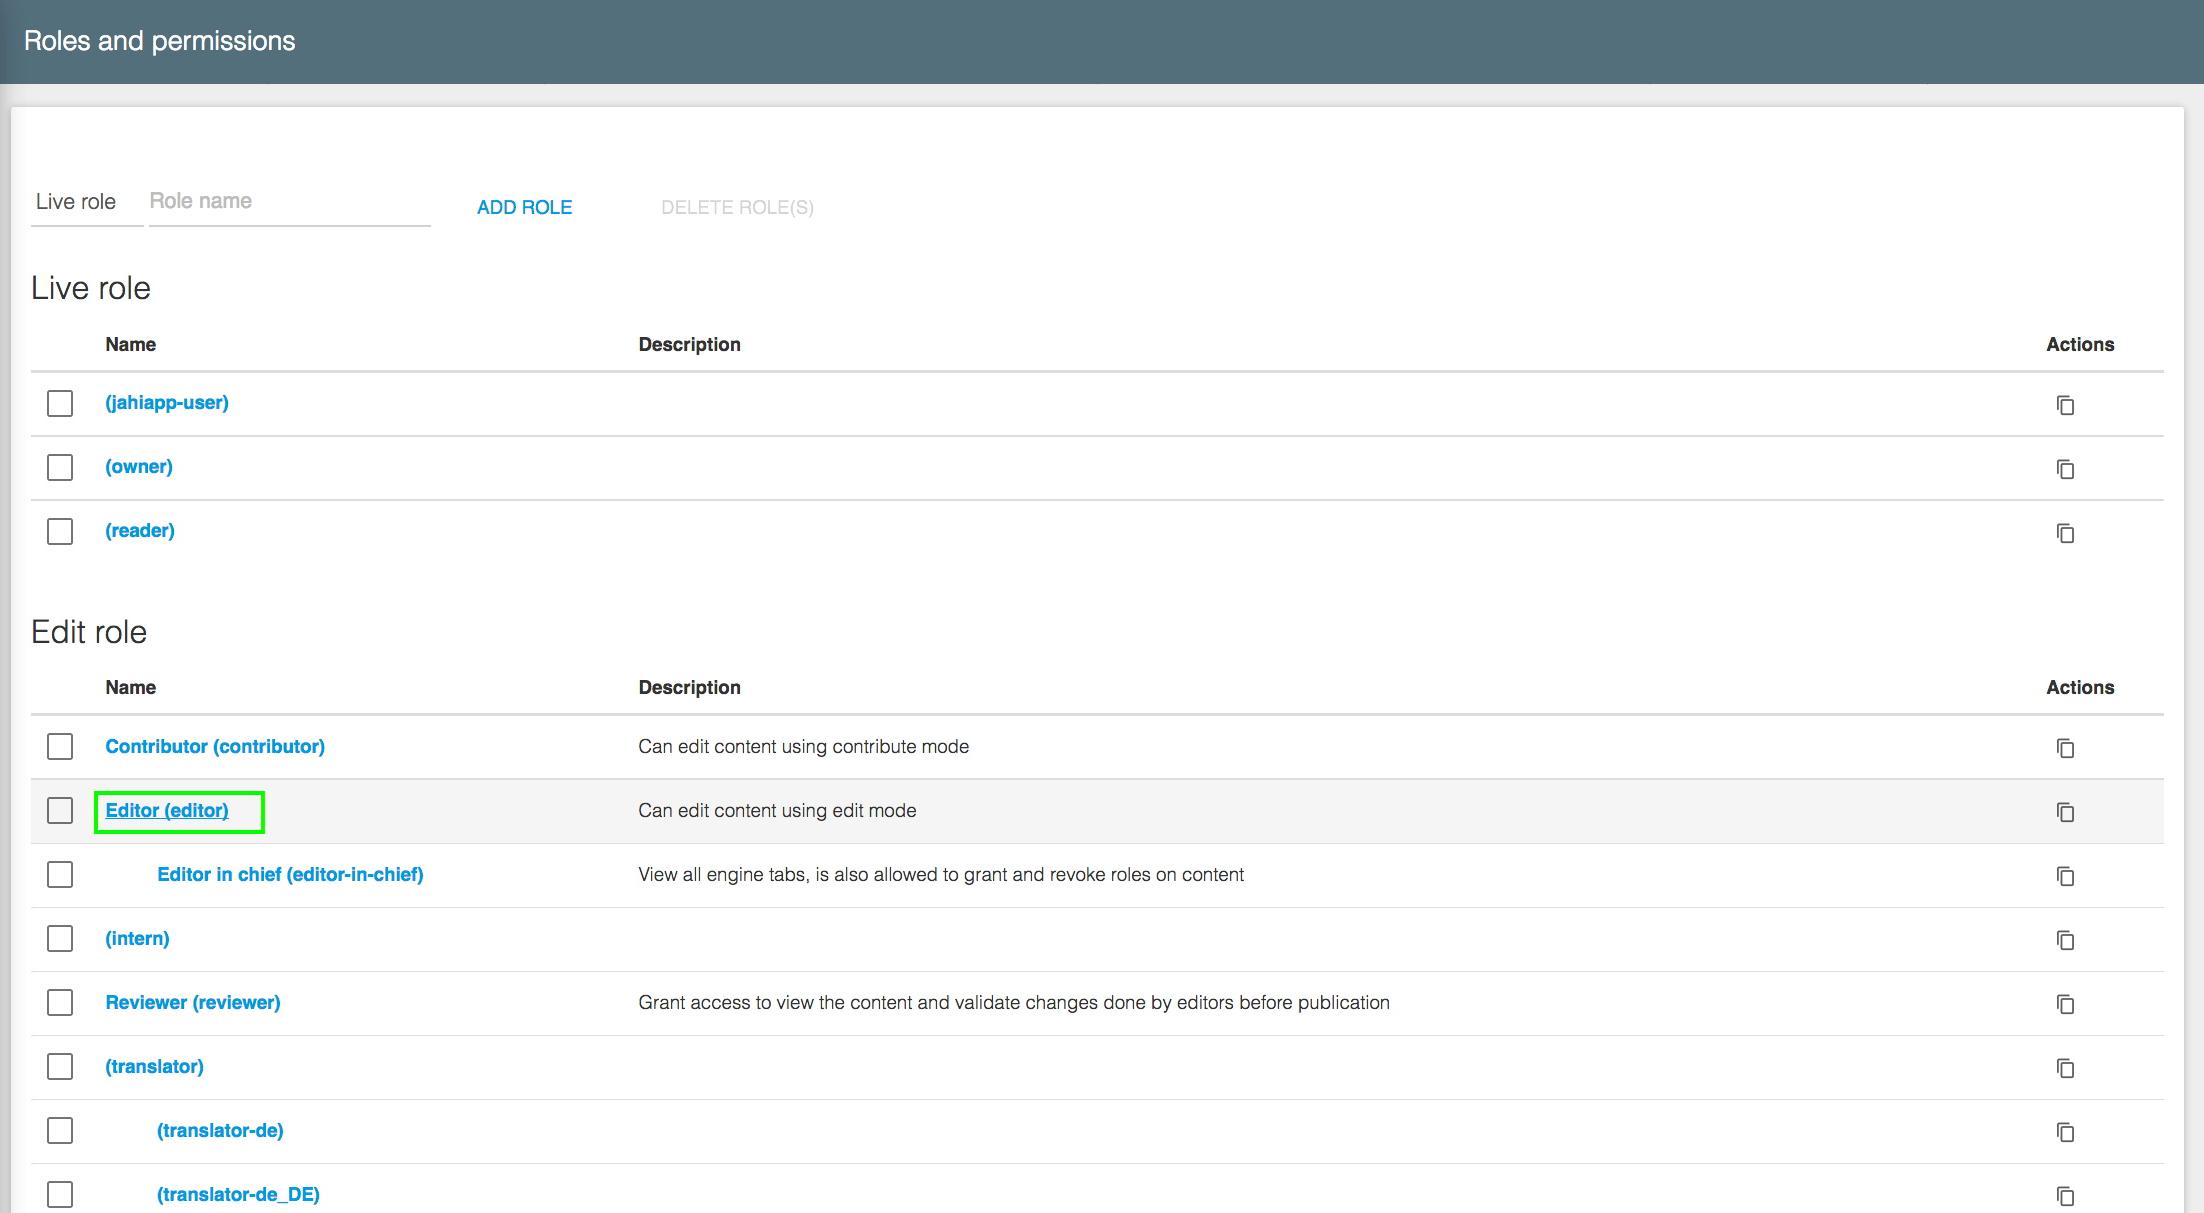
10.1 Creating a New Role
Choose the Role Type (Live, Edit, Site or Server) in the dropdown list, enter the role name and click "Add role" to create a new role. The role name entered will be the system name. It will be the default name as long as no specific labels are created. Therefore, it is recommended to enter a short and descriptive title. You will not be able to change this value later on, so make sure to choose it wisely.

On the next page, you can now edit the new role’s properties :

10.1.1 Labels
A role is first defined by a system-name, but it can have an internationalized title (this title will be used in most screens preferrably to the system-name). It is also possible to add a description for this role in multiple languages.
To set a localized title, click the Labels tab, then choose a language and click "+". You can now define how the role will be displayed in this locale. It is also possible to edit existing labels.
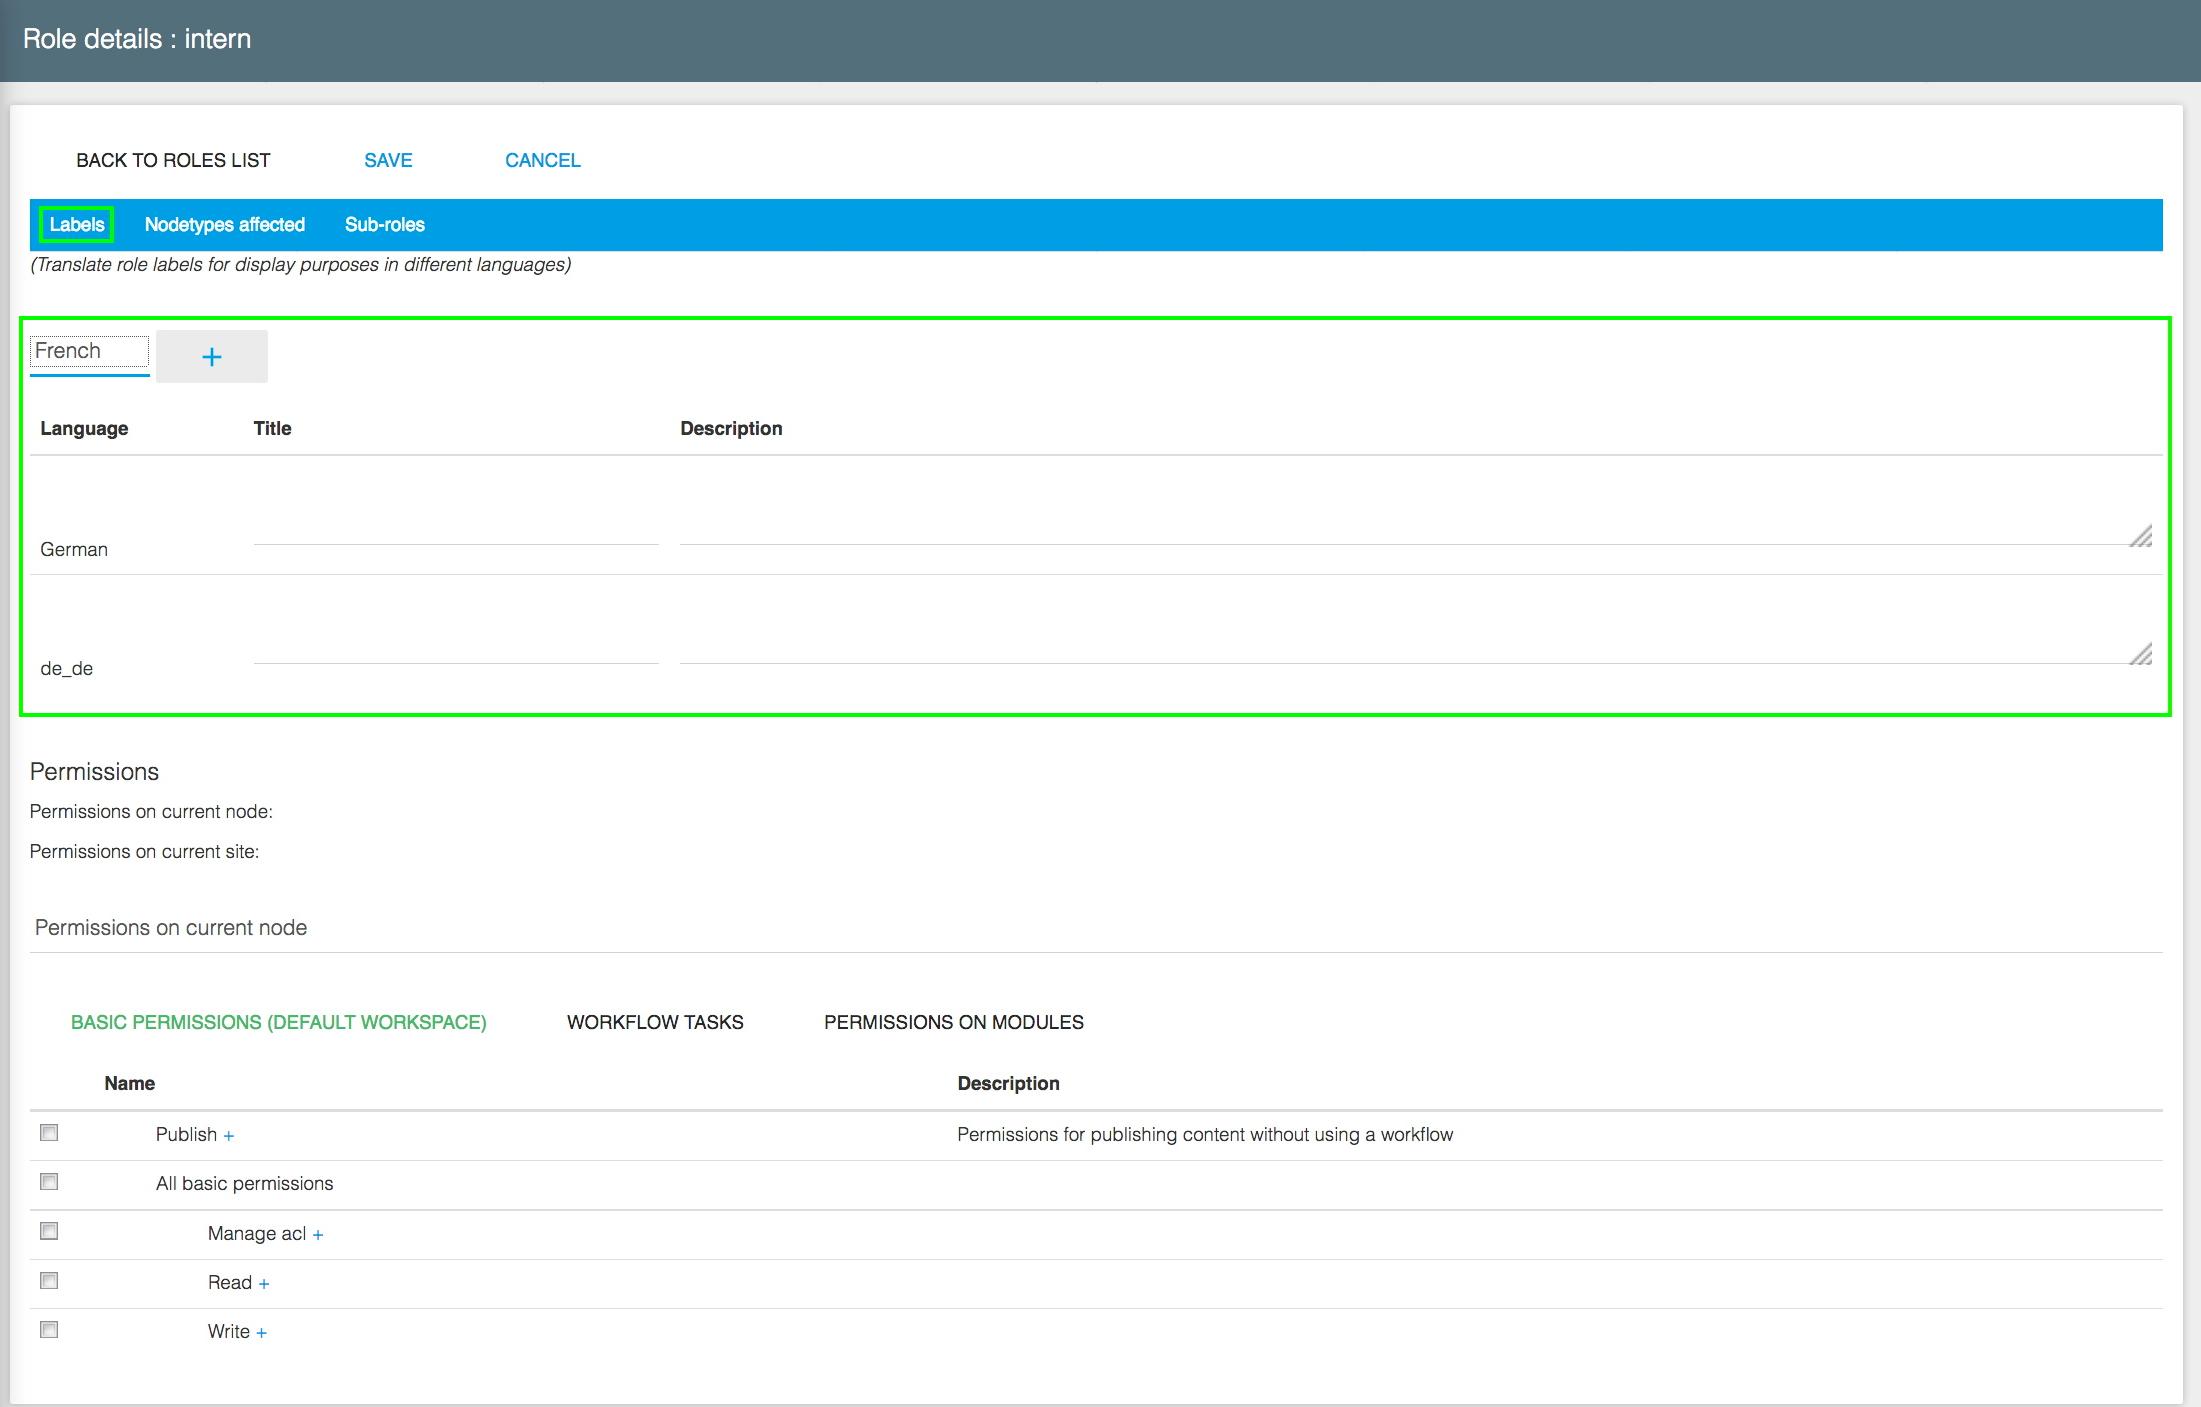
Click "Save" to reflect changes.
10.1.2 Nodetypes affected
It is possible to define node types (content types) in which a role can be applied. By default, a role can be granted to a user or group on any type of content type. By selecting specific types of content, the role in question appear in the access rights management interfaces for these types of content and will not be available for others types. This prevents Access Rights management interfaces from being overloaded and from confusing users by making available roles that would have strictly no effects on the targeted object.
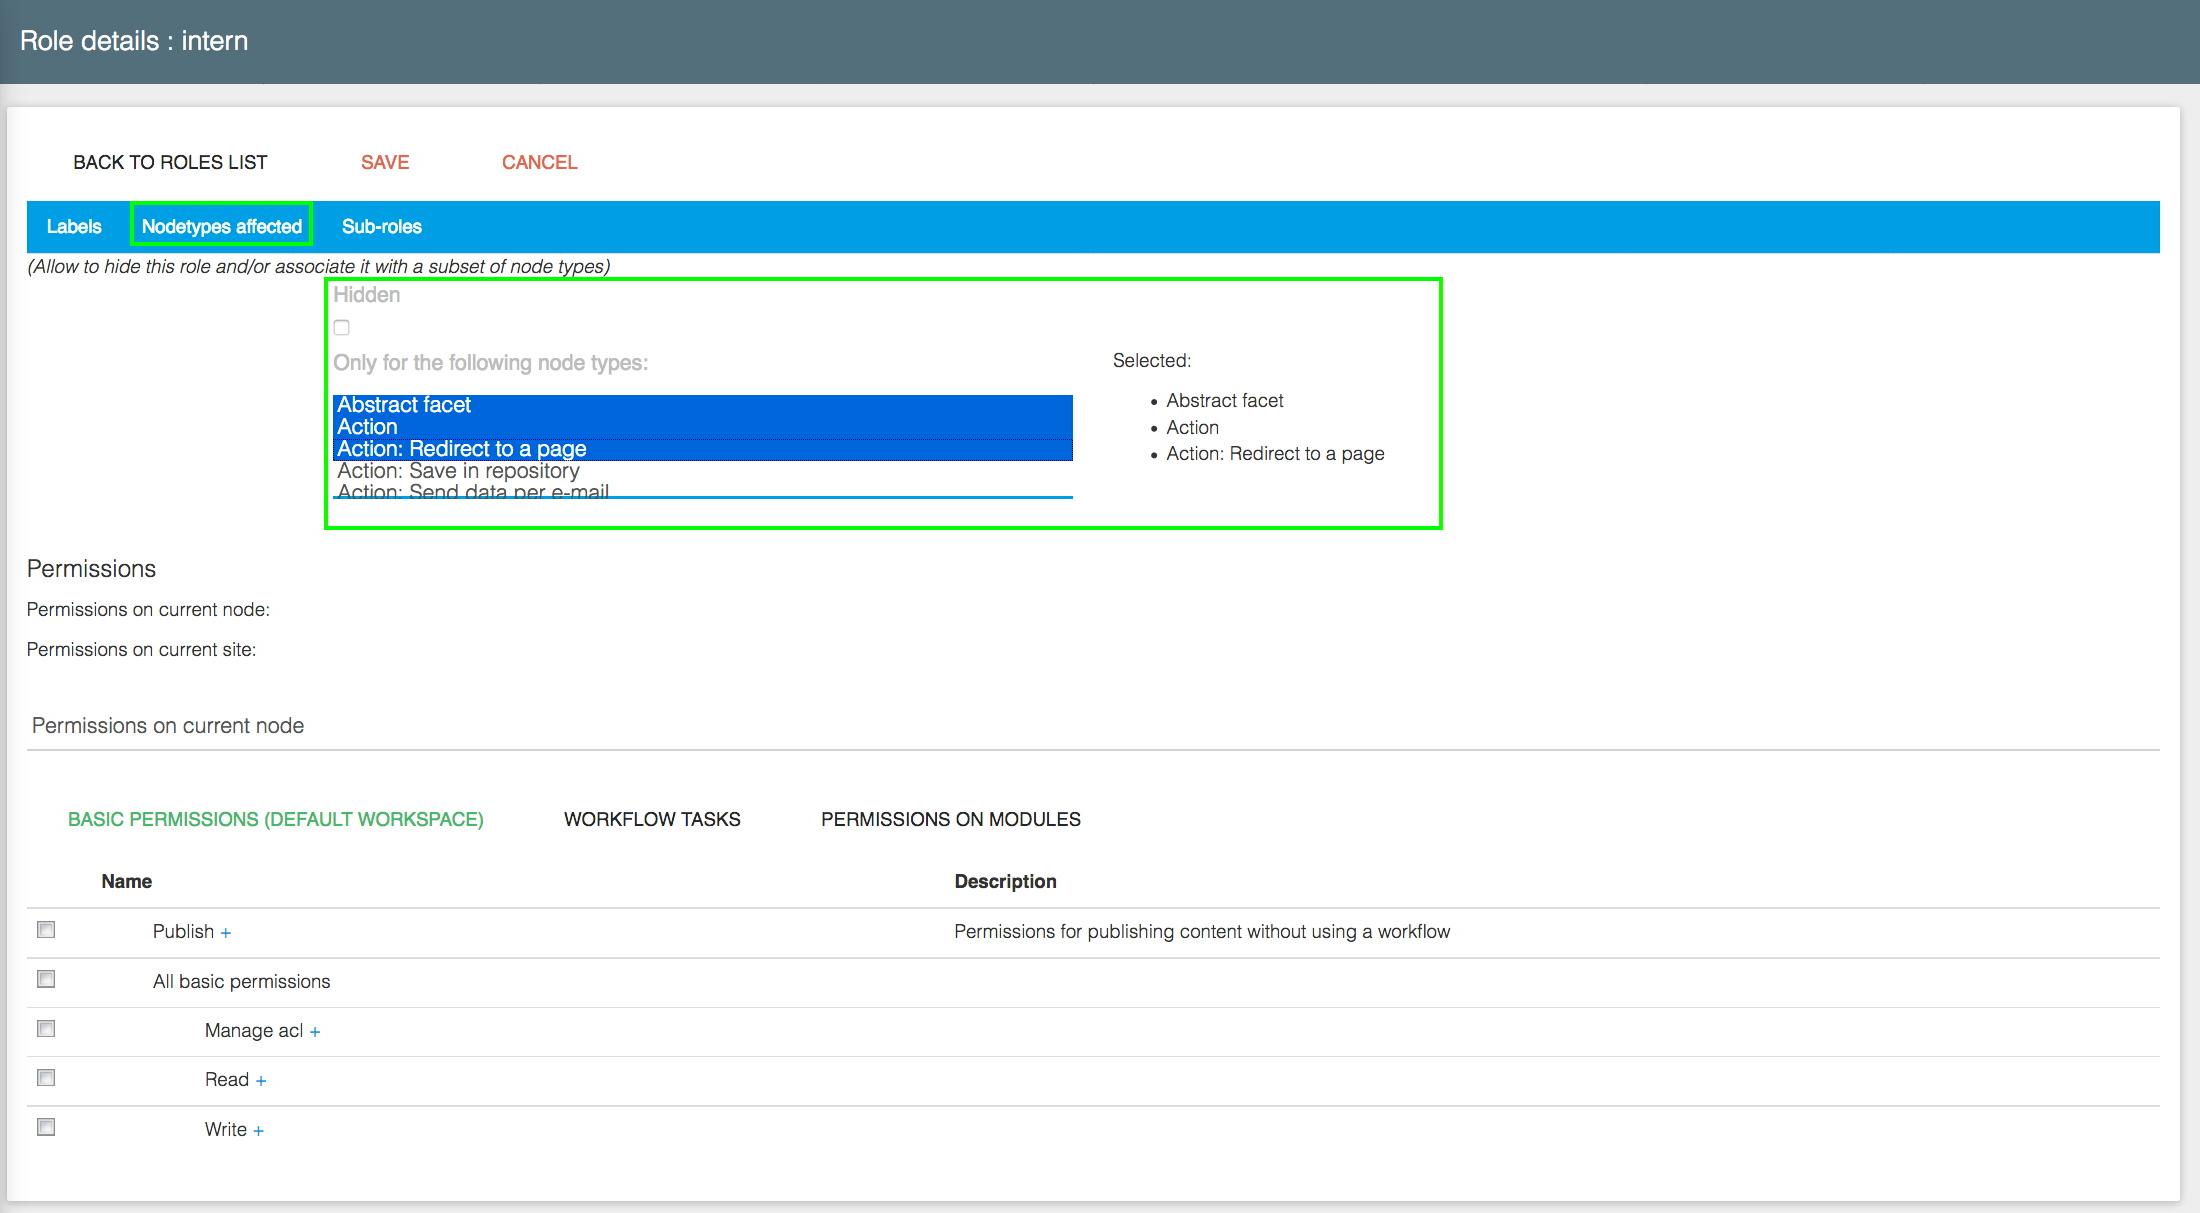
For instance, you may want to create a specific "article-editor" role, which can be granted permissions only to edit content items with the type "article".
10.1.3 Permissions
Now that you have set the basic parameters, let’s define permissions associated to this new role. Go to the "Permissions" section on the current screen.
A summary view shows you the list of currently active permissions for this role.
The dropdown list below the summary allows you to choose the sets of permissions you wish to edit (Permissions on current node, permissions on current site, permissions on whole server).

Each set of permissions is accessible through a tab and contains its own specific categories of rights.
Clicking on the "+" sign shows the detailed sub-permissions. Checking the box next to a parent permission automatically checks all its sub-permissions, which can then be unchecked on an individual basis.
10.1.4 Permissions on current node
These are the permissions applied to content items, pages, etc. as opposed as permissions global to a site:
Basic permissions
These permissions include Read, Write and system-related node-specific access control (ACL) on the default workspace, used mainly in the Edit and Contribute Modes.
Workflow tasks
These permissions define which steps of the workflow will be allowed for this role.
Permissions on modules
Using this tab, you can grant permissions on specific modules (Blog, Forum, Wiki…) and their features.
10.1.5 Permissions on current site
These are the permissions set at site level.
User Interface
These permissions manage access to parts of the editing interface (Contribute Mode, Editing engine, Managers etc.).
Templates and Components
These permissions allow to create content using certain content types (basic, social, multimedia etc…) and to create pages using specific layout templates.
Site administration (Site Roles only)
This tab is only visible to roles that have been created as Site Roles. With these permissions, you can grant access to administration panels of the Site Settings menu (Groups, Languages, HTML settings, etc.). For more information about Site Settings, please see the features described in section two.
10.1.6 Permissions on whole server (only accessible to Server roles)
These are the permissions global to the server.
Basic permissions
Simple Read, Write and system-related ACL permissions on the default workspace.
Server Administration
Access to the different panels of the Server Administration settings.
When you are finished setting the permissions, click "Save" to save your changes.
10.1.7 Subroles
Digital Experience Manager allows you to create Subroles, built on an existing role and its set of permissions. A Subrole can only have extended permissions compared to its parent role.
Permissions from the parent role are copied and inherited automatically, including subsequent changes made to the parent role’s permissions.
To add a Subrole, click the "Subroles" tab, and enter a name for the new subrole.
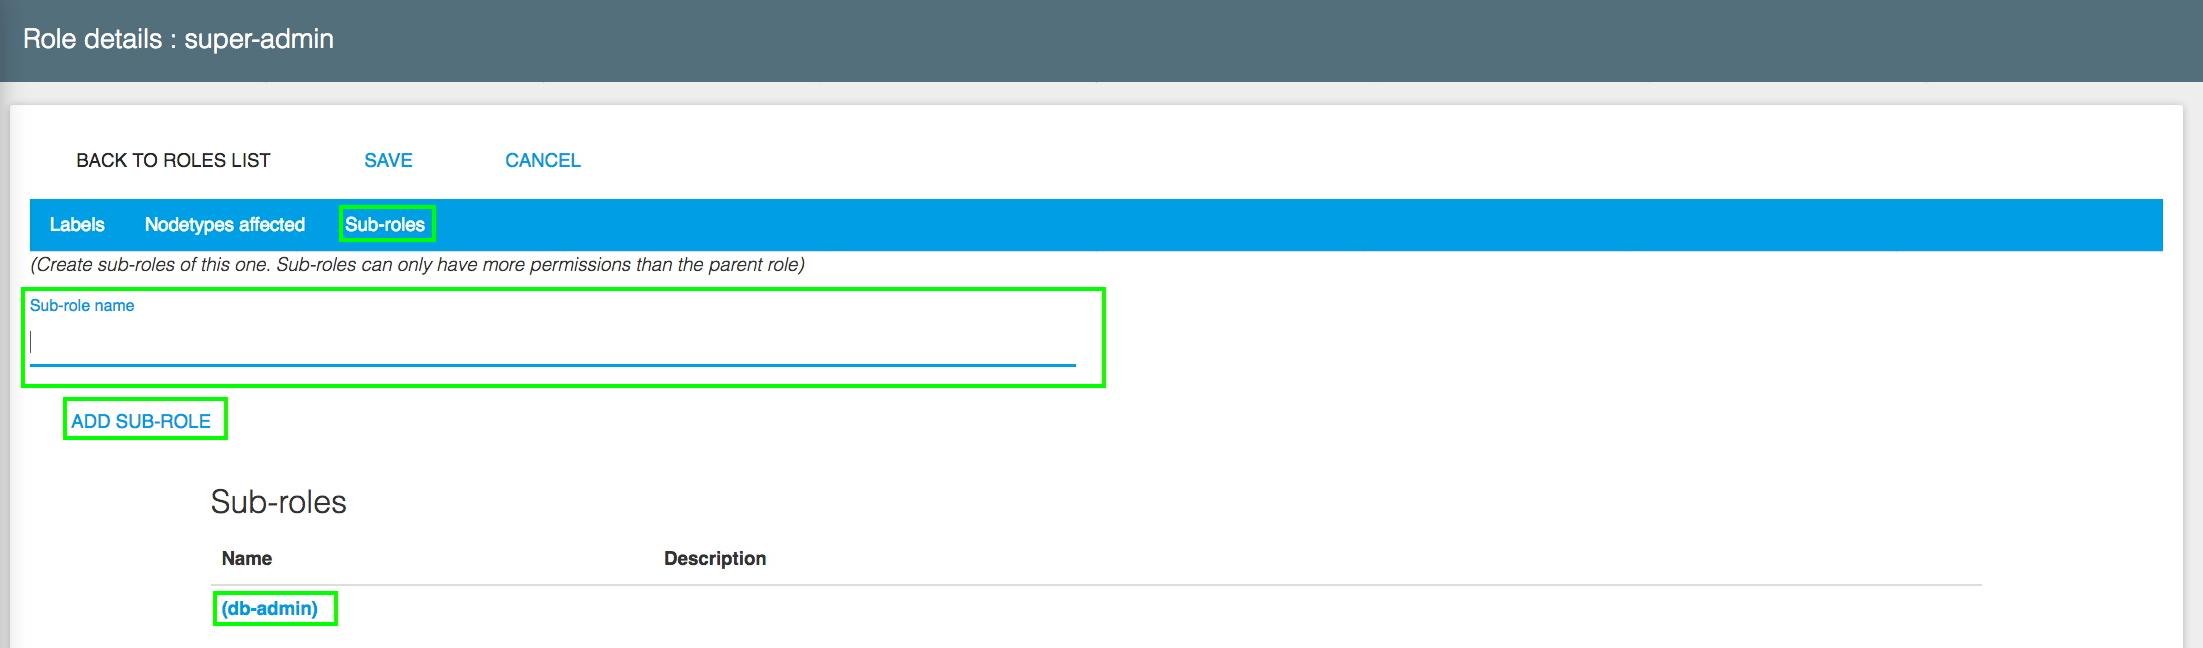
The newly created subrole will be visible in the Roles list. From there, you will be able to edit it by clicking on its name.

Permissions that are inherited from the parent role are greyed out and cannot be edited.
10.2 Editing an existing role
To change the permissions for an existing role, click on the role’s name in the Roles list to edit its properties.
The screen displayed is the same as the properties screen shown after a new role is created. See "Creating a New Role" for more details. Click "Save" to reflect any changes.
10.3 Deleting a Role
Select one or more roles by checking the box next to them, then click on the "Delete Role(s)" button.
The next screen asks you for confirmation. Deleting a role cannot be undone; please proceed with caution.
If the role that is to be deleted has sub-roles, they will be deleted as well.
10.4 Roles, users and groups
Edit Roles can be assigned to users or groups through the Editing engine, on a specific node (page, content item…) The permissions associated with the role are then transferred to the users and the members of the designated groups. Use the contextual menu to Edit the desired node then click the "Edit roles" tab to manage Edit roles for this node.
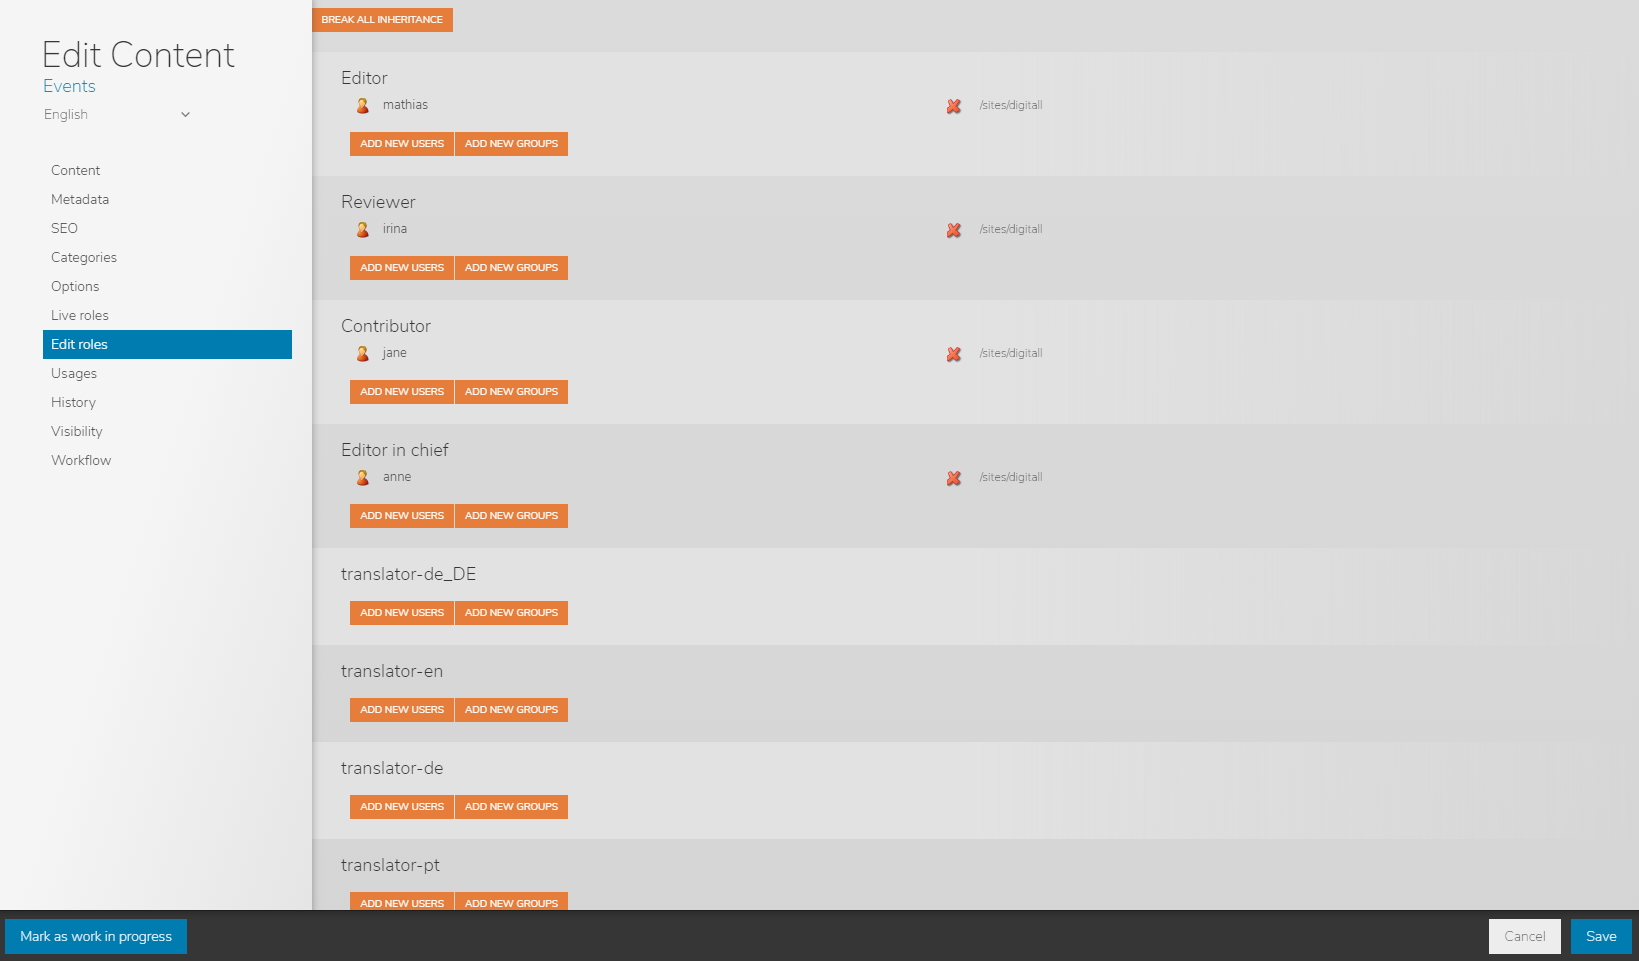
Similarly, a "Live roles" tab allows you to assign Live roles to users and groups.
10.5 Server Roles
Server Roles are a specific type of Roles that have permissions on the server itself, including access to the Server Administration interface. By default, only "root" has Server Administration privileges.
Permissions for Server Roles can be set like for any other role using the "Roles and Permissions" item in the left menu.
The "Server Roles" administration panel allows you to add users to existing Server roles.

To add or edit the members for one of the available Server Roles, (i.e. Server Administrator) click the "Members" button associated with this role, select/deselect the users or groups and click "Save".
The updated list of members is displayed on the Server Roles page.
11 Manage Modules
The module management screen allows the administration of the modules on the server. From here, the server administrator can upload new modules (or download them directly from a store), start and stop modules, activate or deactivate a module on a site, etc. It also provides information on the status of the modules. For more information about this screen, please read the corresponding document: Deployed modules lifecycle and administration[1] .
12 Private App Stores
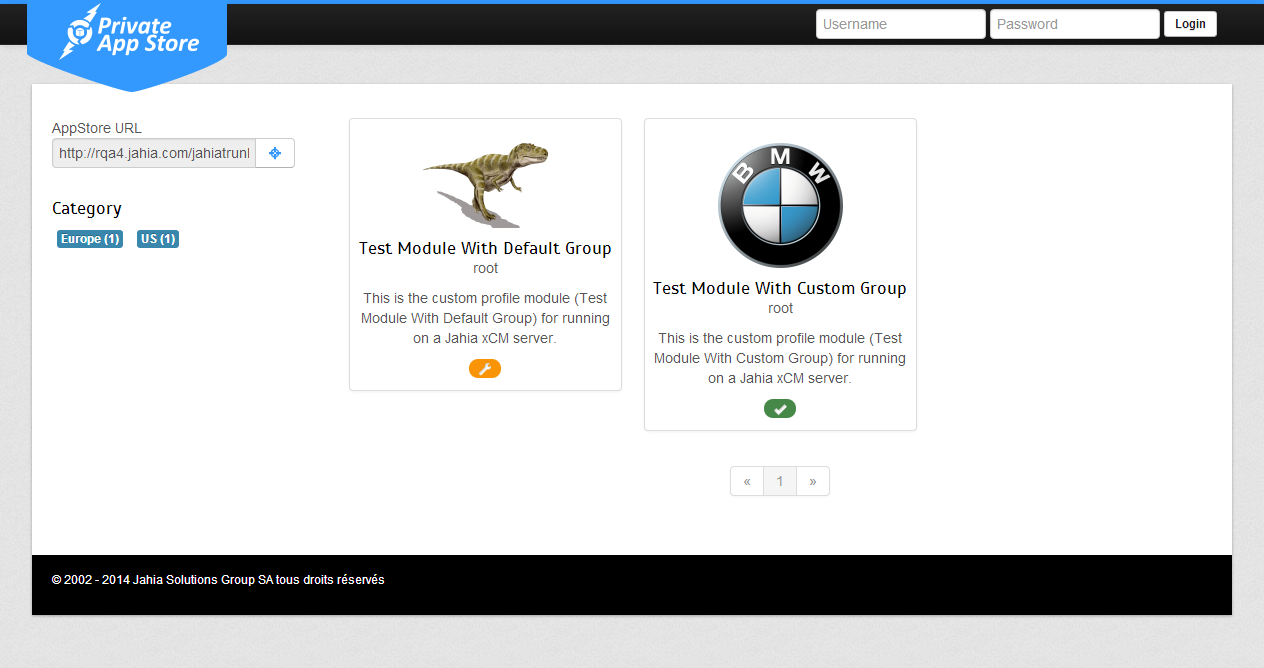
12.1 What is a Private App Store?
With Digital Experience Manager, you can re-use and distribute validated modules and business applications you developed from one project to the next thanks to your own private app store - which can be either fully private within your entire organization and/or shared with your integration partner.
When you add the reference of a Private App Store on your server, the modules available on this Private App Store will then be ready to deploy and manage on your Web Projects through the "Modules" Administration Panel.
Note : The creation or configuration of the Private App Store itself is not covered in this Administration Guide and will be explained in a dedicated document on www.jahia.com.
12.2 Adding a new Private App Store
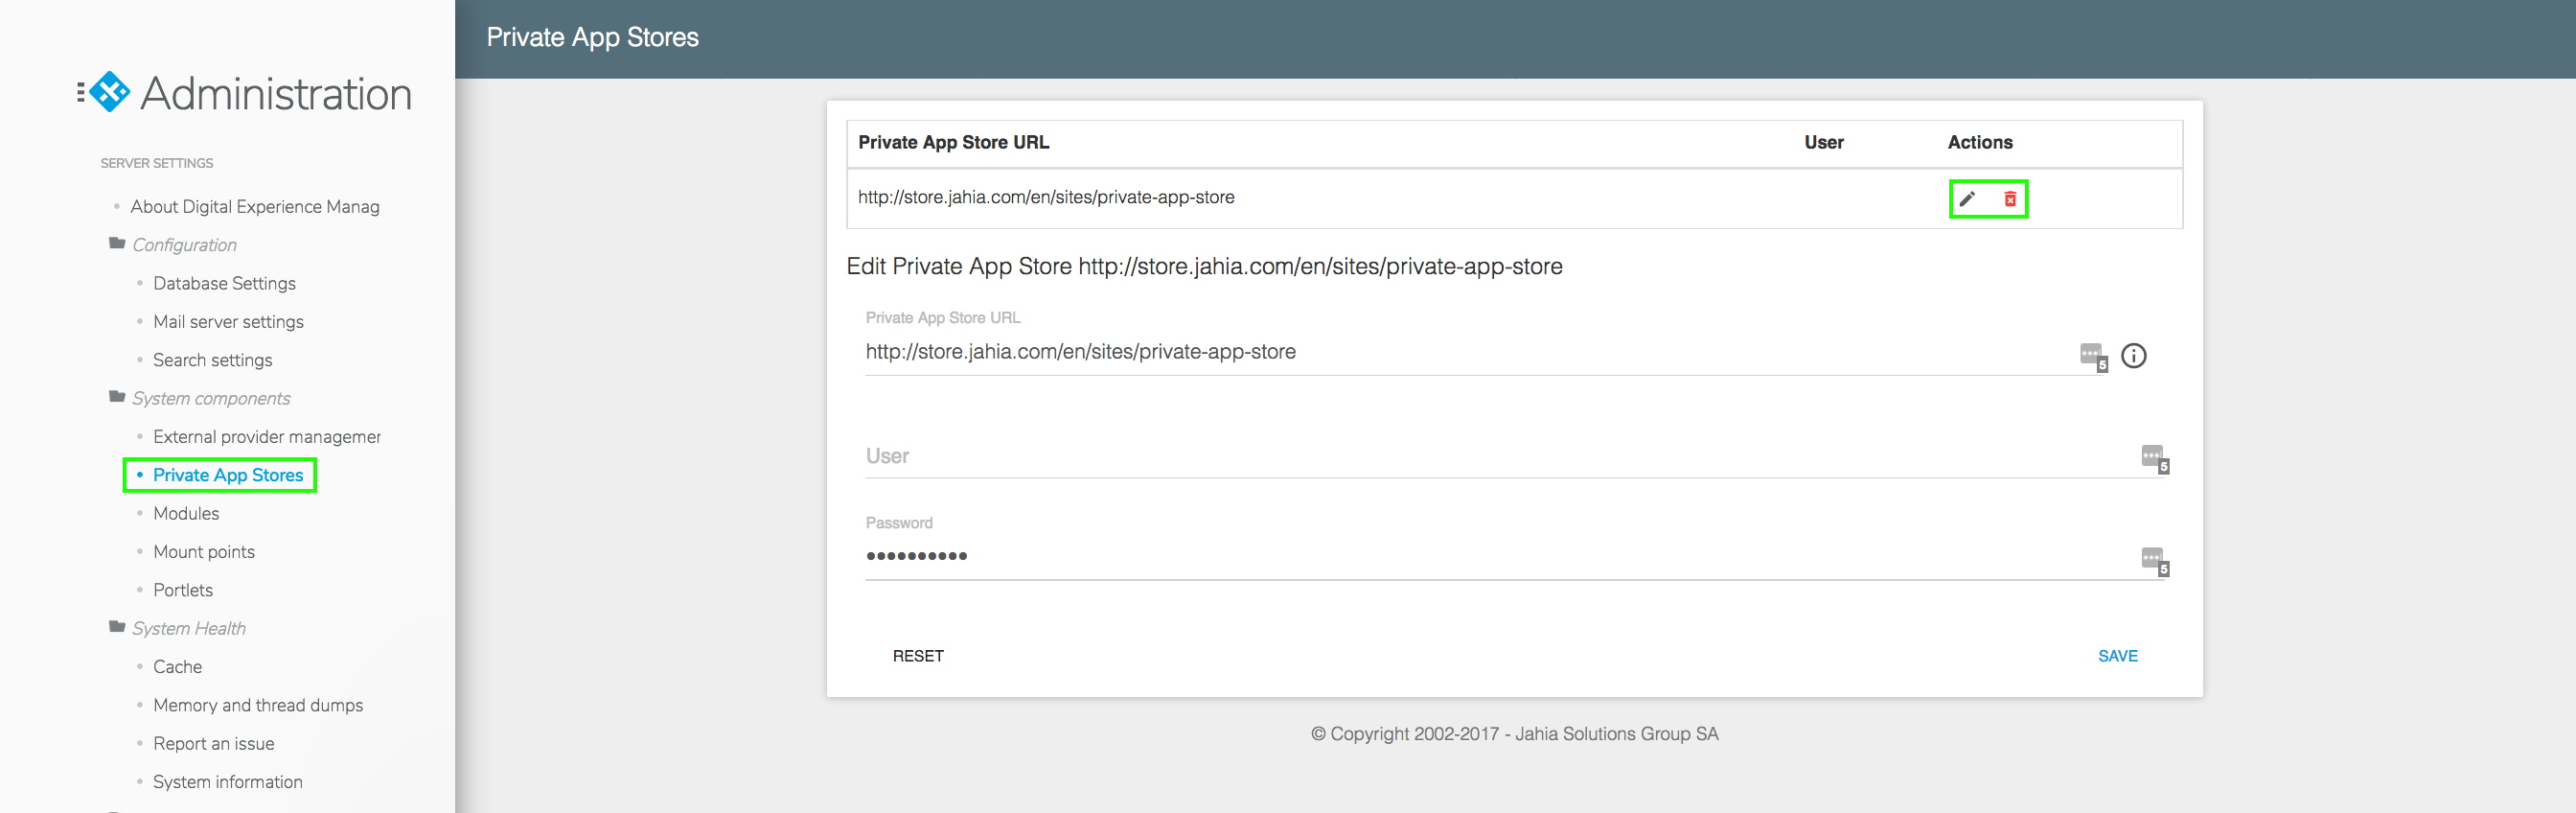
Click on "Private App Store" in the left menu to manage Private App Stores.
To configure the reference to a new Private App Store, enter the URL and, if needed, the required username and password.
12.3 Managing Private App Stores
Using the buttons on the right, you can edit a Private App Store’s details or remove it.
One Digital Experience Manager server can be a client to multiple Private App Stores.
13 Mounts points
13.1 External providers
This panel list all external data sources whether they have been declared automatically when a module is deployed (code driven), or declared manually by the administrators.
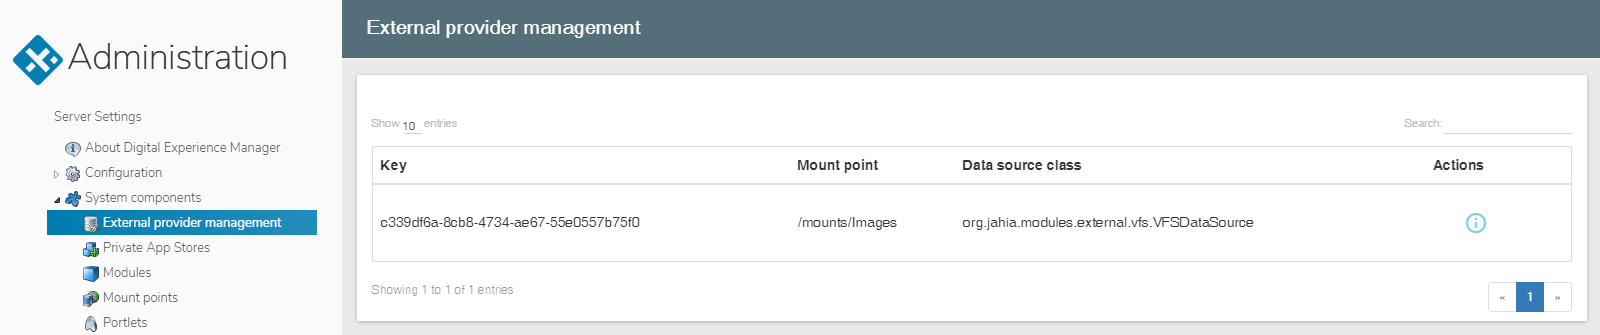
To access to the list of capabilities of a particular provider, click on the "Debug information" button in front of it.

The provider capabilities displayed are auto-discovered by Digital Experience Manager.
13.2 Mount points
This panel allows administrators to manually add and manage mount points of external data sources that will be available to editors in the editing interfaces to manipulate them.
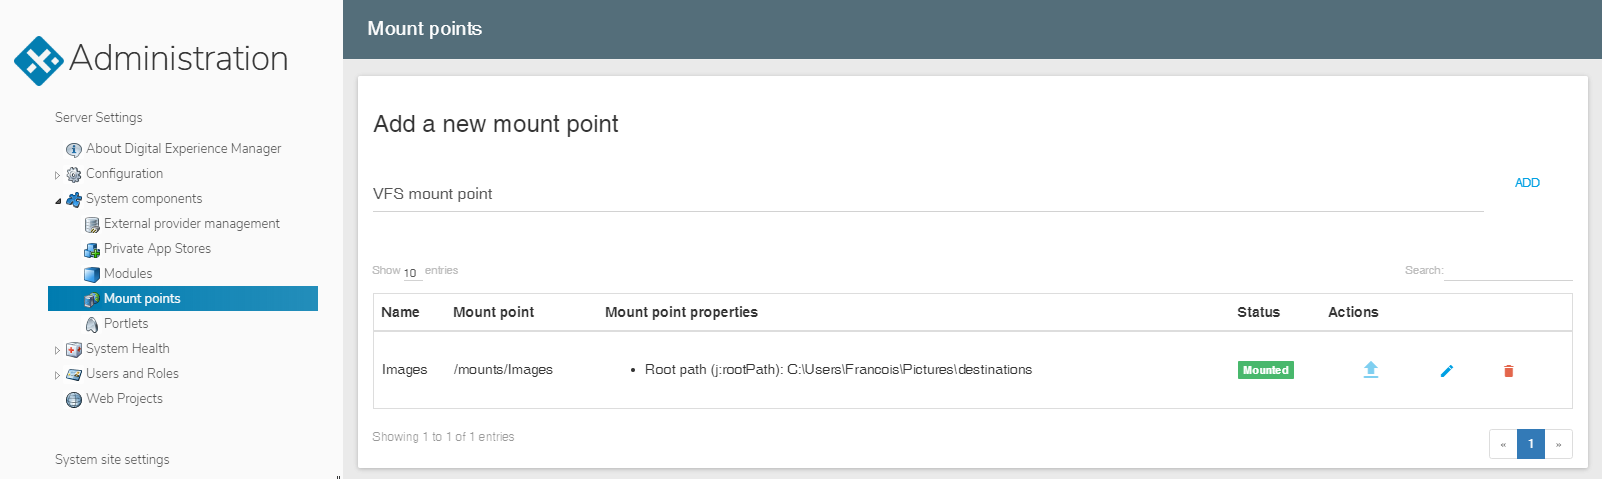
To add a mount point choose the type of mount point you want to declare in the drop down list and click "add". By default there’s only one type of mount point available in Digital Experience Manager (VFS)
- Give a name to your mount point
- Type the path its location on your server or network.
- If you want to select where the mount point should appear for the editors, check the "select a target local mount point" box.
- Otherwise the mount point will be created in the "mounts" entry of the repository.
- If you don’t select a local target, the mount point will be accessible for all web projects.
- If you select a local target, you can choose where this mount point will appear
Note that each provider must provide its own interface to allow the selection of a local target. In the case of VFS, as this protocol allows only to manipulate files, the selection interface shoes only the "files" repositories (and sub folders) of all sites of the platform to remain consistent and ensure that mounted files will be accessible through the Document Manager.
Click "save" to validate your setting. Note that if the root path is not correct (does not exist) the save action won’t do anything and you’ll stay on the page until you’ve provided a correct path.
Once the new provider has been saved, you are redirected to the full list of providers. In this list you can
- Edit the settings of a provider (same screen as the creation one)
- Delete the provider entry (the provider won’t be available for editors and will completely disappear from this list, you’ll have to declare it once again if necessary)
- Unmount the provider entry. When unmounting, the external data source is not available anymore but the provider declaration remains, so it can be reactivated in one click on the "Mount" button.
14 Report an Issue
This shortcut redirects you to the Jahia online bug tracking system. Therefore, an Internet connection is required.
There are two bug tracking systems:
- The free online platform available to the Jahia community.
- The Enterprise online platform only available to clients with a valid support contract.
The community system is also designed to collect and follow up on enhancement suggestions. Do not hesitate to send your own ideas to improve the application. As these tickets are public, you should not mention your environment-specific parameters or any other confidential data.
The commercial bug tracking system is only available to clients. Each client has its own personal secure environment only accessible with specific credentials. All tickets submitted through this system are processed by employees of Jahia Solutions Group and subjected to standard confidentiality rules. Tickets are not shared with other customers and every client is guaranteed a response from the editor and a maximum response time.
15 About Digital Experience Manager
Finally, the "About Digital Experience Manager" panel displays a summary of all the available functionalities depending on your type of license (number of users, restrictions on some modules, trial version expiry...).
In this section, you will also find the Digital Experience Manager version number. This information also appears in the footer of each page of the Administration Center.
The version number must be mentioned in all bug reports, as this will help technical support resolve your problem.